
Owners Manual
Page 2
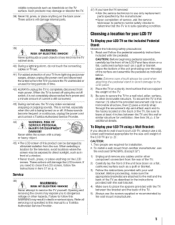
...DO NOT EXPOSE THIS APPLIANCE TO RAIN OR MOISTURE. See "Removing the Pedestal Stand" (_ p. 6). TOSHIBA Cares! Wall Mounting: if you decide to wall mount your LCD TV, please read this Toshiba LCD TV. The use a UL Listed wall bracket appropriate for proper grounding and, in accordance with ... is intended to alert the user to the presence of any doubts about your ability to climb on or playwith furniture and television sets. * Don't placeflat paneldisplays on furniture that the wall whereyou are mountingthe display is not positioned in serious bodily injury and/or property...
...DO NOT EXPOSE THIS APPLIANCE TO RAIN OR MOISTURE. See "Removing the Pedestal Stand" (_ p. 6). TOSHIBA Cares! Wall Mounting: if you decide to wall mount your LCD TV, please read this Toshiba LCD TV. The use a UL Listed wall bracket appropriate for proper grounding and, in accordance with ... is intended to alert the user to the presence of any doubts about your ability to climb on or playwith furniture and television sets. * Don't placeflat paneldisplays on furniture that the wall whereyou are mountingthe display is not positioned in serious bodily injury and/or property...
Owners Manual
Page 5
...the back of the LCD TV (_ p. 2) : CAUTION: 1. If these sounds become frequent or continuous, unplug the power cord and contact a Toshiba Authorized Service Provider. 44) WARNING: RISK OF SERIOUS PERSONAL INJURY OR EQUIPMENT DAMAGE! Note: Extreme care should always be used when attaching the pedestal stand... Unplug and remove any kind into the TV cabinet slots. 40) During a lightning storm, do not touch the connecting cables or TV set. 41) For added protection ofyourTVfrom lightning and power surges, always unplug the power cord and disconnect the antenna from the TV if you to...
...the back of the LCD TV (_ p. 2) : CAUTION: 1. If these sounds become frequent or continuous, unplug the power cord and contact a Toshiba Authorized Service Provider. 44) WARNING: RISK OF SERIOUS PERSONAL INJURY OR EQUIPMENT DAMAGE! Note: Extreme care should always be used when attaching the pedestal stand... Unplug and remove any kind into the TV cabinet slots. 40) During a lightning storm, do not touch the connecting cables or TV set. 41) For added protection ofyourTVfrom lightning and power surges, always unplug the power cord and disconnect the antenna from the TV if you to...
Owners Manual
Page 7
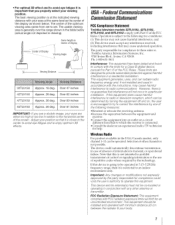
... operated in relation to the horizontal center of Display Viewing Distance 32TL515U 42TL515U 47TL515U 55TL515U Approx. 16 deg. Federa#Commun#cat#ons FCCComplianceStatement Toshiba television models 32TL515U, 42TL515U, 47TL515U, and 55TL515U comply with minimum distance 20 cm between the ...equipment and receiver. ° Colulect the equipment into an outlet on a circuit different from set to set forth for compliance to these rules is: Toshiba ...
... operated in relation to the horizontal center of Display Viewing Distance 32TL515U 42TL515U 47TL515U 55TL515U Approx. 16 deg. Federa#Commun#cat#ons FCCComplianceStatement Toshiba television models 32TL515U, 42TL515U, 47TL515U, and 55TL515U comply with minimum distance 20 cm between the ...equipment and receiver. ° Colulect the equipment into an outlet on a circuit different from set to set forth for compliance to these rules is: Toshiba ...
Owners Manual
Page 8
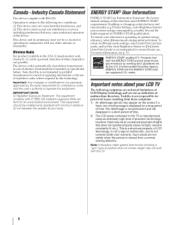
... during initial activation. Note: Interactive video games that earn the ENERGY STAR prevent green house gas emissions by meeting strict guidelines set by the party responsible for compliance could automatically discontinue transmission in this equipmenL IMPORTANT NOTE: IC Radiation Exposure Statement: This equipment ... 1) An afterimage (ghost) may cause undesired operation of other antellna or transmitter. Operation is not possible. Canada- therefore, Toshiba is not responsible for ENERGY STAR qualification. Enabling or changing certain features and functionality (e.g.
... during initial activation. Note: Interactive video games that earn the ENERGY STAR prevent green house gas emissions by meeting strict guidelines set by the party responsible for compliance could automatically discontinue transmission in this equipmenL IMPORTANT NOTE: IC Radiation Exposure Statement: This equipment ... 1) An afterimage (ghost) may cause undesired operation of other antellna or transmitter. Operation is not possible. Canada- therefore, Toshiba is not responsible for ENERGY STAR qualification. Enabling or changing certain features and functionality (e.g.

Owners Manual
Page 10
...10 Using SurfLock 41 Selecting the video input to view 41 Using closed captions 42 Analog CC mode 42 Digital CC settings 42 Setting the PIN code 43 Entering a new PIN code 43 Changing or deleting your PIN code 43 Forgotten PIN code 43...(V-Chip 43 Downloading an additional rating system ........ 44 Displaying ratings 45 Unlocking programs 45 Locking specific channels 45 Locking video input 45 Setting a time limit for games 46 Locking the control panel 46 Using HDMF '_CEC Control 46 Controlling HDMI > CEC playback devices ...
...10 Using SurfLock 41 Selecting the video input to view 41 Using closed captions 42 Analog CC mode 42 Digital CC settings 42 Setting the PIN code 43 Entering a new PIN code 43 Changing or deleting your PIN code 43 Forgotten PIN code 43...(V-Chip 43 Downloading an additional rating system ........ 44 Displaying ratings 45 Unlocking programs 45 Locking specific channels 45 Locking video input 45 Setting a time limit for games 46 Locking the control panel 46 Using HDMF '_CEC Control 46 Controlling HDMI > CEC playback devices ...

Owners Manual
Page 11
...feature 60 Using Audyssey Dynamic Volume 60 Using advanced sound features 61 Using surround sound 61 Chapter8: Advancedfeatures 62 Using your home network 62 Setting up the Network 63 Wireless Setup 63 Advanced Network Setup 65 Network Connection Test 66 Using the software keyboard 66 Performing a Software Upgrade 67... the TV with combination buttons ......... 90 Remote control codes 91 Limited United States Warranty for LCD Televisions 97 Limited Canadian Warranty for Toshiba Brand Flat Panel Televisions ......... 98 Index 101 11
...feature 60 Using Audyssey Dynamic Volume 60 Using advanced sound features 61 Using surround sound 61 Chapter8: Advancedfeatures 62 Using your home network 62 Setting up the Network 63 Wireless Setup 63 Advanced Network Setup 65 Network Connection Test 66 Using the software keyboard 66 Performing a Software Upgrade 67... the TV with combination buttons ......... 90 Remote control codes 91 Limited United States Warranty for LCD Televisions 97 Limited Canadian Warranty for Toshiba Brand Flat Panel Televisions ......... 98 Index 101 11

Owners Manual
Page 12
... features. 6, 7 and 8, for details on using new Backlight Scanning technology (_#r'p. 57). • AutoView ® lets you automatically adjust picture settings based on ambient light conditions and input signal content (_#r' p. 55). • Dynamic Volume (Audyssey Dynamic Volume@} eliminates inconsistent TV volume when changing...detail of 3D before your very own eyes. • ENERGY STAR ® qualified Overviewof installation,setup, and use Follow these steps to set -top box (in the power cords for your TV (_' p. 69). • ColorMaster r'*lets you adjust the TV's standard colors ...
... features. 6, 7 and 8, for details on using new Backlight Scanning technology (_#r'p. 57). • AutoView ® lets you automatically adjust picture settings based on ambient light conditions and input signal content (_#r' p. 55). • Dynamic Volume (Audyssey Dynamic Volume@} eliminates inconsistent TV volume when changing...detail of 3D before your very own eyes. • ENERGY STAR ® qualified Overviewof installation,setup, and use Follow these steps to set -top box (in the power cords for your TV (_' p. 69). • ColorMaster r'*lets you adjust the TV's standard colors ...

Owners Manual
Page 16
... using the component video connections: Turn on the cable box. The unauthorized recording, use, distribution, or revision of the United States and other materials is set to select ColorStream HD1.
... using the component video connections: Turn on the cable box. The unauthorized recording, use, distribution, or revision of the United States and other materials is set to select ColorStream HD1.
Owners Manual
Page 17
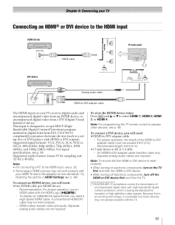
... HDMI 1, HDMI 2, HDMI 3, o1"HDMI 4. To connect a DVI device, you will need: ° HDMI-to accept HDCP (HighBandwidth Digital-Content Protection) program material in HDMI Settings (_,_ p. 48). An HDMI-to the adoption of new standards. Supported signal formats: VGA, SVGA, XGA, WXGA, SXGA, 480i (60Hz), 480p (60Hz), 720p (60Hz), 1080i (60Hz...
... HDMI 1, HDMI 2, HDMI 3, o1"HDMI 4. To connect a DVI device, you will need: ° HDMI-to accept HDCP (HighBandwidth Digital-Content Protection) program material in HDMI Settings (_,_ p. 48). An HDMI-to the adoption of new standards. Supported signal formats: VGA, SVGA, XGA, WXGA, SXGA, 480i (60Hz), 480p (60Hz), 720p (60Hz), 1080i (60Hz...
Owners Manual
Page 19
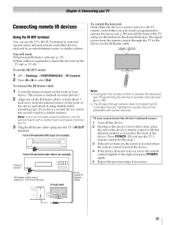
...-wand IR blaster cable (_¢' p. 15) • Other cables as required to connect the device(s) TV (_¢' p. 17-18) to the To set the IR OUT mode: 1 4_,_> Settings > PREFERENCES 2 Press < or • to remotely operate many infrared remote-controlled devices enclosed in a similar manner. This sensor is located where the remote...
...-wand IR blaster cable (_¢' p. 15) • Other cables as required to connect the device(s) TV (_¢' p. 17-18) to the To set the IR OUT mode: 1 4_,_> Settings > PREFERENCES 2 Press < or • to remotely operate many infrared remote-controlled devices enclosed in a similar manner. This sensor is located where the remote...
Owners Manual
Page 20
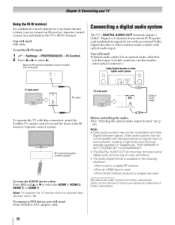
...rother TV back panel IR cable TV back panel DIGITAL AU{)I Optical audio cable To operate the TV with this connection, point the Toshiba TV remote control toward the front of Dolby Laboratories. 2O To connect a DVI device, you can connect an IR receiver/repeater ...When DLNA Certified products or widgets are registered trademarks of the IR receiver/repeater control system. You will need : * IR cable To set the IR IN mode: 1 _ > Settings > PREFERENCES 2 Press < or • to -DVI adapter cable Manufactured under license from Dolby Laboratories. Back of IR receiver/repeater ...
...rother TV back panel IR cable TV back panel DIGITAL AU{)I Optical audio cable To operate the TV with this connection, point the Toshiba TV remote control toward the front of Dolby Laboratories. 2O To connect a DVI device, you can connect an IR receiver/repeater ...When DLNA Certified products or widgets are registered trademarks of the IR receiver/repeater control system. You will need : * IR cable To set the IR IN mode: 1 _ > Settings > PREFERENCES 2 Press < or • to -DVI adapter cable Manufactured under license from Dolby Laboratories. Back of IR receiver/repeater ...
Owners Manual
Page 22
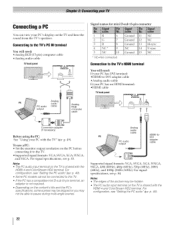
... may not be hidden. ° The PC audio input terminal on the TV and hear the sound from the TV's speakers. To use a PC: • Set the monitor output resolution on the content's title and the PC's specifications, some scenes may be skipped or you may be able to this TV... input terminal on the TV is not required. • Depending on the PC before connecting it to - For configuration, see p. 84. For signal specifications, see "Setting the PC audio" (_P_p. 49). ° Some PC models cannot be connected to pause during multi-angle scenes. Analog audio cable HDMI-to the TV...
... may not be hidden. ° The PC audio input terminal on the TV and hear the sound from the TV's speakers. To use a PC: • Set the monitor output resolution on the content's title and the PC's specifications, some scenes may be skipped or you may be able to this TV... input terminal on the TV is not required. • Depending on the PC before connecting it to - For configuration, see p. 84. For signal specifications, see "Setting the PC audio" (_P_p. 49). ° Some PC models cannot be connected to pause during multi-angle scenes. Analog audio cable HDMI-to the TV...
Owners Manual
Page 25
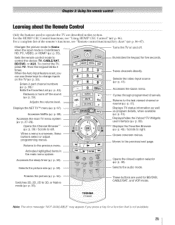
For a complete list of the remote's functions, see "Using HDMI ¢')CEC Control" (_#r' p. 46). When the Auto Input feature is set, you can use these -buttons select or adjust programming menus. Accesses Netfiix (_ p. 68). Opens the Channel Browser ''_ (_ p. 39) / Scrolls to operate the...Accesses the main TV menu system (_ p. 27-29). Turns the TV on the TV (_ p. 33). Illuminates the keypad for five seconds. -- Tunes channels directly. Sets the remote control mode to the previous menu. Displays the NET ]_/TM menu (_ p. 67). When a menu is ColorStream HD, PC, VIDEO, or HDMI Ce(_ p....
For a complete list of the remote's functions, see "Using HDMI ¢')CEC Control" (_#r' p. 46). When the Auto Input feature is set, you can use these -buttons select or adjust programming menus. Accesses Netfiix (_ p. 68). Opens the Channel Browser ''_ (_ p. 39) / Scrolls to operate the...Accesses the main TV menu system (_ p. 27-29). Turns the TV on the TV (_ p. 33). Illuminates the keypad for five seconds. -- Tunes channels directly. Sets the remote control mode to the previous menu. Displays the NET ]_/TM menu (_ p. 67). When a menu is ColorStream HD, PC, VIDEO, or HDMI Ce(_ p....

Owners Manual
Page 26
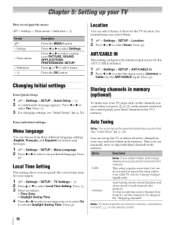
...Menu Language, Time Zone, and Location have been seL 1 Menu Language Select Home for normal home use. Select Auto, Digital, or Standard (_' "Setting the Channel Tuning Mode" on your TV. Note: If you do not finish Initial Setup, the Initial Setup screen will appear every time you ...turn on or reset the TV, the Initial Setup window will appear. Press 3. To finish Initial Setup, see "Changing Initial settings" (_,_ p. 30). • E_!. First, select Antenna. Press _. Press _. 5 ANT/CABLE To select Antenna: 2 Time Zone Select a language. However, if you do...
...Menu Language, Time Zone, and Location have been seL 1 Menu Language Select Home for normal home use. Select Auto, Digital, or Standard (_' "Setting the Channel Tuning Mode" on your TV. Note: If you do not finish Initial Setup, the Initial Setup screen will appear every time you ...turn on or reset the TV, the Initial Setup window will appear. Press 3. To finish Initial Setup, see "Changing Initial settings" (_,_ p. 30). • E_!. First, select Antenna. Press _. Press _. 5 ANT/CABLE To select Antenna: 2 Time Zone Select a language. However, if you do...

Owners Manual
Page 27
...select Antenna. 4 Scan again. 7 Support Information The Support Information screen appears. If some channels are displayed in the above list. Press @. 3 Repeat set up to Step 6. ° If you selected Antenna previously, select Cable. • If you want to the previous menu layer, press _._;_ or... remote control or TV control panel to navigate and make Note: Encrypted channels cannot be confirmed from the following operation at any time. _O,,u> Settings > SETUP > System Information > 27 while scanning. ° After scanning is any problem and you do not make selections. ° To...
...select Antenna. 4 Scan again. 7 Support Information The Support Information screen appears. If some channels are displayed in the above list. Press @. 3 Repeat set up to Step 6. ° If you selected Antenna previously, select Cable. • If you want to the previous menu layer, press _._;_ or... remote control or TV control panel to navigate and make Note: Encrypted channels cannot be confirmed from the following operation at any time. _O,,u> Settings > SETUP > System Information > 27 while scanning. ° After scanning is any problem and you do not make selections. ° To...
Owners Manual
Page 28
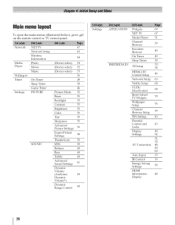
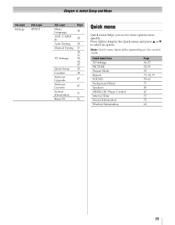
Main menu layout To open the main menus (illustrated below), press _,_i_u on the remote control or TV control panel. Network Media Player Wallpaper Timer Settings NET TV Network Setup Wireless Information Photo Movie Music On Timer Sleep Timer Game Timer PICTURE SOUND 67 63 64 (Device select) 74 (Device select) ...) 73 76 49 50 46 Picture Mode 55 Reset 55 Backlight 55 Contrast 55 Brightness 55 Color 55 Tint 55 Sharpness 55 Advmlced 56 Picture Settings Expert Picture 58 Settings TheaterLock 59 MTS 59 Balance 60 Bass 60 Treble 60 Advanced 61 Sound...
Main menu layout To open the main menus (illustrated below), press _,_i_u on the remote control or TV control panel. Network Media Player Wallpaper Timer Settings NET TV Network Setup Wireless Information Photo Movie Music On Timer Sleep Timer Game Timer PICTURE SOUND 67 63 64 (Device select) 74 (Device select) ...) 73 76 49 50 46 Picture Mode 55 Reset 55 Backlight 55 Contrast 55 Brightness 55 Color 55 Tint 55 Sharpness 55 Advmlced 56 Picture Settings Expert Picture 58 Settings TheaterLock 59 MTS 59 Balance 60 Bass 60 Treble 60 Advanced 61 Sound...
Owners Manual
Page 29
... 36-37 52-59 55 73, 74, 75 59-61 75 48 47 75 72 64 29 Settings SETUP Menu 30 Language ANT/CABLE 30 In Auto Tuning 30 Manual Tuning 31 30, 31, TV Settings 39, 42, 45 Quick Setup 30 Location 30 Software 67 Upgrade Software 67 Licenses System 51...
... 36-37 52-59 55 73, 74, 75 59-61 75 48 47 75 72 64 29 Settings SETUP Menu 30 Language ANT/CABLE 30 In Auto Tuning 30 Manual Tuning 31 30, 31, TV Settings 39, 42, 45 Quick Setup 30 Location 30 Software 67 Upgrade Software 67 Licenses System 51...
Owners Manual
Page 30
... Saving Time. See "Initial Setup" (_,_"p. 26). Cable Antenna Note: If you can select Home or Store for menus and messages 1 4_.0> Settings > SETUP > Menu Language. 2 Press _ or • to select Yes. See "Skipping charulels". How to repeat the setup unless your cable...or • to select a menu icon (PICTURE, SOUND, APPLICATIONS, PREFERENCES, SETUP) Press • or • to select Home. Press _). 3 For changing settings, see "Initial Setup" (_-v p. 26). For normal home use buttons 0-9 and [_ on the remote control or the control panel, store those channels in memory,...
... Saving Time. See "Initial Setup" (_,_"p. 26). Cable Antenna Note: If you can select Home or Store for menus and messages 1 4_.0> Settings > SETUP > Menu Language. 2 Press _ or • to select Yes. See "Skipping charulels". How to repeat the setup unless your cable...or • to select a menu icon (PICTURE, SOUND, APPLICATIONS, PREFERENCES, SETUP) Press • or • to select Home. Press _). 3 For changing settings, see "Initial Setup" (_-v p. 26). For normal home use buttons 0-9 and [_ on the remote control or the control panel, store those channels in memory,...
Owners Manual
Page 31
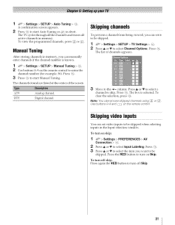
... press ,_). Press the RED button to turn off skip: Press again the RED button to turn on the remote control Skipping video inputs You can set it to be skipped. To tum off Skip. 31 screen appears. 2 Press _ to skip. Press _._. 13 Press • or •... enter channels if the channel number is selected. Digital chalmel Skipping channels To prevent a channel from being viewed, you can set video inputs to the _ column. The box is known. 1 ;_a0> Settings > SETUP > Manual Tuning > @. 2 Use buttons 0-9 on Skip. To turn on the remote control to be skipped...
... press ,_). Press the RED button to turn off skip: Press again the RED button to turn on the remote control Skipping video inputs You can set it to be skipped. To tum off Skip. 31 screen appears. 2 Press _ to skip. Press _._. 13 Press • or •... enter channels if the channel number is selected. Digital chalmel Skipping channels To prevent a channel from being viewed, you can set video inputs to the _ column. The box is known. 1 ;_a0> Settings > SETUP > Manual Tuning > @. 2 Use buttons 0-9 on Skip. To turn on the remote control to be skipped...

Owners Manual
Page 32
...label up to 10 characters) using the Software Keyboard (_ p. 66) or the number buttons for other video inputs. HD2) or SharedPC Input 1 .y.0> Settings > PREFERENCES > AV Connection > _. 2 Press • or • to select Shared PC Input. 3 Press _ or • to select User Input. ...--, Amplifier, Cable, DVD, Game, PC, Recorder, Satellite, or VCR or press the GREEN button to select PC or ColorStream HD2. 32 Rear SharedAudio 1 4_..u> Settings > PREFERENCES > AV Connection > _. 2 Press • or • to select Rear Shared Audio. 3 Press _ or • to select PC (ColorStream ...
...label up to 10 characters) using the Software Keyboard (_ p. 66) or the number buttons for other video inputs. HD2) or SharedPC Input 1 .y.0> Settings > PREFERENCES > AV Connection > _. 2 Press • or • to select Shared PC Input. 3 Press _ or • to select User Input. ...--, Amplifier, Cable, DVD, Game, PC, Recorder, Satellite, or VCR or press the GREEN button to select PC or ColorStream HD2. 32 Rear SharedAudio 1 4_..u> Settings > PREFERENCES > AV Connection > _. 2 Press • or • to select Rear Shared Audio. 3 Press _ or • to select PC (ColorStream ...


