Brochure
Page 2
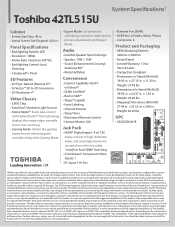
...in WiFi®5 • Skype® Capable • Input Labeling • Channel Browser • Sleep Timer • Illuminated Remote Control • Horizon Motion GUI Jack Pack • HDMI® Digital Inputs6: 4 w/ CEC Easily connect to avoid prolonged viewing ...8226; Expert Mode: Use advanced calibrating controls to experience the full suggested capabilities of this product, fully-compatible devices may change without rest. Care should be more susceptible to health issues associated with this product. Toshiba 42TL515U System Specifications1 Cabinet • Screen Size...
...in WiFi®5 • Skype® Capable • Input Labeling • Channel Browser • Sleep Timer • Illuminated Remote Control • Horizon Motion GUI Jack Pack • HDMI® Digital Inputs6: 4 w/ CEC Easily connect to avoid prolonged viewing ...8226; Expert Mode: Use advanced calibrating controls to experience the full suggested capabilities of this product, fully-compatible devices may change without rest. Care should be more susceptible to health issues associated with this product. Toshiba 42TL515U System Specifications1 Cabinet • Screen Size...

Owners Manual
Page 10
... system Using the TV remote and HDMF '_CEC Control to control other devices Connecting Connecting Connecting an HDMI audio system a PC to a home network 15 15 15 16 17 _'_ 18 19 20 21 21 22 23 Chapter 3: Using the remote control 24 Controlling other devices 24 Installing ...batteries 24 Learning about the Remote Control 25 Chapter4: Initial Setupand Menu 26 Initial Setup 26 Navigating the menu system 27 Main menu layout...
... system Using the TV remote and HDMF '_CEC Control to control other devices Connecting Connecting Connecting an HDMI audio system a PC to a home network 15 15 15 16 17 _'_ 18 19 20 21 21 22 23 Chapter 3: Using the remote control 24 Controlling other devices 24 Installing ...batteries 24 Learning about the Remote Control 25 Chapter4: Initial Setupand Menu 26 Initial Setup 26 Navigating the menu system 27 Main menu layout...

Owners Manual
Page 11
...HDML and 3D . 83 PC IN signal formats 83 HDMI signal formats 84 3D signal formats 85 Remote control functional key chart 86 Operating other devices 88 Programming the remote to operate other devices . . . 88 Device code setup 88 Searching for a device code 89...'s programming 89 Resetting to the factory default 89 Operating the TV with combination buttons ......... 90 Remote control codes 91 Limited United States Warranty for LCD Televisions 97 Limited Canadian Warranty for Toshiba Brand Flat Panel Televisions ......... 98 Index 101 11
...HDML and 3D . 83 PC IN signal formats 83 HDMI signal formats 84 3D signal formats 85 Remote control functional key chart 86 Operating other devices 88 Programming the remote to operate other devices . . . 88 Device code setup 88 Searching for a device code 89...'s programming 89 Resetting to the factory default 89 Operating the TV with combination buttons ......... 90 Remote control codes 91 Limited United States Warranty for LCD Televisions 97 Limited Canadian Warranty for Toshiba Brand Flat Panel Televisions ......... 98 Index 101 11

Owners Manual
Page 12
... cables or devices to the TV, learn the functions of the TV's connections and controls (_#r' p. 13). 4 Connect your other electronic device(s) to the TV (_ p. 15-23). 5 See "Chapter 3: Using the remote control" (_#r' p. 24) for an overview of navigating the TV's menu system (_vr'...p. 26). 8 Program channels into the TV*s channel memory (_vr p. 30). 9 See Chapters features. 6, 7 and 8, for details on the remote control, installing the batteries, and preparing to "Chapter 9: Troubleshooting" (_#r' p. 77). 11 See "Chapter 10: Appendix", for your other devices. RGB Range ...
... cables or devices to the TV, learn the functions of the TV's connections and controls (_#r' p. 13). 4 Connect your other electronic device(s) to the TV (_ p. 15-23). 5 See "Chapter 3: Using the remote control" (_#r' p. 24) for an overview of navigating the TV's menu system (_vr'...p. 26). 8 Program channels into the TV*s channel memory (_vr p. 30). 9 See Chapters features. 6, 7 and 8, for details on the remote control, installing the batteries, and preparing to "Chapter 9: Troubleshooting" (_#r' p. 77). 11 See "Chapter 10: Appendix", for your other devices. RGB Range ...

Owners Manual
Page 15
StandardA/V cables (compositevideo) J@) o_@ _ >__ White Red Yellow Use with video devices with infrared remote control. These cables (and the related inputs on your devices may differ. Componentvideo cables Dual-wandIR blaster cable Use with video devices with analog ...with video devices with devices built-in its native format. An HDMI cable delivers digital audio and video in HDMI output. Crossover LAN cable is a Toshiba brand.) Note: Component video cables provide better picture quality than composite video cables. AnalogROB(15-pin) computer cable Connects a PC to the TV's ...
StandardA/V cables (compositevideo) J@) o_@ _ >__ White Red Yellow Use with video devices with infrared remote control. These cables (and the related inputs on your devices may differ. Componentvideo cables Dual-wandIR blaster cable Use with video devices with analog ...with video devices with devices built-in its native format. An HDMI cable delivers digital audio and video in HDMI output. Crossover LAN cable is a Toshiba brand.) Note: Component video cables provide better picture quality than composite video cables. AnalogROB(15-pin) computer cable Connects a PC to the TV's ...
Owners Manual
Page 17
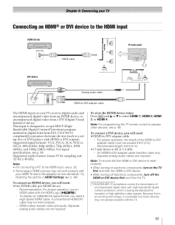
... or DVD player with the TV. 17 A conventional HDMI/DVI cable may not operate properly with HDMI or DVI output). Note: For programming the TV remote control to operate other devices, see p. 84. Connecting an HDMI® or DVI device to the HDMI input HDMIdevice HDMI cable 4 DVI device Ana,aouodciaoble TV...
... or DVD player with the TV. 17 A conventional HDMI/DVI cable may not operate properly with HDMI or DVI output). Note: For programming the TV remote control to operate other devices, see p. 84. Connecting an HDMI® or DVI device to the HDMI input HDMIdevice HDMI cable 4 DVI device Ana,aouodciaoble TV...
Owners Manual
Page 18
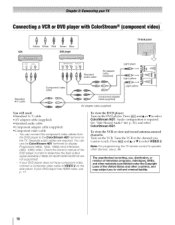
... materials is required. Press _6oi] and • or • to watch. See "Side Shared Audio" (_ p. 32), and select ColorStream HD1. Note: For programming the TV remote control to the ColorStream NDt terminal on the VCR. To view the DVD player: Turn on the side panel If your DVD player does not have...
... materials is required. Press _6oi] and • or • to watch. See "Side Shared Audio" (_ p. 32), and select ColorStream HD1. Note: For programming the TV remote control to the ColorStream NDt terminal on the VCR. To view the DVD player: Turn on the side panel If your DVD player does not have...
Owners Manual
Page 19
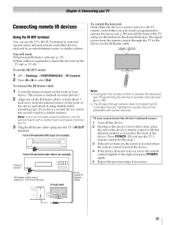
...) sensor IR blaster cable wand (approx.1 inch from device) TV backpanel Dualwand IR blaster cable To control the d evice(s): Point either the device's remote control or the TV remote control (that you have a second device, coil the second wand with the infrared emitter) so it touches...connect the IR blaster cable: 1 Locate the infrared sensor on , move the remote control slightly to remotely operate many infrared remote-controlled devices enclosed in a similar manner. This sensor is located where the remote control touched the device. 4 If the device does not turn on the front of...
...) sensor IR blaster cable wand (approx.1 inch from device) TV backpanel Dualwand IR blaster cable To control the d evice(s): Point either the device's remote control or the TV remote control (that you have a second device, coil the second wand with the infrared emitter) so it touches...connect the IR blaster cable: 1 Locate the infrared sensor on , move the remote control slightly to remotely operate many infrared remote-controlled devices enclosed in a similar manner. This sensor is located where the remote control touched the device. 4 If the device does not turn on the front of...
Owners Manual
Page 20
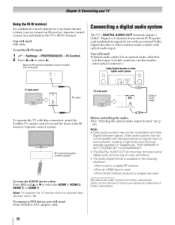
...cable TV back panel DIGITAL AU{)I Optical audio cable To operate the TV with this connection, point the Toshiba TV remote control toward the front of the IR receiver/repeater control system. When an HDMI input is available in the following situations: - To connect a DVI device, ...you can connect an IR receiver/repeater control system (not included) to -DVI adapter cable Manufactured under license from Dolby ...
...cable TV back panel DIGITAL AU{)I Optical audio cable To operate the TV with this connection, point the Toshiba TV remote control toward the front of the IR receiver/repeater control system. When an HDMI input is available in the following situations: - To connect a DVI device, ...you can connect an IR receiver/repeater control system (not included) to -DVI adapter cable Manufactured under license from Dolby ...
Owners Manual
Page 21
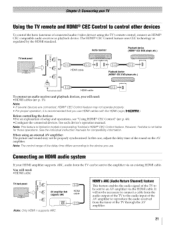
... of the delay time differs according In this case, adjust the delay to the device you use . When using the TV's remote control, connect an HDMI ® CEC compatible audio receiver or playback device. time of the sound on the AV Connecting an HDMI audio ...is limited to an AV amplifier via an existing HDMI cable. However, Toshiba is recommended that you use HDMI cables with the HDMI Logo (I-.l_rTH). synchronized. Usingthe TV remote and HDMI® CECControl to control other devices To control the basic functions of connected audio/video devices using an external AV amplifier:...
... of the delay time differs according In this case, adjust the delay to the device you use . When using the TV's remote control, connect an HDMI ® CEC compatible audio receiver or playback device. time of the sound on the AV Connecting an HDMI audio ...is limited to an AV amplifier via an existing HDMI cable. However, Toshiba is recommended that you use HDMI cables with the HDMI Logo (I-.l_rTH). synchronized. Usingthe TV remote and HDMI® CECControl to control other devices To control the basic functions of connected audio/video devices using an external AV amplifier:...

Owners Manual
Page 24
... remove batteries from leaking into the battery compartmenL 24 Note: • Every time you change the batteries, you must reprogram the remote. • Dispose of Non-Toshiba d evices or Toshiba d evices that the remote control is programmed devices (_#r' p. 88). Note: Use carbon zinc batteries or alkaline batteries. 3 Slide on the cover. Always follow appficable laws...
... remove batteries from leaking into the battery compartmenL 24 Note: • Every time you change the batteries, you must reprogram the remote. • Dispose of Non-Toshiba d evices or Toshiba d evices that the remote control is programmed devices (_#r' p. 88). Note: Use carbon zinc batteries or alkaline batteries. 3 Slide on the cover. Always follow appficable laws...
Owners Manual
Page 25
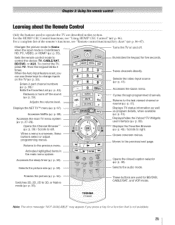
...programmed channels. For a complete list of the remote's functions, see "Using HDMI ¢')CEC Control" (_#r' p. 46). To control the TV, press TV. Returns to control the device: TV, CABLE/SAT, BD/DVD, or AUX. For the HDMF _ CEC Control functions, see "Remote control functional key chart" (_#r' p. 86-87). ... the picture mode to Game when the input mode is onscreen, these keys to the previous menu. Reduces or turns off . -- Sets the remote control mode to the last viewed channel or source (_ p. 41). When a menu is ColorStream HD, PC, VIDEO, or HDMI Ce(_ p. 55...
...programmed channels. For a complete list of the remote's functions, see "Using HDMI ¢')CEC Control" (_#r' p. 46). To control the TV, press TV. Returns to control the device: TV, CABLE/SAT, BD/DVD, or AUX. For the HDMF _ CEC Control functions, see "Remote control functional key chart" (_#r' p. 86-87). ... the picture mode to Game when the input mode is onscreen, these keys to the previous menu. Reduces or turns off . -- Sets the remote control mode to the last viewed channel or source (_ p. 41). When a menu is ColorStream HD, PC, VIDEO, or HDMI Ce(_ p. 55...

Owners Manual
Page 27
... menus will appear, Press @ or Navigating the menu system °To open the main menu, press 4_u on the remote control or TV control panel. ° Press A, V, "I, or • on the remote control or TV control panel to navigate and make Note: Encrypted channels cannot be confirmed from the following operation at any problem and you...
... menus will appear, Press @ or Navigating the menu system °To open the main menu, press 4_u on the remote control or TV control panel. ° Press A, V, "I, or • on the remote control or TV control panel to navigate and make Note: Encrypted channels cannot be confirmed from the following operation at any problem and you...
Owners Manual
Page 28
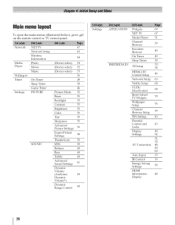
Main menu layout To open the main menus (illustrated below), press _,_i_u on the remote control or TV control panel. Network Media Player Wallpaper Timer Settings NET TV Network Setup Wireless Information Photo Movie Music On Timer Sleep Timer Game Timer PICTURE SOUND 67 ...
Main menu layout To open the main menus (illustrated below), press _,_i_u on the remote control or TV control panel. Network Media Player Wallpaper Timer Settings NET TV Network Setup Wireless Information Photo Movie Music On Timer Sleep Timer Game Timer PICTURE SOUND 67 ...
Owners Manual
Page 30
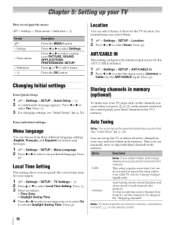
...SOUND, APPLICATIONS, PREFERENCES, SETUP) Press • or • to activate Daylight Saving Time. For normal home use buttons 0-9 and [_ on the remote control or the control panel, store those channels in the TV's memory. Press _). 3 For changing settings, see "Initial Setup" (_-v p. 26). To skip an ... menu. Press the OK button Location You can choose from memory. Press Eg*. This setup requires some time, but you press _ or _," on the remote control 3O How to select Yes. Press _ or • to navigate the menu: 4_P > Settings > Main menu > Submenu > _,u > Settings >...
...SOUND, APPLICATIONS, PREFERENCES, SETUP) Press • or • to activate Daylight Saving Time. For normal home use buttons 0-9 and [_ on the remote control or the control panel, store those channels in the TV's memory. Press _). 3 For changing settings, see "Initial Setup" (_-v p. 26). To skip an ... menu. Press the OK button Location You can choose from memory. Press Eg*. This setup requires some time, but you press _ or _," on the remote control 3O How to select Yes. Press _ or • to navigate the menu: 4_P > Settings > Main menu > Submenu > _,u > Settings >...
Owners Manual
Page 31
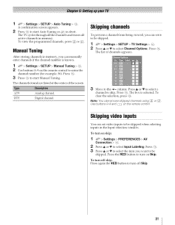
...to turn off skip: Press again the RED button to select Input Labeling. Use buttons 0-9 and [_ on Skip. To turn on the remote control Skipping video inputs You can manually enter channels if the channel number is selected. To view the programmed channels, press _ or _,". The .... 13 Move to enter the channel number (for example, 56). ATV DTV Analog channel. Press • or • to select a channel to turn on the remote control to the _ column. Press the RED button to skip. Press @. The box is known. 1 ;_a0> Settings > SETUP > Manual Tuning > @. 2 Use buttons...
...to turn off skip: Press again the RED button to select Input Labeling. Use buttons 0-9 and [_ on Skip. To turn on the remote control Skipping video inputs You can manually enter channels if the channel number is selected. To view the programmed channels, press _ or _,". The .... 13 Move to enter the channel number (for example, 56). ATV DTV Analog channel. Press • or • to select a channel to turn on the remote control to the _ column. Press the RED button to skip. Press @. The box is known. 1 ;_a0> Settings > SETUP > Manual Tuning > @. 2 Use buttons...
Owners Manual
Page 33
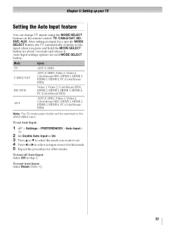
... reset Auto Input: Select Reset. Press _°0. 33 Setting the Auto Input feature You can change TV inputs using the MODE SELECT buttons on the remote control: TV, CABLE/SAT, BD/ DVD, AUX. Auto Input settings options for each MODE SELECT button: TV CABLE/SAT BD/DVD AUX ANT/CABLE ANT/CABLE...
... reset Auto Input: Select Reset. Press _°0. 33 Setting the Auto Input feature You can change TV inputs using the MODE SELECT buttons on the remote control: TV, CABLE/SAT, BD/ DVD, AUX. Auto Input settings options for each MODE SELECT button: TV CABLE/SAT BD/DVD AUX ANT/CABLE ANT/CABLE...
Owners Manual
Page 39
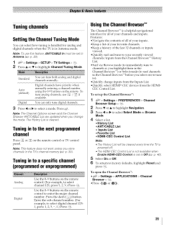
... priority when manually entering a chmmel number using the 0-9 buttons on the remote control. (For example, to a specific channel (programmedor unprogrammed) Analog Digital Use the 0-9 buttons on the remote. Note: This feature does not work unless you store channels in to ...the next programmed channel Press _ or _," on the remote control to factory defaults, highlight Reset and press _. Use the 0-9 buttons on the remote control or TV control panel. To set up the Channel Browserr'*: 1 4__u > Settings > PREFERENCES Browser Setup > ...
... priority when manually entering a chmmel number using the 0-9 buttons on the remote control. (For example, to a specific channel (programmedor unprogrammed) Analog Digital Use the 0-9 buttons on the remote. Note: This feature does not work unless you store channels in to ...the next programmed channel Press _ or _," on the remote control to factory defaults, highlight Reset and press _. Use the 0-9 buttons on the remote control or TV control panel. To set up the Channel Browserr'*: 1 4__u > Settings > PREFERENCES Browser Setup > ...

Owners Manual
Page 40
...List is turned off the TV. 4O The Channel Browser ''_ stores these channels: • Channels that are tuned using the numeric buttons on the remote control. • Channels that are tuned for 3 seconds. To tune to the History List and displays it on the left . Note: Additions are...Channel or input that is currently highlighted browser 3 Inputs or channels labels 4 Input type 5 Current list (History, ANT/CABLE, Inputs, Favorites, o1"HDMI-CEC Control) 6 Channel o1"input currently being viewed in the last selected lisL ° If aft lists are turned off, (( _ or _ )) will not display ...
...List is turned off the TV. 4O The Channel Browser ''_ stores these channels: • Channels that are tuned using the numeric buttons on the remote control. • Channels that are tuned for 3 seconds. To tune to the History List and displays it on the left . Note: Additions are...Channel or input that is currently highlighted browser 3 Inputs or channels labels 4 Input type 5 Current list (History, ANT/CABLE, Inputs, Favorites, o1"HDMI-CEC Control) 6 Channel o1"input currently being viewed in the last selected lisL ° If aft lists are turned off, (( _ or _ )) will not display ...

Owners Manual
Page 41
... have connected to the TV (_ "Labefing video inputs" on p. 32). ° You can skip sources (_ "Skipping video inputs" on the remote control or TV control panel. 2 Change the input: ° Press 0-8. * Repeatedly press • or V. UsingSurfLockTM The SurfLock '_' feature temporarily memorizes one or more... using the Channel Number buttons (and the dash (EE3) button if needed). {3 Each time you can select a video input source with the remote control by repeatedly pressing _] or • or Y ° You can selectinputs thatare set to be skippedusing the number buttons. ° If one...
... have connected to the TV (_ "Labefing video inputs" on p. 32). ° You can skip sources (_ "Skipping video inputs" on the remote control or TV control panel. 2 Change the input: ° Press 0-8. * Repeatedly press • or V. UsingSurfLockTM The SurfLock '_' feature temporarily memorizes one or more... using the Channel Number buttons (and the dash (EE3) button if needed). {3 Each time you can select a video input source with the remote control by repeatedly pressing _] or • or Y ° You can selectinputs thatare set to be skippedusing the number buttons. ° If one...


