User Manual
Page 3
... plug is dropped and the cabinet or enclosure surface has been damaged or the TV does not operate normally, take the following precautions: • ALWAYS turn off the TV and unplug the power cord to avoid possible electric shock or fire. • NEVER allow your outlet, consult an electrician for such...
... plug is dropped and the cabinet or enclosure surface has been damaged or the TV does not operate normally, take the following precautions: • ALWAYS turn off the TV and unplug the power cord to avoid possible electric shock or fire. • NEVER allow your outlet, consult an electrician for such...
User Manual
Page 5
When the TV is turned off using a Wall Bracket: If you need to clean the LCD screen, follow this manual to a Toshiba Authorized Service Provider. 47) If you have the TV serviced: • Ask the service technician to use a UL Listed wall bracket appropriate for the ...: 1) Read and Follow the pedestal assembly instructions included with the pedestal. If these sounds become frequent or continuous, unplug the power cord and contact a Toshiba Authorized Service Provider. 44) WARNING: RISK OF SERIOUS PERSONAL INJURY OR EQUIPMENT DAMAGE! If you decide to wall mount your LCD TV on /off . ...
When the TV is turned off using a Wall Bracket: If you need to clean the LCD screen, follow this manual to a Toshiba Authorized Service Provider. 47) If you have the TV serviced: • Ask the service technician to use a UL Listed wall bracket appropriate for the ...: 1) Read and Follow the pedestal assembly instructions included with the pedestal. If these sounds become frequent or continuous, unplug the power cord and contact a Toshiba Authorized Service Provider. 44) WARNING: RISK OF SERIOUS PERSONAL INJURY OR EQUIPMENT DAMAGE! If you decide to wall mount your LCD TV on /off . ...
User Manual
Page 6
Federal Communications Commission Statement FCC Compliance Statement Toshiba television models 42SL417U, 46SL417U, and 55SL417U comply with the instructions, may not cause harmful interference, and (2) This device must not be determined by turning the equipment off and on, the user is encouraged to try to the following measures: • Reorient or relocate the ...possible. The device could void the user's authority to be used in 5.15-5.25GHz frequency range, then it is going to operate this is : Toshiba America Information Systems, Inc. 9740 Irvine Blvd., Irvine, CA 92618.
Federal Communications Commission Statement FCC Compliance Statement Toshiba television models 42SL417U, 46SL417U, and 55SL417U comply with the instructions, may not cause harmful interference, and (2) This device must not be determined by turning the equipment off and on, the user is encouraged to try to the following measures: • Reorient or relocate the ...possible. The device could void the user's authority to be used in 5.15-5.25GHz frequency range, then it is going to operate this is : Toshiba America Information Systems, Inc. 9740 Irvine Blvd., Irvine, CA 92618.
User Manual
Page 9
... HDMI® signal information 41 Using your PC with the TV 42 Adjusting the image 42 Setting the PC audio 42 Setting the timer to turn on the TV 42 Setting the sleep timer 43 Setting Automatic Power Down 43 Setting No Signal Power Down 43 Displaying TV status information 44...
... HDMI® signal information 41 Using your PC with the TV 42 Adjusting the image 42 Setting the PC audio 42 Setting the timer to turn on the TV 42 Setting the sleep timer 43 Setting Automatic Power Down 43 Setting No Signal Power Down 43 Displaying TV status information 44...
User Manual
Page 11
...;HDMI® CEC Control allows control of installation, setup, and use Follow these steps to set -top box (in any power cords until AFTER you turn on ambient light conditions and input signal content (- p. 62). •ColorMaster™ lets you view photo files and play music or movie files (- p. 70). 11...
...;HDMI® CEC Control allows control of installation, setup, and use Follow these steps to set -top box (in any power cords until AFTER you turn on ambient light conditions and input signal content (- p. 62). •ColorMaster™ lets you view photo files and play music or movie files (- p. 70). 11...
User Manual
Page 12
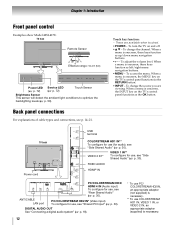
... TV's control panel functions as up/down menu navigation buttons. • + - - When a menu is onscreen, these keys function as the RETURN button. • INPUT - To turn the TV on and off. • B b - DIGITAL AUDIO OUT See "Connecting a digital audio system" (- TV back Power cord USB terminal COLORSTREAM HD1 IN** To configure...
... TV's control panel functions as up/down menu navigation buttons. • + - - When a menu is onscreen, these keys function as the RETURN button. • INPUT - To turn the TV on and off. • B b - DIGITAL AUDIO OUT See "Connecting a digital audio system" (- TV back Power cord USB terminal COLORSTREAM HD1 IN** To configure...
User Manual
Page 15
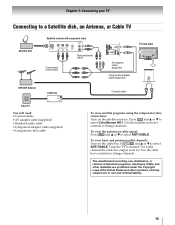
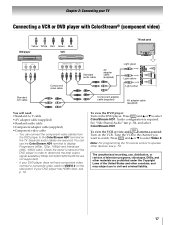
...) •Standard audio cable •Component adapter cable (supplied) •Component video cable Coaxial cable To view satellite programs using the component video connections: Turn on the cable box. Press INPUT and B or b to select ANT/CABLE. Press INPUT and B or b to select ColorStream HD1. To view basic... and premium cable channels: Turn on the satellite receiver. Tune the TV to channel 3 or 4 (the channel the cable box output is set to civil and criminal liability. 15 The...
...) •Standard audio cable •Component adapter cable (supplied) •Component video cable Coaxial cable To view satellite programs using the component video connections: Turn on the cable box. Press INPUT and B or b to select ANT/CABLE. Press INPUT and B or b to select ColorStream HD1. To view basic... and premium cable channels: Turn on the satellite receiver. Tune the TV to channel 3 or 4 (the channel the cable box output is set to civil and criminal liability. 15 The...
User Manual
Page 16
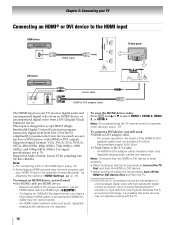
... Audio cable HDMI-to-DVI adapter cable The HDMI input on the TV first and then the HDMI or DVI device. • When turning off electronic components, turn off the HDMI or DVI device first and then the TV. [1] EIA/CEA-861-D compliance covers the transmission of uncompressed digital video with... transfers video only. Because this is an evolving technology, it is possible that the HDMI or DVI device is reset properly: • When turning on electronic components, turn on your HDMI TV due to the HDMI input, see p. 20. • Some legacy HDMI sources may not work properly with your TV...
... Audio cable HDMI-to-DVI adapter cable The HDMI input on the TV first and then the HDMI or DVI device. • When turning off electronic components, turn off the HDMI or DVI device first and then the TV. [1] EIA/CEA-861-D compliance covers the transmission of uncompressed digital video with... transfers video only. Because this is an evolving technology, it is possible that the HDMI or DVI device is reset properly: • When turning on electronic components, turn on your HDMI TV due to the HDMI input, see p. 20. • Some legacy HDMI sources may not work properly with your TV...
User Manual
Page 17
... available (1080p 24 Hz/30 Hz/50 Hz/25 Hz are not supported). - To view the DVD player: Turn on the VCR. To view the VCR or view and record antenna-sourced: Turn on the DVD player. You can connect the component video cables from the DVD player to display Progressive (480p...
... available (1080p 24 Hz/30 Hz/50 Hz/25 Hz are not supported). - To view the DVD player: Turn on the VCR. To view the VCR or view and record antenna-sourced: Turn on the DVD player. You can connect the component video cables from the DVD player to display Progressive (480p...
User Manual
Page 23
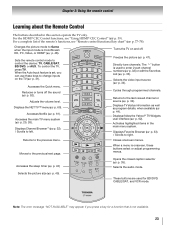
...Using HDMI® CEC Control" (- Accesses the Quick menu. p. 52). Adjusts the volume level. Displays the NET TV™ menu (- p. 25, 26). Turns the TV on the TV (- The "-" button is used for a function that is ColorStream HD, PC, Video, or HDMI® (- p. 34). Moves to...left. To control the TV, press TV. When the Auto Input feature is onscreen, these keys to enter 2-part channel numbers (- p. 31). Reduces or turns off . p. 60). Accesses Netflix (- p. 61). Accesses the main TV menu system (- Displays Channel Browser™ (-p. 32). / Scrolls to control the...
...Using HDMI® CEC Control" (- Accesses the Quick menu. p. 52). Adjusts the volume level. Displays the NET TV™ menu (- p. 25, 26). Turns the TV on the TV (- The "-" button is used for a function that is ColorStream HD, PC, Video, or HDMI® (- p. 34). Moves to...left. To control the TV, press TV. When the Auto Input feature is onscreen, these keys to enter 2-part channel numbers (- p. 31). Reduces or turns off . p. 60). Accesses Netflix (- p. 61). Accesses the main TV menu system (- Displays Channel Browser™ (-p. 32). / Scrolls to control the...
User Manual
Page 24
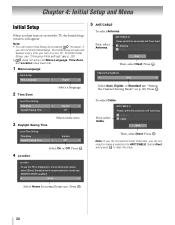
..." on p. 32). Select Next and press OK to scan channels, you do not finish Initial Setup, the Initial Setup screen will appear every time you turn on or reset the TV, the Initial Setup window will appear. Select Home for normal use . To finish Initial Setup, see "Changing Initial settings" (- ... Please confirm the connection with Tuner Input. Antenna Cable Next Then, select Next. Chapter 4: Initial Setup and Menu Initial Setup When you first turn on your TV. OK Note: If you do not want to skip this step. Antenna Cable Next Then, select Next. Press . OK To select ...
..." on p. 32). Select Next and press OK to scan channels, you do not finish Initial Setup, the Initial Setup screen will appear every time you turn on or reset the TV, the Initial Setup window will appear. Select Home for normal use . To finish Initial Setup, see "Changing Initial settings" (- ... Please confirm the connection with Tuner Input. Antenna Cable Next Then, select Next. Chapter 4: Initial Setup and Menu Initial Setup When you first turn on your TV. OK Note: If you do not want to skip this step. Antenna Cable Next Then, select Next. Press . OK To select ...
User Manual
Page 29
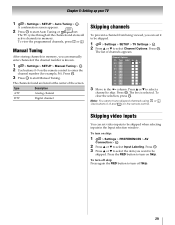
...Press B or b to select Input Labeling. The box is known. 1 > Settings > SETUP > Manual Tuning > . CH Use buttons 0-9 and - To turn on the remote control. To turn on the remote control to be skipped. 1 > Settings > SETUP > TV Settings > . To view the programmed channels, press CH or . Press . Channel ...Options Ch. To clear the selection, press . Press the RED button to turn off skip: Press again the RED button to turn off Skip. 29 OK 2 Use buttons 0-9 on Skip. Type ATV DTV Description Analog channel Digital channel Skipping channels To...
...Press B or b to select Input Labeling. The box is known. 1 > Settings > SETUP > Manual Tuning > . CH Use buttons 0-9 and - To turn on the remote control. To turn on the remote control to be skipped. 1 > Settings > SETUP > TV Settings > . To view the programmed channels, press CH or . Press . Channel ...Options Ch. To clear the selection, press . Press the RED button to turn off skip: Press again the RED button to turn off Skip. 29 OK 2 Use buttons 0-9 on Skip. Type ATV DTV Description Analog channel Digital channel Skipping channels To...

User Manual
Page 31
...: The TV mode select button will be restricted to select an input source for that mode. 5 Repeat the procedure for 2 seconds and release it. To turn off Auto Input: Select Off in Step 2.
...: The TV mode select button will be restricted to select an input source for that mode. 5 Repeat the procedure for 2 seconds and release it. To turn off Auto Input: Select Off in Step 2.

User Manual
Page 33
...remote control. •Channels that is tuned, the Channel Browser™ adds it to close the Channel Browser™. Note: Additions are turned off, or will not display the Favorites Browser. • Pressing opens the Channel Browser™ Favorites list regardless of the Channel Browser&#...channel or input. 2 Press and hold - CH To clear channels from the History List: •Reconfigure the ANT/CABLE input. •Turn off , pressing will not display the Channel Browser™. The Channel Browser™ stores these channels: •Channels that are tuned for ...
...remote control. •Channels that is tuned, the Channel Browser™ adds it to close the Channel Browser™. Note: Additions are turned off, or will not display the Favorites Browser. • Pressing opens the Channel Browser™ Favorites list regardless of the Channel Browser&#...channel or input. 2 Press and hold - CH To clear channels from the History List: •Reconfigure the ANT/CABLE input. •Turn off , pressing will not display the Channel Browser™. The Channel Browser™ stores these channels: •Channels that are tuned for ...
User Manual
Page 35
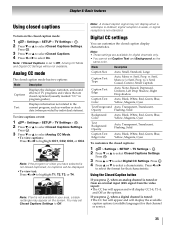
... rectangle may set Caption Text and Background as weather or stock data (when provided by individual stations). Press . Chapter 6: Basic features Using closed captions To turn on the screen. To view captions or text: 1 > Settings > SETUP > TV Settings > . Note: If the program or video you have selected is tuned: •The...
... rectangle may set Caption Text and Background as weather or stock data (when provided by individual stations). Press . Chapter 6: Basic features Using closed captions To turn on the screen. To view captions or text: 1 > Settings > SETUP > TV Settings > . Note: If the program or video you have selected is tuned: •The...
User Manual
Page 39
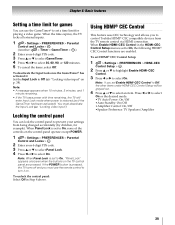
... will enter Input Lock mode when power is set a time limit for playing a video game. Note: When Panel Lock is pressed, the TV turns off and you to control Toshiba HDMI® CEC compatible devices from being changed accidentally (by children, for example). Chapter 6: Basic features Setting a time limit for games You... power with time remaining, the TV will be grayed out. 4 Press B or b to Off (- Locking the control panel You can use the remote control to turn it : Set the Input Lock to select an item. Press C or c to select On.
... will enter Input Lock mode when power is set a time limit for playing a video game. Note: When Panel Lock is pressed, the TV turns off and you to control Toshiba HDMI® CEC compatible devices from being changed accidentally (by children, for example). Chapter 6: Basic features Setting a time limit for games You... power with time remaining, the TV will be grayed out. 4 Press B or b to Off (- Locking the control panel You can use the remote control to turn it : Set the Input Lock to select an item. Press C or c to select On.
User Manual
Page 40
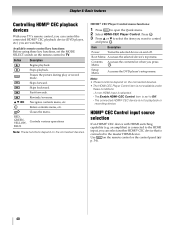
Button Description Begins playback. Pauses the picture during play or record mode. Fast-forwards. OK Item Description Power Turns the selected device on the remote control or the control panel (p. 34). 40 O K Setup Menu Accesses the DVD player's setup menu. The Enable HDMI-CEC ...
Button Description Begins playback. Pauses the picture during play or record mode. Fast-forwards. OK Item Description Power Turns the selected device on the remote control or the control panel (p. 34). 40 O K Setup Menu Accesses the DVD player's setup menu. The Enable HDMI-CEC ...
User Manual
Page 41
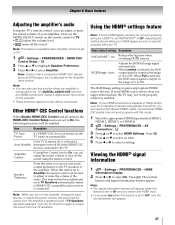
...Hz, you will be output from the TV speakers. If the TV is connected to the TV's DIGITAL AUDIO OUT terminal (not HDMI connection). Turn the TV off the sound using the remote control. RGB Range: Auto Adjusts the RGB full range signal automatically. Select a digital audio input ...is selected, the RGB output signal is selected for the Amplifier input source. When Full is selected, the RGB output signal is turned on, the TV turns on the device connected. If your HDMI source device does not support this item is set your amplifier. Amplifier Control If Amplifier ...
...Hz, you will be output from the TV speakers. If the TV is connected to the TV's DIGITAL AUDIO OUT terminal (not HDMI connection). Turn the TV off the sound using the remote control. RGB Range: Auto Adjusts the RGB full range signal automatically. Select a digital audio input ...is selected, the RGB output signal is selected for the Amplifier input source. When Full is selected, the RGB output signal is turned on, the TV turns on the device connected. If your HDMI source device does not support this item is set your amplifier. Amplifier Control If Amplifier ...
User Manual
Page 42
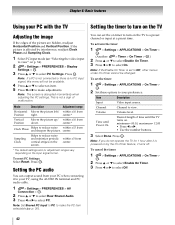
... depending on the input signal format. Sampling Clock Helps to select On. Press . OK Setting the PC audio You can set the on timer to turn on . To activate the timer: 1 > Settings > APPLICATIONS > On Timer > . To set to Off, other menus under On Timer cannot be available. 4 Press B or... the TV You can output sound from Position right. Press . within ±10 from your PC when connecting it turns off. Note: Set Shared PC Input to PC to turn on the screen. OK (Another: > Timer > On Timer > OK .) 2 Press B or b to select Enable On Timer. 3 Press C or c to...
... depending on the input signal format. Sampling Clock Helps to select On. Press . OK Setting the PC audio You can set the on timer to turn on . To activate the timer: 1 > Settings > APPLICATIONS > On Timer > . To set to Off, other menus under On Timer cannot be available. 4 Press B or... the TV You can output sound from Position right. Press . within ±10 from your PC when connecting it turns off. Note: Set Shared PC Input to PC to turn on the screen. OK (Another: > Timer > On Timer > OK .) 2 Press B or b to select Enable On Timer. 3 Press C or c to...
User Manual
Page 43
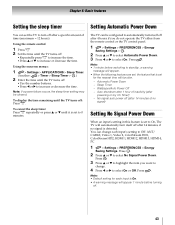
...OK 2 Press B or b to select Automatic Power Down. 3 Press C or c to select No Signal Power Down. To display the time remaining until the TV turns off. •Use the number buttons. •Press C or c to 0 minutes. Press . Sleep Timer - OK 2 Press B or b to select On.... Using the onscreen menus: 1 > Settings > APPLICATIONS > Sleep Timer. (Another: > Timer > Sleep Timer > OK .) 2 Enter the time until the TV turns off . •Repeatedly press [ to increase the time. •Press B or b to increase or decrease the time. Automatic Power Down - To cancel the sleep ...
...OK 2 Press B or b to select Automatic Power Down. 3 Press C or c to select No Signal Power Down. To display the time remaining until the TV turns off. •Use the number buttons. •Press C or c to 0 minutes. Press . Sleep Timer - OK 2 Press B or b to select On.... Using the onscreen menus: 1 > Settings > APPLICATIONS > Sleep Timer. (Another: > Timer > Sleep Timer > OK .) 2 Enter the time until the TV turns off . •Repeatedly press [ to increase the time. •Press B or b to increase or decrease the time. Automatic Power Down - To cancel the sleep ...


