Owner's Manual - English
Page 1
.... © 2009 TOSHIBA CORPORATION All Rights Reserved Owner's Record The model number and serial number are on the back and side of steps for setting up your new TV, see page 9. Integrated High Definition LCD Television HIGH-DEFINITION TELEVISION 40XV645U 46XV645U 52XV645U For an... overview of your TV. Record these numbers whenever you communicate with your Toshiba dealer about this TV. Note: To display a High...
.... © 2009 TOSHIBA CORPORATION All Rights Reserved Owner's Record The model number and serial number are on the back and side of steps for setting up your new TV, see page 9. Integrated High Definition LCD Television HIGH-DEFINITION TELEVISION 40XV645U 46XV645U 52XV645U For an... overview of your TV. Record these numbers whenever you communicate with your Toshiba dealer about this TV. Note: To display a High...
Owner's Manual - English
Page 2
... • Don't allow children to climb on or play with furniture and television sets. • Don't place flat panel display. WARNING RISK OF ELECTRIC SHOCK ... CATV INSTALLERS This is a reminder to call the CATV system installer's attention to Article 820-40 of important operating and maintenance (servicing) instructions in mind: The Issue • The home... equilateral triangle is committed to walls with the installation instructions. WARNING To prevent injury, this Toshiba LCD TV. page 5). This manual will help you for the safe installation and use of your fl...
... • Don't allow children to climb on or play with furniture and television sets. • Don't place flat panel display. WARNING RISK OF ELECTRIC SHOCK ... CATV INSTALLERS This is a reminder to call the CATV system installer's attention to Article 820-40 of important operating and maintenance (servicing) instructions in mind: The Issue • The home... equilateral triangle is committed to walls with the installation instructions. WARNING To prevent injury, this Toshiba LCD TV. page 5). This manual will help you for the safe installation and use of your fl...
Owner's Manual - English
Page 6
...set the Power-On mode to [Power-Saving]. [AutoView] mode is not permanent and will not occur in accordance with this TV. Such pixels are not visible when the picture is : Toshiba...These limits are registered U.S. FCC Declaration of Conformity Compliance Statement (Part 15): The Toshiba 40XV645U, 46XV645U and 52XV645U Televisions comply with the limits for a Class B digital device... This is a structural property of LCD technology, is not a sign of Silicon Image, Inc. To ensure your LCD TV The following two conditions: (1) this TV is not responsible for perceived issues resulting...
...set the Power-On mode to [Power-Saving]. [AutoView] mode is not permanent and will not occur in accordance with this TV. Such pixels are not visible when the picture is : Toshiba...These limits are registered U.S. FCC Declaration of Conformity Compliance Statement (Part 15): The Toshiba 40XV645U, 46XV645U and 52XV645U Televisions comply with the limits for a Class B digital device... This is a structural property of LCD technology, is not a sign of Silicon Image, Inc. To ensure your LCD TV The following two conditions: (1) this TV is not responsible for perceived issues resulting...

Owner's Manual - English
Page 7
...LCD TV 5 Chapter 1: Introduction 9 Features of your new TV 9 Overview of steps for installing, setting up, and using your new TV 9 TV front and side panel controls and connections . . . . 10 TV back panel connections 11 Chapter 2: Connecting your TV...TV's channel memory 28 Auto Tuning 28 Manual Tuning 28 Setting channel skip 29 Setting video input skip 29 Labeling video input sources 29 Setting the time zone 30 Selecting the location 30 Selecting the TOSHIBA... 40 Viewing the Control Visualization window 40 Using the closed caption mode 40 Analog CC Mode 40 Digital CC Settings 41...
...LCD TV 5 Chapter 1: Introduction 9 Features of your new TV 9 Overview of steps for installing, setting up, and using your new TV 9 TV front and side panel controls and connections . . . . 10 TV back panel connections 11 Chapter 2: Connecting your TV...TV's channel memory 28 Auto Tuning 28 Manual Tuning 28 Setting channel skip 29 Setting video input skip 29 Labeling video input sources 29 Setting the time zone 30 Selecting the location 30 Selecting the TOSHIBA... 40 Viewing the Control Visualization window 40 Using the closed caption mode 40 Analog CC Mode 40 Digital CC Settings 41...
Owner's Manual - English
Page 8
... Adjustment Pro 55 Using the ColorMaster™ feature 55 Using the Base Color Adjustment 55 Selecting the color temperature 56 Using the advanced sound setting features 56 Using the Media Player 57 Media Player Specifications 57 Basic operation 57 Viewing JPEG files 58 Chapter 8: Troubleshooting 59 General troubleshooting 59...Acceptable signal formats for PC IN and HDMI terminals 63 PC IN signal formats 63 HDMI signal formats 64 Limited United States Warranty for LCD Televisions 26" and Larger 65 Limited Canadian Warranty for Toshiba Brand Flat Panel Televisions 66 Index 69 8
... Adjustment Pro 55 Using the ColorMaster™ feature 55 Using the Base Color Adjustment 55 Selecting the color temperature 56 Using the advanced sound setting features 56 Using the Media Player 57 Media Player Specifications 57 Basic operation 57 Viewing JPEG files 58 Chapter 8: Troubleshooting 59 General troubleshooting 59...Acceptable signal formats for PC IN and HDMI terminals 63 PC IN signal formats 63 HDMI signal formats 64 Limited United States Warranty for LCD Televisions 26" and Larger 65 Limited Canadian Warranty for Toshiba Brand Flat Panel Televisions 66 Index 69 8
Owner's Manual - English
Page 9
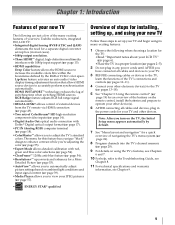
...of your new Toshiba widescreen, integrated HD, LCD TV: •Integrated digital tuning (8VSB ATSC and QAM) eliminates the need for a separate digital converter set up , and using your new TV Follow these steps to set -top box (in the power cords for installing, setting up your TV and other devices...until AFTER you turn on the remote control, install the batteries and prepare to the TV (- page 49). •Two sets of navigating the TV's menu system (page 26). 8 Program channels into the TV's channel memory (- page 53). •AutoView™ allows you to the Troubleshooting ...
...of your new Toshiba widescreen, integrated HD, LCD TV: •Integrated digital tuning (8VSB ATSC and QAM) eliminates the need for a separate digital converter set up , and using your new TV Follow these steps to set -top box (in the power cords for installing, setting up your TV and other devices...until AFTER you turn on the remote control, install the batteries and prepare to the TV (- page 49). •Two sets of navigating the TV's menu system (page 26). 8 Program channels into the TV's channel memory (- page 53). •AutoView™ allows you to the Troubleshooting ...
Owner's Manual - English
Page 10
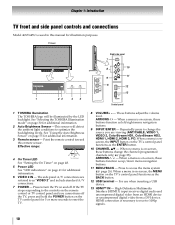
... IN - HDMI connection is on-screen, the MENU button on page 61 for additional information. 3 Remote sensor - See "Selecting the TOSHIBA Illumination mode" on the TV's control panel functions as "VIDEO 2" and include standard A/V connections. 7 POWER - Repeatedly press to turn off . Press to receive ...buttons adjust the volume level. Effective range: 4 On Timer LED 16.4 ft (5m) See "Setting the On Timer" on page 48. 5 Power LED See "LED indications" on the TV's control panel functions as left/right menu navigation buttons. 9 INPUT/ENTER - The side panel ...
... IN - HDMI connection is on-screen, the MENU button on page 61 for additional information. 3 Remote sensor - See "Selecting the TOSHIBA Illumination mode" on the TV's control panel functions as "VIDEO 2" and include standard A/V connections. 7 POWER - Repeatedly press to turn off . Press to receive ...buttons adjust the volume level. Effective range: 4 On Timer LED 16.4 ft (5m) See "Setting the On Timer" on page 48. 5 Power LED See "LED indications" on the TV's control panel functions as left/right menu navigation buttons. 9 INPUT/ENTER - The side panel ...
Owner's Manual - English
Page 11
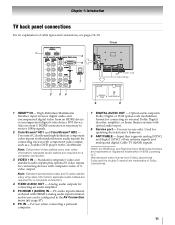
... and High-Definition Multimedia Interface are trademarks of HDMI Licensing LLC. Two sets of cable types and connections, see item 5. Analog audio outputs for connecting devices with component video output, such as a Toshiba DVD player with standard stereo audio inputs) for connecting an audio amplifier....input terminal is necessary to receive 1080p signals. 2 ColorStream® HD1 and ColorStream® HD2 - Chapter 1: Introduction TV back panel connections For an explanation of ColorStream high-definition component video inputs (with ColorStream. For use only. Also see pages 12...
... and High-Definition Multimedia Interface are trademarks of HDMI Licensing LLC. Two sets of cable types and connections, see item 5. Analog audio outputs for connecting devices with component video output, such as a Toshiba DVD player with standard stereo audio inputs) for connecting an audio amplifier....input terminal is necessary to receive 1080p signals. 2 ColorStream® HD1 and ColorStream® HD2 - Chapter 1: Introduction TV back panel connections For an explanation of ColorStream high-definition component video inputs (with ColorStream. For use only. Also see pages 12...
Owner's Manual - English
Page 12
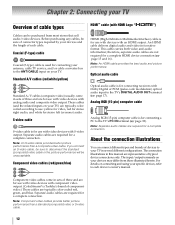
...cables (red/white/yellow) Standard A/V cables (composite video) usually come in sets of three and are typically colorcoded according to use with video devices with an HDMI output. S-video cable S-video cable is Toshiba's brand of component video.) These cables are for a complete connection. therefore...stereo right audio, and white for use with video devices with analog audio and composite video output. The input/output terminals on your TV) are for stereo left (or mono) audio. Note: Component video cables provide better picture performance than a composite video cable. Coaxial...
...cables (red/white/yellow) Standard A/V cables (composite video) usually come in sets of three and are typically colorcoded according to use with video devices with an HDMI output. S-video cable S-video cable is Toshiba's brand of component video.) These cables are for a complete connection. therefore...stereo right audio, and white for use with video devices with analog audio and composite video output. The input/output terminals on your TV) are for stereo left (or mono) audio. Note: Component video cables provide better picture performance than a composite video cable. Coaxial...

Owner's Manual - English
Page 13
...plus the audio cables) instead of the standard video cable. - To program the TV remote control to change channels. Do not connect both types of television programs, videotapes, DVDs, and other materials is set to). To view the antenna or Cable signal: Select the ANT/CABLE video ...VCR (or a VCR with S-video) and antenna, Cable TV or Camcorder Camcorder AUDIO OUT L R VIDEO TV upper back panel VIDEO 2 inputs on TV right side panel TV lower back panel S-video cable or Standard A/V cable Audio cable From Cable TV or antenna From Cable TV Cable box IN CH 3 CH 4 OUT Stereo VCR ...
...plus the audio cables) instead of the standard video cable. - To program the TV remote control to change channels. Do not connect both types of television programs, videotapes, DVDs, and other materials is set to). To view the antenna or Cable signal: Select the ANT/CABLE video ...VCR (or a VCR with S-video) and antenna, Cable TV or Camcorder Camcorder AUDIO OUT L R VIDEO TV upper back panel VIDEO 2 inputs on TV right side panel TV lower back panel S-video cable or Standard A/V cable Audio cable From Cable TV or antenna From Cable TV Cable box IN CH 3 CH 4 OUT Stereo VCR ...
Owner's Manual - English
Page 14
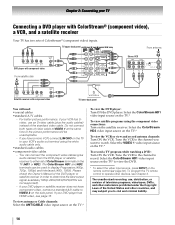
... COMPONENT VIDEO S-VIDEO VIDEO R IN OUT OUT Satellite receiver with ColorStream® (component video), a VCR, and a satellite receiver Your TV has two sets of the United States and other devices, see page 15. TV upper back panel From antenna Y PB PR COMPONENT VIDEO S-VIDEO VIDEO OUT OUT DVD player with component video AUDIO...
... COMPONENT VIDEO S-VIDEO VIDEO R IN OUT OUT Satellite receiver with ColorStream® (component video), a VCR, and a satellite receiver Your TV has two sets of the United States and other devices, see page 15. TV upper back panel From antenna Y PB PR COMPONENT VIDEO S-VIDEO VIDEO OUT OUT DVD player with component video AUDIO...
Owner's Manual - English
Page 15
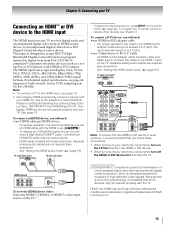
... of high-definition video signals. page 51). To connect a DVI device, you will need : •one 3.5mm Stereo to RCA Y-Cable - See "Setting the HDMI audio mode" (- Chapter 2: Connecting your TV Connecting an HDMI™ or DVI device to the HDMI input The HDMI input on the... display an 1080p/60Hz signal format, you will need a High Speed HDMI™ cable. To program the TV remote control to the HDMI input, see illustration). - An HDMI-to Off. See "Setting the HDMI audio mode" (- The recommended length is recommended that the HDMI or DVI device is reset properly,...
... of high-definition video signals. page 51). To connect a DVI device, you will need : •one 3.5mm Stereo to RCA Y-Cable - See "Setting the HDMI audio mode" (- Chapter 2: Connecting your TV Connecting an HDMI™ or DVI device to the HDMI input The HDMI input on the... display an 1080p/60Hz signal format, you will need a High Speed HDMI™ cable. To program the TV remote control to the HDMI input, see illustration). - An HDMI-to Off. See "Setting the HDMI audio mode" (- The recommended length is recommended that the HDMI or DVI device is reset properly,...
Owner's Manual - English
Page 16
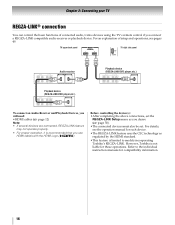
... L R To connect an Audio Receiver and Playback Devices, you desire (- page 50). •The connected devices must also be set the REGZA-LINK Setup menu as regulated by the HDMI standard. •This feature is limited to the individual instruction manuals for compatibility... information. 16 For details, see pages 49. Refer to models incorporating Toshiba's REGZA-LINK. Before controlling the device(s): •After completing the above connections, set . Chapter 2: Connecting your TV REGZA-LINK® connection You can control the basic functions of setup and ...
... L R To connect an Audio Receiver and Playback Devices, you desire (- page 50). •The connected devices must also be set the REGZA-LINK Setup menu as regulated by the HDMI standard. •This feature is limited to the individual instruction manuals for compatibility... information. 16 For details, see pages 49. Refer to models incorporating Toshiba's REGZA-LINK. Before controlling the device(s): •After completing the above connections, set . Chapter 2: Connecting your TV REGZA-LINK® connection You can control the basic functions of setup and ...
Owner's Manual - English
Page 17
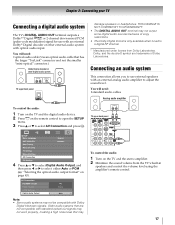
...b to a digital RF channel. * Manufactured under license from the TV's built-in speakers and control the volume level using the amplifier's remote control. 17 AV Connection PC/HDMI 1 Audio HDMI 1 Audio HDMI Settings Digital Audio Output PC Digital Auto Note: • Some audio systems ... audio output format" on the TV and the stereo amplifier. 2 Minimize the sound volume from Dolby Laboratories. LINE IN LR TV upper back panel SETUP Menu Language English ANT/CABLE In Antenna Auto Tuning Manual Tuning TV Settings Manual Setting AV Connection PC Settings 4 Press B or b to...
...b to a digital RF channel. * Manufactured under license from the TV's built-in speakers and control the volume level using the amplifier's remote control. 17 AV Connection PC/HDMI 1 Audio HDMI 1 Audio HDMI Settings Digital Audio Output PC Digital Auto Note: • Some audio systems ... audio output format" on the TV and the stereo amplifier. 2 Minimize the sound volume from Dolby Laboratories. LINE IN LR TV upper back panel SETUP Menu Language English ANT/CABLE In Antenna Auto Tuning Manual Tuning TV Settings Manual Setting AV Connection PC Settings 4 Press B or b to...
Owner's Manual - English
Page 18
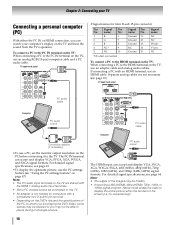
... panel PC audio cable Computer PC audio output PC audio cable Conversion adapter (if necessary) •To use an HDMI cable. "Using the PC settings feature" on the TV are not necessary (- name No. 1 R 6 2 G 7 3 B 8 4 NC * 9 5 NC 10 *NC=Not connected Signal Pin name No. The PC IN ...D-sub 15-pin connector Pin Signal Pin No. no overscanning). 18 To connect a PC to the PC IN terminal on the TV, use the PC settings feature (- TV upper back panel •Signal names for computers with the HDMI 1 analog audio input terminals. • Some PC models cannot be...
... panel PC audio cable Computer PC audio output PC audio cable Conversion adapter (if necessary) •To use an HDMI cable. "Using the PC settings feature" on the TV are not necessary (- name No. 1 R 6 2 G 7 3 B 8 4 NC * 9 5 NC 10 *NC=Not connected Signal Pin name No. The PC IN ...D-sub 15-pin connector Pin Signal Pin No. no overscanning). 18 To connect a PC to the PC IN terminal on the TV, use the PC settings feature (- TV upper back panel •Signal names for computers with the HDMI 1 analog audio input terminals. • Some PC models cannot be...
Owner's Manual - English
Page 20
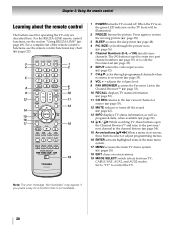
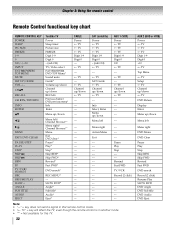
... channel numbers (- For the REGZA-LINK remote control functions, see the remote control functional key chart (- pages 22). 1 POWER turns the TV on the TV front will be illuminated. 2 FREEZE freezes the picture. page 48). 4 PIC SIZE cycles through programmed channels when no menu is not available...(- page 33). 10 RECALL displays TV status information (- page 52). 11 CH RTN returns to control the TV. page 34). 15 Arrow buttons (BbC c) When a menu is on -screen menus. 19 MODE SELECT switch selects between TV, CABLE/SAT, AUX1, and AUX2 modes. Set to "TV" to the last viewed channel or...
... channel numbers (- For the REGZA-LINK remote control functions, see the remote control functional key chart (- pages 22). 1 POWER turns the TV on the TV front will be illuminated. 2 FREEZE freezes the picture. page 48). 4 PIC SIZE cycles through programmed channels when no menu is not available...(- page 33). 10 RECALL displays TV status information (- page 52). 11 CH RTN returns to control the TV. page 34). 15 Arrow buttons (BbC c) When a menu is on -screen menus. 19 MODE SELECT switch selects between TV, CABLE/SAT, AUX1, and AUX2 modes. Set to "TV" to the last viewed channel or...
Owner's Manual - English
Page 21
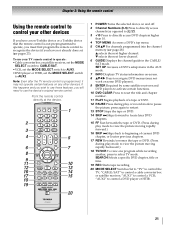
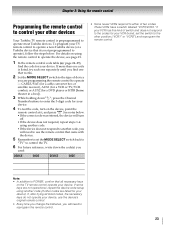
...operate: •Cable converter box or satellite receiver, set the MODE SELECT switch to CABLE/SAT. •VCR, set the MODE SELECT switch to AUX1. •DVD player or HTIB, set the MODE SELECT switch to AUX2. Note: Even after the TV remote control is not preprogrammed to operate, you ... not already done so) (- "AUX2" to control a cable converter box or satellite receiver; To use those features, you have a non-Toshiba device or a Toshiba device that the remote control is programmed, it may not work on some DVD players). 9 ENTER Required by some satellite receivers and DVD players...
...operate: •Cable converter box or satellite receiver, set the MODE SELECT switch to CABLE/SAT. •VCR, set the MODE SELECT switch to AUX1. •DVD player or HTIB, set the MODE SELECT switch to AUX2. Note: Even after the TV remote control is not preprogrammed to operate, you ... not already done so) (- "AUX2" to control a cable converter box or satellite receiver; To use those features, you have a non-Toshiba device or a Toshiba device that the remote control is programmed, it may not work on some DVD players). 9 ENTER Required by some satellite receivers and DVD players...
Owner's Manual - English
Page 22
...Eject* CABLE Power s TV s TV s TV Digit 1-9 Digit 0 --s TV --- AUX 1 (VCR) Power s TV s TV s TV Digit 1-9 Digit 0 100 s TV --- CHBb RECALL CH RTN...TV/VCR/ SEARCH REC RESUME PLAY SLOW + ANGLE SUB TITLE AUDIO EJECT Toshiba TV Power Sleep timer Picture size FREEZE Digit 1-9 Digit 0 - (sub CH) TV...TV --s TV Channel up /down s TV --- ----- --- --- --- --- --- SAT (satellite) Power s TV s TV s TV Digit 1-9 Digit 0 - (sub CH) s TV --- Pause Play Stop ----Rewind Fast FWD TV...Audio DVD Eject s TV SAT Guide s TV Channel up /down s TV --- s TV --s TV Channel up /down s TV --- ----- --- ---...
...Eject* CABLE Power s TV s TV s TV Digit 1-9 Digit 0 --s TV --- AUX 1 (VCR) Power s TV s TV s TV Digit 1-9 Digit 0 100 s TV --- CHBb RECALL CH RTN...TV/VCR/ SEARCH REC RESUME PLAY SLOW + ANGLE SUB TITLE AUDIO EJECT Toshiba TV Power Sleep timer Picture size FREEZE Digit 1-9 Digit 0 - (sub CH) TV...TV --s TV Channel up /down s TV --- ----- --- --- --- --- --- SAT (satellite) Power s TV s TV s TV Digit 1-9 Digit 0 - (sub CH) s TV --- Pause Play Stop ----Rewind Fast FWD TV...Audio DVD Eject s TV SAT Guide s TV Channel up /down s TV --- s TV --s TV Channel up /down s TV --- ----- --- ---...
Owner's Manual - English
Page 23
... remote control to control your VCR brand, set the MODE SELECT switch back to "TV" to control the TV. 6 For future reference, write down E, press the Channel Number buttons to enter the 3-digit code for your TV remote control to operate most Toshiba devices. If more than one code is... preprogrammed to operate a non-Toshiba device (or a Toshiba device that came with the device. 5 Remember to set the switch to the other position ("VCR1" or "VCR2") ...
... remote control to control your VCR brand, set the MODE SELECT switch back to "TV" to control the TV. 6 For future reference, write down E, press the Channel Number buttons to enter the 3-digit code for your TV remote control to operate most Toshiba devices. If more than one code is... preprogrammed to operate a non-Toshiba device (or a Toshiba device that came with the device. 5 Remember to set the switch to the other position ("VCR1" or "VCR2") ...
Owner's Manual - English
Page 26
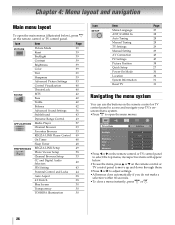
... Audio Selectors 40 PIN Setting 43 Parental Control and Locks 44 Auto Aspect 38 4:3 Stretch 38 Blue Screen 30 Transparency 30 TOSHIBA Illumination 30 Icon SETUP Item Menu Language ANT/CABLE In Auto Tuning Manual Tuning TV Settings Manual Setting AV Connection PC Settings Picture Position ...Quick Setup Power-On Mode Location System Information Reset TV Page 27 28 28 28 29...
... Audio Selectors 40 PIN Setting 43 Parental Control and Locks 44 Auto Aspect 38 4:3 Stretch 38 Blue Screen 30 Transparency 30 TOSHIBA Illumination 30 Icon SETUP Item Menu Language ANT/CABLE In Auto Tuning Manual Tuning TV Settings Manual Setting AV Connection PC Settings Picture Position ...Quick Setup Power-On Mode Location System Information Reset TV Page 27 28 28 28 29...


