
Owners Manual
Page 10
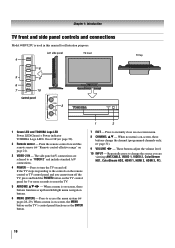
... an on-screen menu. 8 CHANNEL ST - page 31). 9 VOLUME WX - Repeatedly press to as up/down/left/right menu navigation buttons. 6 MENU (ENTER) - Press to reset the TV. 5 ARROWS STWX - Chapter 1: Introduction TV front and side panel controls and connections Model 40RV525U is used in this remote sensor ( "Remote control effective... the source you cannot turn off the TV, press and hold the POWER button on the TV control panel for illustration purposes. 1 Green LED and TOSHIBA Logo LED Power LED(Green) = Power indicator TOSHIBA Logo LED= On or Off ( page 30). 2 Remote sensor -
... an on-screen menu. 8 CHANNEL ST - page 31). 9 VOLUME WX - Repeatedly press to as up/down/left/right menu navigation buttons. 6 MENU (ENTER) - Press to reset the TV. 5 ARROWS STWX - Chapter 1: Introduction TV front and side panel controls and connections Model 40RV525U is used in this remote sensor ( "Remote control effective... the source you cannot turn off the TV, press and hold the POWER button on the TV control panel for illustration purposes. 1 Green LED and TOSHIBA Logo LED Power LED(Green) = Power indicator TOSHIBA Logo LED= On or Off ( page 30). 2 Remote sensor -

Owners Manual
Page 17
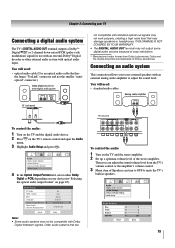
... will need: • one HDMI cable (type A connector) per HDMI device − For proper operation, it is recommended that the HDMI or DVI device is reset properly, it is 6.6 ft (2m). • one HDMI-to-DVI adapter cable (HDMI type A connector) per DVI device − An HDMI-to -DVI adapter cable...
... will need: • one HDMI cable (type A connector) per HDMI device − For proper operation, it is recommended that the HDMI or DVI device is reset properly, it is 6.6 ft (2m). • one HDMI-to-DVI adapter cable (HDMI type A connector) per DVI device − An HDMI-to -DVI adapter cable...
Owners Manual
Page 19
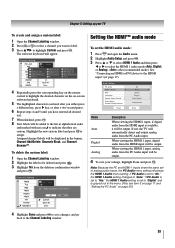
... can turn to OFF to adjust the sound level. Audio Setup PC Audio HDMI 1 Audio MTS Language Optical Output Format Dolby Digital Dynamic Range Control Reset No Auto Stereo English Dolby Digital Compressed Done Note: • Some audio systems may not work properly, creating a high noise level that are trademarks of...
... can turn to OFF to adjust the sound level. Audio Setup PC Audio HDMI 1 Audio MTS Language Optical Output Format Dolby Digital Dynamic Range Control Reset No Auto Stereo English Dolby Digital Compressed Done Note: • Some audio systems may not work properly, creating a high noise level that are trademarks of...
Owners Manual
Page 23
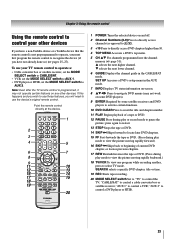
...the CABLE/SAT mode. "CABLE/SAT" to control a VCR; If this happens and you wish to use those features, you have a non-Toshiba device or a Toshiba device that the remote control is programmed, it may not work on some DVD players). 9 ENTER Required by some satellite receivers and DVD players... to activate certain functions. 10 DVD CLEAR Press to reset the title and chapter number. 11 PLAY Begins playback of current DVD chapter, or...
...the CABLE/SAT mode. "CABLE/SAT" to control a VCR; If this happens and you wish to use those features, you have a non-Toshiba device or a Toshiba device that the remote control is programmed, it may not work on some DVD players). 9 ENTER Required by some satellite receivers and DVD players... to activate certain functions. 10 DVD CLEAR Press to reset the title and chapter number. 11 PLAY Begins playback of current DVD chapter, or...
Owners Manual
Page 32
... (ABC, CBS, etc.) will appear. To remove encrypted channels from the channel memory: If an encrypted channel is not available from the channel memory: Highlight Reset and press , and then highlight Done and press . Labeling channels A list of presets, you are channel surfing. The Channel Labeling window opens. 3 Press or to...
... (ABC, CBS, etc.) will appear. To remove encrypted channels from the channel memory: If an encrypted channel is not available from the channel memory: Highlight Reset and press , and then highlight Done and press . Labeling channels A list of presets, you are channel surfing. The Channel Labeling window opens. 3 Press or to...
Owners Manual
Page 33
..., Channel Add/Delete, Channels Block, and Channel Browser™. Audio Setup PC Audio HDMI 1 Audio MTS Language Optical Output Format Dolby Digital Dynamic Range Control Reset No Auto Stereo English Dolby Digital Compressed Done Mode Auto Digital Analog Description When viewing the HDMI 1 input, if digital audio from the HDMI input...
..., Channel Add/Delete, Channels Block, and Channel Browser™. Audio Setup PC Audio HDMI 1 Audio MTS Language Optical Output Format Dolby Digital Dynamic Range Control Reset No Auto Stereo English Dolby Digital Compressed Done Mode Auto Digital Analog Description When viewing the HDMI 1 input, if digital audio from the HDMI input...

Owners Manual
Page 34
... menu: Highlight Done and press . Note: • The physical digital channel number listed in the ANT/CABLE digital TV input source only. Reset Factory Defaults To reset all settings and channels to normal viewing: Press . The TV will appear. 2 Open the Time Zone menu, highlight Time Zone Setup, and... code has been set of Installation menu icons will turn off , unplug the TV power cord and then plug it in again to complete the reset process. A new set of Installation menu icons will allow you want to check. Open the Terrestrial menu, highlight Signal Meter, and press . 4...
... menu: Highlight Done and press . Note: • The physical digital channel number listed in the ANT/CABLE digital TV input source only. Reset Factory Defaults To reset all settings and channels to normal viewing: Press . The TV will appear. 2 Open the Time Zone menu, highlight Time Zone Setup, and... code has been set of Installation menu icons will turn off , unplug the TV power cord and then plug it in again to complete the reset process. A new set of Installation menu icons will allow you want to check. Open the Terrestrial menu, highlight Signal Meter, and press . 4...
Owners Manual
Page 35
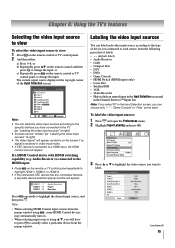
... control or TV control panel to the type of the Input Selection screen. Input Labeling Video 1 Video 2 ColorStream HD 1 ColorStream HD 2 HDMI 1 HDMI 2 HDMI 3 PC Reset VCR Cable Video Recorder Hide DTV Satellite/DSS DV D -- Labeling the video input sources You can label each video input source according to change the...
... control or TV control panel to the type of the Input Selection screen. Input Labeling Video 1 Video 2 ColorStream HD 1 ColorStream HD 2 HDMI 1 HDMI 2 HDMI 3 PC Reset VCR Cable Video Recorder Hide DTV Satellite/DSS DV D -- Labeling the video input sources You can label each video input source according to change the...
Owners Manual
Page 36
... Browser™ The Channel Browser™ provides an easy navigation interface for 3 seconds. To add a favorite channel/input: 1 Tune to the factory default labels, highlight Reset and press . The channel/input will cause that input to Select Navigation Input Selection screen with all inputs labeled except input 4, which means that is... to immediately tune channels as a specific device). Favorites Browser The Favorites Browser allows you to open the Preferences menu. 2 Highlight Input Labeling and press . 3 Highlight Reset and press .
... Browser™ The Channel Browser™ provides an easy navigation interface for 3 seconds. To add a favorite channel/input: 1 Tune to the factory default labels, highlight Reset and press . The channel/input will cause that input to Select Navigation Input Selection screen with all inputs labeled except input 4, which means that is... to immediately tune channels as a specific device). Favorites Browser The Favorites Browser allows you to open the Preferences menu. 2 Highlight Input Labeling and press . 3 Highlight Reset and press .
Owners Manual
Page 37
... Browse mode: 1 While watching TV, press W or X to open the Channel Browser™ and surf back to a previous item or forward to factory defaults, highlight Reset and press . If Favorites List is turned off . 4 Press T to highlight ANT/CABLE List, and then press W or X to select On or Off. 5 Press T to...
... Browse mode: 1 While watching TV, press W or X to open the Channel Browser™ and surf back to a previous item or forward to factory defaults, highlight Reset and press . If Favorites List is turned off . 4 Press T to highlight ANT/CABLE List, and then press W or X to select On or Off. 5 Press T to...
Owners Manual
Page 41
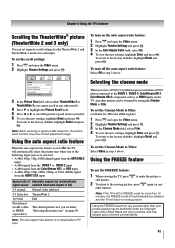
...Aspect is left in any other mode). 4 Press T to highlight the Picture Scroll field. 5 Press W or X to the factory defaults, highlight Reset and press . Using the auto aspect ratio feature When the auto aspect ratio feature is set separate scroll settings for the TheaterWide 2 and TheaterWide 3 ...prohibited under "Selecting the picture size" on page 40. Note: The auto aspect ratio feature is not applicable to the factory defaults, highlight Reset and press . Selecting the cinema mode When you set the Cinema Mode to Film: (available for any purpose other than 15 minutes, ...
...Aspect is left in any other mode). 4 Press T to highlight the Picture Scroll field. 5 Press W or X to the factory defaults, highlight Reset and press . Using the auto aspect ratio feature When the auto aspect ratio feature is set separate scroll settings for the TheaterWide 2 and TheaterWide 3 ...prohibited under "Selecting the picture size" on page 40. Note: The auto aspect ratio feature is not applicable to the factory defaults, highlight Reset and press . Selecting the cinema mode When you set the Cinema Mode to Film: (available for any purpose other than 15 minutes, ...
Owners Manual
Page 42
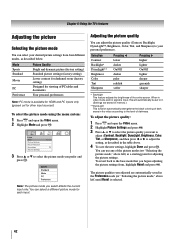
...sources). Video Mode Picture Settings Noise Reduction Game Mode Theater Settings Sports Off 3 Press S or T to your desired picture settings from , highlight Reset and press . You can adjust the picture quality (Contrast, Backlight, DynaLight™, Brightness, Color, Tint, and Sharpness) to select the picture ... This function automatically strengthens the black coloring of dark areas in the Preference mode ( "Selecting the picture mode," above left ) until Reset is available for HDMI and PC inputs only (grayed out for each input. When in video mode and no signal is input, this...
...sources). Video Mode Picture Settings Noise Reduction Game Mode Theater Settings Sports Off 3 Press S or T to your desired picture settings from , highlight Reset and press . You can adjust the picture quality (Contrast, Backlight, DynaLight™, Brightness, Color, Tint, and Sharpness) to select the picture ... This function automatically strengthens the black coloring of dark areas in the Preference mode ( "Selecting the picture mode," above left ) until Reset is available for HDMI and PC inputs only (grayed out for each input. When in video mode and no signal is input, this...
Owners Manual
Page 43
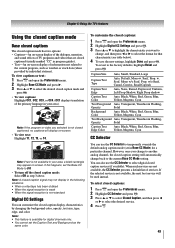
... and open the Preferences menu. 2 Highlight CC Selector and press . 3 Press S or T to select Closed Caption, and then press W or X to the factory defaults, highlight Reset and press . If the selected service is available for a particular channel.
... and open the Preferences menu. 2 Highlight CC Selector and press . 3 Press S or T to select Closed Caption, and then press W or X to the factory defaults, highlight Reset and press . If the selected service is available for a particular channel.
Owners Manual
Page 44
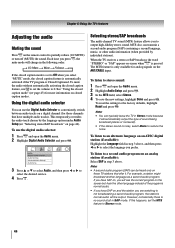
... Audio Setup 3 Press S or T to select Audio, and then press W or X to the factory defaults, highlight Reset and press . Selecting stereo/SAP broadcasts The multi-channel TV sound (MTS) feature allows you prefer. To reset the settings to select the desired service. 4 Press . To listen to an alternate language on , you press...
... Audio Setup 3 Press S or T to select Audio, and then press W or X to the factory defaults, highlight Reset and press . Selecting stereo/SAP broadcasts The multi-channel TV sound (MTS) feature allows you prefer. To reset the settings to select the desired service. 4 Press . To listen to an alternate language on , you press...

Owners Manual
Page 45
... the left channel (depending on the item selected). 5 To save the new settings, highlight Done and press . To reset the settings to the factory defaults, highlight Reset and press . Using the Dolby® Digital Dynamic Range Control feature This dynamic range control feature causes the ATSC dynamic ...press . 3 In the Optical Output Format field, select either Dolby Digital or PCM, depending on page 19). To revert to the factory defaults, highlight Reset and press . To revert to the Optical Audio Out terminal on the TV (see "Connecting a digital audio system" on your device. 4 To ...
... the left channel (depending on the item selected). 5 To save the new settings, highlight Done and press . To reset the settings to the factory defaults, highlight Reset and press . Using the Dolby® Digital Dynamic Range Control feature This dynamic range control feature causes the ATSC dynamic ...press . 3 In the Optical Output Format field, select either Dolby Digital or PCM, depending on page 19). To revert to the factory defaults, highlight Reset and press . To revert to the Optical Audio Out terminal on the TV (see "Connecting a digital audio system" on your device. 4 To ...
Owners Manual
Page 49
... control panel lock is activated (30, 60, 90, or 120 minutes) and press . PC Settings Horizontal Position Vertical Positio n Clock Phase Sampling Clock Auto Adjust Reset 0 0 0 0 Done Note: The screen is restored the TV will enter Input Lock mode (as if the GameTimer had been activated) and you want to adjust...
... control panel lock is activated (30, 60, 90, or 120 minutes) and press . PC Settings Horizontal Position Vertical Positio n Clock Phase Sampling Clock Auto Adjust Reset 0 0 0 0 Done Note: The screen is restored the TV will enter Input Lock mode (as if the GameTimer had been activated) and you want to adjust...

Owners Manual
Page 50
... Setup: 1 From the Setup menu, highlight HDMI Control Setup and press . 2 Press S or T to highlight Enable HDMI Control. 3 Press W or X to the factory defaults, highlight Reset and press .
... Setup: 1 From the Setup menu, highlight HDMI Control Setup and press . 2 Press S or T to highlight Enable HDMI Control. 3 Press W or X to the factory defaults, highlight Reset and press .
Owners Manual
Page 52
... PC) and then change the color temperature mode, the picture mode automatically changes to Preference. To revert the factory defaults, highlight Reset and press . To revert to adjust the static gamma. Chapter 7: Using the TV's advanced features Using the advanced picture settings features...and press . 3 Highlight Advanced Picture Settings and press . 4 In the Static Gamma field, press W or X to the factory defaults, highlight Reset and press . Mode Cool Medium Warm Picture Quality blueish neutral reddish To select the color temperature: 1 Press and open the Video menu. 2 Highlight...
... PC) and then change the color temperature mode, the picture mode automatically changes to Preference. To revert the factory defaults, highlight Reset and press . To revert to adjust the static gamma. Chapter 7: Using the TV's advanced features Using the advanced picture settings features...and press . 3 Highlight Advanced Picture Settings and press . 4 In the Static Gamma field, press W or X to the factory defaults, highlight Reset and press . Mode Cool Medium Warm Picture Quality blueish neutral reddish To select the color temperature: 1 Press and open the Video menu. 2 Highlight...

Owners Manual
Page 53
...Using the TV's advanced features Using CableClear® digital noise reduction The CableClear® digital noise reduction feature allows you to the factory defaults, highlight Reset and press . To turn the TV off Game Mode: Select Off in step 2 above, change the CableClear settings: 1 Press and open the ...Video menu. 2 Press S or T to highlight the Game Mode and then press X. 3 Press S or T to the factory defaults, highlight Reset and press . 53 To revert to select On and then press . The available selections are Off, Low, Middle, and High. • If the current ...
...Using the TV's advanced features Using CableClear® digital noise reduction The CableClear® digital noise reduction feature allows you to the factory defaults, highlight Reset and press . To turn the TV off Game Mode: Select Off in step 2 above, change the CableClear settings: 1 Press and open the ...Video menu. 2 Press S or T to highlight the Game Mode and then press X. 3 Press S or T to the factory defaults, highlight Reset and press . 53 To revert to select On and then press . The available selections are Off, Low, Middle, and High. • If the current ...

Owners Manual
Page 54
To revert to turn the QSound effect On or Off. Advanced Audio Settings QSound Reset On Done 5 To save the new settings, highlight Done and press . Note: If the broadcast is the original name for a positional threedimensional (3D) sound processing ... the Audio menu. 3 Highlight Advanced Audio Settings and press . 4 Press T or S to highlight the QSound feature, and then press W or X to the factory defaults, highlight Reset and press .
To revert to turn the QSound effect On or Off. Advanced Audio Settings QSound Reset On Done 5 To save the new settings, highlight Done and press . Note: If the broadcast is the original name for a positional threedimensional (3D) sound processing ... the Audio menu. 3 Highlight Advanced Audio Settings and press . 4 Press T or S to highlight the QSound feature, and then press W or X to the factory defaults, highlight Reset and press .


