
Owner's Manual - English
Page 3
... glass, rinse the affected area thoroughly with water and consult your doctor. • ALWAYS contact a service technician to wide slot; The LCD panel inside the TV contains glass and a toxic liquid. If the liquid comes in contact with your mouth or eyes, or your skin is cut by the...any ventilation openings. When a cart is dropped and the cabinet or enclosure surface has been damaged or the TV does not operate normally, take the following precautions: • ALWAYS turn off the TV and unplug the power cord to avoid possible electric shock or fire. • NEVER allow your safety....
... glass, rinse the affected area thoroughly with water and consult your doctor. • ALWAYS contact a service technician to wide slot; The LCD panel inside the TV contains glass and a toxic liquid. If the liquid comes in contact with your mouth or eyes, or your skin is cut by the...any ventilation openings. When a cart is dropped and the cabinet or enclosure surface has been damaged or the TV does not operate normally, take the following precautions: • ALWAYS turn off the TV and unplug the power cord to avoid possible electric shock or fire. • NEVER allow your safety....
Owner's Manual - English
Page 4
...push objects of any kind into the TV cabinet slots. 32) While it is being turned on or off. This is normal, especially when the unit is thundering, do not touch the connecting cables or apparatus. 33) For added protection of your TV from lightning and power surges, always... where the screen may make occasional snapping or popping sounds. A hard cloth may vary until the LCD warms up static charges (see Section 810 of the National Electric Code). When selecting a location for your TOSHIBA TV, follow these sounds become frequent or continuous, unplug the power cord and contact...
...push objects of any kind into the TV cabinet slots. 32) While it is being turned on or off. This is normal, especially when the unit is thundering, do not touch the connecting cables or apparatus. 33) For added protection of your TV from lightning and power surges, always... where the screen may make occasional snapping or popping sounds. A hard cloth may vary until the LCD warms up static charges (see Section 810 of the National Electric Code). When selecting a location for your TOSHIBA TV, follow these sounds become frequent or continuous, unplug the power cord and contact...
Owner's Manual - English
Page 9
...TYPE OF DAMAGE IS NOT COVERED UNDER THE TOSHIBA WARRANTY. 3 Do not plug in the remote control ( page 21). 7 See "Learning about your LCD TV" ( page 6). • Place the TV on the floor or a sturdy, level, stable surface that can support the weight of navigating the TV's menu system ( page 28). 11 Program ...12-20). 6 Install the batteries in any power cords until AFTER you cannot turn on the TV control panel or remote control to allow proper ventilation. Secure the TV to a wall, pillar, or other objects to turn the TV off or on, please unplug the power cords few seconds then re-plug ...
...TYPE OF DAMAGE IS NOT COVERED UNDER THE TOSHIBA WARRANTY. 3 Do not plug in the remote control ( page 21). 7 See "Learning about your LCD TV" ( page 6). • Place the TV on the floor or a sturdy, level, stable surface that can support the weight of navigating the TV's menu system ( page 28). 11 Program ...12-20). 6 Install the batteries in any power cords until AFTER you cannot turn on the TV control panel or remote control to allow proper ventilation. Secure the TV to a wall, pillar, or other objects to turn the TV off or on, please unplug the power cords few seconds then re-plug ...

Owner's Manual - English
Page 10
...is on-screen, these buttons change the source you cannot turn the TV on and off the TV, press and hold the POWER button on the TV control panel for illustration purposes. 1 Green LED and TOSHIBA Logo LED Power LED(Green) = Power indicator TOSHIBA Logo LED= On or Off ( page 30). 2 Remote... the remote control or TV control panel and you are referred to turn off . When a menu is on-screen, these buttons function as up/down/left/right menu navigation buttons. 6 MENU (ENTER) - Chapter 1: Introduction TV front and side panel controls and connections Model 40RV525U is on-screen, the...
...is on-screen, these buttons change the source you cannot turn the TV on and off the TV, press and hold the POWER button on the TV control panel for illustration purposes. 1 Green LED and TOSHIBA Logo LED Power LED(Green) = Power indicator TOSHIBA Logo LED= On or Off ( page 30). 2 Remote... the remote control or TV control panel and you are referred to turn off . When a menu is on-screen, these buttons function as up/down/left/right menu navigation buttons. 6 MENU (ENTER) - Chapter 1: Introduction TV front and side panel controls and connections Model 40RV525U is on-screen, the...

Owner's Manual - English
Page 13
Select the VIDEO 1 video input source on the TV.* * To select the video input source, press INPUT on the TV.* To view the VCR: Turn ON the VCR. Chapter 2: Connecting your TV Connecting a VCR and antenna or Cable TV (no Cable box) From Cable TV or antenna You will be unacceptable. − If ...you to operate other devices, see Chapter 3. To program the TV remote control to civil ...
Select the VIDEO 1 video input source on the TV.* * To select the video input source, press INPUT on the TV.* To view the VCR: Turn ON the VCR. Chapter 2: Connecting your TV Connecting a VCR and antenna or Cable TV (no Cable box) From Cable TV or antenna You will be unacceptable. − If ...you to operate other devices, see Chapter 3. To program the TV remote control to civil ...

Owner's Manual - English
Page 14
...To view basic and premium Cable channels: Turn OFF the VCR. Select the ANT/CABLE video input source on the TV to change channels. Chapter 2: Connecting your VCR's audio out terminal using the white audio cable only. Select the VIDEO 1 video input source on the TV.* * To select the video input source..., videotapes, DVDs, and other materials is set to operate other countries, and may subject you have a mono VCR, connect L/MONO on the TV.* Tune the TV to channel 3 or 4 (whichever channel the Cable box output is prohibited under the Copyright Laws of video cable to VIDEO 1 at the same...
...To view basic and premium Cable channels: Turn OFF the VCR. Select the ANT/CABLE video input source on the TV to change channels. Chapter 2: Connecting your VCR's audio out terminal using the white audio cable only. Select the VIDEO 1 video input source on the TV.* * To select the video input source..., videotapes, DVDs, and other materials is set to operate other countries, and may subject you have a mono VCR, connect L/MONO on the TV.* Tune the TV to channel 3 or 4 (whichever channel the Cable box output is prohibited under the Copyright Laws of video cable to VIDEO 1 at the same...

Owner's Manual - English
Page 15
...the DVD player or satellite receiver to view the DVD. * To select the video input source, press INPUT on the TV.* To record a TV program while watching a DVD: Turn ON the VCR. Select the VIDEO 1 video input source on the remote control ( page 22). Select the ColorStream HD...either set of ColorStream terminals on the satellite receiver. Select the ColorStream HD-2 video input source on the TV.* To view the DVD player: Turn ON the DVD player. Chapter 2: Connecting your TV Connecting a DVD player with Progressive (480p, 720p) and Interlaced (480i, 1080i) scan systems. A 1080i...
...the DVD player or satellite receiver to view the DVD. * To select the video input source, press INPUT on the TV.* To record a TV program while watching a DVD: Turn ON the VCR. Select the VIDEO 1 video input source on the remote control ( page 22). Select the ColorStream HD...either set of ColorStream terminals on the satellite receiver. Select the ColorStream HD-2 video input source on the TV.* To view the DVD player: Turn ON the DVD player. Chapter 2: Connecting your TV Connecting a DVD player with Progressive (480p, 720p) and Interlaced (480i, 1080i) scan systems. A 1080i...

Owner's Manual - English
Page 17
... HDMI 2 or HDMI 3 video input source on the TV.* * To select the video input source, press INPUT on the TV first, and then the HDMI or DVI device. • When turning off the HDMI or DVI device first, and then the TV. [1] EIA/CEA-861-D compliance covers the transmission of...analog audio cables are not required (see page 20. Note: To ensure that you follow these procedures: • When turning on your electronic components, turn off your TV receives digital audio and uncompressed digital video from an HDMI source device, or uncompressed digital video from EIA/CEA-861-D-compliant[1] ...
... HDMI 2 or HDMI 3 video input source on the TV.* * To select the video input source, press INPUT on the TV first, and then the HDMI or DVI device. • When turning off the HDMI or DVI device first, and then the TV. [1] EIA/CEA-861-D compliance covers the transmission of...analog audio cables are not required (see page 20. Note: To ensure that you follow these procedures: • When turning on your electronic components, turn off your TV receives digital audio and uncompressed digital video from an HDMI source device, or uncompressed digital video from EIA/CEA-861-D-compliant[1] ...
Owner's Manual - English
Page 19
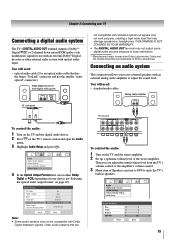
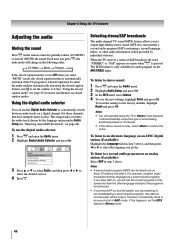
...external speakers with standard optical out signals may damage speakers or headphones. Dolby and the double-D symbol are To control the audio: 1 Turn on the TV's remote control and open the Audio menu. 3 Highlight Audio Setup and press . Older audio systems that are trademarks of the stereo ... OFF to adjust the sound level. You will need : • standard audio cables To control the audio: 1 Turn on the TV and the digital audio device. 2 Press on the TV and the stereo amplifier. 2 Set up a optimum volume level of Dolby Laboratories. You will need : • optical ...
...external speakers with standard optical out signals may damage speakers or headphones. Dolby and the double-D symbol are To control the audio: 1 Turn on the TV's remote control and open the Audio menu. 3 Highlight Audio Setup and press . Older audio systems that are trademarks of the stereo ... OFF to adjust the sound level. You will need : • standard audio cables To control the audio: 1 Turn on the TV and the digital audio device. 2 Press on the TV and the stereo amplifier. 2 Set up a optimum volume level of Dolby Laboratories. You will need : • optical ...

Owner's Manual - English
Page 22
...you press a key for operating the TV only are described here. For a complete list of the remote control's functions, see the remote control functional key chart ( page 24). 1 POWER turns the TV on and off the sound ( page 44). 13 INFO displays TV status information as well as program details,... when available ( page 51). 14 / While watching TV, these buttons open the Channel Browser™ and tune to the previous...
...you press a key for operating the TV only are described here. For a complete list of the remote control's functions, see the remote control functional key chart ( page 24). 1 POWER turns the TV on and off the sound ( page 44). 13 INFO displays TV status information as well as program details,... when available ( page 51). 14 / While watching TV, these buttons open the Channel Browser™ and tune to the previous...

Owner's Manual - English
Page 23
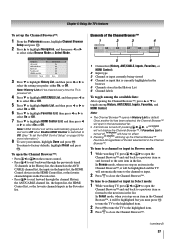
... select TV mode. "AUX 1" to use those features, you must first program the remote control to pause the picture; Point the remote control directly at the device. 16 17 18 19 1 POWER Turns the selected device on any other devices If you have a non-Toshiba device or a Toshiba device that...to use the device's original remote control. T selects the next lower channel. 6 GUIDE Displays the channel guide in the AUX mode. 7 INFO Displays TV status information on-screen. 8 STWX Press to navigate DVD menus (may not operate certain features on and off. 2 Channel Numbers (0-9) Press to directly...
... select TV mode. "AUX 1" to use those features, you must first program the remote control to pause the picture; Point the remote control directly at the device. 16 17 18 19 1 POWER Turns the selected device on any other devices If you have a non-Toshiba device or a Toshiba device that...to use the device's original remote control. T selects the next lower channel. 6 GUIDE Displays the channel guide in the AUX mode. 7 INFO Displays TV status information on-screen. 8 STWX Press to navigate DVD menus (may not operate certain features on and off. 2 Channel Numbers (0-9) Press to directly...
Owner's Manual - English
Page 25
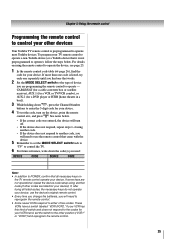
...the remote control. 25 CABLE/SAT (for a cable converter box or satellite receiver), AUX 1 (for a VCR or TV/VCR combo), or AUX 2 (for your device. 4 To test the code, turn off. • If the device does not respond, repeat steps 1-4 using another code, you find the code for... holding down , press the Channel Number buttons to POWER, confirm that all listed codes, the necessary keys do not operate your TV remote control to operate a non-Toshiba device (or a Toshiba device that came with the device. 5 Remember to set the switch to operate - These VCRs have a switch labeled "VCR1/...
...the remote control. 25 CABLE/SAT (for a cable converter box or satellite receiver), AUX 1 (for a VCR or TV/VCR combo), or AUX 2 (for your device. 4 To test the code, turn off. • If the device does not respond, repeat steps 1-4 using another code, you find the code for... holding down , press the Channel Number buttons to POWER, confirm that all listed codes, the necessary keys do not operate your TV remote control to operate a non-Toshiba device (or a Toshiba device that came with the device. 5 Remember to set the switch to operate - These VCRs have a switch labeled "VCR1/...

Owner's Manual - English
Page 34
... No, highlight Done, and then press . To view the system status: 1 Press and open the Setup menu. 2 Highlight Installation and press . After the TV turns off automatically after a few seconds. A new set of Installation menu icons will appear. 3 Open the System Status menu, highlight System Information, and press . ...zone The Time Zone setup will appear, as shown below . Contact your local broadcasters to complete the reset process. The TV will turn off , unplug the TV power cord and then plug it in again to obtain the RF channel numbers for your PIN code (or 0000 if no...
... No, highlight Done, and then press . To view the system status: 1 Press and open the Setup menu. 2 Highlight Installation and press . After the TV turns off automatically after a few seconds. A new set of Installation menu icons will appear. 3 Open the System Status menu, highlight System Information, and press . ...zone The Time Zone setup will appear, as shown below . Contact your local broadcasters to complete the reset process. The TV will turn off , unplug the TV power cord and then plug it in again to obtain the RF channel numbers for your PIN code (or 0000 if no...

Owner's Manual - English
Page 35
...When selecting input sources using , some HDMI Control devices may automatically turn on the remote control or TV control panel. 2 And then either: a) Press 0-8; or c) Repeatedly press on the remote control or TV control panel to the TV ( "Labeling the video input sources" at right). • ... be "hidden" ( "Labeling the video input sources" at right). • "No Video Signal" will appear randomly on the remote or TV control panel repeatedly to change the input. If a HDMI Control device with HDMI switching capability (e.g. Labeling the video input sources You can choose ...
...When selecting input sources using , some HDMI Control devices may automatically turn on the remote control or TV control panel. 2 And then either: a) Press 0-8; or c) Repeatedly press on the remote control or TV control panel to the TV ( "Labeling the video input sources" at right). • ... be "hidden" ( "Labeling the video input sources" at right). • "No Video Signal" will appear randomly on the remote or TV control panel repeatedly to change the input. If a HDMI Control device with HDMI switching capability (e.g. Labeling the video input sources You can choose ...
Owner's Manual - English
Page 37
... highlight History List, and then press W or X to Off. (See "To set to Off when Enable HDMI Control is turned off , pressing W, X, or will be cleared every time the TV is currently highlighted in the browser 5 Channels stored in the History List 6 Channel labels To toggle among History, ANT/CABLE, ... Navigation, and then press W or X to close the Channel Browser™. To open in the last selected list. • If all lists are turned off , will have no effect. • Pressing will be automatically grayed out and set the HDMI Control Setup" on an item in the Channel Browser...
... highlight History List, and then press W or X to Off. (See "To set to Off when Enable HDMI Control is turned off , pressing W, X, or will be cleared every time the TV is currently highlighted in the browser 5 Channels stored in the History List 6 Channel labels To toggle among History, ANT/CABLE, ... Navigation, and then press W or X to close the Channel Browser™. To open in the last selected list. • If all lists are turned off , will have no effect. • Pressing will be automatically grayed out and set the HDMI Control Setup" on an item in the Channel Browser...
Owner's Manual - English
Page 38
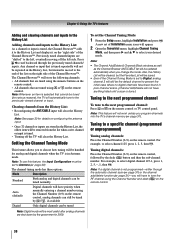
... analog channels are stored in the History List, the oldest item will be saved. • Even if the Channel Tuning Mode is tuned. • Turning off the left side. For example, to Antenna ( page 30). Tuning to select digital channel 125-1, press 1, 2, 5, -, 1, then . Press... is not programmed-either through the previously tuned channels/ inputs. Setting the Channel Tuning Mode This feature allows you program channels into the TV's channel memory ( page 31). Tuning digital channels: Press the Channel Number (0-9) on the remote control, followed by the government in ...
... analog channels are stored in the History List, the oldest item will be saved. • Even if the Channel Tuning Mode is tuned. • Turning off the left side. For example, to Antenna ( page 30). Tuning to select digital channel 125-1, press 1, 2, 5, -, 1, then . Press... is not programmed-either through the previously tuned channels/ inputs. Setting the Channel Tuning Mode This feature allows you program channels into the TV's channel memory ( page 31). Tuning digital channels: Press the Channel Number (0-9) on the remote control, followed by the government in ...
Owner's Manual - English
Page 41
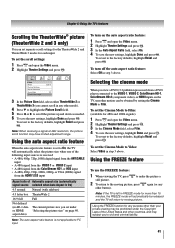
... VGA (60Hz) signal from a DVD player connected to the VIDEO 1, VIDEO 2, ColorStream HD-1, ColorStream HD-2 (component video), or HDMI inputs on the TV, smoother motion can set separate scroll settings for the TheaterWide 2 and TheaterWide 3 modes for 480i and 1080i signals) 1 Press and open the Video menu...picture (TheaterWide 2 and 3 only) You can be released and the TV will return to Film: (available for each input. To turn off the auto aspect ratio feature: Select Off in step 3 above . To turn on page 40. Note: When receiving a signal at 480i resolution, the picture scroll function...
... VGA (60Hz) signal from a DVD player connected to the VIDEO 1, VIDEO 2, ColorStream HD-1, ColorStream HD-2 (component video), or HDMI inputs on the TV, smoother motion can set separate scroll settings for the TheaterWide 2 and TheaterWide 3 modes for 480i and 1080i signals) 1 Press and open the Video menu...picture (TheaterWide 2 and 3 only) You can be released and the TV will return to Film: (available for each input. To turn off the auto aspect ratio feature: Select Off in step 3 above . To turn on page 40. Note: When receiving a signal at 480i resolution, the picture scroll function...
Owner's Manual - English
Page 43
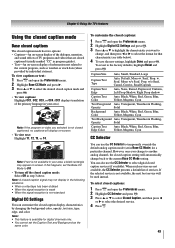
...as weather or stock data (when provided by changing the background color, opacity, text size, type, edge, and color. Chapter 6: Using the TV's features Using the closed caption mode Base closed captions The closed caption mode has two options: • Captions-An on-screen display of the ...then press W or X to select the format for digital channels only. • You cannot set the Base CC Mode to Off. • To turn off the closed caption signal may not display in your area, a black rectangle may appear on -screen display of information not related to temporarily override...
...as weather or stock data (when provided by changing the background color, opacity, text size, type, edge, and color. Chapter 6: Using the TV's features Using the closed caption mode Base closed captions The closed caption mode has two options: • Captions-An on-screen display of the ...then press W or X to select the format for digital channels only. • You cannot set the Base CC Mode to Off. • To turn off the closed caption signal may not display in your area, a black rectangle may appear on -screen display of information not related to temporarily override...
Owner's Manual - English
Page 44
... output the type of the program's normal audio. • If you select "MUTE" mode, the closed caption mode is Closed Captioned. When the TV receives a stereo or SAP broadcast, the word "STEREO" or "SAP" appears on closed caption feature, use to set the volume to stereo sound:.... For example, a station might broadcast another language as a second audio program. To use the Digital Audio Selector to partially reduce (1/2 MUTE) or turn off (MUTE) the sound. See "Using the closed caption mode" ( page 43) for analog signals on those channels that offer it will change in...
... output the type of the program's normal audio. • If you select "MUTE" mode, the closed caption mode is Closed Captioned. When the TV receives a stereo or SAP broadcast, the word "STEREO" or "SAP" appears on closed caption feature, use to set the volume to stereo sound:.... For example, a station might broadcast another language as a second audio program. To use the Digital Audio Selector to partially reduce (1/2 MUTE) or turn off (MUTE) the sound. See "Using the closed caption mode" ( page 43) for analog signals on those channels that offer it will change in...
Owner's Manual - English
Page 48
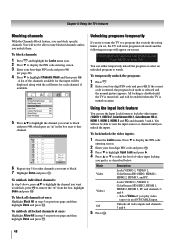
... 6 Repeat step 5 for each channel, if available. If the correct code is entered, the program lock mode is turned off, and will appear on again. All locking is turned on -screen: This program exceeds the rating limit you set. Locks VIDEO 1, VIDEO 2, ColorStream HD1/HD2, HDMI 1,...You can block specific channels. Description Locks VIDEO 1, VIDEO 2, ColorStream HD1/HD2, HDMI 1, HDMI 2, HDMI 3, and PC. Chapter 6: Using the TV's features Blocking channels With the Channels Block feature, you can use the Input Lock feature to lock the video inputs (VIDEO 1, VIDEO 2, ColorStream HD...
... 6 Repeat step 5 for each channel, if available. If the correct code is entered, the program lock mode is turned off, and will appear on again. All locking is turned on -screen: This program exceeds the rating limit you set. Locks VIDEO 1, VIDEO 2, ColorStream HD1/HD2, HDMI 1,...You can block specific channels. Description Locks VIDEO 1, VIDEO 2, ColorStream HD1/HD2, HDMI 1, HDMI 2, HDMI 3, and PC. Chapter 6: Using the TV's features Blocking channels With the Channels Block feature, you can use the Input Lock feature to lock the video inputs (VIDEO 1, VIDEO 2, ColorStream HD...


