Printable Spec Sheet
Page 2
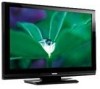
... remote control for the applicable device. 4If you decide to 10 times that is a powerful picture with deep blacks for high quality home theater. The result is 7 to wall mount your Toshiba television...40.0" LCD PANEL: Resolution Dynamic Backlight Control Response Time 1080p DynaLightTM CineSpeedTM VIDEO: Video Processor Video Scan Rate Cinema Mode 24fps1 TheaterWide® Modes Color Temperature Control Native ModeTM 10 Bit 60Hz 3:2 Pull-Down • • • AUDIO: Speaker System Sound Enhancement Mute/Half Mute Thin-Line QSound® • CONVENIENCE: Built-in TV...
... remote control for the applicable device. 4If you decide to 10 times that is a powerful picture with deep blacks for high quality home theater. The result is 7 to wall mount your Toshiba television...40.0" LCD PANEL: Resolution Dynamic Backlight Control Response Time 1080p DynaLightTM CineSpeedTM VIDEO: Video Processor Video Scan Rate Cinema Mode 24fps1 TheaterWide® Modes Color Temperature Control Native ModeTM 10 Bit 60Hz 3:2 Pull-Down • • • AUDIO: Speaker System Sound Enhancement Mute/Half Mute Thin-Line QSound® • CONVENIENCE: Built-in TV...
Owners Manual
Page 7
...remote control to control your other devices ........23 Remote Control functional key chart 24 Programming the remote control to control your other devices 25 Remote control codes 26 Chapter 4: Menu layout and navigation 28 Main menu layout 28 Setup/Installation menu layout 29 Navigating the menu system 29 Chapter 5: Setting up your TV 30 Selecting the menu language 30 TOSHIBA... 57 Acceptable signal formats for PC IN and HDMI terminals 58 Limited United States Warranty for LCD Televisions 26" and Larger 59 Limited Canadian Warranty for Toshiba Brand Flat Panel Televisions 60 7
...remote control to control your other devices ........23 Remote Control functional key chart 24 Programming the remote control to control your other devices 25 Remote control codes 26 Chapter 4: Menu layout and navigation 28 Main menu layout 28 Setup/Installation menu layout 29 Navigating the menu system 29 Chapter 5: Setting up your TV 30 Selecting the menu language 30 TOSHIBA... 57 Acceptable signal formats for PC IN and HDMI terminals 58 Limited United States Warranty for LCD Televisions 26" and Larger 59 Limited Canadian Warranty for Toshiba Brand Flat Panel Televisions 60 7
Owners Manual
Page 9
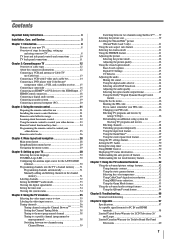
... immovable structure ( page 3). • Place the TV in the remote control ( page 21). 7 See "Learning about your LCD TV" ( page 6). • Place the TV on the floor or a sturdy, level, stable surface that can support the weight of the unit. THIS TYPE OF DAMAGE IS NOT COVERED UNDER THE TOSHIBA WARRANTY. 3 Do not plug in any power...
... immovable structure ( page 3). • Place the TV in the remote control ( page 21). 7 See "Learning about your LCD TV" ( page 6). • Place the TV on the floor or a sturdy, level, stable surface that can support the weight of the unit. THIS TYPE OF DAMAGE IS NOT COVERED UNDER THE TOSHIBA WARRANTY. 3 Do not plug in any power...
Owners Manual
Page 10
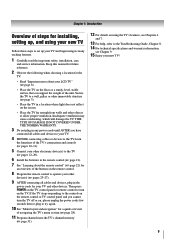
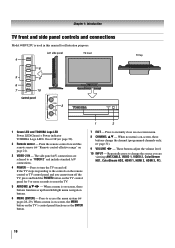
... Power LED(Green) = Power indicator TOSHIBA Logo LED= On or Off ( page 30). 2 Remote sensor - When a menu is on-screen, the MENU button on page 21). 3 VIDEO-2 IN - Chapter 1: Introduction TV front and side panel controls and connections Model 40RV525U is used in this remote sensor ( "Remote control effective range" on the TV's control panel functions as the ENTER...
... Power LED(Green) = Power indicator TOSHIBA Logo LED= On or Off ( page 30). 2 Remote sensor - When a menu is on-screen, the MENU button on page 21). 3 VIDEO-2 IN - Chapter 1: Introduction TV front and side panel controls and connections Model 40RV525U is used in this remote sensor ( "Remote control effective range" on the TV's control panel functions as the ENTER...
Owners Manual
Page 13
... terminal using the white audio cable only. Select the VIDEO 1 video input source on the TV.* * To select the video input source, press INPUT on the TV.* To view the VCR: Turn ON the VCR. To program the TV remote control to VIDEO 1 at the same time or the picture performance will need: • coaxial...
... terminal using the white audio cable only. Select the VIDEO 1 video input source on the TV.* * To select the video input source, press INPUT on the TV.* To view the VCR: Turn ON the VCR. To program the TV remote control to VIDEO 1 at the same time or the picture performance will need: • coaxial...

Owners Manual
Page 14
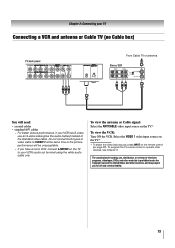
... a mono VCR, connect L/MONO on the remote control ( page 22). Use the Cable box controls to operate other devices, see Chapter 3. Select the ANT/CABLE video input source on the TV. Select the VIDEO 1 video input source on the TV.* * To select the video input source, ...performance will provide better picture performance than a standard (composite) video cable. The unauthorized recording, use the remote control to program or access certain features on the TV.* Tune the TV to channel 3 or 4 (whichever channel the Cable box output is prohibited under the Copyright Laws of ...
... a mono VCR, connect L/MONO on the remote control ( page 22). Use the Cable box controls to operate other devices, see Chapter 3. Select the ANT/CABLE video input source on the TV. Select the VIDEO 1 video input source on the TV.* * To select the video input source, ...performance will provide better picture performance than a standard (composite) video cable. The unauthorized recording, use the remote control to program or access certain features on the TV.* Tune the TV to channel 3 or 4 (whichever channel the Cable box output is prohibited under the Copyright Laws of ...
Owners Manual
Page 15
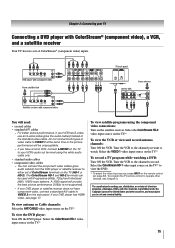
...channels: Select the ANT/CABLE video input source on the TV.* To record a TV program while watching a DVD: Turn ON the VCR. Select the VIDEO 1 video input source on the TV.* To view the DVD player: Turn ON the DVD player. To program the TV remote control to view the DVD. * To select the video ...input source, press INPUT on the remote control ( page 22). If your DVD player has HDMI video, see Chapter...
...channels: Select the ANT/CABLE video input source on the TV.* To record a TV program while watching a DVD: Turn ON the VCR. Select the VIDEO 1 video input source on the TV.* To view the DVD player: Turn ON the DVD player. To program the TV remote control to view the DVD. * To select the video ...input source, press INPUT on the remote control ( page 22). If your DVD player has HDMI video, see Chapter...

Owners Manual
Page 16
To program the TV remote control to VIDEO 1 on the TV back instead of the VIDEO 2 on the remote control ( page 22). Chapter 2: Connecting your TV Connecting a camcorder You will need: • standard A/V cables − For better picture performance, if your camcorder has S-video, connect an S-video cable (plus the audio cables) to operate other devices, see Chapter 3. 16 Camcorder VIDEO AUDIO OUT L R VIDEO 2 inputs on TV side panel To view the camcorder video: Select the VIDEO 2 video input source on the TV.* * To select the video input source, press INPUT on the TV side panel.
To program the TV remote control to VIDEO 1 on the TV back instead of the VIDEO 2 on the remote control ( page 22). Chapter 2: Connecting your TV Connecting a camcorder You will need: • standard A/V cables − For better picture performance, if your camcorder has S-video, connect an S-video cable (plus the audio cables) to operate other devices, see Chapter 3. 16 Camcorder VIDEO AUDIO OUT L R VIDEO 2 inputs on TV side panel To view the camcorder video: Select the VIDEO 2 video input source on the TV.* * To select the video input source, press INPUT on the TV side panel.

Owners Manual
Page 17
... required (see page 58. Note: To ensure that some devices may not work properly. − HDMI cable transfers both video and audio. To program the TV remote control to accept HDCP (High-Bandwidth Digital-Content Protection) program material in digital form from a DVI (Digital Visual Interface) source device. The HDMI input can accept...
... required (see page 58. Note: To ensure that some devices may not work properly. − HDMI cable transfers both video and audio. To program the TV remote control to accept HDCP (High-Bandwidth Digital-Content Protection) program material in digital form from a DVI (Digital Visual Interface) source device. The HDMI input can accept...
Owners Manual
Page 18
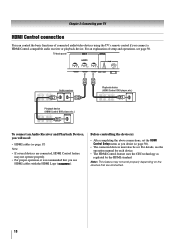
... uses the CEC technology as you use HDMI cables with the HDMI Logo ( ). For an explanation of connected audio/video devices using the TV's remote control if you connect a HDMI Control compatible audio receiver or playback device. For details, see page 50. Note : This feature may not work properly depending on the devices that...
... uses the CEC technology as you use HDMI cables with the HDMI Logo ( ). For an explanation of connected audio/video devices using the TV's remote control if you connect a HDMI Control compatible audio receiver or playback device. For details, see page 50. Note : This feature may not work properly depending on the devices that...
Owners Manual
Page 19
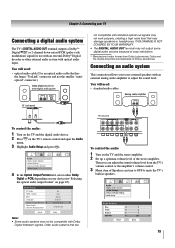
...the stereo amplifier. 2 Set up a optimum volume level of the stereo amplifier. Dolby and the double-D symbol are To control the audio: 1 Turn on the TV's remote control and open the Audio menu. 3 Highlight Audio Setup and press . Then you to use with an external Dolby® Digital... decoder or other external audio system with an external analog audio amplifier to mute the TV's built in speakers. 19 Chapter 2: Connecting...
...the stereo amplifier. 2 Set up a optimum volume level of the stereo amplifier. Dolby and the double-D symbol are To control the audio: 1 Turn on the TV's remote control and open the Audio menu. 3 Highlight Audio Setup and press . Then you to use with an external Dolby® Digital... decoder or other external audio system with an external analog audio amplifier to mute the TV's built in speakers. 19 Chapter 2: Connecting...

Owners Manual
Page 21
... for use Your TV remote control can program the TV remote control so it will prevent battery acid from the remote control if they are dead or if the remote control is preprogrammed to match the + and - If you have a non-Toshiba device or a Toshiba device that the remote control is no obstruction between the remote control and the TV. Chapter 3: Using the remote control Preparing the remote control for an...
... for use Your TV remote control can program the TV remote control so it will prevent battery acid from the remote control if they are dead or if the remote control is preprogrammed to match the + and - If you have a non-Toshiba device or a Toshiba device that the remote control is no obstruction between the remote control and the TV. Chapter 3: Using the remote control Preparing the remote control for an...

Owners Manual
Page 22
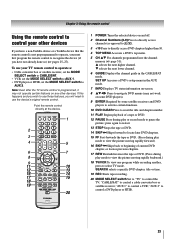
... is used for a function that is on-screen, these buttons select or adjust programming menus. (Also see the remote control functional key chart ( page 24). 1 POWER turns the TV on the TV front will be illuminated. 2 FREEZE freezes the picture. adjusts the volume level. 9 FAV BROWSER accesses the Favorites ... ( page 37). (Also see "Arrow buttons.") 15 Arrow buttons (STWX) When a menu is not available. 22 Press again to control the TV. For a complete list of the remote control's functions, see / .) 16 ENTER activates highlighted items in the main menu system. 17 MENU accesses the main...
... is used for a function that is on-screen, these buttons select or adjust programming menus. (Also see the remote control functional key chart ( page 24). 1 POWER turns the TV on the TV front will be illuminated. 2 FREEZE freezes the picture. adjusts the volume level. 9 FAV BROWSER accesses the Favorites ... ( page 37). (Also see "Arrow buttons.") 15 Arrow buttons (STWX) When a menu is not available. 22 Press again to control the TV. For a complete list of the remote control's functions, see / .) 16 ENTER activates highlighted items in the main menu system. 17 MENU accesses the main...
Owners Manual
Page 23
... and you wish to use those features, you will need to use your other devices If you have a non-Toshiba device or a Toshiba device that the remote control is programmed, it may not work on and off. 2 Channel Numbers (0-9) Press to directly access channels (as opposed...devices. Note: Even after the TV remote control is not preprogrammed to operate, you must first program the remote control to recognize the device (if you have not already done so) ( pages 25-27). Chapter 3: Using the remote control Using the remote control to control your TV remote control to operate a: • Cable...
... and you wish to use those features, you will need to use your other devices If you have a non-Toshiba device or a Toshiba device that the remote control is programmed, it may not work on and off. 2 Channel Numbers (0-9) Press to directly access channels (as opposed...devices. Note: Even after the TV remote control is not preprogrammed to operate, you must first program the remote control to recognize the device (if you have not already done so) ( pages 25-27). Chapter 3: Using the remote control Using the remote control to control your TV remote control to operate a: • Cable...
Owners Manual
Page 24
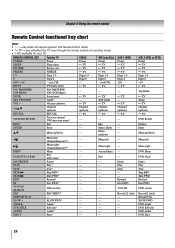
...* --- --- REC REC MENU* --- --- SLOW + SLOW FWD* --- --- EJECT Eject* --- --- AUX 1 (VCR) Power TV TV TV Digit 1-9 Digit 0 100 TV --- TV Channel up /down W Menu left/ Channel Browser™ --- REMOTE CONTROL KEY Toshiba TV CABLE SAT (satellite) POWER Power Power Power SLEEP Sleep timer TV TV PIC SIZE Picture size TV TV FREEZE FREEZE TV TV 1-9 Digit 1-9 Digit 1-9 Digit 1-9 0 Digit 0 Digit 0 Digit 0 100/-/+10 - (sub CH) --- - (sub...
...* --- --- REC REC MENU* --- --- SLOW + SLOW FWD* --- --- EJECT Eject* --- --- AUX 1 (VCR) Power TV TV TV Digit 1-9 Digit 0 100 TV --- TV Channel up /down W Menu left/ Channel Browser™ --- REMOTE CONTROL KEY Toshiba TV CABLE SAT (satellite) POWER Power Power Power SLEEP Sleep timer TV TV PIC SIZE Picture size TV TV FREEZE FREEZE TV TV 1-9 Digit 1-9 Digit 1-9 Digit 1-9 0 Digit 0 Digit 0 Digit 0 100/-/+10 - (sub CH) --- - (sub...
Owners Manual
Page 25
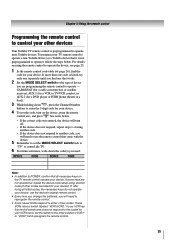
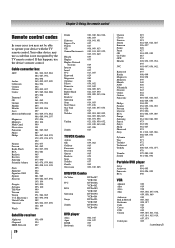
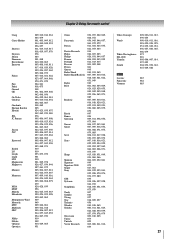
...press the Channel Number buttons to enter the 3-digit code for your device. Chapter 3: Using the remote control Programming the remote control to control your other devices Your Toshiba TV remote control is not preprogrammed to operate), follow the steps below . • If the correct code was entered... does not respond to another code (if other codes are programming the remote control to the type of device you will turn on the TV remote control operate your TV remote control to operate a non-Toshiba device (or a Toshiba device that it , and press . To program your device.
...press the Channel Number buttons to enter the 3-digit code for your device. Chapter 3: Using the remote control Programming the remote control to control your other devices Your Toshiba TV remote control is not preprogrammed to operate), follow the steps below . • If the correct code was entered... does not respond to another code (if other codes are programming the remote control to the type of device you will turn on the TV remote control operate your TV remote control to operate a non-Toshiba device (or a Toshiba device that it , and press . To program your device.
Owners Manual
Page 26
... Memorex Mintek NAD Nakamichi Norcent Onkyo Oritron Panasonic Philips Pioneer Proscan Qwestar RCA Sampo Samsung Sansui Sanyo Sharp Sherwood Sony Sylvania Teac Technics Techwood Toshiba Yamaha Zenith 019 020 021 022, 023, 024, 025 026, 027 028 027 001, 029, 030 087 031 005, 032, 033..., 012, 013, 014, 015, 019, 057, 073 005 (continued) If this happens, use a code that is not recognized by the TV remote control. Cable converter box ABC Archer Cableview Century Citizen Contec Diamond GE Gemini Hamlin Hitachi Jasco Motorola/GI/Jerrold Magnavox Memorex Multi Canal Novavision Panasonic Philco...
... Memorex Mintek NAD Nakamichi Norcent Onkyo Oritron Panasonic Philips Pioneer Proscan Qwestar RCA Sampo Samsung Sansui Sanyo Sharp Sherwood Sony Sylvania Teac Technics Techwood Toshiba Yamaha Zenith 019 020 021 022, 023, 024, 025 026, 027 028 027 001, 029, 030 087 031 005, 032, 033..., 012, 013, 014, 015, 019, 057, 073 005 (continued) If this happens, use a code that is not recognized by the TV remote control. Cable converter box ABC Archer Cableview Century Citizen Contec Diamond GE Gemini Hamlin Hitachi Jasco Motorola/GI/Jerrold Magnavox Memorex Multi Canal Novavision Panasonic Philco...
Owners Manual
Page 27
... 005, 006, 007, 012, 014, 037, 043, 053, 054, 067, 070 010 009 010, 049, 065 031 Chapter 3: Using the remote control Orion Panasonic Pentax Pentex Research Philco Philips Pioneer Portland Proscan Proton Quasar Radio Shack Radio Shack/Realistic Radix RCA Realistic Ricoh Runco Samsung Sansui Sanyo... Scott Sears Sharp Shintom Signature Signature 2000 Singer Sony STS Sylvania Symphonic Tandy Tashiko Tatung Teac Technics Teknika Toshiba Totevision Unitec Unitech Vector Research 054, 057, 062, 065, 068, 072 036, 045, 046, 057, 061, 072, 079 012, 024,...
... 005, 006, 007, 012, 014, 037, 043, 053, 054, 067, 070 010 009 010, 049, 065 031 Chapter 3: Using the remote control Orion Panasonic Pentax Pentex Research Philco Philips Pioneer Portland Proscan Proton Quasar Radio Shack Radio Shack/Realistic Radix RCA Realistic Ricoh Runco Samsung Sansui Sanyo... Scott Sears Sharp Shintom Signature Signature 2000 Singer Sony STS Sylvania Symphonic Tandy Tashiko Tatung Teac Technics Teknika Toshiba Totevision Unitec Unitech Vector Research 054, 057, 062, 065, 068, 072 036, 045, 046, 057, 061, 072, 079 012, 024,...
Owners Manual
Page 28
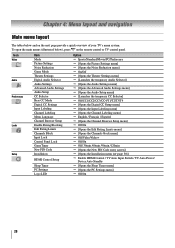
To open the main menus (illustrated below and on the remote control or TV control panel. Chapter 4: Menu layout and navigation Main menu layout The tables below ), press on the next page provide a quick overview of your TV's menu system. Icon Video Audio Preferences Locks Setup Item Mode Picture Settings ... Off/On p Off/ 30min /60min /90min /120min p [Opens the New PIN Code entry screen] p [Opens the Installation menu ( page 30)] p Enable HDMI Control / TV Auto Input Switch / TV Auto Power/ Device Auto Standby p [Opens the Sleep Timer menu] p [Opens the PC Settings menu] p Off/On 28
To open the main menus (illustrated below and on the remote control or TV control panel. Chapter 4: Menu layout and navigation Main menu layout The tables below ), press on the next page provide a quick overview of your TV's menu system. Icon Video Audio Preferences Locks Setup Item Mode Picture Settings ... Off/On p Off/ 30min /60min /90min /120min p [Opens the New PIN Code entry screen] p [Opens the Installation menu ( page 30)] p Enable HDMI Control / TV Auto Input Switch / TV Auto Power/ Device Auto Standby p [Opens the Sleep Timer menu] p [Opens the PC Settings menu] p Off/On 28
Owners Manual
Page 29
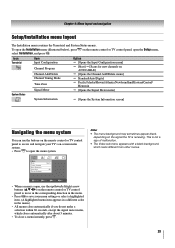
...the menu system You can use the buttons on the remote control or TV control panel to access and navigate your TV's on-screen menu system. • Press to open , use the up/down/left/right arrow buttons (STWX) on the remote control or TV control panel, open the Setup menu, select Installation, and press...RTN Back EXIT Exit • When a menu is open the menu system. To open the Installation menu (illustrated below), press on the remote control or TV control panel to move in the corresponding direction in the menu. • Press to save your menu settings or select a highlighted item. (A ...
...the menu system You can use the buttons on the remote control or TV control panel to access and navigate your TV's on-screen menu system. • Press to open , use the up/down/left/right arrow buttons (STWX) on the remote control or TV control panel, open the Setup menu, select Installation, and press...RTN Back EXIT Exit • When a menu is open the menu system. To open the Installation menu (illustrated below), press on the remote control or TV control panel to move in the corresponding direction in the menu. • Press to save your menu settings or select a highlighted item. (A ...


