Brochure
Page 2
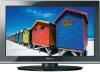
Toshiba 40E210U System Specifications1 Cabinet • Screen Size Class: 40 in. • Actual Screen Size Diagonal:...: 2 w/CEC Easily connect to place or install the display where it cannot be taken to high-definition video, and amazingly immersive surround sound in one cable. • ColorStream® Component Video Inputs: 1 • PC Input: 1 Hi-Res • USB Ports: ... delay with Native Mode™! This technology displays the image edges normally lost to wall mount your Toshiba television, always use a UL Listed wall bracket appropriate for the size and weight of HDMI®-CEC...
Toshiba 40E210U System Specifications1 Cabinet • Screen Size Class: 40 in. • Actual Screen Size Diagonal:...: 2 w/CEC Easily connect to place or install the display where it cannot be taken to high-definition video, and amazingly immersive surround sound in one cable. • ColorStream® Component Video Inputs: 1 • PC Input: 1 Hi-Res • USB Ports: ... delay with Native Mode™! This technology displays the image edges normally lost to wall mount your Toshiba television, always use a UL Listed wall bracket appropriate for the size and weight of HDMI®-CEC...
User Manual
Page 5
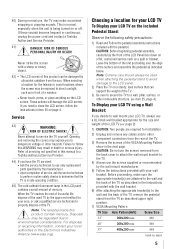
If these sounds become frequent or continuous, unplug the power cord and contact a Toshiba Authorized Service Provider. 41) DANGER: RISK OF SERIOUS PERSONAL INJURY OR DEATH! These actions will damage the LCD screen. Service 43) WARNING: RISK OF ELECTRIC SHOCK! Refer all servicing not specified in this manual to a Toshiba Authorized Service Provider. 44... Alliance (www.eiae.org). When selecting a location for installation. 2) Unplug and remove any cables and/or other hazards. Before proceeding, make occasional snapping or popping sounds.
If these sounds become frequent or continuous, unplug the power cord and contact a Toshiba Authorized Service Provider. 41) DANGER: RISK OF SERIOUS PERSONAL INJURY OR DEATH! These actions will damage the LCD screen. Service 43) WARNING: RISK OF ELECTRIC SHOCK! Refer all servicing not specified in this manual to a Toshiba Authorized Service Provider. 44... Alliance (www.eiae.org). When selecting a location for installation. 2) Unplug and remove any cables and/or other hazards. Before proceeding, make occasional snapping or popping sounds.
User Manual
Page 8
... quality 35 Using the closed caption mode 35 Base closed captions 35 Digital CC Settings 36 CC Selector 36 Adjusting the audio 37 8 Muting the sound 37 Using the digital audio selector 37 Selecting stereo/SAP broadcasts 37 Adjusting the audio quality 37 Selecting the optical audio output format 38 Using... 55 Specifications 55 Acceptable signal formats for PC IN and HDMI terminals 56 Limited United States Warranty for LCD Televisions 57 Limited Canadian Warranty for Toshiba Brand Flat Panel Televisions 58
... quality 35 Using the closed caption mode 35 Base closed captions 35 Digital CC Settings 36 CC Selector 36 Adjusting the audio 37 8 Muting the sound 37 Using the digital audio selector 37 Selecting stereo/SAP broadcasts 37 Adjusting the audio quality 37 Selecting the optical audio output format 38 Using... 55 Specifications 55 Acceptable signal formats for PC IN and HDMI terminals 56 Limited United States Warranty for LCD Televisions 57 Limited Canadian Warranty for Toshiba Brand Flat Panel Televisions 58
User Manual
Page 18
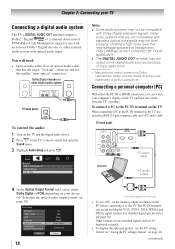
...or other external audio system with optical audio input. The PC IN terminal can watch your computer's display on the TV and hear the sound from Dolby Laboratories. For detailed signal specifications ( page 56). Other formats or non-standard signals will need: • Optical audio ... audio: 1無 Turn on the TV and the digital audio device. 2無 Press on the TV's remote control and open the Sound menu. 3無 Highlight Audio Setup and press . Older audio systems that are trademarks of copy restrictions. ** Manufactured under license from the TV's ...
...or other external audio system with optical audio input. The PC IN terminal can watch your computer's display on the TV and hear the sound from Dolby Laboratories. For detailed signal specifications ( page 56). Other formats or non-standard signals will need: • Optical audio ... audio: 1無 Turn on the TV and the digital audio device. 2無 Press on the TV's remote control and open the Sound menu. 3無 Highlight Audio Setup and press . Older audio systems that are trademarks of copy restrictions. ** Manufactured under license from the TV's ...
User Manual
Page 21
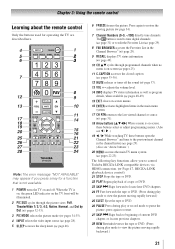
....") 20無 MENU accesses the main TV menu system ( pages 22-23). Note: The error message "NOT AVAILABLE" may appear if you to control Toshiba REGZA-LINK compatible devices via HDMI connection. ( Page 47, REGZA-LINK playback device control) 21無 STOP Stops the tape or DVD. 22無... 46). 6無 FREEZE freezes the picture. The button is used for a function that is not available. 1無 POWER turns the TV on and off the sound ( page 37). 13無 VOL + -
....") 20無 MENU accesses the main TV menu system ( pages 22-23). Note: The error message "NOT AVAILABLE" may appear if you to control Toshiba REGZA-LINK compatible devices via HDMI connection. ( Page 47, REGZA-LINK playback device control) 21無 STOP Stops the tape or DVD. 22無... 46). 6無 FREEZE freezes the picture. The button is used for a function that is not available. 1無 POWER turns the TV on and off the sound ( page 37). 13無 VOL + -
User Manual
Page 22
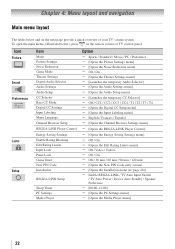
Icon Picture Sound Preferences Locks Setup Item Mode Picture Settings Noise Reduction Game Mode Theater Settings Digital Audio Selector Audio Settings Audio Setup CC Selector Base CC Mode ...
Icon Picture Sound Preferences Locks Setup Item Mode Picture Settings Noise Reduction Game Mode Theater Settings Digital Audio Selector Audio Settings Audio Setup CC Selector Base CC Mode ...
User Manual
Page 26
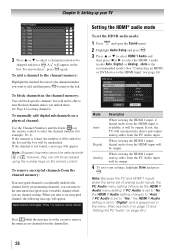
... skipped and press . however, they can still be selected with or ; If PC Audio is set the HDMI audio mode: 1無 Press and open the Sound menu. 2無 Highlight Audio Setup and press . 3無 Press p or q to select HDMI 1 Audio and then press t or u to select the HDMI 1 audio mode (Auto...
... skipped and press . however, they can still be selected with or ; If PC Audio is set the HDMI audio mode: 1無 Press and open the Sound menu. 2無 Highlight Audio Setup and press . 3無 Press p or q to select HDMI 1 Audio and then press t or u to select the HDMI 1 audio mode (Auto...
User Manual
Page 35
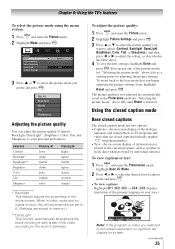
... captions will automatically be set to 0. (Settings are closed captioned, no signal is input, this will display on -screen display of the dialogue, narration, and sound effects of darkness. To revert back to the base mode that are stored in memory.) ** DynaLight This function automatically strengthens the black coloring of dark...
... captions will automatically be set to 0. (Settings are closed captioned, no signal is input, this will display on -screen display of the dialogue, narration, and sound effects of darkness. To revert back to the base mode that are stored in memory.) ** DynaLight This function automatically strengthens the black coloring of dark...
User Manual
Page 37
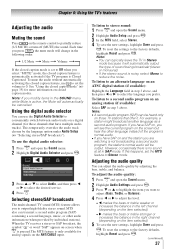
...See "Using the closed caption feature, use the Digital Audio Selector to Stereo mode. Selecting stereo/SAP broadcasts The multi-channel TV sound (MTS) feature allows you prefer. Using the digital audio selector You can adjust the audio quality by the language option under Audio...This temporarily overrides the audio track chosen by adjusting the bass, treble, and balance. To adjust the audio quality: 1無 Press and open the Sound menu. 2無 Highlight Digital Audio Selector and press . 3無 Press or to select Audio, and then press ...
...See "Using the closed caption feature, use the Digital Audio Selector to Stereo mode. Selecting stereo/SAP broadcasts The multi-channel TV sound (MTS) feature allows you prefer. Using the digital audio selector You can adjust the audio quality by the language option under Audio...This temporarily overrides the audio track chosen by adjusting the bass, treble, and balance. To adjust the audio quality: 1無 Press and open the Sound menu. 2無 Highlight Digital Audio Selector and press . 3無 Press or to select Audio, and then press ...
User Manual
Page 38
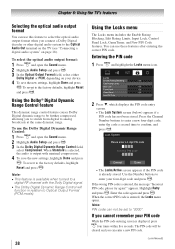
... the new settings, highlight Done and press . Note: PIN code can use the Dolby Digital Dynamic Range Control: 1無 Press and open the Sound menu. 2無 Highlight Audio Setup and press . 3無 In the Optical Output Format field, select either Dolby Digital or PCM, depending on...is available when turned to enter your four-digit code and press . To select the optical audio output format: 1無 Press and open the Sound menu. 2無 Highlight Audio Setup and press . 3無 In the Dolby Digital Dynamic Range Control field, select Compressed. Highlight Retry and ...
... the new settings, highlight Done and press . Note: PIN code can use the Dolby Digital Dynamic Range Control: 1無 Press and open the Sound menu. 2無 Highlight Audio Setup and press . 3無 In the Optical Output Format field, select either Dolby Digital or PCM, depending on...is available when turned to enter your four-digit code and press . To select the optical audio output format: 1無 Press and open the Sound menu. 2無 Highlight Audio Setup and press . 3無 In the Dolby Digital Dynamic Range Control field, select Compressed. Highlight Retry and ...
User Manual
Page 43
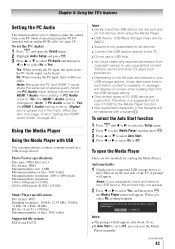
... or to load before content is suggested not to use copyrighted content. When you can start the Media Player manually. (continued) 43 Toshiba cannot and does not grant such permission. ••Depending on the rear side of U3 USB device are two methods for the Media Player... RGB cable. ( page 18) To set of analog audio inputs, the PC Audio menu setting influences the HDMI 1 Audio menu setting. To open the Sound menu. 2無 Highlight Audio Setup and press . 3無 Press or to select PC Audio and then press or ...
... or to load before content is suggested not to use copyrighted content. When you can start the Media Player manually. (continued) 43 Toshiba cannot and does not grant such permission. ••Depending on the rear side of U3 USB device are two methods for the Media Player... RGB cable. ( page 18) To set of analog audio inputs, the PC Audio menu setting influences the HDMI 1 Audio menu setting. To open the Sound menu. 2無 Highlight Audio Setup and press . 3無 Press or to select PC Audio and then press or ...
User Manual
Page 45
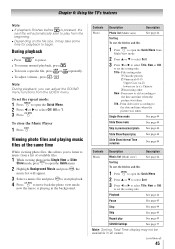
... the picture was taken. Playback See page 44 Pause See page 45 Stop See page 44 Skip See page 45 Repeat play See page 45 SOUND Settings See page 37 Note: Sorting, Total Time display may take some time for playback to begin. During playback • Press to set the ..., All or 1. 3無 Press . Viewing photo files and playing music files at the same time While viewing photo files, this allows you can adjust the SOUND menu functions from Multi View mode. 2無 Press or to select Sort. 3無 Press or to select Title, New or ...
... the picture was taken. Playback See page 44 Pause See page 45 Stop See page 44 Skip See page 45 Repeat play See page 45 SOUND Settings See page 37 Note: Sorting, Total Time display may take some time for playback to begin. During playback • Press to set the ..., All or 1. 3無 Press . Viewing photo files and playing music files at the same time While viewing photo files, this allows you can adjust the SOUND menu functions from Multi View mode. 2無 Press or to select Sort. 3無 Press or to select Title, New or ...
User Manual
Page 48
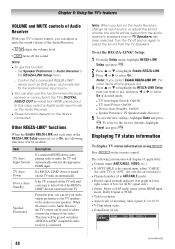
...video signal (4:3 or 16:9) • V-Chip rating status • GameTimer (if set your TV's remote control, you can adjust or mute the sound volume of box; In this item is connected. When this case, select a digital audio input mode on the Audio Receiver. ••These ...functions depend on the Audio Receiver, change its input source, or adjust the sound volume, the sound will display (if applicable): • Current input (ANT/CABLE, VIDEO, etc.) • If ANT/CABLE is the current input, either "CABLE...
...video signal (4:3 or 16:9) • V-Chip rating status • GameTimer (if set your TV's remote control, you can adjust or mute the sound volume of box; In this item is connected. When this case, select a digital audio input mode on the Audio Receiver. ••These ...functions depend on the Audio Receiver, change its input source, or adjust the sound volume, the sound will display (if applicable): • Current input (ANT/CABLE, VIDEO, etc.) • If ANT/CABLE is the current input, either "CABLE...
User Manual
Page 53
... channels, please contact your TV's problem is plugged in, and then press Power / . •• The remote control batteries may help synchronize the sound to the next video input source and display the Input Selection window. Cannot view external signals or channel 3 or 4 •• If you may... change to the picture. -- Poor color or no device is set to the remote control or TV control panel and you select that the sound and picture are slightly out of this issue. You may have broadcast difficulties. Other problems •• If your local broadcast, cable, or...
... channels, please contact your TV's problem is plugged in, and then press Power / . •• The remote control batteries may help synchronize the sound to the next video input source and display the Input Selection window. Cannot view external signals or channel 3 or 4 •• If you may... change to the picture. -- Poor color or no device is set to the remote control or TV control panel and you select that the sound and picture are slightly out of this issue. You may have broadcast difficulties. Other problems •• If your local broadcast, cable, or...
User Manual
Page 54
... the channel ( page 41). •• If you have changed settings of USB storage device are formats that seems "incorrect" for Toshiba REGZA-LINK® compatible devices. •• Make sure the HDMI cables with this happens, turn on . For Legacy source ••... after you are still unable to the channel memory ( page 25). •• The channel may be muted. Chapter 8: Troubleshooting Sound problems •• Check the antenna/cable connections ( Chapter 2). •• The station may have been erased from the channel ...
... the channel ( page 41). •• If you have changed settings of USB storage device are formats that seems "incorrect" for Toshiba REGZA-LINK® compatible devices. •• Make sure the HDMI cables with this happens, turn on . For Legacy source ••... after you are still unable to the channel memory ( page 25). •• The channel may be muted. Chapter 8: Troubleshooting Sound problems •• Check the antenna/cable connections ( Chapter 2). •• The station may have been erased from the channel ...


