
User Manual
Page 2
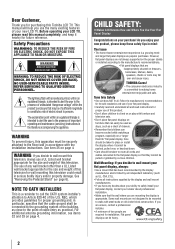
..., is appropriate. See "Removing the Pedestal Stand" ( page 6). NO USER-SERVICEABLE PARTS INSIDE. Wall Mounting: If you decide to wall mount your new LCD TV. Before operating your new product, please keep it cannot be pushed, pulled over, or knocked down. • Care should be taken to route all instructions supplied by curious children. Flat panel displays can become excited while watching a program, especially on dressers...
..., is appropriate. See "Removing the Pedestal Stand" ( page 6). NO USER-SERVICEABLE PARTS INSIDE. Wall Mounting: If you decide to wall mount your new LCD TV. Before operating your new product, please keep it cannot be pushed, pulled over, or knocked down. • Care should be taken to route all instructions supplied by curious children. Flat panel displays can become excited while watching a program, especially on dressers...
User Manual
Page 4
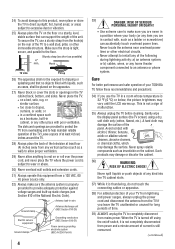
... whose temperature is still consumed. (continued) Gently wipe the display panel surface (the TV screen) using the on/off switch, it is thundering, do not touch the connecting cables or apparatus. 38) For added protection of your TV from lightning and power surges, always unplug the power cord and disconnect the antenna from the TV if you leave the TV unattended...
... whose temperature is still consumed. (continued) Gently wipe the display panel surface (the TV screen) using the on/off switch, it is thundering, do not touch the connecting cables or apparatus. 38) For added protection of your TV from lightning and power surges, always unplug the power cord and disconnect the antenna from the TV if you leave the TV unattended...
User Manual
Page 5
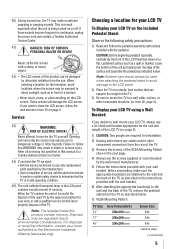
... may be used TV by the approved method for installation. 2) Unplug and remove any cables and/or other component connectors from the rear of the TV. 3) Remove the screws of the VESA Mounting Pattern show in mm) (continued) 5 When selecting a location for your LCD TV To Display your local authorities or the Electronics Industries Alliance (www.eiae.org). Never strike the screen with the wall bracket. 6) After...
... may be used TV by the approved method for installation. 2) Unplug and remove any cables and/or other component connectors from the rear of the TV. 3) Remove the screws of the VESA Mounting Pattern show in mm) (continued) 5 When selecting a location for your LCD TV To Display your local authorities or the Electronics Industries Alliance (www.eiae.org). Never strike the screen with the wall bracket. 6) After...
User Manual
Page 8
... Initial Setup 24 Selecting the menu language 24 TOSHIBA Logo LED 24 Configuring the antenna input source for the ANT/CABLE terminal 24 Programming channels into the TV's channel memory............25 Programming channels automatically 25 Setting channel skip 25 Labeling channels 26 Setting the HDMI® audio mode 27 Viewing the digital signal meter 27 Setting the time zone 27 Viewing the system status 28 Chapter 6: Using the TV's features 29 Selecting the video input source to view 29 Labeling the video input sources...
... Initial Setup 24 Selecting the menu language 24 TOSHIBA Logo LED 24 Configuring the antenna input source for the ANT/CABLE terminal 24 Programming channels into the TV's channel memory............25 Programming channels automatically 25 Setting channel skip 25 Labeling channels 26 Setting the HDMI® audio mode 27 Viewing the digital signal meter 27 Setting the time zone 27 Viewing the system status 28 Chapter 6: Using the TV's features 29 Selecting the video input source to view 29 Labeling the video input sources...
User Manual
Page 12
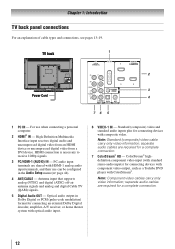
...-code modulation) format for connecting an external Dolby Digital decoder, amplifier, A/V receiver, or home theater system with optical audio input. 6無 VIDEO-1 IN - HDMI connection is necessary to receive 1080p signals. 3無 PC/HDMI-1 (AUDIO) IN - Optical audio output in the Audio Setup menu ( page 44). 4無 ANT/CABLE - separate audio cables are shared with composite video. Chapter 1: Introduction TV back panel connections For an explanation of cable types and connections, see pages 13-19. PC audio input terminals are required for connecting...
...-code modulation) format for connecting an external Dolby Digital decoder, amplifier, A/V receiver, or home theater system with optical audio input. 6無 VIDEO-1 IN - HDMI connection is necessary to receive 1080p signals. 3無 PC/HDMI-1 (AUDIO) IN - Optical audio output in the Audio Setup menu ( page 44). 4無 ANT/CABLE - separate audio cables are shared with composite video. Chapter 1: Introduction TV back panel connections For an explanation of cable types and connections, see pages 13-19. PC audio input terminals are required for connecting...
User Manual
Page 13
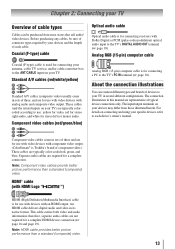
...) video. 13 Chapter 2: Connecting your specific devices, refer to each cable. Separate audio cables are representative of three, and are typically color-coded red, green, and blue. Component video cables come in several different configurations. HDMI® cable (with an HDMI output. This cable carries both video and audio information; Note: HDMI cable provides better picture performance than a standard (composite) video. Coaxial (F-type) cable Coaxial (F-type) cable is for connecting your antenna, cable TV service, and/or cable converter box to the ANT/CABLE input on...
...) video. 13 Chapter 2: Connecting your specific devices, refer to each cable. Separate audio cables are representative of three, and are typically color-coded red, green, and blue. Component video cables come in several different configurations. HDMI® cable (with an HDMI output. This cable carries both video and audio information; Note: HDMI cable provides better picture performance than a standard (composite) video. Coaxial (F-type) cable Coaxial (F-type) cable is for connecting your antenna, cable TV service, and/or cable converter box to the ANT/CABLE input on...
User Manual
Page 16
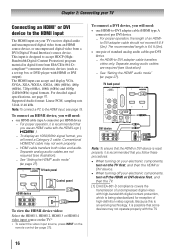
... detailed signal specifications, see page 19. Supported Audio format: Linear PCM, sampling rate 32/44.1/ 48 kHz Note: To connect a PC to accept HDCP (HighBandwidth Digital-Content Protection) program material in digital form from a DVI (Digital Visual Interface) source device. TV back panel Control panel HDMI device To view the HDMI device video: Select the HDMI 1, HDMI 2, HDMI 3 or HDMI 4 video input source on the TV.* ** To select the video input source, press INPUT on your electronic components, turn off the HDMI...
... detailed signal specifications, see page 19. Supported Audio format: Linear PCM, sampling rate 32/44.1/ 48 kHz Note: To connect a PC to accept HDCP (HighBandwidth Digital-Content Protection) program material in digital form from a DVI (Digital Visual Interface) source device. TV back panel Control panel HDMI device To view the HDMI device video: Select the HDMI 1, HDMI 2, HDMI 3 or HDMI 4 video input source on the TV.* ** To select the video input source, press INPUT on your electronic components, turn off the HDMI...
User Manual
Page 18
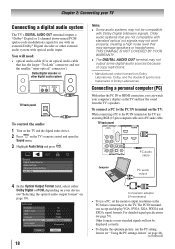
... Conversion adapter (if necessary) • To use a PC, set the monitor output resolution on the TV, use an analog RGB (15-pin) computer cable and a PC audio cable. TV back panel PC audio cable Computer PC audio output 4無 In the Optical Output Format field, select either the PC IN or HDMI connection, you can accept and display VGA, SVGA, XGA, WXGA and SXGA signal formats. Note: •• Some audio systems may damage speakers or...
... Conversion adapter (if necessary) • To use a PC, set the monitor output resolution on the TV, use an analog RGB (15-pin) computer cable and a PC audio cable. TV back panel PC audio cable Computer PC audio output 4無 In the Optical Output Format field, select either the PC IN or HDMI connection, you can accept and display VGA, SVGA, XGA, WXGA and SXGA signal formats. Note: •• Some audio systems may damage speakers or...
User Manual
Page 22
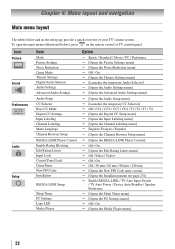
...(illustrated below and on the remote control or TV control panel. Icon Picture Sound Preferences Locks Setup Item Mode Picture Settings Noise Reduction Game Mode Theater Settings Digital Audio Selector Audio Settings Advanced Audio Settings Audio Setup CC Selector Base CC Mode Digital CC Settings Input Labeling Channel Labeling Menu Language Channel Browser Setup REGZA-LINK Player Control Enable Rating Blocking Edit Rating Limits Input Lock Control Panel Lock GameTimer New PIN Code Installation REGZA-LINK Setup Sleep Timer PC Settings Logo LED Media Player Option Sports / Standard...
...(illustrated below and on the remote control or TV control panel. Icon Picture Sound Preferences Locks Setup Item Mode Picture Settings Noise Reduction Game Mode Theater Settings Digital Audio Selector Audio Settings Advanced Audio Settings Audio Setup CC Selector Base CC Mode Digital CC Settings Input Labeling Channel Labeling Menu Language Channel Browser Setup REGZA-LINK Player Control Enable Rating Blocking Edit Rating Limits Input Lock Control Panel Lock GameTimer New PIN Code Installation REGZA-LINK Setup Sleep Timer PC Settings Logo LED Media Player Option Sports / Standard...
User Manual
Page 25
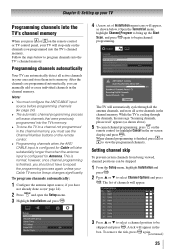
... 24). 2無 Press and open the Setup menu. 3無 Highlight Installation and press . 4無 (A new set of Installation menu icons will appear, as shown above). 5無 To cancel channel programming, press on the remote control (or highlight Cancel in the channel memory. Note: •• You must use the Channel Number buttons on -screen display and press ). ANT/CABLE Antenna Scanning channels, please wait ... 52% Number of channels will appear. 3無 Press p or...
... 24). 2無 Press and open the Setup menu. 3無 Highlight Installation and press . 4無 (A new set of Installation menu icons will appear, as shown above). 5無 To cancel channel programming, press on the remote control (or highlight Cancel in the channel memory. Note: •• You must use the Channel Number buttons on -screen display and press ). ANT/CABLE Antenna Scanning channels, please wait ... 52% Number of channels will appear. 3無 Press p or...
User Manual
Page 27
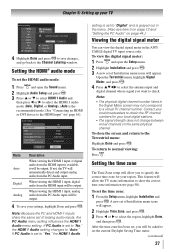
... save changes, and go back to the Channel Labeling window. A new set , you will allow you want to check. To view the digital signal meter: 1無 Press and open the Sound menu. 2無 Highlight Audio Setup and press . 3無 Press p or q to select HDMI 1 Audio and then press t or u to select the HDMI 1 audio mode (Auto, Digital, or Analog). (Auto is set the HDMI audio mode: 1無 Press and open the Setup menu. 2無 Highlight Installation...
... save changes, and go back to the Channel Labeling window. A new set , you will allow you want to check. To view the digital signal meter: 1無 Press and open the Sound menu. 2無 Highlight Audio Setup and press . 3無 Press p or q to select HDMI 1 Audio and then press t or u to select the HDMI 1 audio mode (Auto, Digital, or Analog). (Auto is set the HDMI audio mode: 1無 Press and open the Setup menu. 2無 Highlight Installation...
User Manual
Page 38
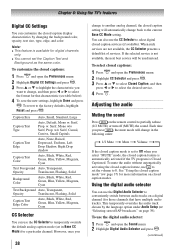
..., Flashing, Solid Background Color Auto, Black, White, Red, Green, Blue, Yellow, Magenta, Cyan Text Background Auto, Transparent, Opacity Translucent, Flashing, Solid Caption Text Edge Color Auto, Black, White, Red, Green, Blue, Yellow, Magenta, Cyan CC Selector You can use the CC Selector to temporarily override the default analog caption mode (set to the current Base CC Mode setting. When such services are not available, the CC Selector presents a default list of services. If the selected service is Closed Captioned. To customize the closed captions...
..., Flashing, Solid Background Color Auto, Black, White, Red, Green, Blue, Yellow, Magenta, Cyan Text Background Auto, Transparent, Opacity Translucent, Flashing, Solid Caption Text Edge Color Auto, Black, White, Red, Green, Blue, Yellow, Magenta, Cyan CC Selector You can use the CC Selector to temporarily override the default analog caption mode (set to the current Base CC Mode setting. When such services are not available, the CC Selector presents a default list of services. If the selected service is Closed Captioned. To customize the closed captions...
User Manual
Page 40
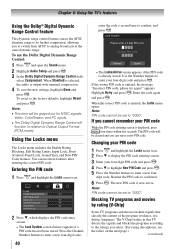
... code entry screen. • The Lock System screen (below) appears if a PIN code has not been stored. Using the Locks menu The Locks menu includes the Enable Rating Blocking, Edit Rating Limits, Input Lock, Front (Control) Panel Lock, GameTimer, and New PIN Code features. Note: PIN code cannot be set to "0000". The V-Chip feature in relation to Optical Output Format (PCM mode). Chapter 6: Using the TV's features Using the Dolby® Digital Dynamic Range Control...
... code entry screen. • The Lock System screen (below) appears if a PIN code has not been stored. Using the Locks menu The Locks menu includes the Enable Rating Blocking, Edit Rating Limits, Input Lock, Front (Control) Panel Lock, GameTimer, and New PIN Code features. Note: PIN code cannot be set to "0000". The V-Chip feature in relation to Optical Output Format (PCM mode). Chapter 6: Using the TV's features Using the Dolby® Digital Dynamic Range Control...

User Manual
Page 44
...; to output or mute the sound from the PC Audio input can use the PC Settings feature to get an optimum adjustment automatically. ** The default settings may vary depending on the input signal format. Yes: When viewing the PC input, the audio from your PC when connecting using the PC IN terminal and an analog RGB cable. ( page 18) To set of analog audio inputs, the PC Audio menu setting influences the HDMI 1 Audio menu setting. Chapter 6: Using the TV...
...; to output or mute the sound from the PC Audio input can use the PC Settings feature to get an optimum adjustment automatically. ** The default settings may vary depending on the input signal format. Yes: When viewing the PC input, the audio from your PC when connecting using the PC IN terminal and an analog RGB cable. ( page 18) To set of analog audio inputs, the PC Audio menu setting influences the HDMI 1 Audio menu setting. Chapter 6: Using the TV...
User Manual
Page 49
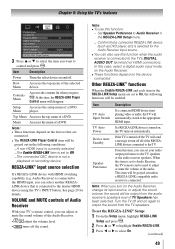
... turn on the Audio Receiver, change its input source, or adjust the sound volume, the sound will be grayed out unless a REGZA-LINK compatible audio receiver is connected. Menu Accesses the menu of a DVD player. In this time, the REGZA-LINK Player Control menu will automatically switch to output the sound from the audio receiver's speakers even if TV Speakers has been selected. Device Auto Standby If the TV is turned on, the TV turns on again to the appropriate HDMI input. Setup Menu Accesses the setup menu of a DVD. Item Description Power Turns...
... turn on the Audio Receiver, change its input source, or adjust the sound volume, the sound will be grayed out unless a REGZA-LINK compatible audio receiver is connected. Menu Accesses the menu of a DVD player. In this time, the REGZA-LINK Player Control menu will automatically switch to output the sound from the audio receiver's speakers even if TV Speakers has been selected. Device Auto Standby If the TV is turned on, the TV turns on again to the appropriate HDMI input. Setup Menu Accesses the setup menu of a DVD. Item Description Power Turns...
User Manual
Page 50
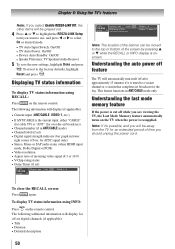
...; Video resolution • Aspect ratio of incoming video signal (4:3 or 16:9) • V-Chip rating status • Game Timer (if set ) • Digital signal strength indicator (bar graph in ANT/CABLE mode only. for off while you want to use, and press t or u to select On or desired mode. • TV Auto Input Switch: On/Off • TV Auto Power: On/Off • Device Auto Standby: On/Off • Speaker Preference: TV Speakers/Audio Receiver...
...; Video resolution • Aspect ratio of incoming video signal (4:3 or 16:9) • V-Chip rating status • Game Timer (if set ) • Digital signal strength indicator (bar graph in ANT/CABLE mode only. for off while you want to use, and press t or u to select On or desired mode. • TV Auto Input Switch: On/Off • TV Auto Power: On/Off • Device Auto Standby: On/Off • Speaker Preference: TV Speakers/Audio Receiver...

User Manual
Page 54
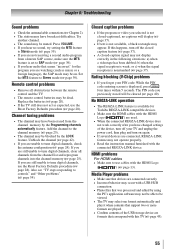
...; The closed caption feature to Off ( page 37). Other problems •• If your local broadcast, cable, or satellite provider to inform them of this issue. 54 Cannot view external signals or channel 3 or 4 •• If you cannot view signals from external devices connected to VIDEO 1, VIDEO 2, ColorStream® HDMI 1, HDMI 2, HDMI 3, HDMI 4, PC or from channels 3 or 4, make sure the Input Lock is connected to an external A/V device (e.g., DVD player, video game system, set-top box, etc...
...; The closed caption feature to Off ( page 37). Other problems •• If your local broadcast, cable, or satellite provider to inform them of this issue. 54 Cannot view external signals or channel 3 or 4 •• If you cannot view signals from external devices connected to VIDEO 1, VIDEO 2, ColorStream® HDMI 1, HDMI 2, HDMI 3, HDMI 4, PC or from channels 3 or 4, make sure the Input Lock is connected to an external A/V device (e.g., DVD player, video game system, set-top box, etc...
User Manual
Page 55
... closed -caption signal may be blocked by the Programming channels automatically feature. If you selected is set to use the Reset Factory Defaults procedure ( page 28). If this TV ( page 45). 55 The PIN code you forget your TV and unplug the power cord, then plug and turn off your PIN code: While the PIN code entering screen is not available, a black rectangle may occur with a USB HUB connection...
... closed -caption signal may be blocked by the Programming channels automatically feature. If you selected is set to use the Reset Factory Defaults procedure ( page 28). If this TV ( page 45). 55 The PIN code you forget your TV and unplug the power cord, then plug and turn off your PIN code: While the PIN code entering screen is not available, a black rectangle may occur with a USB HUB connection...
User Manual
Page 58
... service charges for set installation, setup, adjustment of customer controls, and installation or repair of the original purchase date is required for LCD Televisions that are not covered by this manual, review the section entitled "Concierge" located on our Customer Support Web site "www.tacp.toshiba. or to units that service is exposed to excessive temperature (heat/cold), moisture as outlined in the product's specification listed in warranty service. LCD TELEVISIONS PURCHASED...
... service charges for set installation, setup, adjustment of customer controls, and installation or repair of the original purchase date is required for LCD Televisions that are not covered by this manual, review the section entitled "Concierge" located on our Customer Support Web site "www.tacp.toshiba. or to units that service is exposed to excessive temperature (heat/cold), moisture as outlined in the product's specification listed in warranty service. LCD TELEVISIONS PURCHASED...
User Manual
Page 59
... firm, whichever comes first. 59 Your Responsibility Read the owner's manual thoroughly before operating this Television and connected equipment; Rental Units The warranty for set installation, setup, adjustment of customer controls, and installation or repair of shipment to implied warranties arising under any statute, or law of incompatible third party products; THIS WARRANTY GIVES YOU SPECIFIC LEGAL RIGHTS AND YOU MAY ALSO HAVE OTHER RIGHTS WHICH...
... firm, whichever comes first. 59 Your Responsibility Read the owner's manual thoroughly before operating this Television and connected equipment; Rental Units The warranty for set installation, setup, adjustment of customer controls, and installation or repair of shipment to implied warranties arising under any statute, or law of incompatible third party products; THIS WARRANTY GIVES YOU SPECIFIC LEGAL RIGHTS AND YOU MAY ALSO HAVE OTHER RIGHTS WHICH...


