User Manual
Page 8
...remote control batteries 20 Remote control effective range 20 Learning about the remote control 21 Chapter 4: Menu layout and navigation 22 Main menu layout 22 Setup/Installation menu layout 23 Navigating the menu system 23 Chapter 5: Setting up your TV 24 Initial Setup 24 Selecting the menu language 24 TOSHIBA... Logo LED 24 Configuring the antenna input source for the ANT/CABLE terminal 24 Programming channels into the TV's channel memory............25 Programming channels automatically...
...remote control batteries 20 Remote control effective range 20 Learning about the remote control 21 Chapter 4: Menu layout and navigation 22 Main menu layout 22 Setup/Installation menu layout 23 Navigating the menu system 23 Chapter 5: Setting up your TV 24 Initial Setup 24 Selecting the menu language 24 TOSHIBA... Logo LED 24 Configuring the antenna input source for the ANT/CABLE terminal 24 Programming channels into the TV's channel memory............25 Programming channels automatically...
User Manual
Page 9
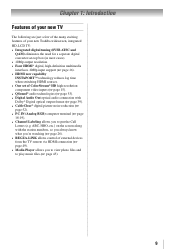
...you to view photo files and to put the Call Letters (e.g. Chapter 1: Introduction Features of your new TV The following are just a few of the many exciting features of your new Toshiba widescreen, integrated HD, LCD TV: • Integrated digital tuning (8VSB ATSC and QAM) eliminates the need for a separate digital converter...the station numbers, so you always know what you're watching ( page 26). • REGZA-LINK allows control of external devices from the TV remote via HDMI connection ( page 49). • Media Player allows you to play music files.( page 45). 9
...you to view photo files and to put the Call Letters (e.g. Chapter 1: Introduction Features of your new TV The following are just a few of the many exciting features of your new Toshiba widescreen, integrated HD, LCD TV: • Integrated digital tuning (8VSB ATSC and QAM) eliminates the need for a separate digital converter...the station numbers, so you always know what you're watching ( page 26). • REGZA-LINK allows control of external devices from the TV remote via HDMI connection ( page 49). • Media Player allows you to play music files.( page 45). 9
User Manual
Page 10
... 8. 13 For technical specifications and warranty information, see Chapter 9. 14 Enjoy your new TV! 10 Then press POWER on the TV control panel or remote control to turn the TV off or on, please unplug the power cords few seconds then re-plug to try again...remote control. 8 AFTER connecting all cables and devices, plug in the power cords for an overview of the unit. If the TV stops responding to set up , and using its many exciting features. 1 Carefully read the important safety, installation, care, and service information. THIS TYPE OF DAMAGE IS NOT COVERED UNDER THE TOSHIBA...
... 8. 13 For technical specifications and warranty information, see Chapter 9. 14 Enjoy your new TV! 10 Then press POWER on the TV control panel or remote control to turn the TV off or on, please unplug the power cords few seconds then re-plug to try again...remote control. 8 AFTER connecting all cables and devices, plug in the power cords for an overview of the unit. If the TV stops responding to set up , and using its many exciting features. 1 Carefully read the important safety, installation, care, and service information. THIS TYPE OF DAMAGE IS NOT COVERED UNDER THE TOSHIBA...
User Manual
Page 11
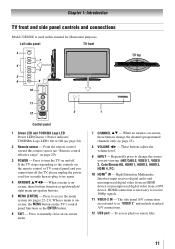
... 32E200U is used in this remote sensor ( "Remote control effective range" on page 20). 3無 POWER - Left side panel TV front 3 7 4 8 5 6 9 10 TV top 11 12 2 Control panel 1無 Green LED and TOSHIBA Logo LED Power LED(Green) = Power indicator TOSHIBA Logo LED= On or Off... ( page 24). 2無 Remote sensor - When a menu is onscreen, the MENU...
... 32E200U is used in this remote sensor ( "Remote control effective range" on page 20). 3無 POWER - Left side panel TV front 3 7 4 8 5 6 9 10 TV top 11 12 2 Control panel 1無 Green LED and TOSHIBA Logo LED Power LED(Green) = Power indicator TOSHIBA Logo LED= On or Off... ( page 24). 2無 Remote sensor - When a menu is onscreen, the MENU...
User Manual
Page 14
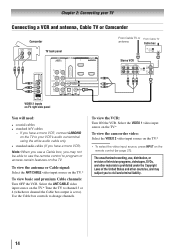
... Cable box controls to civil and criminal liability. 14 To view the antenna or Cable signal: Select the ANT/CABLE video input source on the remote control ( page 21). The unauthorized recording, use, distribution, or revision of television programs, videotapes, DVDs, and other materials is set to...side panel You will need: • coaxial cables • standard A/V cables −− If you have a mono VCR, connect L/MONO on the TV to your VCR's audio out terminal using the white audio cable only. • standard audio cables (If you have a mono VCR) Note: When you...
... Cable box controls to civil and criminal liability. 14 To view the antenna or Cable signal: Select the ANT/CABLE video input source on the remote control ( page 21). The unauthorized recording, use, distribution, or revision of television programs, videotapes, DVDs, and other materials is set to...side panel You will need: • coaxial cables • standard A/V cables −− If you have a mono VCR, connect L/MONO on the TV to your VCR's audio out terminal using the white audio cable only. • standard audio cables (If you have a mono VCR) Note: When you...
User Manual
Page 15
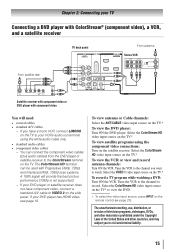
...HDMI video, see page 16. Tune the VCR to the channel to watch. Select the ColorStream HD video input source on the TV. Select the VIDEO 1 video input source on the remote control ( page 21). If your VCR's audio out terminal using the component video connections: Turn on the... TV.* To view the DVD player: Turn ON the DVD player. Select the ColorStream HD video input source on the TV* to civil and criminal liability. ...
...HDMI video, see page 16. Tune the VCR to the channel to watch. Select the ColorStream HD video input source on the TV. Select the VIDEO 1 video input source on the remote control ( page 21). If your VCR's audio out terminal using the component video connections: Turn on the... TV.* To view the DVD player: Turn ON the DVD player. Select the ColorStream HD video input source on the TV* to civil and criminal liability. ...
User Manual
Page 16
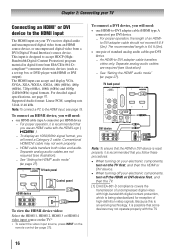
...1080i (60Hz) and 1080p (24Hz/60Hz) signal formats. Chapter 2: Connecting your TV Connecting an HDMI® or DVI device to the HDMI input The HDMI input on your electronic components, turn on the remote control ( page 21). Because this is an evolving technology, it is designed...To display an 1080i/60Hz signal format, you follow these procedures: •• When turning on your electronic components, turn off your TV receives digital audio and uncompressed digital video from an HDMI source device, or uncompressed digital video from EIA/CEA-861-D- This input is ...
...1080i (60Hz) and 1080p (24Hz/60Hz) signal formats. Chapter 2: Connecting your TV Connecting an HDMI® or DVI device to the HDMI input The HDMI input on your electronic components, turn on the remote control ( page 21). Because this is an evolving technology, it is designed...To display an 1080i/60Hz signal format, you follow these procedures: •• When turning on your electronic components, turn off your TV receives digital audio and uncompressed digital video from an HDMI source device, or uncompressed digital video from EIA/CEA-861-D- This input is ...
User Manual
Page 17
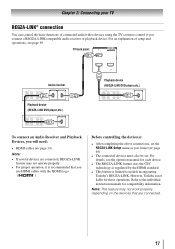
...,etc.) To connect an Audio Receiver and Playback Devices, you connect a REGZA-LINK compatible audio receiver or playback device. However, Toshiba is recommended that are connected, REGZA-LINK feature may not work properly depending on the devices that you desire ( page 49... Before controlling the device(s): • After completing the above connections, set . Refer to models incorporating Toshiba's REGZA-LINK. For an explanation of connected audio/video devices using the TV's remote control if you will need: • HDMI cables ( page 13) Note: • If ...
...,etc.) To connect an Audio Receiver and Playback Devices, you connect a REGZA-LINK compatible audio receiver or playback device. However, Toshiba is recommended that are connected, REGZA-LINK feature may not work properly depending on the devices that you desire ( page 49... Before controlling the device(s): • After completing the above connections, set . Refer to models incorporating Toshiba's REGZA-LINK. For an explanation of connected audio/video devices using the TV's remote control if you will need: • HDMI cables ( page 13) Note: • If ...
User Manual
Page 18
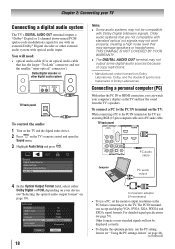
... IN or HDMI connection, you can accept and display VGA, SVGA, XGA, WXGA and SXGA signal formats. Chapter 2: Connecting your TV Connecting a digital audio system The TV's DIGITAL AUDIO OUT terminal outputs a *Dolby® Digital or 2-channel down-mixed PCM (pulse-code modulation) signal for use with... an external Dolby® Digital decoder or other digital audio system TV back panel To control the audio: 1無 Turn on the TV and the digital audio device. 2無 Press on the TV's remote control and open the Sound menu. 3無 Highlight Audio Setup and press . ...
... IN or HDMI connection, you can accept and display VGA, SVGA, XGA, WXGA and SXGA signal formats. Chapter 2: Connecting your TV Connecting a digital audio system The TV's DIGITAL AUDIO OUT terminal outputs a *Dolby® Digital or 2-channel down-mixed PCM (pulse-code modulation) signal for use with... an external Dolby® Digital decoder or other digital audio system TV back panel To control the audio: 1無 Turn on the TV and the digital audio device. 2無 Press on the TV's remote control and open the Sound menu. 3無 Highlight Audio Setup and press . ...
User Manual
Page 20
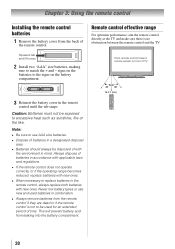
... batteries in combination. •• Always remove batteries from the remote control if they are dead or if the remote control is no obstruction between the remote control and the TV. Remote control effective range For optimum performance, aim the remote control directly at the TV and make sure there is not to replace batteries in the...
... batteries in combination. •• Always remove batteries from the remote control if they are dead or if the remote control is no obstruction between the remote control and the TV. Remote control effective range For optimum performance, aim the remote control directly at the TV and make sure there is not to replace batteries in the...
User Manual
Page 21
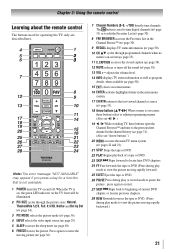
... indicator on the TV front will be illuminated. 2無 PIC SIZE cycles through programmed channels when no menu is on-screen ( page 25). 11無 C.CAPTION accesses the closed caption ( page 38). 12無 MUTE reduces or turns off . Chapter 3: Using the remote control Learning about the remote control The buttons...
... indicator on the TV front will be illuminated. 2無 PIC SIZE cycles through programmed channels when no menu is on-screen ( page 25). 11無 C.CAPTION accesses the closed caption ( page 38). 12無 MUTE reduces or turns off . Chapter 3: Using the remote control Learning about the remote control The buttons...
User Manual
Page 22
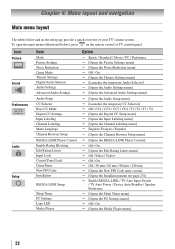
... / 90 min / 120 min [Opens the New PIN Code entry screen] [Opens the Installation menu ( page 23)] Enable REGZA-LINK / TV Auto Input Switch / TV Auto Power / Device Auto Standby / Speaker Preference [Opens the Sleep Timer menu] [Opens the PC Settings menu] Off / On ... Media Player menu] 22 Chapter 4: Menu layout and navigation Main menu layout The tables below ), press on the next page provide a quick overview of your TV's menu system. To open the main menus (illustrated below and on the...
... / 90 min / 120 min [Opens the New PIN Code entry screen] [Opens the Installation menu ( page 23)] Enable REGZA-LINK / TV Auto Input Switch / TV Auto Power / Device Auto Standby / Speaker Preference [Opens the Sleep Timer menu] [Opens the PC Settings menu] Off / On ... Media Player menu] 22 Chapter 4: Menu layout and navigation Main menu layout The tables below ), press on the next page provide a quick overview of your TV's menu system. To open the main menus (illustrated below and on the...
User Manual
Page 23
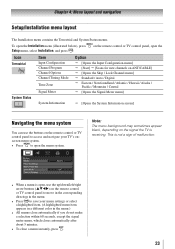
...[Opens the System Information screen] Navigating the menu system You can use the up/down/left/right arrow buttons (pqtu) on the remote control or TV control panel to access and navigate your menu settings or select a highlighted item. (A highlighted menu item appears in a different color .... 23 This is not a sign of malfunction. • When a menu is receiving. To open , use the buttons on the remote control or TV control panel to open the menu system. Chapter 4: Menu layout and navigation Setup/Installation menu layout The Installation menu contains the Terrestrial and ...
...[Opens the System Information screen] Navigating the menu system You can use the up/down/left/right arrow buttons (pqtu) on the remote control or TV control panel to access and navigate your menu settings or select a highlighted item. (A highlighted menu item appears in a different color .... 23 This is not a sign of malfunction. • When a menu is receiving. To open , use the buttons on the remote control or TV control panel to open the menu system. Chapter 4: Menu layout and navigation Setup/Installation menu layout The Installation menu contains the Terrestrial and ...
User Manual
Page 25
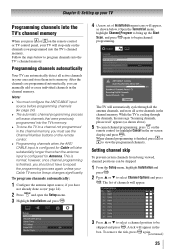
...ANT/ CABLE input is cycling through all the antenna channels, and store all active channels in your TV will appear, as shown above). 5無 To cancel channel programming, press on the remote control (or highlight Cancel in the channel memory. ANT/CABLE Antenna Scanning channels, please wait ... ... Follow the steps below .) Open the Terrestrial menu, highlight Channel Program to bring up your TV Programming channels into the TV's channel memory When you press or on the remote control or TV control panel, your area and store them in the box. This is finished, press or to...
...ANT/ CABLE input is cycling through all the antenna channels, and store all active channels in your TV will appear, as shown above). 5無 To cancel channel programming, press on the remote control (or highlight Cancel in the channel memory. ANT/CABLE Antenna Scanning channels, please wait ... ... Follow the steps below .) Open the Terrestrial menu, highlight Channel Program to bring up your TV Programming channels into the TV's channel memory When you press or on the remote control or TV control panel, your area and store them in the box. This is finished, press or to...

User Manual
Page 26
...and press . 5無 Repeat steps 3 and 4 for various channels (ABC, CBS, etc.) will be programmed into the TV. however, they are custom. Chapter 5: Setting up your TV To add a channel to the channel memory: Highlight the checked box next to the channel number you want to label. 3&#...Labeling and press . The maximum number of labels that they can still be able to manually enter/edit labels using the number keys on the remote control to enter the channel number (for other channels. 6無 To save your settings, highlight Done and press . Labeling channels A list...
...and press . 5無 Repeat steps 3 and 4 for various channels (ABC, CBS, etc.) will be programmed into the TV. however, they are custom. Chapter 5: Setting up your TV To add a channel to the channel memory: Highlight the checked box next to the channel number you want to label. 3&#...Labeling and press . The maximum number of labels that they can still be able to manually enter/edit labels using the number keys on the remote control to enter the channel number (for other channels. 6無 To save your settings, highlight Done and press . Labeling channels A list...
User Manual
Page 29
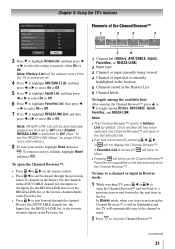
...LINK devices may automatically turn on. ••When selecting input sources using , some REGZA- or c) Repeatedly press on the remote control or TV control panel to view: 1無 Press on the screen if no signal is received in the Input Selection screen, you connected..." at right). ••"No Video Signal" will appear randomly on the remote control or TV control panel. 2無 And then either: a) Press 0-8; or b) Repeatedly press on the remote or TV control panel repeatedly to a HDMI input, the REGZA-LINK icon will appear. ...
...LINK devices may automatically turn on. ••When selecting input sources using , some REGZA- or c) Repeatedly press on the remote control or TV control panel to view: 1無 Press on the screen if no signal is received in the Input Selection screen, you connected..." at right). ••"No Video Signal" will appear randomly on the remote control or TV control panel. 2無 And then either: a) Press 0-8; or b) Repeatedly press on the remote or TV control panel repeatedly to a HDMI input, the REGZA-LINK icon will appear. ...
User Manual
Page 30
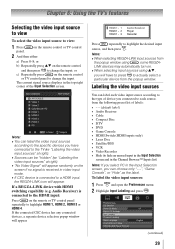
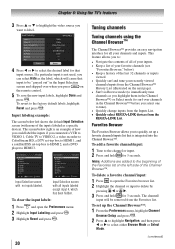
... • Keep a history of how you could label the inputs if you connected a VCR to VIDEO 1, Cable TV to VIDEO 2, a video recorder to ColorStream HD, a DTV set-top box to HDMI 3. Input Selection screen with ... the Channel Browser™ The Channel Browser™ provides an easy navigation interface for 3 seconds. Chapter 6: Using the TV's features 3無 Press or to highlight the video source you want to label. 4無 Press...," below left side of the Favorites list on the remote control. 5無 To save the new input labels, highlight Done and press .
... • Keep a history of how you could label the inputs if you connected a VCR to VIDEO 1, Cable TV to VIDEO 2, a video recorder to ColorStream HD, a DTV set-top box to HDMI 3. Input Selection screen with ... the Channel Browser™ The Channel Browser™ provides an easy navigation interface for 3 seconds. Chapter 6: Using the TV's features 3無 Press or to highlight the video source you want to label. 4無 Press...," below left side of the Favorites list on the remote control. 5無 To save the new input labels, highlight Done and press .
User Manual
Page 31
... the last selected list. ••If all lists are turned off , will have no effect. ••Pressing will be cleared every time the TV is powered off. 4無 Press to highlight ANT/CABLE List, and then press or to select On or Off. 5無 ... List by default. To tune to a channel or input in Browse mode: 1無 While watching TV, press or to open the Channel Browser™: • Press or on the remote control. • Press to surf backward through the previously tuned 32 channels in the History...
... the last selected list. ••If all lists are turned off , will have no effect. ••Pressing will be cleared every time the TV is powered off. 4無 Press to highlight ANT/CABLE List, and then press or to select On or Off. 5無 ... List by default. To tune to a channel or input in Browse mode: 1無 While watching TV, press or to open the Channel Browser™: • Press or on the remote control. • Press to surf backward through the previously tuned 32 channels in the History...
User Manual
Page 48
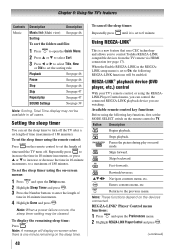
...the time in 10-minute increments. 4無 Highlight Done and press . REGZA-LINK® playback device (DVD player, etc.) control With your TV's remote control, or using the following REGZA-LINK functions will display on-screen when there is one minute remaining on the... and open the Preferences menu. 2無 Highlight REGZA-LINK Player Control and press . (continued) pqtu Navigate contents menu, etc. To set to control Toshiba REGZA-LINK compatible devices from the TV remote via HDMI connection ( page 17). Using REGZA-LINK® This is set the sleep timer using the...
...the time in 10-minute increments. 4無 Highlight Done and press . REGZA-LINK® playback device (DVD player, etc.) control With your TV's remote control, or using the following REGZA-LINK functions will display on-screen when there is one minute remaining on the... and open the Preferences menu. 2無 Highlight REGZA-LINK Player Control and press . (continued) pqtu Navigate contents menu, etc. To set to control Toshiba REGZA-LINK compatible devices from the TV remote via HDMI connection ( page 17). Using REGZA-LINK® This is set the sleep timer using the...
User Manual
Page 49
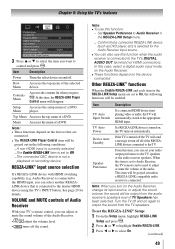
... menu will send a message to turn on again to select On. (continued) 49 Device Auto Standby If the TV is connected to the HDMI input, you can set to Audio Receiver, the TV remote can also use this function when the audio receiver is selected for details. Note: When you can select another... will be enabled. Speaker Preference From this item, you can adjust or mute the sound volume of the audio. When this item is set your TV's remote control, you turn off the sound. This item will be grayed out unless a REGZA-LINK compatible audio receiver is turned on, the...
... menu will send a message to turn on again to select On. (continued) 49 Device Auto Standby If the TV is connected to the HDMI input, you can set to Audio Receiver, the TV remote can also use this function when the audio receiver is selected for details. Note: When you can select another... will be enabled. Speaker Preference From this item, you can adjust or mute the sound volume of the audio. When this item is set your TV's remote control, you turn off the sound. This item will be grayed out unless a REGZA-LINK compatible audio receiver is turned on, the...


