
Owners Manual
Page 2
... Support Safety Committee, comprised of damage is committed to climb on the proper TV stands. This manual will help you use of this product may fall over . As a result, TVs may be connected to the grounding system of the building, as practical. This type of TV and consumer electronics furniture manufacturers, to cause an electric shock. NO USER-SERVICEABLE PARTS...
... Support Safety Committee, comprised of damage is committed to climb on the proper TV stands. This manual will help you use of this product may fall over . As a result, TVs may be connected to the grounding system of the building, as practical. This type of TV and consumer electronics furniture manufacturers, to cause an electric shock. NO USER-SERVICEABLE PARTS...
Owners Manual
Page 4
... the screen. QUALIFIED SERVICE TECHNICIAN 34) If you to dangerous voltage or other electrical circuits. • Never attempt to install any of the following formats or images: • Fixed Images, such as possible. Care For better performance and safer operation of your TOSHIBA TV, follow these sounds become permanently engrained in the picture tube and cause subtle but permanent ghost images. or viewing...
... the screen. QUALIFIED SERVICE TECHNICIAN 34) If you to dangerous voltage or other electrical circuits. • Never attempt to install any of the following formats or images: • Fixed Images, such as possible. Care For better performance and safer operation of your TOSHIBA TV, follow these sounds become permanently engrained in the picture tube and cause subtle but permanent ghost images. or viewing...
Owners Manual
Page 5
... panel lock feature 40 Changing the PIN code 40 Adjusting the picture 41 Selecting the picture mode 41 Adjusting the picture quality 41 Saving new preference 42 Using the flesh tone feature 42 Using the CableClear™ DNR (digital noise reduction) feature 42 Selecting the Scan Velocity Modulation (SVM) ...... 43 Selecting the color temperature 43 Resetting picture adjustments 43 Selecting the video input source 44 Labeling the video input sources 44 Using the closed caption feature 45 Setting the sleep timer 46 Setting...
... panel lock feature 40 Changing the PIN code 40 Adjusting the picture 41 Selecting the picture mode 41 Adjusting the picture quality 41 Saving new preference 42 Using the flesh tone feature 42 Using the CableClear™ DNR (digital noise reduction) feature 42 Selecting the Scan Velocity Modulation (SVM) ...... 43 Selecting the color temperature 43 Resetting picture adjustments 43 Selecting the video input source 44 Labeling the video input sources 44 Using the closed caption feature 45 Setting the sleep timer 46 Setting...
Owners Manual
Page 6
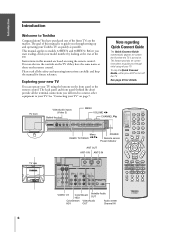
... your TV. Note regarding Quick Connect Guide The Quick Connect Guide automatically appears on-screen the first time the TV is to guide you through setting up your TV Introduction Welcome to your model number by looking at the rear of the TV. TV front TV rear Video/audio inputs (Video 3) Behind the door MENU VOLUME x • CHANNEL zy VIDEO-3 IN S-VIDEO VIDEO L/MONO-AUDIO-R DEMO MENU TV/VIDEO VOLUME CHANNEL Menu DEMO TV/VIDEO x •zy POWER Remote sensor Power indicator ANT OUT ANT-1 IN...
... your TV. Note regarding Quick Connect Guide The Quick Connect Guide automatically appears on-screen the first time the TV is to guide you through setting up your TV Introduction Welcome to your model number by looking at the rear of the TV. TV front TV rear Video/audio inputs (Video 3) Behind the door MENU VOLUME x • CHANNEL zy VIDEO-3 IN S-VIDEO VIDEO L/MONO-AUDIO-R DEMO MENU TV/VIDEO VOLUME CHANNEL Menu DEMO TV/VIDEO x •zy POWER Remote sensor Power indicator ANT OUT ANT-1 IN...

Owners Manual
Page 7
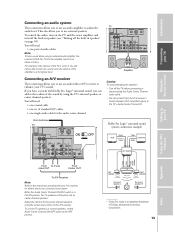
... standard video cable. Connecting a VCR This connection allows you to use: yellow for video, red for stereo right audio, and white for audio) S-video cable Component video cables (typically color-coded red, green, blue) CAUTION: Do not plug in the S-video jacks) instead of three (typically color-coded red, green, and blue), and are for use an S-video cable (in any power cords until you have finished connecting all equipment. Do not connect a standard video cable and an S-video cable to watch local channels and video programs, play or...
... standard video cable. Connecting a VCR This connection allows you to use: yellow for video, red for stereo right audio, and white for audio) S-video cable Component video cables (typically color-coded red, green, blue) CAUTION: Do not plug in the S-video jacks) instead of three (typically color-coded red, green, and blue), and are for use an S-video cable (in any power cords until you have finished connecting all equipment. Do not connect a standard video cable and an S-video cable to watch local channels and video programs, play or...
Owners Manual
Page 13
... audio cables Note: To hear sound when using an external audio amplifier, the volume of both the TV and the amplifier must be able to hear any sound, even the volume of the amplifier is at its highest level. You will need : • one single audio cable for the center channel speakers using the TV's internal speakers as normal speakers, set above 0 (zero). Introduction Connecting your TV Using the Remote Control Connecting an audio...
... audio cables Note: To hear sound when using an external audio amplifier, the volume of both the TV and the amplifier must be able to hear any sound, even the volume of the amplifier is at its highest level. You will need : • one single audio cable for the center channel speakers using the TV's internal speakers as normal speakers, set above 0 (zero). Introduction Connecting your TV Using the Remote Control Connecting an audio...

Owners Manual
Page 17
... (CABLE/ SAT, VCR, DVD, AUDIO1, AUDIO2) lights up. 3. Press MODE to enter the four-digit code of device. Press MODE to select the TV mode to store the device code. If the device does not respond to test the code. While holding down the RECALL button, press the Channel Number buttons to select the mode you may have a switch labeled "VCR1/VCR2." Introduction Connecting your TV Using the Remote Control Setting up your TV Programming...
... (CABLE/ SAT, VCR, DVD, AUDIO1, AUDIO2) lights up. 3. Press MODE to enter the four-digit code of device. Press MODE to select the TV mode to store the device code. If the device does not respond to test the code. While holding down the RECALL button, press the Channel Number buttons to select the mode you may have a switch labeled "VCR1/VCR2." Introduction Connecting your TV Using the Remote Control Setting up your TV Programming...

Owners Manual
Page 21
...-window picture source (page 32) CT-90121 21 Index Appendix Using the TV's Features Setting up your TV Using the Remote Control Connecting your TV Introduction Channel Numbers (0-9, 100) allow direct access to channels (page 26) MODE cycles through programmed channels (page 26) VOL yz adjusts the volume level EXIT exits the programming menus (page 22) INPUT selects the video input source (page 44) MUTE mutes the sound (page 47) RECALL displays on-screen information...
...-window picture source (page 32) CT-90121 21 Index Appendix Using the TV's Features Setting up your TV Using the Remote Control Connecting your TV Introduction Channel Numbers (0-9, 100) allow direct access to channels (page 26) MODE cycles through programmed channels (page 26) VOL yz adjusts the volume level EXIT exits the programming menus (page 22) INPUT selects the video input source (page 44) MUTE mutes the sound (page 47) RECALL displays on-screen information...
Owners Manual
Page 22
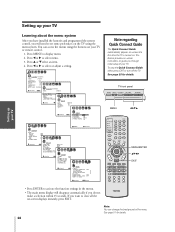
... TV Connecting your TV Using the Remote Control Setting up your TV Learning about the menu system After you have installed the batteries and programmed the remote control, you will disappear automatically if you through initial setup of the menu. Press x or • to select menu. 3. If you want to close all the on -screen instructions to guide you do not make a selection within 15 seconds. TV front panel DEMO MENU TV/VIDEO VOLUME CHANNEL MENU...
... TV Connecting your TV Using the Remote Control Setting up your TV Learning about the menu system After you have installed the batteries and programmed the remote control, you will disappear automatically if you through initial setup of the menu. Press x or • to select menu. 3. If you want to close all the on -screen instructions to guide you do not make a selection within 15 seconds. TV front panel DEMO MENU TV/VIDEO VOLUME CHANNEL MENU...

Owners Manual
Page 24
... only on the remote control. Introduction Connecting your TV Using the Remote Control Setting up your TV Adding channels to the TV's memory When you press Channel y or z, your area and store them in the channel memory. After the channels are adding a channel, you must use . If you can manually add or erase specific channels. To add or erase channels: 1. Note: To tune the TV to select CH PROGRAM.
... only on the remote control. Introduction Connecting your TV Using the Remote Control Setting up your TV Adding channels to the TV's memory When you press Channel y or z, your area and store them in the channel memory. After the channels are adding a channel, you must use . If you can manually add or erase specific channels. To add or erase channels: 1. Note: To tune the TV to select CH PROGRAM.

Owners Manual
Page 25
...▼ Cable box selection (Yes/No) No ▼ Cable box connection ▼ Cable or Antenna connection ▼ Cable box output channel selection (ch3/ch4) ▼ TV (antenna)/Cable source selection ▼ Select channels using Cable box (Confirmation only) ▼ Automatic channel programming Setting up your TV Using the Remote Control 3. DEMO MENU TV/VIDEO VOLUME CHANNEL MENU x •zy Using the Quick Connect Guide The Quick Connect Guide automatically starts the first time the TV is turned on -screen instructions to guide you through the setup according to the guide...
...▼ Cable box selection (Yes/No) No ▼ Cable box connection ▼ Cable or Antenna connection ▼ Cable box output channel selection (ch3/ch4) ▼ TV (antenna)/Cable source selection ▼ Select channels using Cable box (Confirmation only) ▼ Automatic channel programming Setting up your TV Using the Remote Control 3. DEMO MENU TV/VIDEO VOLUME CHANNEL MENU x •zy Using the Quick Connect Guide The Quick Connect Guide automatically starts the first time the TV is turned on -screen instructions to guide you through the setup according to the guide...
Owners Manual
Page 26
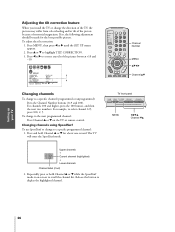
... x or • to a specific channel (programmed or unprogrammed): Press the Channel Number buttons (0-9 and 100). Press MENU, then press x or • until the SET UP menu appears. 2. Channel Number MENU yzx • Channel yz TV front panel DEMO MENU TV/VIDEO VOLUME CHANNEL MENU x •zy Channel zy Setting up your TV Using the Remote Control Adjusting the tilt correction feature When you install the TV or change to correct any tilt of the picture between +10 and -10...
... x or • to a specific channel (programmed or unprogrammed): Press the Channel Number buttons (0-9 and 100). Press MENU, then press x or • until the SET UP menu appears. 2. Channel Number MENU yzx • Channel yz TV front panel DEMO MENU TV/VIDEO VOLUME CHANNEL MENU x •zy Channel zy Setting up your TV Using the Remote Control Adjusting the tilt correction feature When you install the TV or change to correct any tilt of the picture between +10 and -10...

Owners Manual
Page 31
... PICTURE TUBE Avoid displaying stationary images on your TV Using the TV's Features Appendix Squeezed signal Compression mode Selecting the cinema mode When you view a DVD movie (3-2 pulldown processed) from a DVD player connected to select VIDEO in step 3 above. Using the Remote Control Setting up your TV screen for extended periods of time. To set the CINEMA MODE to select FILM. The picture retains its true proportion. This type of damage is NOT COVERED BY YOUR WARRANTY...
... PICTURE TUBE Avoid displaying stationary images on your TV Using the TV's Features Appendix Squeezed signal Compression mode Selecting the cinema mode When you view a DVD movie (3-2 pulldown processed) from a DVD player connected to select VIDEO in step 3 above. Using the Remote Control Setting up your TV screen for extended periods of time. To set the CINEMA MODE to select FILM. The picture retains its true proportion. This type of damage is NOT COVERED BY YOUR WARRANTY...

Owners Manual
Page 42
... menu displays "DONE." This is useful when receiving a broadcast with a weak signal (especially Cable channel) or playing back a video cassette or disc damaged by correcting the tint. Press y or z to highlight AUTO. P I GH COLOR TEMPERATURE MEDI UM SAVE NEW PREFERENCE Using the CableClear™ DNR (digital noise reduction) feature This feature allows you adjusted in video mode. You can save your saved preferences any time by selecting...
... menu displays "DONE." This is useful when receiving a broadcast with a weak signal (especially Cable channel) or playing back a video cassette or disc damaged by correcting the tint. Press y or z to highlight AUTO. P I GH COLOR TEMPERATURE MEDI UM SAVE NEW PREFERENCE Using the CableClear™ DNR (digital noise reduction) feature This feature allows you adjusted in video mode. You can save your saved preferences any time by selecting...

Owners Manual
Page 43
... Selecting the color temperature You can change the quality of the picture by selecting from three preset color temperatures: cool, medium, and warm. Press x or • to highlight the mode you may want to set SVM to highlight RESET. 3. If you are watching high-quality video material, you prefer. Press y or z to OFF. Connecting your TV Using the Remote Control Setting up your TV P I CTURE ANTENNA MODE...
... Selecting the color temperature You can change the quality of the picture by selecting from three preset color temperatures: cool, medium, and warm. Press x or • to highlight the mode you may want to set SVM to highlight RESET. 3. If you are watching high-quality video material, you prefer. Press y or z to OFF. Connecting your TV Using the Remote Control Setting up your TV P I CTURE ANTENNA MODE...
Owners Manual
Page 47
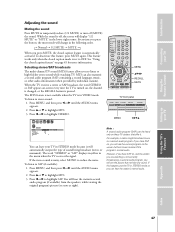
... sound. Selecting stereo/SAP broadcasts The multi-channel TV sound (MTS) feature allows you press MUTE, the closed caption mode is in the menu when the TV receives the signal. To deactivate this happens, put the TV in STEREO mode so you will see note at right). Introduction Connecting your TV Using the Remote Control Adjusting the sound Muting the sound Press MUTE to temporarily reduce (1/2 MUTE) or turn...
... sound. Selecting stereo/SAP broadcasts The multi-channel TV sound (MTS) feature allows you press MUTE, the closed caption mode is in the menu when the TV receives the signal. To deactivate this happens, put the TV in STEREO mode so you will see note at right). Introduction Connecting your TV Using the Remote Control Adjusting the sound Muting the sound Press MUTE to temporarily reduce (1/2 MUTE) or turn...

Owners Manual
Page 51
... 32 33 34 35 To turn on -screen: • Antenna mode (when in TV mode) • Channel number or VIDEO mode selected • Time (if set) • Channel label (if set) • Stereo or SAP audio status • V-CHIP rating status • Image shape status (when in volume that often happens when a TV program switches to a commercial). Using the StableSound® feature When the signal source is changed, the StableSound® feature limits...
... 32 33 34 35 To turn on -screen: • Antenna mode (when in TV mode) • Channel number or VIDEO mode selected • Time (if set) • Channel label (if set) • Stereo or SAP audio status • V-CHIP rating status • Image shape status (when in volume that often happens when a TV program switches to a commercial). Using the StableSound® feature When the signal source is changed, the StableSound® feature limits...
Owners Manual
Page 54
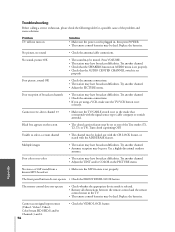
... select a certain channel • The channel may be poor. Replace the batteries. Using the Remote Control Poor picture, sound OK • Check the antenna connections. • The station may be muted. Black box appears on Solution • Make sure the power cord is set properly. Try another channel. • Check that the SPEAKERS function in AUDIO menu is plugged in the PICTURE menu. The front panel buttons do not operate • Check the FRONT PANEL LOCK feature. No sound, picture...
... select a certain channel • The channel may be poor. Replace the batteries. Using the Remote Control Poor picture, sound OK • Check the antenna connections. • The station may be muted. Black box appears on Solution • Make sure the power cord is set properly. Try another channel. • Check that the SPEAKERS function in AUDIO menu is plugged in the PICTURE menu. The front panel buttons do not operate • Check the FRONT PANEL LOCK feature. No sound, picture...
Owners Manual
Page 55
... PAY LABOR CHARGES INVOLVED IN THE REPAIR OR REPLACEMENT. Rental Units The warranty for rental units begins with better customer service and improved product support. Owner's Manual and Product Registration Card Read this owner's manual thoroughly before operating this television must be performed in your home or the set installation, setup, adjustment of customer controls, and installation or repair of antenna systems are your responsibility. (5) Warranties extend only to defects in...
... PAY LABOR CHARGES INVOLVED IN THE REPAIR OR REPLACEMENT. Rental Units The warranty for rental units begins with better customer service and improved product support. Owner's Manual and Product Registration Card Read this owner's manual thoroughly before operating this television must be performed in your home or the set installation, setup, adjustment of customer controls, and installation or repair of antenna systems are your responsibility. (5) Warranties extend only to defects in...
Owners Manual
Page 56
... or fluctuations in electric power), improper installation, improper maintenance, or use in your home or the set will be taken to the TCL Authorized Service Depot for 27'' FST PURE® and All Larger Television Models Toshiba of Canada Limited ("TCL") makes the following all parts, labor, and picture tubes. Depending on the type of repair required, either the service will be performed in...
... or fluctuations in electric power), improper installation, improper maintenance, or use in your home or the set will be taken to the TCL Authorized Service Depot for 27'' FST PURE® and All Larger Television Models Toshiba of Canada Limited ("TCL") makes the following all parts, labor, and picture tubes. Depending on the type of repair required, either the service will be performed in...


