
User Manual
Page 2
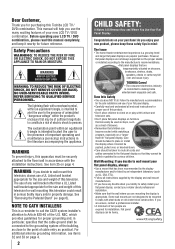
..." ( page 6). Follow the manufacturer's recommendations for the safe installation and use of your flat panel display. • Carefully read this Toshiba LCD TV / DVD combination. WARNING: TO REDUCE THE RISK OF ELECTRIC SHOCK, DO NOT REMOVE COVER (OR BACK). The exclamation point within an...instructions supplied by curious children. Tune Into Safety • One size does NOT fit all cords and cables connected to the floor/wall in particular, specifies that can be connected to the grounding system of this television. See item 25 on your LCD TV / DVD combination, please...
..." ( page 6). Follow the manufacturer's recommendations for the safe installation and use of your flat panel display. • Carefully read this Toshiba LCD TV / DVD combination. WARNING: TO REDUCE THE RISK OF ELECTRIC SHOCK, DO NOT REMOVE COVER (OR BACK). The exclamation point within an...instructions supplied by curious children. Tune Into Safety • One size does NOT fit all cords and cables connected to the floor/wall in particular, specifies that can be connected to the grounding system of this television. See item 25 on your LCD TV / DVD combination, please...
User Manual
Page 4
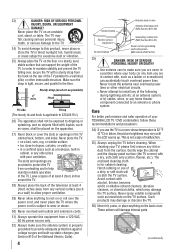
...or any other place with , such as a bookcase, built-in cabinet, or any home theater component connected to an antenna or phone system. Care For better performance and safer operation of the television at least... 4 (four) inches around the TV. 28) Always place the back of your TOSHIBA LCD TV / DVD combination, follow these recommendations and precautions: 34) If you are in direct ... extreme care to make sure the antenna system is for cabinet cleaning. This is applicable to 32SLV411U.) 26) The apparatus shall not be placed on an unstable cart, stand, or table....
...or any other place with , such as a bookcase, built-in cabinet, or any home theater component connected to an antenna or phone system. Care For better performance and safer operation of the television at least... 4 (four) inches around the TV. 28) Always place the back of your TOSHIBA LCD TV / DVD combination, follow these recommendations and precautions: 34) If you are in direct ... extreme care to make sure the antenna system is for cabinet cleaning. This is applicable to 32SLV411U.) 26) The apparatus shall not be placed on an unstable cart, stand, or table....

User Manual
Page 5
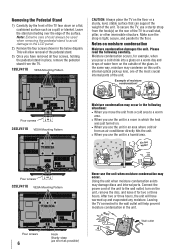
... surface that the TV is being turned on /off . If these sounds become frequent or continuous, unplug the power cord and contact a Toshiba Authorized Service Provider. 42) WARNING: RISK OF SERIOUS PERSONAL INJURY OR EQUIPMENT DAMAGE! CAUTION: Before beginning pedestal assembly, carefully lay the front of...location for installation. 2) Unplug and remove any kind into the TV cabinet slots. 38) While it is thundering, do not touch the connecting cables or apparatus. 39) For added protection of your TV from lightning and power surges, always unplug the power cord and disconnect the ...
... surface that the TV is being turned on /off . If these sounds become frequent or continuous, unplug the power cord and contact a Toshiba Authorized Service Provider. 42) WARNING: RISK OF SERIOUS PERSONAL INJURY OR EQUIPMENT DAMAGE! CAUTION: Before beginning pedestal assembly, carefully lay the front of...location for installation. 2) Unplug and remove any kind into the TV cabinet slots. 38) While it is thundering, do not touch the connecting cables or apparatus. 39) For added protection of your TV from lightning and power surges, always unplug the power cord and disconnect the ...
User Manual
Page 6
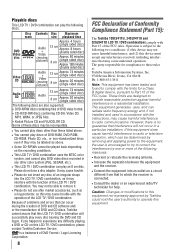
... Optical pickup lens Moisture condensation may damage discs and internal parts. Example of the surface. Four screws 32SLV411U VESA Mounting Pattern Four screws 6 Hook Sturdy strap (as short as a quilt or blanket. Connect the power cord of the unit to a warm area. • When you use the unit in... drops of water form on the floor or a sturdy, level, stable surface that can support the weight of the unit. Leaving the TV connected to a wall stud, pillar, or other immovable structure. Note: Extreme care should always be used when removing the pedestal stand to avoid damage...
... Optical pickup lens Moisture condensation may damage discs and internal parts. Example of the surface. Four screws 32SLV411U VESA Mounting Pattern Four screws 6 Hook Sturdy strap (as short as a quilt or blanket. Connect the power cord of the unit to a warm area. • When you use the unit in... drops of water form on the floor or a sturdy, level, stable surface that can support the weight of the unit. Leaving the TV connected to a wall stud, pillar, or other immovable structure. Note: Extreme care should always be used when removing the pedestal stand to avoid damage...
User Manual
Page 8
... these rules is a trademark of DVD Format / Logo Licensing Corporation. 8 FCC Declaration of Conformity Compliance Statement (Part 15): The Toshiba 19SLV411U, 24SLV411U and 32SLV411U LCD TV / DVD combinations comply with Part 15 of the FCC rules. If this LCD TV / DVD combination will not occur ... of the following measures: • Reorient or relocate the receiving antenna. • Increase the separation between the equipment and the receiver. • Connect the equipment into the LCD TV / DVD combination, as it . • Please do not use a disc adapter. Please do not insert any...
... these rules is a trademark of DVD Format / Logo Licensing Corporation. 8 FCC Declaration of Conformity Compliance Statement (Part 15): The Toshiba 19SLV411U, 24SLV411U and 32SLV411U LCD TV / DVD combinations comply with Part 15 of the FCC rules. If this LCD TV / DVD combination will not occur ... of the following measures: • Reorient or relocate the receiving antenna. • Increase the separation between the equipment and the receiver. • Connect the equipment into the LCD TV / DVD combination, as it . • Please do not use a disc adapter. Please do not insert any...
User Manual
Page 10
...panel controls and connections 12 TV back panel connections 13 Chapter 2: Connecting your TV 14 Overview of cable types 14 About the connection illustrations 14 Connecting TV to a power source 14 Connecting a VCR, and antenna, Cable TV 15 Connecting a camcorder 15 Connecting a DVD player with ColorStream® (component video)..........16 Connecting a satellite receiver 16 Connecting an HDMI or... signal formats for PC IN and HDMI terminals...........75 Limited United States Warranty LCD TV/DVD Combination ......76 Limited Canadian Warranty for Toshiba Brand Flat Panel Televisions 77
...panel controls and connections 12 TV back panel connections 13 Chapter 2: Connecting your TV 14 Overview of cable types 14 About the connection illustrations 14 Connecting TV to a power source 14 Connecting a VCR, and antenna, Cable TV 15 Connecting a camcorder 15 Connecting a DVD player with ColorStream® (component video)..........16 Connecting a satellite receiver 16 Connecting an HDMI or... signal formats for PC IN and HDMI terminals...........75 Limited United States Warranty LCD TV/DVD Combination ......76 Limited Canadian Warranty for Toshiba Brand Flat Panel Televisions 77
User Manual
Page 11
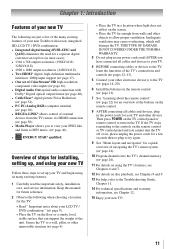
...; page 26). 11 For details on using its many exciting features of your new Toshiba widescreen, integrated HD, LCD TV / DVD combination: • Integrated digital tuning (8VSB... digital converter set-top box (in most cases). • 1366 x 768 output resolution. (19SLV411U, 32SLV411U) • 1920 x 1080 output resolution. (24SLV411U) • Two HDMI® digital, high-definition...HD high-resolution component video inputs ( page 16). • Digital Audio Out optical audio connection with Dolby® Digital optical output format ( page 40). • CableClear® digital...
...; page 26). 11 For details on using its many exciting features of your new Toshiba widescreen, integrated HD, LCD TV / DVD combination: • Integrated digital tuning (8VSB... digital converter set-top box (in most cases). • 1366 x 768 output resolution. (19SLV411U, 32SLV411U) • 1920 x 1080 output resolution. (24SLV411U) • Two HDMI® digital, high-definition...HD high-resolution component video inputs ( page 16). • Digital Audio Out optical audio connection with Dolby® Digital optical output format ( page 40). • CableClear® digital...
User Manual
Page 12
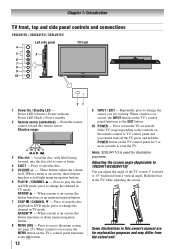
...When a menu is on -screen, these buttons function as up menu navigation button. 7無 STOP / CHANNEL q - Note: 32SLV411U is on -screen, the button functions as left/right menu navigation buttons. 6無 PLAY u / CHANNEL p - Some illustrations in this ...remote sensor. Chapter 1: Introduction TV front, top and side panel controls and connections 19SLV411U / 24SLV411U / 32SLV411U Left side panel 4 TV front 5 3 6 7 8 9 10 21 1無 Power On / Standby LED - Power LED (Green) = Power...
...When a menu is on -screen, these buttons function as up menu navigation button. 7無 STOP / CHANNEL q - Note: 32SLV411U is on -screen, the button functions as left/right menu navigation buttons. 6無 PLAY u / CHANNEL p - Some illustrations in this ...remote sensor. Chapter 1: Introduction TV front, top and side panel controls and connections 19SLV411U / 24SLV411U / 32SLV411U Left side panel 4 TV front 5 3 6 7 8 9 10 21 1無 Power On / Standby LED - Power LED (Green) = Power...
User Manual
Page 13
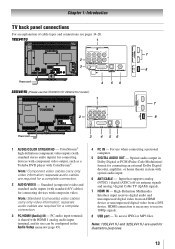
...audio input. 6無 ANT/CABLE - For use can be configured in Dolby Digital or PCM (Pulse-Code Modulation) format for connecting devices with composite video. Optical audio output in the Audio Setup menu ( page 45). 4無 PC IN - High-Definition...USB port - Chapter 1: Introduction TV back panel connections For an explanation of cable types and connections see pages 14-20. 19SLV411U 1 2 3 Power cord 32SLV411U (Please use this illustration for connecting devices with component video output, such as a Toshiba DVD player with ColorStream®. separate audio cables ...
...audio input. 6無 ANT/CABLE - For use can be configured in Dolby Digital or PCM (Pulse-Code Modulation) format for connecting devices with composite video. Optical audio output in the Audio Setup menu ( page 45). 4無 PC IN - High-Definition...USB port - Chapter 1: Introduction TV back panel connections For an explanation of cable types and connections see pages 14-20. 19SLV411U 1 2 3 Power cord 32SLV411U (Please use this illustration for connecting devices with component video output, such as a Toshiba DVD player with ColorStream®. separate audio cables ...
User Manual
Page 14
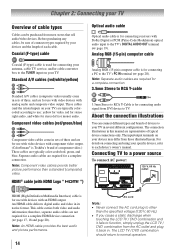
... representative of each device's owner's manual. HDMI® cable (with HDMI Logo " ") Analog RGB (15-pin) computer cable is for connecting receivers with component video output. (ColorStream® is used for use with video devices with Dolby Digital or PCM (Pulse-Code Modulation) optical ...(15-pin) computer cable Coaxial (F-type) cable is Toshiba's brand of cable types Cables can connect different types and brands of three, and are required for a complete connection. 3.5mm Stereo to RCA Y-cable 3.5mm Stereo to a power source To connect AC power: 120 V, 60 Hz outlet HDMI (High-...
... representative of each device's owner's manual. HDMI® cable (with HDMI Logo " ") Analog RGB (15-pin) computer cable is for connecting receivers with component video output. (ColorStream® is used for use with video devices with Dolby Digital or PCM (Pulse-Code Modulation) optical ...(15-pin) computer cable Coaxial (F-type) cable is Toshiba's brand of cable types Cables can connect different types and brands of three, and are required for a complete connection. 3.5mm Stereo to RCA Y-cable 3.5mm Stereo to a power source To connect AC power: 120 V, 60 Hz outlet HDMI (High-...
User Manual
Page 15
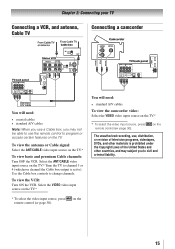
Chapter 2: Connecting your TV Connecting a VCR, and antenna, Cable TV Connecting a camcorder Yellow White Red Yellow Red White Red White Yellow Yellow White Red You will need : • coaxial cables • standard A/V cables Note: When you ...
Chapter 2: Connecting your TV Connecting a VCR, and antenna, Cable TV Connecting a camcorder Yellow White Red Yellow Red White Red White Yellow Yellow White Red You will need : • coaxial cables • standard A/V cables Note: When you ...
User Manual
Page 16
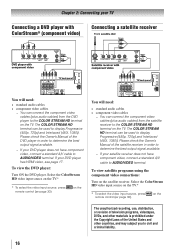
...on the TV.* * To select the video input source, press INPUT on the satellite receiver. To view satellite programs using the component video connections: Turn on the remote control ( page 30). The unauthorized recording, use, distribution, or revision of television programs, videotapes, DVDs,... DVD player in order to determine the best output signal available. −− If your satellite receiver does not have component video, connect a standard A/V cable to AUDIO/VIDEO terminal. Please check the Owner's Manual of the satellite receiver in order to determine the best ...
...on the TV.* * To select the video input source, press INPUT on the satellite receiver. To view satellite programs using the component video connections: Turn on the remote control ( page 30). The unauthorized recording, use, distribution, or revision of television programs, videotapes, DVDs,... DVD player in order to determine the best output signal available. −− If your satellite receiver does not have component video, connect a standard A/V cable to AUDIO/VIDEO terminal. Please check the Owner's Manual of the satellite receiver in order to determine the best ...
User Manual
Page 17
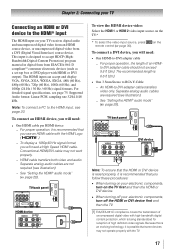
...28). Note: To ensure that you use an HDMI cable with the TV. 17 For detailed signal specifications, see page 20. Note: To connect a PC to -DVI adapter cable −− For proper operation, the length of high definition video signals. The recommended length is designed to...; An HDMI-to accept HDCP (HighBandwidth Digital-Content Protection) program material in digital form from a DVI (Digital Visual Interface) source device. To connect a DVI device, you follow these procedures: •• When turning on your electronic components, turn on the TV first and then the HDMI...
...28). Note: To ensure that you use an HDMI cable with the TV. 17 For detailed signal specifications, see page 20. Note: To connect a PC to -DVI adapter cable −− For proper operation, the length of high definition video signals. The recommended length is designed to...; An HDMI-to accept HDCP (HighBandwidth Digital-Content Protection) program material in digital form from a DVI (Digital Visual Interface) source device. To connect a DVI device, you follow these procedures: •• When turning on your electronic components, turn on the TV first and then the HDMI...
User Manual
Page 18
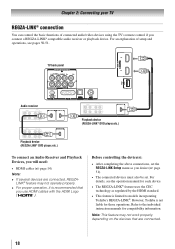
... Playback Devices, you will need: • HDMI cables ( page 14) Note: •• If several devices are connected. 18 However, Toshiba is not liable for compatibility information. Chapter 2: Connecting your TV REGZA-LINK® connection You can control the basic functions of setup and operations, see the operation manual for each device. •...
... Playback Devices, you will need: • HDMI cables ( page 14) Note: •• If several devices are connected. 18 However, Toshiba is not liable for compatibility information. Chapter 2: Connecting your TV REGZA-LINK® connection You can control the basic functions of setup and operations, see the operation manual for each device. •...
User Manual
Page 19
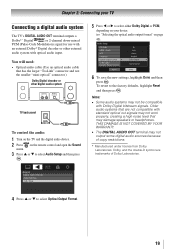
...audio input. THIS DAMAGE IS NOT COVERED BY YOUR WARRANTY. •• The DIGITAL AUDIO OUT terminal may damage speakers or headphones. Chapter 2: Connecting your device. ( "Selecting the optical audio output format" on page 40). 6無 To save the new settings, highlight Done and then.... 4無 Press p or q to select Optical Output Format. 19 To revert to select either Dolby Digital or PCM, depending on your TV Connecting a digital audio system The TV's DIGITAL AUDIO OUT terminal outputs a Dolby® * Digital or 2-channel down-mixed PCM (Pulse-Code Modulation)...
...audio input. THIS DAMAGE IS NOT COVERED BY YOUR WARRANTY. •• The DIGITAL AUDIO OUT terminal may damage speakers or headphones. Chapter 2: Connecting your device. ( "Selecting the optical audio output format" on page 40). 6無 To save the new settings, highlight Done and then.... 4無 Press p or q to select Optical Output Format. 19 To revert to select either Dolby Digital or PCM, depending on your TV Connecting a digital audio system The TV's DIGITAL AUDIO OUT terminal outputs a Dolby® * Digital or 2-channel down-mixed PCM (Pulse-Code Modulation)...
User Manual
Page 20
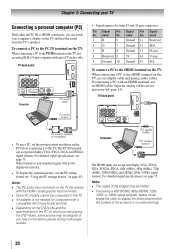
...;• The PC audio input terminals on the TV are shared with the HDMI-1 analog audio input terminals. •• Some PC models cannot be connected to this TV. •• An adapter is not needed for mini D-sub 15-pin connector Pin Signal No. Note: •• The edges... and hear the sound from the TV's speakers. TV back panel PC audio output Conversion adapter (if necessary) • To use an HDMI cable. If connecting a PC with a compatible mini D-sub15-pin terminal. •• Depending on the DVD's title and the specifications of the screen (i.e. Other formats or non...
...;• The PC audio input terminals on the TV are shared with the HDMI-1 analog audio input terminals. •• Some PC models cannot be connected to this TV. •• An adapter is not needed for mini D-sub 15-pin connector Pin Signal No. Note: •• The edges... and hear the sound from the TV's speakers. TV back panel PC audio output Conversion adapter (if necessary) • To use an HDMI cable. If connecting a PC with a compatible mini D-sub15-pin terminal. •• Depending on the DVD's title and the specifications of the screen (i.e. Other formats or non...

User Manual
Page 21
... ones. Never mix battery types or use The remote control can operate your LCD TV / DVD combination and control the basic functions of connected audio/video devices if you connect a REGZA-LINK® compatible audio receiver or playback device ( page 50). Installing the remote control batteries 1無 Open the battery lid...
... ones. Never mix battery types or use The remote control can operate your LCD TV / DVD combination and control the basic functions of connected audio/video devices if you connect a REGZA-LINK® compatible audio receiver or playback device ( page 50). Installing the remote control batteries 1無 Open the battery lid...
User Manual
Page 28
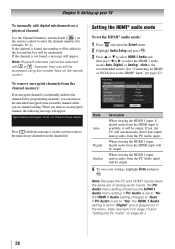
... p or q to select HDMI 1 Audio and then press t or u to select the HDMI 1 audio mode (Auto, Digital, or Analog). (Auto is the recommended mode.) See "Connecting an HDMI or DVI device to "Digital" and is available, it will automatically detect and output analog audio from the HDMI input is grayed out...
... p or q to select HDMI 1 Audio and then press t or u to select the HDMI 1 audio mode (Auto, Digital, or Analog). (Auto is the recommended mode.) See "Connecting an HDMI or DVI device to "Digital" and is available, it will automatically detect and output analog audio from the HDMI input is grayed out...

User Manual
Page 30
...the popup window. Labeling the video input sources You can choose only "- -", "Game Console", or "Hide" as the label. Audio Receiver) is connected to highlight the desired input source, and then press . To label the video input sources: 1無 Press and open the Preferences menu. 2無... or TV control panel repeatedly to change the input; If a REGZA-LINK® device with HDMI switching capability (e.g. If the connected CEC device has any connected devices, a separate device selection popup window will appear. Press INPUT repeatedly to an HDMI input, the REGZA-LINK® icon ...
...the popup window. Labeling the video input sources You can choose only "- -", "Game Console", or "Hide" as the label. Audio Receiver) is connected to highlight the desired input source, and then press . To label the video input sources: 1無 Press and open the Preferences menu. 2無... or TV control panel repeatedly to change the input; If a REGZA-LINK® device with HDMI switching capability (e.g. If the connected CEC device has any connected devices, a separate device selection popup window will appear. Press INPUT repeatedly to an HDMI input, the REGZA-LINK® icon ...
User Manual
Page 31
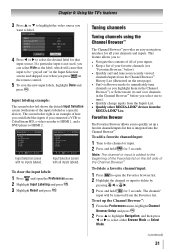
... save the new input labels, highlight Done and press . Chapter 6: Using the TV's features 3無 Press or to highlight the video source you connected a VCR to ColorStream HD, a video recorder to HDMI 1, and a DVD player to HDMI 2. To clear the input labels: 1無 Press and open the Favorites browser...
... save the new input labels, highlight Done and press . Chapter 6: Using the TV's features 3無 Press or to highlight the video source you connected a VCR to ColorStream HD, a video recorder to HDMI 1, and a DVD player to HDMI 2. To clear the input labels: 1無 Press and open the Favorites browser...


