
Owners Manual
Page 3
.... Servicing is dropped and the cabinet or enclosure surface has been damaged or the TV does not operate normally, take the following precautions: • ALWAYS turn off the TV and unplug the power cord to avoid possible electric shock or fire. • NEVER allow anything to a wall, pillar, or other apparatus...
.... Servicing is dropped and the cabinet or enclosure surface has been damaged or the TV does not operate normally, take the following precautions: • ALWAYS turn off the TV and unplug the power cord to avoid possible electric shock or fire. • NEVER allow anything to a wall, pillar, or other apparatus...
Owners Manual
Page 4
.... When selecting a location for the television, avoid locations where the screen may damage or discolor the cabinet. 29) To avoid damage to a Toshiba Authorized Service Center. 37) If you use the TV in the LCD panel contains a small amount of the used TV by ultraviolet radiation from ...etc.). Service 36) WARNING: RISK OF ELECTRIC SHOCK! When the TV reaches the end of its useful life, dispose of mercury. This is being turned on the LCD screen. Such products may be exposed to direct sunlight, such as a ladder or screwdriver) can be regulated due to provide adequate...
.... When selecting a location for the television, avoid locations where the screen may damage or discolor the cabinet. 29) To avoid damage to a Toshiba Authorized Service Center. 37) If you use the TV in the LCD panel contains a small amount of the used TV by ultraviolet radiation from ...etc.). Service 36) WARNING: RISK OF ELECTRIC SHOCK! When the TV reaches the end of its useful life, dispose of mercury. This is being turned on the LCD screen. Such products may be exposed to direct sunlight, such as a ladder or screwdriver) can be regulated due to provide adequate...
Owners Manual
Page 5
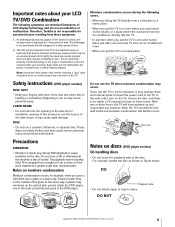
...malfunction. Drops of water form on discs (DVD player section) On handling discs • Do not touch the playback side of the disc. Therefore, Toshiba is not responsible for two or three hours. Safety instructions (DVD player section) DISC SLOT • Keep your LCD TV/DVD Combination The following cases...recommended. In the same way, moisture may cause personal injury. DO Playback side • Do not attach paper or tape to the wall outlet, turn on a warm day. Important notes about your fingers well clear of the disc slot when disc is loading or unloading. If you use the TV...
...malfunction. Drops of water form on discs (DVD player section) On handling discs • Do not touch the playback side of the disc. Therefore, Toshiba is not responsible for two or three hours. Safety instructions (DVD player section) DISC SLOT • Keep your LCD TV/DVD Combination The following cases...recommended. In the same way, moisture may cause personal injury. DO Playback side • Do not attach paper or tape to the wall outlet, turn on a warm day. Important notes about your fingers well clear of the disc slot when disc is loading or unloading. If you use the TV...
Owners Manual
Page 8
FCC Declaration of Conformity Compliance Statement (Part 15): The Toshiba 32HLX95/37HLX95 LCD Color Televisions comply with Part 15 of the FCC ... functional key chart 27 Programming the remote control to radio or television reception, which the receiver is : Toshiba America Consumer Products, L.L.C. 82 Totowa Rd. If this equipment. Increase the separation between the equipment and the... Setting up the TV Guide On Screen™ system 35 TV Guide On Screen™ reminder 38 Turning off the TV Guide On Screen™ automatic display feature 38 (component video 18 Connecting a DVD player...
FCC Declaration of Conformity Compliance Statement (Part 15): The Toshiba 32HLX95/37HLX95 LCD Color Televisions comply with Part 15 of the FCC ... functional key chart 27 Programming the remote control to radio or television reception, which the receiver is : Toshiba America Consumer Products, L.L.C. 82 Totowa Rd. If this equipment. Increase the separation between the equipment and the... Setting up the TV Guide On Screen™ system 35 TV Guide On Screen™ reminder 38 Turning off the TV Guide On Screen™ automatic display feature 38 (component video 18 Connecting a DVD player...
Owners Manual
Page 9
...audio quality 75 Using the StableSound® feature 75 Using the SRS WOW™ surround sound feature .......... 76 Turning off the built-in speakers 76 Selecting the optical audio output format 76 Setting the On/Off timer 77 ... Repeat playback 86 Changing angles 86 Title selection 86 Changing soundtrack language 87 Subtitles 87 Disc status 87 To turn off the PBC 88 MP3/JPEG CD operation 88 MP3/JPEG CD information 88 MP3 CD playback 88 JPEG CD... United States Warranty 97 Limited Canada Warranty 98 Index 100 Copyright © 2005 TOSHIBA CORPORATION. All rights reserved. 9
...audio quality 75 Using the StableSound® feature 75 Using the SRS WOW™ surround sound feature .......... 76 Turning off the built-in speakers 76 Selecting the optical audio output format 76 Setting the On/Off timer 77 ... Repeat playback 86 Changing angles 86 Title selection 86 Changing soundtrack language 87 Subtitles 87 Disc status 87 To turn off the PBC 88 MP3/JPEG CD operation 88 MP3/JPEG CD information 88 MP3 CD playback 88 JPEG CD... United States Warranty 97 Limited Canada Warranty 98 Index 100 Copyright © 2005 TOSHIBA CORPORATION. All rights reserved. 9
Owners Manual
Page 10
...license from SRS Labs, Inc. • *Manufactured under license by default when you turn off the automatic program guide (page 38) and instead press the TV GUIDE button on the TV. Use of this Toshiba LCD TV/DVD combination, one of its affiliates. See "Important notes about your TV...Laboratories. You also can turn on the remote control to manually open .) • The side panel and back panel provide terminals for connecting other intellectual property rights. See page 13 for top panel and side panel details. AND/OR ITS RELATED AFFILIATES AND/OR TOSHIBA ARE NOT IN ANY...
...license from SRS Labs, Inc. • *Manufactured under license by default when you turn off the automatic program guide (page 38) and instead press the TV GUIDE button on the TV. Use of this Toshiba LCD TV/DVD combination, one of its affiliates. See "Important notes about your TV...Laboratories. You also can turn on the remote control to manually open .) • The side panel and back panel provide terminals for connecting other intellectual property rights. See page 13 for top panel and side panel details. AND/OR ITS RELATED AFFILIATES AND/OR TOSHIBA ARE NOT IN ANY...
Owners Manual
Page 11
..., be far enough from walls and other devices. Program the remote control to the controls on the remote control or top panel and you cannot turn on setting up your TV. 4. will display on page 5. 3. If the TV stops responding to operate your new LCD TV/DVD! Note:..., press POWER on the top panel or remote control to the Troubleshooting Guide (Chapter 11). 18. Connect your area). 14. Copyright © 2005 TOSHIBA CORPORATION. Install the batteries in your other device(s) (pages 29-30). 10. See "Menu layout and navigation" for details on using its many exciting...
..., be far enough from walls and other devices. Program the remote control to the controls on the remote control or top panel and you cannot turn on setting up your TV. 4. will display on page 5. 3. If the TV stops responding to operate your new LCD TV/DVD! Note:..., press POWER on the top panel or remote control to the Troubleshooting Guide (Chapter 11). 18. Connect your area). 14. Copyright © 2005 TOSHIBA CORPORATION. Install the batteries in your other device(s) (pages 29-30). 10. See "Menu layout and navigation" for details on using its many exciting...
Owners Manual
Page 12
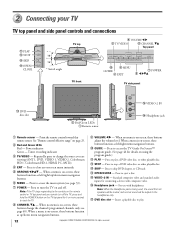
...control toward this remote sensor. Repeatedly press to eject a disc. !∞ VIDEO-2 IN - Press to play . 12 Copyright © 2005 TOSHIBA CORPORATION. For use with composite video. !§ Headphone jack - All rights reserved. See "Remote control effective range" on using the program ...guide.) !¡ PLAY - Press to turn off . Press to change the channel (programmed channels only; 2 Connecting your TV TV top panel and side panel controls and connections !&#...
...control toward this remote sensor. Repeatedly press to eject a disc. !∞ VIDEO-2 IN - Press to play . 12 Copyright © 2005 TOSHIBA CORPORATION. For use with composite video. !§ Headphone jack - All rights reserved. See "Remote control effective range" on using the program ...guide.) !¡ PLAY - Press to turn off . Press to change the channel (programmed channels only; 2 Connecting your TV TV top panel and side panel controls and connections !&#...
Owners Manual
Page 16
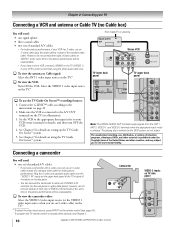
...'s audio out terminal using the TV Guide On Screen™ system. Camcorder S-VIDEO VIDEO AUDIO OUT L R 16 Copyright © 2005 TOSHIBA CORPORATION. However, do not connect devices to VIDEO 1 at the same time or the picture performance will be unacceptable. Make sure the VCR...lower back panel TV upper back panel To use the TV Guide On Screen™ recording features: 1. See Chapter 5 for details), and then turn OFF the VCR. 4. The unauthorized recording, use, distribution, or revision of television programs, videotapes, DVDs, and other devices, see page 60)....
...'s audio out terminal using the TV Guide On Screen™ system. Camcorder S-VIDEO VIDEO AUDIO OUT L R 16 Copyright © 2005 TOSHIBA CORPORATION. However, do not connect devices to VIDEO 1 at the same time or the picture performance will be unacceptable. Make sure the VCR...lower back panel TV upper back panel To use the TV Guide On Screen™ recording features: 1. See Chapter 5 for details), and then turn OFF the VCR. 4. The unauthorized recording, use, distribution, or revision of television programs, videotapes, DVDs, and other devices, see page 60)....
Owners Manual
Page 17
...see illustration). 3. The unauthorized recording, use the TV Guide On Screen™ recording features: 1. See Chapter 7 for details), and then turn OFF the VCR. 4. All rights reserved. 17 Do not connect an S-video cable and a standard video cable to operate other countries, ... VIDEO 2 terminals when the appropriate input mode is selected. Connect the G-LINK™ cable according to change channels. Copyright © 2005 TOSHIBA CORPORATION. Use the Cable box controls to program or access certain features on setting up the TV Guide On Screen™ system. 5. To...
...see illustration). 3. The unauthorized recording, use the TV Guide On Screen™ recording features: 1. See Chapter 7 for details), and then turn OFF the VCR. 4. All rights reserved. 17 Do not connect an S-video cable and a standard video cable to operate other countries, ... VIDEO 2 terminals when the appropriate input mode is selected. Connect the G-LINK™ cable according to change channels. Copyright © 2005 TOSHIBA CORPORATION. Use the Cable box controls to program or access certain features on setting up the TV Guide On Screen™ system. 5. To...

Owners Manual
Page 18
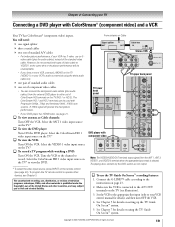
... ColorStream HD 1 video input source on all three devices. Set the VCR to the appropriate line input (refer to record satellite programs: Turn on the TV.* To view satellite programs using the TV Guide On Screen™ system. The unauthorized recording, use the TV Guide On... Screen™ recording features: 1. See Chapter 5 for details), and then turn OFF the VCR. 4. All rights reserved. Connect the G-LINK™ cable according to civil and criminal liability. 18 Copyright © 2005 TOSHIBA CORPORATION. Make sure the VCR is prohibited under the Copyright Laws of the ...
... ColorStream HD 1 video input source on all three devices. Set the VCR to the appropriate line input (refer to record satellite programs: Turn on the TV.* To view satellite programs using the TV Guide On Screen™ system. The unauthorized recording, use the TV Guide On... Screen™ recording features: 1. See Chapter 5 for details), and then turn OFF the VCR. 4. All rights reserved. Connect the G-LINK™ cable according to civil and criminal liability. 18 Copyright © 2005 TOSHIBA CORPORATION. Make sure the VCR is prohibited under the Copyright Laws of the ...
Owners Manual
Page 19
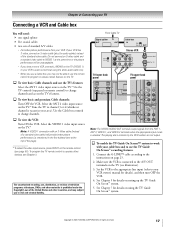
... criminal liability. Make sure the VCR is selected. Copyright © 2005 TOSHIBA CORPORATION. Select the ANT 1 video input source on page 23. 2. All rights reserved. 19 To view antenna or Cable channels: Turn OFF the VCR. one pair of standard audio cables one signal splitter three... source on using the white audio cable only. See Chapter 5 for details on the TV.* To record a TV program while watching a DVD: Turn ON the VCR. The playing disc's contents by the DVD section are not output. To use , distribution, or revision of television programs, videotapes,...
... criminal liability. Make sure the VCR is selected. Copyright © 2005 TOSHIBA CORPORATION. Select the ANT 1 video input source on page 23. 2. All rights reserved. 19 To view antenna or Cable channels: Turn OFF the VCR. one pair of standard audio cables one signal splitter three... source on using the white audio cable only. See Chapter 5 for details on the TV.* To record a TV program while watching a DVD: Turn ON the VCR. The playing disc's contents by the DVD section are not output. To use , distribution, or revision of television programs, videotapes,...
Owners Manual
Page 20
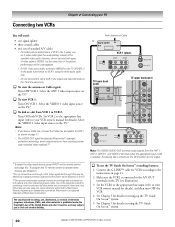
...; Do not connect the same VCR to the audio out terminal on VCR 1 using the TV Guide On Screen™ system. 20 Copyright © 2005 TOSHIBA CORPORATION. Make sure the VCR2 is connected to the A/V OUT terminals on the TV.* To dub or edit from the ANT 1, ANT 2, VIDEO 1, and ... will be distorted on the TV at the same time. To program the TV remote control to your VCR owner's manual for details), and then turn OFF the VCR. 4. Reverse engineering or disassembly is a registered trademark of the United States and other intellectual property rights. Set the VCR2 to the ...
...; Do not connect the same VCR to the audio out terminal on VCR 1 using the TV Guide On Screen™ system. 20 Copyright © 2005 TOSHIBA CORPORATION. Make sure the VCR2 is connected to the A/V OUT terminals on the TV.* To dub or edit from the ANT 1, ANT 2, VIDEO 1, and ... will be distorted on the TV at the same time. To program the TV remote control to your VCR owner's manual for details), and then turn OFF the VCR. 4. Reverse engineering or disassembly is a registered trademark of the United States and other intellectual property rights. Set the VCR2 to the ...
Owners Manual
Page 21
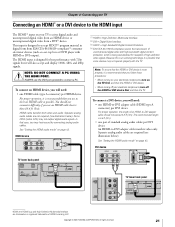
... (3m). Note: To ensure that the HDMI or DVI device is reset properly, it is recommended that case, you follow these procedures: • When turning on your TV receives digital audio and uncompressed digital video from an HDMI device or uncompressed digital video from EIA/CEA-861/861B-compliant[4] consumer... length is designed to the HDMI input The HDMI[1] input on the TV first, and then the HDMI or DVI device. • When turning off your electronic components, turn on your electronic components, turn off the HDMI or DVI device first, and then the TV. Copyright © 2005...
... (3m). Note: To ensure that the HDMI or DVI device is reset properly, it is recommended that case, you follow these procedures: • When turning on your TV receives digital audio and uncompressed digital video from an HDMI device or uncompressed digital video from EIA/CEA-861/861B-compliant[4] consumer... length is designed to the HDMI input The HDMI[1] input on the TV first, and then the HDMI or DVI device. • When turning off your electronic components, turn on your electronic components, turn off the HDMI or DVI device first, and then the TV. Copyright © 2005...

Owners Manual
Page 22
...with Dolby Digital bitstream signals. Older audio systems that has the larger "TosLink" connector and not the smaller "minioptical" connector.) To control the audio: Turn on the TV and the stereo amplifier. Press MENU on page 76). You will need : one optical audio cable (Use an optical audio cable that... may not be set to adjust the sound level. Analog audio amplifier LINE IN LR 22 TV upper back panel Copyright © 2005 TOSHIBA CORPORATION. All rights reserved. In the Optical Output Format field, select either Dolby Digital/Surround or PCM, depending on page 76...
...with Dolby Digital bitstream signals. Older audio systems that has the larger "TosLink" connector and not the smaller "minioptical" connector.) To control the audio: Turn on the TV and the stereo amplifier. Press MENU on page 76). You will need : one optical audio cable (Use an optical audio cable that... may not be set to adjust the sound level. Analog audio amplifier LINE IN LR 22 TV upper back panel Copyright © 2005 TOSHIBA CORPORATION. All rights reserved. In the Optical Output Format field, select either Dolby Digital/Surround or PCM, depending on page 76...
Owners Manual
Page 23
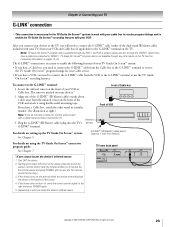
.... 5. TV lower back panel *If you locate the device's infrared sensor. If the device does not turn on the TV. TV Guide On Screen™ program data is not available through the VIDEO 1 inputs ... infrared sensor on setting up the TV Guide On Screen™ system: See Chapter 5. If the device turns on, the point at the lower left corner of the device, place the end of VCR For details ...on the front of the sensor. 4. Copyright © 2005 TOSHIBA CORPORATION. Note: TV Guide On Screen™ program data is available through the ANT-1 and ANT-2...
.... 5. TV lower back panel *If you locate the device's infrared sensor. If the device does not turn on the TV. TV Guide On Screen™ program data is not available through the VIDEO 1 inputs ... infrared sensor on setting up the TV Guide On Screen™ system: See Chapter 5. If the device turns on, the point at the lower left corner of the device, place the end of VCR For details ...on the front of the sensor. 4. Copyright © 2005 TOSHIBA CORPORATION. Note: TV Guide On Screen™ program data is available through the ANT-1 and ANT-2...

Owners Manual
Page 25
...PBC, SLOW, SKIP, REW, FF, PAUSE, PLAY, OPEN/CLOSE, STOP, A-B REPEAT, and SEARCH (see chapter 10). 16.4 ft (5m) Copyright © 2005 TOSHIBA CORPORATION. INPUT selects the video input source (page 60). MODE cycles through the five pictures sizes: Natural, TheaterWide 1/2/3, and Full (page 65). The mode indicator... and the TV Guide On Screen™ system. For a complete list of TV. Channel Numbers (0-9, -/100) directly tune channels. Every time you turn on , pressing any other key lights the keypad for 5 seconds (10 seconds if you press a key for a function that operate the TV Guide...
...PBC, SLOW, SKIP, REW, FF, PAUSE, PLAY, OPEN/CLOSE, STOP, A-B REPEAT, and SEARCH (see chapter 10). 16.4 ft (5m) Copyright © 2005 TOSHIBA CORPORATION. INPUT selects the video input source (page 60). MODE cycles through the five pictures sizes: Natural, TheaterWide 1/2/3, and Full (page 65). The mode indicator... and the TV Guide On Screen™ system. For a complete list of TV. Channel Numbers (0-9, -/100) directly tune channels. Every time you turn on , pressing any other key lights the keypad for 5 seconds (10 seconds if you press a key for a function that operate the TV Guide...

Owners Manual
Page 37
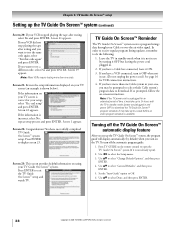
... ENTER to display screen 17. Screen 15: Is a VCR connected? If you select Yes, screen 14 appears. Screen 18 appears. Screen 18: Turn on -screen information regarding the amount of VCR you must select Yes in this screen to download from the TV Guide On Screen™ service...listings. Select either blank or previously recorded), and then press PLAY. Do not press any keys on the TV. Copyright © 2005 TOSHIBA CORPORATION. Press ENTER to display screen 15. Note: If you selected No in screen 3, you selected. When testing is completed, screen 20 appears.
... ENTER to display screen 17. Screen 15: Is a VCR connected? If you select Yes, screen 14 appears. Screen 18 appears. Screen 18: Turn on -screen information regarding the amount of VCR you must select Yes in this screen to download from the TV Guide On Screen™ service...listings. Select either blank or previously recorded), and then press PLAY. Do not press any keys on the TV. Copyright © 2005 TOSHIBA CORPORATION. Press ENTER to display screen 15. Note: If you selected No in screen 3, you selected. When testing is completed, screen 20 appears.
Owners Manual
Page 38
...standby mode (power cord plugged in and power OFF) to download the TV Guide On Screen™ program schedule. Screen 22: Congratulations! To turn on using your area, you may be prompted to select which Cable system's program data to test a different code, select No and press ENTER... exit the TV Guide On Screen™ setup and watch TV. Use yz to select Done, and then press ENTER. 38 Copyright © 2005 TOSHIBA CORPORATION. Screen 22 appears. Screen 1 appears. If you have a Cable box connected, leave it is shown below). Screen 21: Review the setup ...
...standby mode (power cord plugged in and power OFF) to download the TV Guide On Screen™ program schedule. Screen 22: Congratulations! To turn on using your area, you may be prompted to select which Cable system's program data to test a different code, select No and press ENTER... exit the TV Guide On Screen™ setup and watch TV. Use yz to select Done, and then press ENTER. 38 Copyright © 2005 TOSHIBA CORPORATION. Screen 22 appears. Screen 1 appears. If you have a Cable box connected, leave it is shown below). Screen 21: Review the setup ...

Owners Manual
Page 45
... Back EXIT Exit 3. Follow steps 1-3 above. 2. Enter your PIN code (or 0000 if no PIN has been set of Installation menu icons will turn off , unplug the TV power cord and then plug it in your TV Viewing the system status To check the system status: 1. After the TV...to select Factory Defaults. Highlight Yes and press ENTER. Type in again to normal viewing: Press EXIT. System Information System Information Product Information Brand: Toshiba Model: 32HLX95 Software Version 0.8.2 Jun 13 2005 - 13:54:14 FW:1.41 Sub:41 Done Done To close the screen and return to reset the TV...
... Back EXIT Exit 3. Follow steps 1-3 above. 2. Enter your PIN code (or 0000 if no PIN has been set of Installation menu icons will turn off , unplug the TV power cord and then plug it in your TV Viewing the system status To check the system status: 1. After the TV...to select Factory Defaults. Highlight Yes and press ENTER. Type in again to normal viewing: Press EXIT. System Information System Information Product Information Brand: Toshiba Model: 32HLX95 Software Version 0.8.2 Jun 13 2005 - 13:54:14 FW:1.41 Sub:41 Done Done To close the screen and return to reset the TV...

