
Owners Manual
Page 3
... amplifiers) that no objects filled with liquids, such as vases, shall be placed on the floor or a sturdy, Sturdy tie (as short as power-supply cord or plug is damaged, liquid has been spilled or objects have fallen into your outlet, consult an electrician for replacement of the obsolete... outlet. 10) Protect the power cord from being walked on or pinched, particularly at least 4 inches around the TV (5 inches away from the TV slot side). 22) Never...
... amplifiers) that no objects filled with liquids, such as vases, shall be placed on the floor or a sturdy, Sturdy tie (as short as power-supply cord or plug is damaged, liquid has been spilled or objects have fallen into your outlet, consult an electrician for replacement of the obsolete... outlet. 10) Protect the power cord from being walked on or pinched, particularly at least 4 inches around the TV (5 inches away from the TV slot side). 22) Never...
Owners Manual
Page 4
...object. 35) • The LCD screen in front of the TV. Service 36) WARNING: RISK OF ELECTRIC SHOCK! Refer all servicing to a Toshiba Authorized Service Center. 37) If you to dangerous voltage or other electrical circuits. • Never attempt to this product, never place or store the...to use , the TV may be regulated due to clean the LCD screen, follow these sounds become frequent or continuous, unplug the power cord and contact a Toshiba Authorized Service Center. 34) WARNING: RISK OF SERIOUS PERSONAL INJURY OR EQUIPMENT DAMAGE ! Note: The lamp unit contains mercury, the...
...object. 35) • The LCD screen in front of the TV. Service 36) WARNING: RISK OF ELECTRIC SHOCK! Refer all servicing to a Toshiba Authorized Service Center. 37) If you to dangerous voltage or other electrical circuits. • Never attempt to this product, never place or store the...to use , the TV may be regulated due to clean the LCD screen, follow these sounds become frequent or continuous, unplug the power cord and contact a Toshiba Authorized Service Center. 34) WARNING: RISK OF SERIOUS PERSONAL INJURY OR EQUIPMENT DAMAGE ! Note: The lamp unit contains mercury, the...
Owners Manual
Page 5
...the DVD player. DISC • Do not use the TV when moisture condensation may condense on the optical pick-up lens Copyright © 2005 TOSHIBA CORPORATION. Do not use a cracked, deformed, or repaired disc. After two or three hours, the TV will seldom occur. In the same ...may cause sight damage. All rights reserved. 5 This is a structural property of LCD technology, is dropped from a normal viewing distance. Connect the power cord of malfunction, and is not permanent and will disappear in a short period of time. The afterimage is not covered under your warranty. Do ...
...the DVD player. DISC • Do not use the TV when moisture condensation may condense on the optical pick-up lens Copyright © 2005 TOSHIBA CORPORATION. Do not use a cracked, deformed, or repaired disc. After two or three hours, the TV will seldom occur. In the same ...may cause sight damage. All rights reserved. 5 This is a structural property of LCD technology, is dropped from a normal viewing distance. Connect the power cord of malfunction, and is not permanent and will disappear in a short period of time. The afterimage is not covered under your warranty. Do ...
Owners Manual
Page 8
... Declaration of Conformity Compliance Statement (Part 15): The Toshiba 32HLX95/37HLX95 LCD Color Televisions comply with Part 15 of ...rights reserved. Wayne, NJ 07470. This equipment generates, uses, and can be determined by removing and applying power to operate your other devices 29 Device code setup 29 Searching and sampling the code of a device (8500)...functional key chart 27 Programming the remote control to the equipment, the user is connected. - Operation is : Toshiba America Consumer Products, L.L.C. 82 Totowa Rd. Ph: (973) 628-8000 Note: This equipment has been tested...
... Declaration of Conformity Compliance Statement (Part 15): The Toshiba 32HLX95/37HLX95 LCD Color Televisions comply with Part 15 of ...rights reserved. Wayne, NJ 07470. This equipment generates, uses, and can be determined by removing and applying power to operate your other devices 29 Device code setup 29 Searching and sampling the code of a device (8500)...functional key chart 27 Programming the remote control to the equipment, the user is connected. - Operation is : Toshiba America Consumer Products, L.L.C. 82 Totowa Rd. Ph: (973) 628-8000 Note: This equipment has been tested...
Owners Manual
Page 9
... timer 77 Setting the sleep timer 77 Using the PC setting feature 78 Displaying TV setting information on-screen using RECALL 79 Understanding the auto power off feature 79 Understanding the last mode memory feature 79 Using the Gray Level feature 79 Chapter 9: Using the Locks menu 80 Entering the PIN... On Screen™ FAQs 93 Chapter 12: Appendix 96 Specifications 96 Limited United States Warranty 97 Limited Canada Warranty 98 Index 100 Copyright © 2005 TOSHIBA CORPORATION. All rights reserved. 9
... timer 77 Setting the sleep timer 77 Using the PC setting feature 78 Displaying TV setting information on-screen using RECALL 79 Understanding the auto power off feature 79 Understanding the last mode memory feature 79 Using the Gray Level feature 79 Chapter 9: Using the Locks menu 80 Entering the PIN... On Screen™ FAQs 93 Chapter 12: Appendix 96 Specifications 96 Limited United States Warranty 97 Limited Canada Warranty 98 Index 100 Copyright © 2005 TOSHIBA CORPORATION. All rights reserved. 9
Owners Manual
Page 11
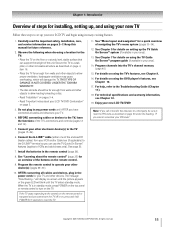
... into the TV's channel memory (page 40). 15. For details on using the DVD player's features, see Chapter 10. 17. Copyright © 2005 TOSHIBA CORPORATION. Keep this television to a third party, be far enough from walls and other device(s) (pages 29-30). 10. Connect your other electronic device... 7. The message "Now Booting..." For details on page 80 under the heading, "If you have connected all cables and devices, plug in the power cords for future reference. 2. AFTER connecting all cables and devices to the Troubleshooting Guide (Chapter 11). 18. Secure the TV to a wall, ...
... into the TV's channel memory (page 40). 15. For details on using the DVD player's features, see Chapter 10. 17. Copyright © 2005 TOSHIBA CORPORATION. Keep this television to a third party, be far enough from walls and other device(s) (pages 29-30). 10. Connect your other electronic device... 7. The message "Now Booting..." For details on page 80 under the heading, "If you have connected all cables and devices, plug in the power cords for future reference. 2. AFTER connecting all cables and devices to the Troubleshooting Guide (Chapter 11). 18. Secure the TV to a wall, ...
Owners Manual
Page 12
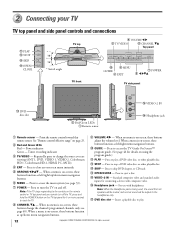
... © 2005 TOSHIBA CORPORATION. Press to eject a disc. !∞ VIDEO-2 IN - All rights reserved. 2 Connecting your TV TV top panel and side panel controls and connections !¡ PLAY !™ STOP !£ SKIP !¢ OPEN/ CLOSE * * * Swivel angle TV top 9 VOLUME x • 3 TV/VIDEO 8 CHANNEL zy Top panel 0 6 MENU GUIDE 4 EXIT 7 POWER 5 x •...
... © 2005 TOSHIBA CORPORATION. Press to eject a disc. !∞ VIDEO-2 IN - All rights reserved. 2 Connecting your TV TV top panel and side panel controls and connections !¡ PLAY !™ STOP !£ SKIP !¢ OPEN/ CLOSE * * * Swivel angle TV top 9 VOLUME x • 3 TV/VIDEO 8 CHANNEL zy Top panel 0 6 MENU GUIDE 4 EXIT 7 POWER 5 x •...
Owners Manual
Page 13
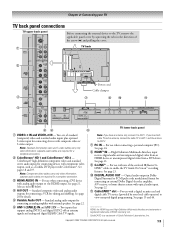
...ANT-1 (CABLE) IN and ANT-2 IN - For use when connecting a DVI device with one of the arrow ( ) and pulling the cover. 1 TV back 2 Power cord Cable clamper 3 7 90 !¡ 4 56 TV lower back panel 8 1 VIDEO-1 IN and VIDEO-2 IN - Optical audio output in the direction of the ... use with analog audio output to ANT-2. 7 PC IN - Standard analog audio outputs for connecting devices with component video output, such as a Toshiba DVD player with optical audio input. See page 24. 8 HDMI™ IN - ColorStream® high-definition component video and standard stereo audio inputs...
...ANT-1 (CABLE) IN and ANT-2 IN - For use when connecting a DVI device with one of the arrow ( ) and pulling the cover. 1 TV back 2 Power cord Cable clamper 3 7 90 !¡ 4 56 TV lower back panel 8 1 VIDEO-1 IN and VIDEO-2 IN - Optical audio output in the direction of the ... use with analog audio output to ANT-2. 7 PC IN - Standard analog audio outputs for connecting devices with component video output, such as a Toshiba DVD player with optical audio input. See page 24. 8 HDMI™ IN - ColorStream® high-definition component video and standard stereo audio inputs...
Owners Manual
Page 23
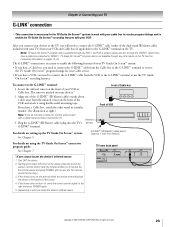
... 2. Turn OFF the device. 2. Infrared sensor Front of Cable box Front of the VCR and attach it behind the TV. 3. Copyright © 2005 TOSHIBA CORPORATION. Chapter 2: Connecting your TV G-LINK™ connection • This connection is necessary for the TV Guide On Screen™ system to work with your... of the device, place the end of the device's remote control (with the infrared emitter) so it touches the front of the device and press POWER. (Do not use the TV Guide On Screen™ recording features. Note: TV Guide On Screen™ program data is marked on this step.)...
... 2. Turn OFF the device. 2. Infrared sensor Front of Cable box Front of the VCR and attach it behind the TV. 3. Copyright © 2005 TOSHIBA CORPORATION. Chapter 2: Connecting your TV G-LINK™ connection • This connection is necessary for the TV Guide On Screen™ system to work with your... of the device, place the end of the device's remote control (with the infrared emitter) so it touches the front of the device and press POWER. (Do not use the TV Guide On Screen™ recording features. Note: TV Guide On Screen™ program data is marked on this step.)...

Owners Manual
Page 25
..., SKIP, REW, FF, PAUSE, PLAY, OPEN/CLOSE, STOP, A-B REPEAT, and SEARCH (see chapter 10). 16.4 ft (5m) Copyright © 2005 TOSHIBA CORPORATION. Channel Numbers (0-9, -/100) directly tune channels. INFO provides detailed information on -screen (page 79). ENTER activates highlighted items in the TV Guide On Screen... For a complete list of the LIGHT button toggle between the remote control and the TV. Press POWER to turn off the sound (page 74). Press POWER again to turn the power on and off. With the Illumination mode on pages 27-28. Subsequent presses of the remote control...
..., SKIP, REW, FF, PAUSE, PLAY, OPEN/CLOSE, STOP, A-B REPEAT, and SEARCH (see chapter 10). 16.4 ft (5m) Copyright © 2005 TOSHIBA CORPORATION. Channel Numbers (0-9, -/100) directly tune channels. INFO provides detailed information on -screen (page 79). ENTER activates highlighted items in the TV Guide On Screen... For a complete list of the LIGHT button toggle between the remote control and the TV. Press POWER to turn off the sound (page 74). Press POWER again to turn the power on and off. With the Illumination mode on pages 27-28. Subsequent presses of the remote control...
Owners Manual
Page 27
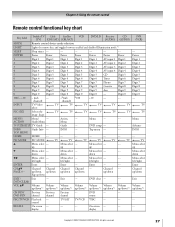
...--- INFO --- display display Copyright © 2005 TOSHIBA CORPORATION. Action, --- Enter --- --- Chapter 3: Using the remote control Remote control functional key chart Key Label Toshiba TV Cable Satellite (TV) (CBL/SAT) (... --- --- --- --- --- --- Advance INFO/ Guide Info --- Menu select down down down down EXIT/ Exit --- control RECALL On-screen --- --- --- POWER Power Power Power Power Power Power Power Power 1 Digit 1 Digit 1 Digit 1 Digit 1 Digit 1 AV input 1 Digit 1 Digit 1 2 Digit 2 Digit 2 Digit 2 Digit 2 Digit ...
...--- INFO --- display display Copyright © 2005 TOSHIBA CORPORATION. Action, --- Enter --- --- Chapter 3: Using the remote control Remote control functional key chart Key Label Toshiba TV Cable Satellite (TV) (CBL/SAT) (... --- --- --- --- --- --- Advance INFO/ Guide Info --- Menu select down down down down EXIT/ Exit --- control RECALL On-screen --- --- --- POWER Power Power Power Power Power Power Power Power 1 Digit 1 Digit 1 Digit 1 Digit 1 Digit 1 AV input 1 Digit 1 Digit 1 2 Digit 2 Digit 2 Digit 2 Digit 2 Digit ...
Owners Manual
Page 29
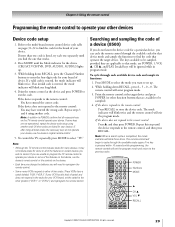
..., it may have entered the wrong code. Point the remote control at the device and press POWER to be sampled). 4. POWER Numbers MODE y CH y VOL z RECALL Copyright © 2005 TOSHIBA CORPORATION. If some keys are not operational, repeat the device code setup using another code (if... other codes are POWER, 1, VOL y, CH y, and PLAY. While holding down RECALL, press 8 - 5 - 0 - 0. Refer to the multi-brand remote control ...
..., it may have entered the wrong code. Point the remote control at the device and press POWER to be sampled). 4. POWER Numbers MODE y CH y VOL z RECALL Copyright © 2005 TOSHIBA CORPORATION. If some keys are not operational, repeat the device code setup using another code (if... other codes are POWER, 1, VOL y, CH y, and PLAY. While holding down RECALL, press 8 - 5 - 0 - 0. Refer to the multi-brand remote control ...
Owners Manual
Page 38
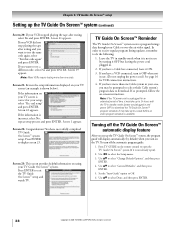
... Screen 23: This screen provides helpful information on your TV screen is correct for your TV Guide On Screen™ system. Note: If the TV power cord is shown below). Chapter 5: TV Guide On Screen™ setup Setting up the TV Guide On Screen™ system (continued) Screen 20: If... by default) when you want to select Done, and then press ENTER. 38 Copyright © 2005 TOSHIBA CORPORATION. All rights reserved. If you may take up to 24 hours with the TV in standby mode (power cord plugged in . 2. Use x • to exit the TV Guide On Screen™ setup and...
... Screen 23: This screen provides helpful information on your TV screen is correct for your TV Guide On Screen™ system. Note: If the TV power cord is shown below). Chapter 5: TV Guide On Screen™ setup Setting up the TV Guide On Screen™ system (continued) Screen 20: If... by default) when you want to select Done, and then press ENTER. 38 Copyright © 2005 TOSHIBA CORPORATION. All rights reserved. If you may take up to 24 hours with the TV in standby mode (power cord plugged in . 2. Use x • to exit the TV Guide On Screen™ setup and...
Owners Manual
Page 43
... Start Setup, and press ENTER. To set automatically. Press MENU and open the Setup menu. 2. It is the recommended mode). Copyright © 2005 TOSHIBA CORPORATION. The TV Guide On Screen™ setup sequence will start, and the time and date will appear on page 21. Manual TV Guide On... if you have not set up the TV Guide On Screen™ system, the following screen will lose the time and date settings when the power is restored. • If you manually set automatically and you highlight Manual (above ) to obtain the time and date. All rights reserved. 43 ...
... Start Setup, and press ENTER. To set automatically. Press MENU and open the Setup menu. 2. It is the recommended mode). Copyright © 2005 TOSHIBA CORPORATION. The TV Guide On Screen™ setup sequence will start, and the time and date will appear on page 21. Manual TV Guide On... if you have not set up the TV Guide On Screen™ system, the following screen will lose the time and date settings when the power is restored. • If you manually set automatically and you highlight Manual (above ) to obtain the time and date. All rights reserved. 43 ...

Owners Manual
Page 45
... and Software Version. Highlight Yes and press ENTER. System Information System Information Product Information Brand: Toshiba Model: 32HLX95 Software Version 0.8.2 Jun 13 2005 - 13:54:14 FW:1.41 Sub:41 Done Done To... rights reserved. 45 After the TV turns off automatically after a few seconds. Copyright © 2005 TOSHIBA CORPORATION. To return to complete the restore process. Setup Installation Sleep Timer On/Off Timer PC Settings ...Installation menu icons will turn off , unplug the TV power cord and then plug it in your TV Viewing the system status To check the system status: ...
... and Software Version. Highlight Yes and press ENTER. System Information System Information Product Information Brand: Toshiba Model: 32HLX95 Software Version 0.8.2 Jun 13 2005 - 13:54:14 FW:1.41 Sub:41 Done Done To... rights reserved. 45 After the TV turns off automatically after a few seconds. Copyright © 2005 TOSHIBA CORPORATION. To return to complete the restore process. Setup Installation Sleep Timer On/Off Timer PC Settings ...Installation menu icons will turn off , unplug the TV power cord and then plug it in your TV Viewing the system status To check the system status: ...
Owners Manual
Page 50
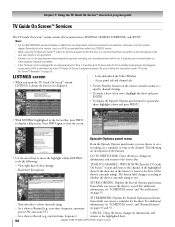
...8226; For the RECORDINGS service to display, an IEEE1394 recording device must be lost. It may take up to Record (e.g, start time, frequency, automatic power ON, auto-tune TV) - Press INFO again to the television; For additional information, see "SCHEDULE screen" and "Remind features" on pages 53 ...control to jump to other devices, such as a VCR, are descriptions of the highlighted show (if the show . 50 Copyright © 2005 TOSHIBA CORPORATION. Lock and unlock the Video Window - View eight days of four main services: LISTINGS, SEARCH, SCHEDULE, and SETUP. Be sure to ...
...8226; For the RECORDINGS service to display, an IEEE1394 recording device must be lost. It may take up to Record (e.g, start time, frequency, automatic power ON, auto-tune TV) - Press INFO again to the television; For additional information, see "SCHEDULE screen" and "Remind features" on pages 53 ...control to jump to other devices, such as a VCR, are descriptions of the highlighted show (if the show . 50 Copyright © 2005 TOSHIBA CORPORATION. Lock and unlock the Video Window - View eight days of four main services: LISTINGS, SEARCH, SCHEDULE, and SETUP. Be sure to ...
Owners Manual
Page 55
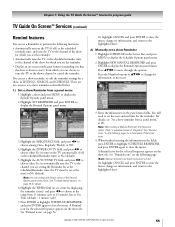
...15 minutes early to the highlighted show tile. Highlight NEW MANUAL REMINDER and press ENTER to display the Episode Options panel menu. 2. Highlight the POWER ON TV field, and press x • to choose either Yes (to automatically tune the TV to move through the options. Press ENTER to...off ) at the scheduled reminder time, and tune the TV to the channel of the show , in the panel menu fields. Copyright © 2005 TOSHIBA CORPORATION. See "Change default options" on at left. All rights reserved. 55 Note: When setting a Manual Reminder, the frequency option "Daily" is about...
...15 minutes early to the highlighted show tile. Highlight NEW MANUAL REMINDER and press ENTER to display the Episode Options panel menu. 2. Highlight the POWER ON TV field, and press x • to choose either Yes (to automatically tune the TV to move through the options. Press ENTER to...off ) at the scheduled reminder time, and tune the TV to the channel of the show , in the panel menu fields. Copyright © 2005 TOSHIBA CORPORATION. See "Change default options" on at left. All rights reserved. 55 Note: When setting a Manual Reminder, the frequency option "Daily" is about...

Owners Manual
Page 58
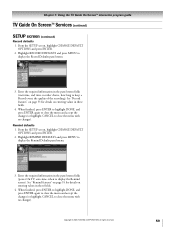
...panel menu. 3. When finished, press ENTER to highlight DONE, and press ENTER again to close the menu with no changes). 58 Copyright © 2005 TOSHIBA CORPORATION. Note: Set the AUTO GUIDE to Off if you want the TV Guide On Screen™ system to one of the following : •... (default) and Off. To edit the options, press INFO and follow the on the remote control when the TV Guide On Screen™ system is powered on the TV. 4. Enter the following categories: • General Defaults • Record Defaults • Remind Defaults General defaults 1. Choices are No Only, ...
...panel menu. 3. When finished, press ENTER to highlight DONE, and press ENTER again to close the menu with no changes). 58 Copyright © 2005 TOSHIBA CORPORATION. Note: Set the AUTO GUIDE to Off if you want the TV Guide On Screen™ system to one of the following : •... (default) and Off. To edit the options, press INFO and follow the on the remote control when the TV Guide On Screen™ system is powered on the TV. 4. Enter the following categories: • General Defaults • Record Defaults • Remind Defaults General defaults 1. Choices are No Only, ...
Owners Manual
Page 59
Remind defaults 1. Copyright © 2005 TOSHIBA CORPORATION. See "Record features" on page 53 for details on entering values in the panel menu fields (power On TV, auto-tune, when to close the menu and accept the changes (or highlight CANCEL to display the Remind screen). Highlight REMIND DEFAULTS and ...
Remind defaults 1. Copyright © 2005 TOSHIBA CORPORATION. See "Record features" on page 53 for details on entering values in the panel menu fields (power On TV, auto-tune, when to close the menu and accept the changes (or highlight CANCEL to display the Remind screen). Highlight REMIND DEFAULTS and ...
Owners Manual
Page 77
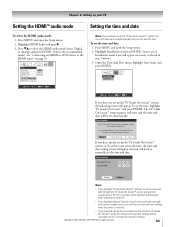
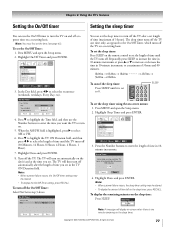
... TV turns off the TV. Highlight Done and press ENTER. 8. Turn off automatically (Maximum 180 minutes) 120 Cancel Done 4. Note: • When a power failure occurs, the On/Off timer settings may be cleared. • To display the On/Off Timer setting, press RECALL. On/Off Timer Turn TV...To set to a maximum of time until it is set the sleep timer: Press SLEEP on the sleep time: Press SLEEP. Copyright © 2005 TOSHIBA CORPORATION. Press MENU and open the Setup menu. 2. Setup Installation Sleep Timer On/Off Timer PC Settings HDMI Audio Auto Gray Level 2 Navigate Select CH...
... TV turns off the TV. Highlight Done and press ENTER. 8. Turn off automatically (Maximum 180 minutes) 120 Cancel Done 4. Note: • When a power failure occurs, the On/Off timer settings may be cleared. • To display the On/Off Timer setting, press RECALL. On/Off Timer Turn TV...To set to a maximum of time until it is set the sleep timer: Press SLEEP on the sleep time: Press SLEEP. Copyright © 2005 TOSHIBA CORPORATION. Press MENU and open the Setup menu. 2. Setup Installation Sleep Timer On/Off Timer PC Settings HDMI Audio Auto Gray Level 2 Navigate Select CH...
