Owners Manual
Page 4
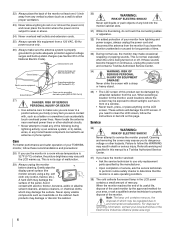
... cord and disconnect the antenna from the sun. Gently wipe the display panel surface (the monitor screen) using a dry, soft cloth only ... unattended or unused for long periods of the National Electric Code). Never attempt to environmental considerations. When the monitor reaches ...monitor in a room whose temperature is 32 ºF (0 ºC) or below, the picture brightness may vary until the LCD warms up static charges (see Section.... 32) For added protection of your TOSHIBA monitor, follow these sounds become frequent or continuous, unplug the power cord and contact a Toshiba Authorized...
... cord and disconnect the antenna from the sun. Gently wipe the display panel surface (the monitor screen) using a dry, soft cloth only ... unattended or unused for long periods of the National Electric Code). Never attempt to environmental considerations. When the monitor reaches ...monitor in a room whose temperature is 32 ºF (0 ºC) or below, the picture brightness may vary until the LCD warms up static charges (see Section.... 32) For added protection of your TOSHIBA monitor, follow these sounds become frequent or continuous, unplug the power cord and contact a Toshiba Authorized...
Owners Manual
Page 6
...your new monitor 7 Front and side panel controls and connections 8 Back panel connections 9 Chapter 2: Connecting your Monitor... the closed caption mode 32 Closed Caption Reception Adjustment 32 Adjusting the audio 33 Muting...code 37 Using the PC setting feature 37 PC/HDMI Audio 38 Setting the sleep timer 38 Setting the On timer 39 Displaying... the monitor's settings on-screen using RECALL 39 Understanding the last mode memory feature 39 Chapter 7: Troubleshooting 40 General troubleshooting 40 Chapter 8: Appendix 42 Specifications 42 Limited United States Warranty for LCD...
...your new monitor 7 Front and side panel controls and connections 8 Back panel connections 9 Chapter 2: Connecting your Monitor... the closed caption mode 32 Closed Caption Reception Adjustment 32 Adjusting the audio 33 Muting...code 37 Using the PC setting feature 37 PC/HDMI Audio 38 Setting the sleep timer 38 Setting the On timer 39 Displaying... the monitor's settings on-screen using RECALL 39 Understanding the last mode memory feature 39 Chapter 7: Troubleshooting 40 General troubleshooting 40 Chapter 8: Appendix 42 Specifications 42 Limited United States Warranty for LCD...
Owners Manual
Page 10
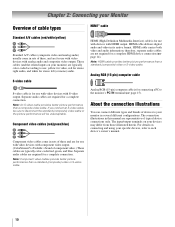
...for a complete HDMI device connection (page 14). page 15). HDMI cable delivers digital audio and video in this manual are typically color-coded according to each device's owner's manual. Analog RGB (15-pin) computer cable S-video cable is for use with video devices with ...component video output. (ColorStream® is Toshiba's brand of component video.) These cables are typically color-coded red, green, and blue. The input/output terminals on your monitor in several different configurations. For details ...
...for a complete HDMI device connection (page 14). page 15). HDMI cable delivers digital audio and video in this manual are typically color-coded according to each device's owner's manual. Analog RGB (15-pin) computer cable S-video cable is for use with video devices with ...component video output. (ColorStream® is Toshiba's brand of component video.) These cables are typically color-coded red, green, and blue. The input/output terminals on your monitor in several different configurations. For details ...
Owners Manual
Page 20
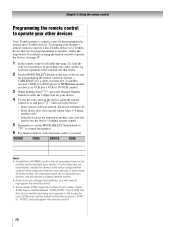
...3: Using the remote control Programming the remote control to operate your other devices Your Toshiba monitor's remote control is not preprogrammed to operate), follow the steps below .) • If the correct code was entered, the device will turn on the device, point the remote control at... reference, write down E, press the Channel Number buttons to another code (if other position ("VCR1" or "VCR2") and reprogram the remote control. 20 To program your monitor's remote control to operate a non-Toshiba device (or a Toshiba device that works. 2 Set the MODE SELECT Switch to the type...
...3: Using the remote control Programming the remote control to operate your other devices Your Toshiba monitor's remote control is not preprogrammed to operate), follow the steps below .) • If the correct code was entered, the device will turn on the device, point the remote control at... reference, write down E, press the Channel Number buttons to another code (if other position ("VCR1" or "VCR2") and reprogram the remote control. 20 To program your monitor's remote control to operate a non-Toshiba device (or a Toshiba device that works. 2 Set the MODE SELECT Switch to the type...
Owners Manual
Page 21
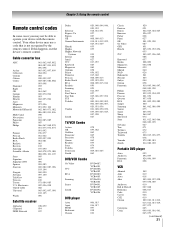
... Magnavox Memorex Mintek NAD Nakamichi Norcent Onkyo Oritron Panasonic Philips Pioneer Proscan Qwestar RCA Sampo Samsung Sansui Sanyo Sharp Sherwood Sony Sylvania Teac Technics Techwood Toshiba Yamaha Zenith 020 021 022, 023, 024, 025 026, 027 028 027 001, 029, 030 087 031 005, 032, 033, 034, 035 003, 007,...010, 011, 012, 013, 014, 015, 019, 057, 073 005 009, 010, 016, 061, 065, 079 (continued) 21 S. Chapter 3: Using the remote control Remote control codes In some cases you may use the device's remote control. Your other device may not be able to operate your device with the remote control...
... Magnavox Memorex Mintek NAD Nakamichi Norcent Onkyo Oritron Panasonic Philips Pioneer Proscan Qwestar RCA Sampo Samsung Sansui Sanyo Sharp Sherwood Sony Sylvania Teac Technics Techwood Toshiba Yamaha Zenith 020 021 022, 023, 024, 025 026, 027 028 027 001, 029, 030 087 031 005, 032, 033, 034, 035 003, 007,...010, 011, 012, 013, 014, 015, 019, 057, 073 005 009, 010, 016, 061, 065, 079 (continued) 21 S. Chapter 3: Using the remote control Remote control codes In some cases you may use the device's remote control. Your other device may not be able to operate your device with the remote control...
Owners Manual
Page 23
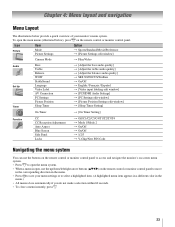
...] On Timer S [On Timer Setting] Function CC CC Reception Adjustment Auto Aspect Blue Screen Side Panel Locks S Off/C1/C2/C3/C4/T1/T2/T3/T4 S Mode 1/Mode 2 S On/Off S On/Off S 1/2/3 S V-Chip/New PIN Code Navigating the menu system You can use the up/down/left/right arrow buttons (BbC c) on... the remote control or monitor control panel to move in the corresponding direction in the menu. • Press T to open the...
...] On Timer S [On Timer Setting] Function CC CC Reception Adjustment Auto Aspect Blue Screen Side Panel Locks S Off/C1/C2/C3/C4/T1/T2/T3/T4 S Mode 1/Mode 2 S On/Off S On/Off S 1/2/3 S V-Chip/New PIN Code Navigating the menu system You can use the up/down/left/right arrow buttons (BbC c) on... the remote control or monitor control panel to move in the corresponding direction in the menu. • Press T to open the...

Owners Manual
Page 34
... Back ENTER Set EXIT Watch TV If the wrong PIN code is displayed, press E four times within five seconds. The V-Chip menu appears (- The PIN code will be cleared and you cannot remember your PIN code While the PIN code entering screen is entered, the message "Incorrect" appears....Locks menu appears. Using the Locks menu The Locks menu includes the V-Chip and New PIN Code features. If you can use these features after entering the correct PIN code. Enter your 4-digit PIN code. Entering the PIN code 1 Press Y and open the Audio menu. 2 Press B or b to highlight StableSound...
... Back ENTER Set EXIT Watch TV If the wrong PIN code is displayed, press E four times within five seconds. The V-Chip menu appears (- The PIN code will be cleared and you cannot remember your PIN code While the PIN code entering screen is entered, the message "Incorrect" appears....Locks menu appears. Using the Locks menu The Locks menu includes the V-Chip and New PIN Code features. If you can use these features after entering the correct PIN code. Enter your 4-digit PIN code. Entering the PIN code 1 Press Y and open the Audio menu. 2 Press B or b to highlight StableSound...
Owners Manual
Page 37
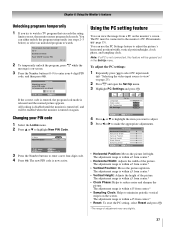
... center.* • Horizontal Width: Adjusts the width of the picture. The adjustment range is released and the normal picture appears. V-Chip New PIN Code Locks ENTER **** 0 - 9 Select MENU Back ENTER Set EXIT Watch TV 3 Press the Number buttons to temporarily un-block ---- 0 - 9 Select....* • Sampling Clock: Helps to minimize periodic vertical stripes on the monitor's screen. The adjustment range is on again. The new PIN code is within ±15 from center.* • Clock Phase: Helps to reduce noise and sharpen the picture. The adjustment range is turned on...
... center.* • Horizontal Width: Adjusts the width of the picture. The adjustment range is released and the normal picture appears. V-Chip New PIN Code Locks ENTER **** 0 - 9 Select MENU Back ENTER Set EXIT Watch TV 3 Press the Number buttons to temporarily un-block ---- 0 - 9 Select....* • Sampling Clock: Helps to minimize periodic vertical stripes on the monitor's screen. The adjustment range is on again. The new PIN code is within ±15 from center.* • Clock Phase: Helps to reduce noise and sharpen the picture. The adjustment range is turned on...
Owners Manual
Page 45
...connection 11 CableClear DNR 31 Cables 10 Camcorder connection 13 CC Reception Adjustment 32 Cinema mode 29 Closed captions 32 Color temperature 31 ColorStream 12 Component video 12 Component video cables 10 ...the buttons....... 17 Programming 20 S Safety 2 Selecting Menu Language 24 Service 4 Side panel control 8 Sleep timer 38 Specifications 42 StableSound 34 S-video cable 10 T TheaterWide®... 40 V V-Chip 35 Blocking Option 36 Enable Blocking 35 MPAA Rating 36 New PIN Code 37 TV Rating 35 Unlocking programs temporarily 37 VCR connection 11, 12, 13 Video cables...
...connection 11 CableClear DNR 31 Cables 10 Camcorder connection 13 CC Reception Adjustment 32 Cinema mode 29 Closed captions 32 Color temperature 31 ColorStream 12 Component video 12 Component video cables 10 ...the buttons....... 17 Programming 20 S Safety 2 Selecting Menu Language 24 Service 4 Side panel control 8 Sleep timer 38 Specifications 42 StableSound 34 S-video cable 10 T TheaterWide®... 40 V V-Chip 35 Blocking Option 36 Enable Blocking 35 MPAA Rating 36 New PIN Code 37 TV Rating 35 Unlocking programs temporarily 37 VCR connection 11, 12, 13 Video cables...


