

Owners Manual
Page 2
.... • Do not place containers with the Toshiba stand listed in the picture. Fixed images, such as close to the TV. Special formats that the cable ground shall be flat and steady. For example, viewing letterbox style (16:9) media on a normal (4:3) display (bars at top and bottom of screen), or viewing normal (4:3) media on a widescreen (16:9) display (bars on left and right sides of the...
.... • Do not place containers with the Toshiba stand listed in the picture. Fixed images, such as close to the TV. Special formats that the cable ground shall be flat and steady. For example, viewing letterbox style (16:9) media on a normal (4:3) display (bars at top and bottom of screen), or viewing normal (4:3) media on a widescreen (16:9) display (bars on left and right sides of the...

Owners Manual
Page 3
... Unlocking programs temporarily 37 Locking channels 37 Locking video inputs 38 Using the front panel lock feature 39 Changing the PIN code 39 Adjusting the picture 40 Selecting the picture mode 40 Adjusting the picture quality 40 Saving new preference 41 Using the flesh tone feature 41 Using the Digital Noise Reduction (DNR) feature ... 41 Selecting the cinema mode 42 Selecting the color temperature 42 Resetting picture adjustments 42 Selecting the video input source 43 Labeling the video input sources 43 Using the closed caption feature 44 Setting...
... Unlocking programs temporarily 37 Locking channels 37 Locking video inputs 38 Using the front panel lock feature 39 Changing the PIN code 39 Adjusting the picture 40 Selecting the picture mode 40 Adjusting the picture quality 40 Saving new preference 41 Using the flesh tone feature 41 Using the Digital Noise Reduction (DNR) feature ... 41 Selecting the cinema mode 42 Selecting the color temperature 42 Resetting picture adjustments 42 Selecting the video input source 43 Labeling the video input sources 43 Using the closed caption feature 44 Setting...

Owners Manual
Page 4
... the remote control. To close the menu, either press EXIT or turn the TV off. The goal of the finest TVs on the market. TV front TV rear Video/audio inputs (Video 3) Behind the door MENU VOLUME x • CHANNEL zy S-VIDEO VIDEO-3 IN AUDIO DEMO MENU TV/VIDEO VOLUME CHANNEL POWER VIDEO L/MONO R DEMO Menu TV/VIDEO x •zy POWER Remote sensor Power indicator ANT OUT ANT-1 IN ANT-2 IN ANT(75 ) IN S-VIDEO ANT-1 OUT ANT-2 IN OUT VIDEO L/MONO AUDIO R COLOR...
... the remote control. To close the menu, either press EXIT or turn the TV off. The goal of the finest TVs on the market. TV front TV rear Video/audio inputs (Video 3) Behind the door MENU VOLUME x • CHANNEL zy S-VIDEO VIDEO-3 IN AUDIO DEMO MENU TV/VIDEO VOLUME CHANNEL POWER VIDEO L/MONO R DEMO Menu TV/VIDEO x •zy POWER Remote sensor Power indicator ANT OUT ANT-1 IN ANT-2 IN ANT(75 ) IN S-VIDEO ANT-1 OUT ANT-2 IN OUT VIDEO L/MONO AUDIO R COLOR...

Owners Manual
Page 8
Introduction Connecting your TV Using the Remote Control Connecting a DVD player with component video Setting up your TV Using the TV's Features Appendix Index 8 You will need: • one coaxial cable • three pairs of audio cables (two single and one pair of audio cables for a nonColorStream DVD player;see notes at the same time. The ColorStream HD1 and HD2 jacks can record from another source. Caution: The unauthorized recording of television programs, videotapes...
Introduction Connecting your TV Using the Remote Control Connecting a DVD player with component video Setting up your TV Using the TV's Features Appendix Index 8 You will need: • one coaxial cable • three pairs of audio cables (two single and one pair of audio cables for a nonColorStream DVD player;see notes at the same time. The ColorStream HD1 and HD2 jacks can record from another source. Caution: The unauthorized recording of television programs, videotapes...

Owners Manual
Page 11
... OUT VIDEO L/MONO AUDIO R COLOR STREAM HD - 1 Y COLOR STREAM HD - 2 VIDEO Y L PB L L/ PB MONO AUDIO PR AUDIO PR AUDIO VIDEO-1 VIDEO-2 R R R VAR AUDIO L R AUDIO CENTER CHANNEL IN ON OFF LR LINE IN Amplifier Caution: To avoid damaging the speakers, turn off the built-in speakers (see "Turning off before connecting or disconnecting the Audio Center Channel audio cable. Introduction Connecting your TV Using the Remote Control Setting up your TV's sound. You will function only as center channel speakers. Adjust the volume...
... OUT VIDEO L/MONO AUDIO R COLOR STREAM HD - 1 Y COLOR STREAM HD - 2 VIDEO Y L PB L L/ PB MONO AUDIO PR AUDIO PR AUDIO VIDEO-1 VIDEO-2 R R R VAR AUDIO L R AUDIO CENTER CHANNEL IN ON OFF LR LINE IN Amplifier Caution: To avoid damaging the speakers, turn off the built-in speakers (see "Turning off before connecting or disconnecting the Audio Center Channel audio cable. Introduction Connecting your TV Using the Remote Control Setting up your TV's sound. You will function only as center channel speakers. Adjust the volume...

Owners Manual
Page 15
... replace the batteries, you want to set the switch to be ignored while in program mode. If your audio/video devices Device code setup 1. The keys available to the other function buttons that works. 2. Press MODE to the remote control: Press y, and then press POWER. If the device does not respond to select the mode you must reprogram the remote control. • Some newer VCRs are 0, 1, 2, 3, POWER, VOL y, CH y, PLAY, and STOP. POWER Numbers MODE...
... replace the batteries, you want to set the switch to be ignored while in program mode. If your audio/video devices Device code setup 1. The keys available to the other function buttons that works. 2. Press MODE to the remote control: Press y, and then press POWER. If the device does not respond to select the mode you must reprogram the remote control. • Some newer VCRs are 0, 1, 2, 3, POWER, VOL y, CH y, PLAY, and STOP. POWER Numbers MODE...

Owners Manual
Page 21
... you're in programming mode). POWER turns the TV on and off SLEEP allows access to the automatic TV shut-off . Subsequent presses of the small picture (page 32) SOURCE selects the PIP/double-window picture source (page 31) CT-90047 21 Index Appendix Using the TV's Features Setting up your TV Using the Remote Control Connecting your TV Introduction The mode indicator light will remain lit...
... you're in programming mode). POWER turns the TV on and off SLEEP allows access to the automatic TV shut-off . Subsequent presses of the small picture (page 32) SOURCE selects the PIP/double-window picture source (page 31) CT-90047 21 Index Appendix Using the TV's Features Setting up your TV Using the Remote Control Connecting your TV Introduction The mode indicator light will remain lit...

Owners Manual
Page 22
Press x or • to select or adjust a setting. TV front panel DEMO MENU TV/VIDEO VOLUME CHANNEL MENU x •zy Connecting your TV Using the Remote Control Setting up your TV Learning about the menu system After you have installed the batteries and programmed the remote control, you want to activate the function settings in the CUSTOM menu, etc. • The main menu display will disappear automatically within 15 seconds; Press y or z select an item. 4. See...
Press x or • to select or adjust a setting. TV front panel DEMO MENU TV/VIDEO VOLUME CHANNEL MENU x •zy Connecting your TV Using the Remote Control Setting up your TV Learning about the menu system After you have installed the batteries and programmed the remote control, you want to activate the function settings in the CUSTOM menu, etc. • The main menu display will disappear automatically within 15 seconds; Press y or z select an item. 4. See...
Owners Manual
Page 25
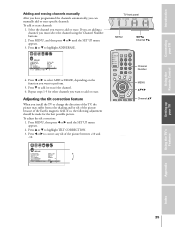
...LT CORRECT I SH 00:00 ANT1 CABLE ADD / ERASE 0 4. Press MENU, and then press x or • until the SET UP menu appears. 2. TV front panel DEMO MENU TV/VIDEO VOLUME CHANNEL MENU x •zy Channel zy SET UP LANGUAGE CLOCK SET ANT 1 / 2 TV / CABLE CH PROGRAM ADD / ERASE T I LT ... 32 33 34 35 Channel Number MENU yzx • Channel yz Setting up your TV Using the Remote Control Adding and erasing channels manually After you have programmed the channels automatically, you must select the channel using the Channel Number buttons. 2. Adjusting the tilt correction feature ...
...LT CORRECT I SH 00:00 ANT1 CABLE ADD / ERASE 0 4. Press MENU, and then press x or • until the SET UP menu appears. 2. TV front panel DEMO MENU TV/VIDEO VOLUME CHANNEL MENU x •zy Channel zy SET UP LANGUAGE CLOCK SET ANT 1 / 2 TV / CABLE CH PROGRAM ADD / ERASE T I LT ... 32 33 34 35 Channel Number MENU yzx • Channel yz Setting up your TV Using the Remote Control Adding and erasing channels manually After you have programmed the channels automatically, you must select the channel using the Channel Number buttons. 2. Adjusting the tilt correction feature ...

Owners Manual
Page 30
... HD2 NORMAL Using the Remote Control Setting up your TV Viewing the wide-screen picture formats You can also change the image shape using the menu system. Note: You can view programs that have bars at the top and bottom of permanently engraining stationary patterns on the picture tube than in the Compression mode. Select IMAGE SHAPE HD1 or HD2 in the conventional 4:3 aspect ratio. Letterbox (recommended mode): • Picture is horizontally...
... HD2 NORMAL Using the Remote Control Setting up your TV Viewing the wide-screen picture formats You can also change the image shape using the menu system. Note: You can view programs that have bars at the top and bottom of permanently engraining stationary patterns on the picture tube than in the Compression mode. Select IMAGE SHAPE HD1 or HD2 in the conventional 4:3 aspect ratio. Letterbox (recommended mode): • Picture is horizontally...
Owners Manual
Page 34
... mode. • Blocking Reset status: Set your TV Using the TV's Features Appendix Index 34 Number MENU/ENTER yzx • RECALL Setting up your 4-digit code by pressing the Number buttons (0-9), and then press ENTER. • When the PIN code is entered, the message "Incorrect" appears. Press y or z to enter the 4-digit PIN code used for blocking channels, and then press ENTER. Introduction Connecting your TV Using the Remote Control Using...
... mode. • Blocking Reset status: Set your TV Using the TV's Features Appendix Index 34 Number MENU/ENTER yzx • RECALL Setting up your 4-digit code by pressing the Number buttons (0-9), and then press ENTER. • When the PIN code is entered, the message "Incorrect" appears. Press y or z to enter the 4-digit PIN code used for blocking channels, and then press ENTER. Introduction Connecting your TV Using the Remote Control Using...

Owners Manual
Page 42
... then press x or • until the PICTURE menu appears. 2. To select the color temperature: 1. Index Appendix Using the TV's Features Setting up your TV Using the Remote Control Connecting your TV Introduction Selecting the cinema mode When you prefer. Press y or z to select FILM. Selecting the color temperature You can change the quality of the picture by selecting from a DVD player connected to the ColorStream (component video) inputs on the TV, smoother and more...
... then press x or • until the PICTURE menu appears. 2. To select the color temperature: 1. Index Appendix Using the TV's Features Setting up your TV Using the Remote Control Connecting your TV Introduction Selecting the cinema mode When you prefer. Press y or z to select FILM. Selecting the color temperature You can change the quality of the picture by selecting from a DVD player connected to the ColorStream (component video) inputs on the TV, smoother and more...

Owners Manual
Page 45
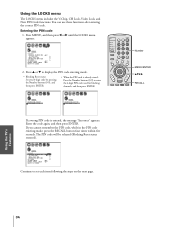
... operates on -screen: Press RECALL. 45 Appendix Index After the number position starts to blink, press the Number buttons (0-9) to turn the TV off automatically: 1. SET UP LANGUAGE CLOCK SET ANT 1 / 2 TV / CABLE CH PROGRAM ADD / ERASE T I LT CORRECT I ON ENGL I MER 60 Every time you press the button, the time display will increase by 10 minutes, up to start the clock. Introduction Setting the sleep timer To set...
... operates on -screen: Press RECALL. 45 Appendix Index After the number position starts to blink, press the Number buttons (0-9) to turn the TV off automatically: 1. SET UP LANGUAGE CLOCK SET ANT 1 / 2 TV / CABLE CH PROGRAM ADD / ERASE T I LT CORRECT I ON ENGL I MER 60 Every time you press the button, the time display will increase by 10 minutes, up to start the clock. Introduction Setting the sleep timer To set...

Owners Manual
Page 46
... TV front panel DEMO MENU TV/VIDEO VOLUME CHANNEL MENU x •zy Note : A second audio program (SAP) can also transmit a second audio program (SAP) containing a second language, music, or other audio information (when provided by individual stations). Introduction Connecting your TV Using the Remote Control Adjusting the sound Muting the sound Press MUTE to temporarily turn off , the screen will hear the station's second audio program (if available) from the speakers, while viewing the original program's picture (see the...
... TV front panel DEMO MENU TV/VIDEO VOLUME CHANNEL MENU x •zy Note : A second audio program (SAP) can also transmit a second audio program (SAP) containing a second language, music, or other audio information (when provided by individual stations). Introduction Connecting your TV Using the Remote Control Adjusting the sound Muting the sound Press MUTE to temporarily turn off , the screen will hear the station's second audio program (if available) from the speakers, while viewing the original program's picture (see the...

Owners Manual
Page 47
... the left channel, depending on or off the vocal emphasis effect. • TruBass - Introduction Connecting your TV Using the Remote Control Using the WOW™ surround sound feature The WOW™ surround sound feature expands the audio listening field wider and deeper to create exceptional sound quality from a TV broadcast or video input. To adjust the WOW feature: 1. Select STEREO mode (see "Selecting stereo/SAP broadcasts" on...
... the left channel, depending on or off the vocal emphasis effect. • TruBass - Introduction Connecting your TV Using the Remote Control Using the WOW™ surround sound feature The WOW™ surround sound feature expands the audio listening field wider and deeper to create exceptional sound quality from a TV broadcast or video input. To adjust the WOW feature: 1. Select STEREO mode (see "Selecting stereo/SAP broadcasts" on...

Owners Manual
Page 49
... ON in speakers: 1. Introduction Connecting your TV Using the Remote Control Turning off the built-in speakers Use this feature to turn off when you to highlight SPEAKERS. 3. Press y or z to select the sound source (MAIN or PIP) that is output from the Audio OUT jacks. Note: Make sure the volume control of the main picture through the built-in speakers. MENU yzx • Setting up your audio amplifier is useful when amplifying...
... ON in speakers: 1. Introduction Connecting your TV Using the Remote Control Turning off the built-in speakers Use this feature to turn off when you to highlight SPEAKERS. 3. Press y or z to select the sound source (MAIN or PIP) that is output from the Audio OUT jacks. Note: Make sure the volume control of the main picture through the built-in speakers. MENU yzx • Setting up your audio amplifier is useful when amplifying...

Owners Manual
Page 50
... Appendix Using the TV's Features Setting up your TV Using the Remote Control Connecting your TV Introduction Using the StableSound™ feature When the signal source is changed, the stable sound feature limits the high volume level to prevent extreme changes in volume (for example, to prevent the sudden increase in TV mode) • Channel number or VIDEO mode selected • Time (if set) • Channel label (if set) • Stereo or SAP audio status...
... Appendix Using the TV's Features Setting up your TV Using the Remote Control Connecting your TV Introduction Using the StableSound™ feature When the signal source is changed, the stable sound feature limits the high volume level to prevent extreme changes in volume (for example, to prevent the sudden increase in TV mode) • Channel number or VIDEO mode selected • Time (if set) • Channel label (if set) • Stereo or SAP audio status...

Owners Manual
Page 53
... PICTURE menu. Index Cannot access signal input sources • Check the VIDEO LOCK feature. (Video1, Video2, Video3, ColorStream HD1/HD2) and/or Channels 3 and 4. 53 Black box appears on Solution • Make sure the power cord is set correctly. Using the TV's Features Unable to select a certain channel • The channel may have broadcast difficulties. Use a highly directional outdoor antenna. Poor color or no sound • Check the antenna/cable connections. Appendix No stereo or SAP sound...
... PICTURE menu. Index Cannot access signal input sources • Check the VIDEO LOCK feature. (Video1, Video2, Video3, ColorStream HD1/HD2) and/or Channels 3 and 4. 53 Black box appears on Solution • Make sure the power cord is set correctly. Using the TV's Features Unable to select a certain channel • The channel may have broadcast difficulties. Use a highly directional outdoor antenna. Poor color or no sound • Check the antenna/cable connections. Appendix No stereo or SAP sound...
Owners Manual
Page 54
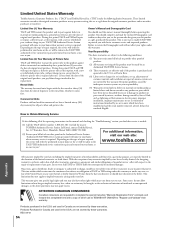
....toshiba.com Setting up , adjustment of customer controls and installation or repair of any warranties implied by this product. With the exception of antenna systems are not covered by state law as a gift, purchased this warranty. Some states do not extend to any state thereof, is needed: (1) Call the TACP toll-free number 1-800-631-3811 to find that if a defective picture tube...
....toshiba.com Setting up , adjustment of customer controls and installation or repair of any warranties implied by this product. With the exception of antenna systems are not covered by state law as a gift, purchased this warranty. Some states do not extend to any state thereof, is needed: (1) Call the TACP toll-free number 1-800-631-3811 to find that if a defective picture tube...

Owners Manual
Page 55
... receiver connection 7 Set-top box connection 9 SLEEP button 45 Sleep timer 45 Sound quality adjustments 47 SPEAKERS on/off 49 Specifications 52 SRS 3D surround 47 StableSound 50 Stereo sound 46 S-video cables 5 T TILT CORRECTION 25 Troubleshooting 53 TruBass feature 47 TV/VIDEO button 23, 43 V V-CHI P BLOCKING OPTION 36 ENABLE BLOCKING 35 MPAA RATING 36 NEW PIN CODE 39 TV RATING 35 Unlocking programs temporarily 37 VCR connection 5-10 Video cables 5 VIDEO LABEL 43 VIDEO LOCK 38 W Warranty...
... receiver connection 7 Set-top box connection 9 SLEEP button 45 Sleep timer 45 Sound quality adjustments 47 SPEAKERS on/off 49 Specifications 52 SRS 3D surround 47 StableSound 50 Stereo sound 46 S-video cables 5 T TILT CORRECTION 25 Troubleshooting 53 TruBass feature 47 TV/VIDEO button 23, 43 V V-CHI P BLOCKING OPTION 36 ENABLE BLOCKING 35 MPAA RATING 36 NEW PIN CODE 39 TV RATING 35 Unlocking programs temporarily 37 VCR connection 5-10 Video cables 5 VIDEO LABEL 43 VIDEO LOCK 38 W Warranty...


