
User Manual
Page 2
... WARRANTY. (See item 33 on or play with your furniture to cause an electric shock. The home theater entertainment experience is committed to the point of TV and consumer electronics furniture manufacturers, to climb on page 4 for purchasing this product. The Consumer Electronics Association formed the Home Entertainment Support Safety Committee, comprised of cable entry as a VCR, remote control...
... WARRANTY. (See item 33 on or play with your furniture to cause an electric shock. The home theater entertainment experience is committed to the point of TV and consumer electronics furniture manufacturers, to climb on page 4 for purchasing this product. The Consumer Electronics Association formed the Home Entertainment Support Safety Committee, comprised of cable entry as a VCR, remote control...
User Manual
Page 3
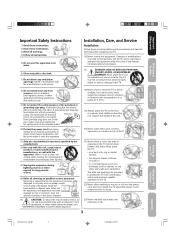
... apparatus. Important Safeguards Welcome to Toshiba Connecting your TV Using the Remote Control Important Safety Instructions 1) Read these instructions. 2) Keep these recommendations and precautions and heed all warnings when installing your TV: 16) Never modify this equipment. Install in cabinet, or any ventilation openings. The TV may void: a) the warranty, and b) the user's authority to operate this equipment under the rules of...
... apparatus. Important Safeguards Welcome to Toshiba Connecting your TV Using the Remote Control Important Safety Instructions 1) Read these instructions. 2) Keep these recommendations and precautions and heed all warnings when installing your TV: 16) Never modify this equipment. Install in cabinet, or any ventilation openings. The TV may void: a) the warranty, and b) the user's authority to operate this equipment under the rules of...
User Manual
Page 4
... BY YOUR WARRANTY. This type of damage is being turned on or off. or 4:3 aspect ratio format media viewed on a widescreen/16:9 aspect ratio display (with , such as possible. Refer all servicing to the left and right sides of the screen.) Service 34) WARNING: RISK OF ELECTRIC SHOCK! or b) cables, wires, or any home theater component connected to check for reflections on the screen, and then remove the source...
... BY YOUR WARRANTY. This type of damage is being turned on or off. or 4:3 aspect ratio format media viewed on a widescreen/16:9 aspect ratio display (with , such as possible. Refer all servicing to the left and right sides of the screen.) Service 34) WARNING: RISK OF ELECTRIC SHOCK! or b) cables, wires, or any home theater component connected to check for reflections on the screen, and then remove the source...
User Manual
Page 5
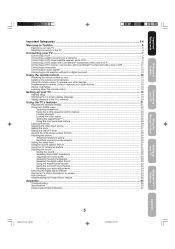
... (parental control) feature 23 Locking channels ...24 Locking the video inputs ...25 Setting the GameTimerTM ...25 Using the front panel lock feature ...26 Labeling channels ...26 Selecting the video input source ...27 Setting the clock ...27 Setting the ON/OFF timer ...27 Viewing the wide-screen picture formats ...28 Adjusting the picture ...30 Adjusting the picture quality ...30 Resetting your picture adjustments ...30 Setting the sleep timer ...30 Using the closed caption feature ...31 Using the CC advanced feature ...31 Adjusting the sound ...32 Muting the sound ...32 Selecting stereo/SAP...
... (parental control) feature 23 Locking channels ...24 Locking the video inputs ...25 Setting the GameTimerTM ...25 Using the front panel lock feature ...26 Labeling channels ...26 Selecting the video input source ...27 Setting the clock ...27 Setting the ON/OFF timer ...27 Viewing the wide-screen picture formats ...28 Adjusting the picture ...30 Adjusting the picture quality ...30 Resetting your picture adjustments ...30 Setting the sleep timer ...30 Using the closed caption feature ...31 Using the CC advanced feature ...31 Adjusting the sound ...32 Muting the sound ...32 Selecting stereo/SAP...
User Manual
Page 6
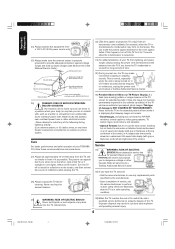
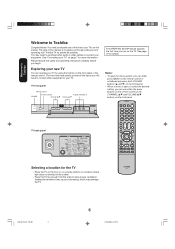
... front and back panels provide all the safety and operating instructions carefully before you turn on a sturdy platform in a location where light does not directly hit the screen. • Place the TV far enough from the walls to Toshiba Congratulations! TV front panel Remote sensor POWER Power indicator Channel L/M Audio(L/R)/Video In Volume L/M The STARTING SETUP feature appears the first time you begin. Welcome to Toshiba Welcome to allow proper...
... front and back panels provide all the safety and operating instructions carefully before you turn on a sturdy platform in a location where light does not directly hit the screen. • Place the TV far enough from the walls to Toshiba Congratulations! TV front panel Remote sensor POWER Power indicator Channel L/M Audio(L/R)/Video In Volume L/M The STARTING SETUP feature appears the first time you begin. Welcome to Toshiba Welcome to allow proper...
User Manual
Page 7
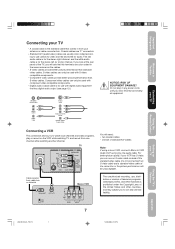
... AUDIO Cables VIDEO Cable Component video Cables DIGITAL AUDID Coaxial Cable Connecting a VCR This connection allows you to watch local channels and video programs, play or record on the VCR while watching TV, and record from your VCR has S-video, you will see page 13.) ANTENNA Coaxial Cable S-Video Cable NOTICE: RISK OF EQUIPMENT DAMAGE! Important Safeguards Welcome to Toshiba Connecting your TV Using the Remote Control Connecting your TV • A coaxial cable is the standard cable that comes in any power cords...
... AUDIO Cables VIDEO Cable Component video Cables DIGITAL AUDID Coaxial Cable Connecting a VCR This connection allows you to watch local channels and video programs, play or record on the VCR while watching TV, and record from your VCR has S-video, you will see page 13.) ANTENNA Coaxial Cable S-Video Cable NOTICE: RISK OF EQUIPMENT DAMAGE! Important Safeguards Welcome to Toshiba Connecting your TV Using the Remote Control Connecting your TV • A coaxial cable is the standard cable that comes in any power cords...

User Manual
Page 8
... most cable channels without using the remote control, such as labeling channels, blocking channels, and programming your favorite channels. Follow the connections shown below . Option 3 : For Subscribers to tune scrambled channels. With the switch in the "A" position, tune your TV to the output of the Converter/Descrambler box (usually channel 3 or 4) and use a two-set signal splitter (sometimes called a "two-set coupler") and an A/B Switch box from the cable installer or an electronics supply...
... most cable channels without using the remote control, such as labeling channels, blocking channels, and programming your favorite channels. Follow the connections shown below . Option 3 : For Subscribers to tune scrambled channels. With the switch in the "A" position, tune your TV to the output of the Converter/Descrambler box (usually channel 3 or 4) and use a two-set signal splitter (sometimes called a "two-set coupler") and an A/B Switch box from the cable installer or an electronics supply...
User Manual
Page 10
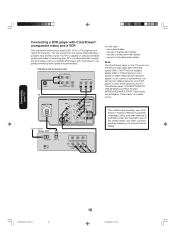
... record TV programs. You can greatly enhance picture quality and performance. If you connect a high-definition settop receiver, 480p progressive scan DVD player, or other countries, and may subject you to a component video compatible DVD player, such as a Toshiba DVD player with ColorStream®, can record from one pair of standard audio cables Note: The ColorStream inputs on this will display "Colorstream" on a black screen. DVD player with Component video S-VIDEO OUT L R AUDIO VIDEO OUT COMPONENT VIDEO Y TV You...
... record TV programs. You can greatly enhance picture quality and performance. If you connect a high-definition settop receiver, 480p progressive scan DVD player, or other countries, and may subject you to a component video compatible DVD player, such as a Toshiba DVD player with ColorStream®, can record from one pair of standard audio cables Note: The ColorStream inputs on this will display "Colorstream" on a black screen. DVD player with Component video S-VIDEO OUT L R AUDIO VIDEO OUT COMPONENT VIDEO Y TV You...

User Manual
Page 14
... sure to be disposed of the remote control. 2. signs on the batteries to operate Volume +/- (TV) your other devices To control a cable TV converter/satellite Power Input (TV) receiver: Mute (TV) Program the remote Channel Numbers control to recognize the brand of your other VCR devices" on the remote control until the lock snaps. Using the remote control to operate your VCR, DVD player, or cable TV converter. This will control the cable TV converter/ satellite receiver.
... sure to be disposed of the remote control. 2. signs on the batteries to operate Volume +/- (TV) your other devices To control a cable TV converter/satellite Power Input (TV) receiver: Mute (TV) Program the remote Channel Numbers control to recognize the brand of your other VCR devices" on the remote control until the lock snaps. Using the remote control to operate your VCR, DVD player, or cable TV converter. This will control the cable TV converter/ satellite receiver.
User Manual
Page 15
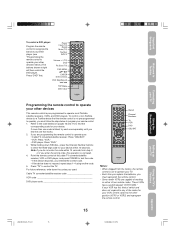
... code for your VCR, set to operate your TV. • Each time you replace the batteries, you must reprogram the remote control. • Some newer VCRs are programming the remote control to program your device. These VCRs have a switch labeled "VCR1/VCR2." Power Input (TV) Recall Mute (TV) Number buttons Volume +/- (TV) DVD Pic Size (TV) DVD MENU LM ENTER DVD controls M DVD Skip/Search / TOP Menu DVD Clear M Connecting your TV Using the Remote Control Setting up your TV Programming the remote control to operate your : • Cable...
... code for your VCR, set to operate your TV. • Each time you replace the batteries, you must reprogram the remote control. • Some newer VCRs are programming the remote control to program your device. These VCRs have a switch labeled "VCR1/VCR2." Power Input (TV) Recall Mute (TV) Number buttons Volume +/- (TV) DVD Pic Size (TV) DVD MENU LM ENTER DVD controls M DVD Skip/Search / TOP Menu DVD Clear M Connecting your TV Using the Remote Control Setting up your TV Programming the remote control to operate your : • Cable...

User Manual
Page 19
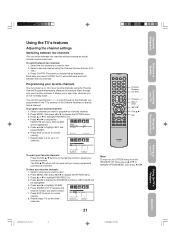
... remote control, you do not make a menu selection, your changes. • After 15 seconds, the menu screen will still be saved. • When you select the menu language, specify the TV/CABLE setting, and program channels automatically. Changing the on the remote control. • When you make a selection. Press L or M to highlight LANGUAGE. Press MENU, then press or until the SETUP menu appears. Important Safeguards Welcome to Toshiba Connecting your TV Using the Remote Control Setting...
... remote control, you do not make a menu selection, your changes. • After 15 seconds, the menu screen will still be saved. • When you select the menu language, specify the TV/CABLE setting, and program channels automatically. Changing the on the remote control. • When you make a selection. Press L or M to highlight LANGUAGE. Press MENU, then press or until the SETUP menu appears. Important Safeguards Welcome to Toshiba Connecting your TV Using the Remote Control Setting...
User Manual
Page 20
... SETUP menu. 2. Press CH 3 or 4 to select channel 125, press 1, 2, 5. Press L or M until the CH PROGRAM selection is not stored in its memory automatically, you can automatically detect all channels from the channel memory. (You can still use cable, choose CABLE. :SELECT :ADJUST 4. When channel programming is complete, the message "COMPLETED" appears. 7. If you use the Channel Numbers on the remote control to tune a channel.) Changing channels To change to a specific analog channel: Press the Channel Number buttons (0-9) on the remote control...
... SETUP menu. 2. Press CH 3 or 4 to select channel 125, press 1, 2, 5. Press L or M until the CH PROGRAM selection is not stored in its memory automatically, you can automatically detect all channels from the channel memory. (You can still use cable, choose CABLE. :SELECT :ADJUST 4. When channel programming is complete, the message "COMPLETED" appears. 7. If you use the Channel Numbers on the remote control to tune a channel.) Changing channels To change to a specific analog channel: Press the Channel Number buttons (0-9) on the remote control...
User Manual
Page 21
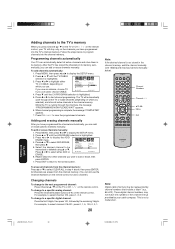
... switch back and forth between two channels without entering an actual channel number each time. Programming your favorite channels You can switch between the two channels. Press EXIT to return to normal viewing. 8. The FAV L M buttons will not work until "0" replaces the channel number you want to erase. 7. SET/CLEAR will be highlighted. 5. Select a channel you do not normally watch. Press EXIT to return to normal :SELECT :ADJUST viewing. 7. Channel Numbers CH RTN Channel 3 4 Menu...
... switch back and forth between two channels without entering an actual channel number each time. Programming your favorite channels You can switch between the two channels. Press EXIT to return to normal viewing. 8. The FAV L M buttons will not work until "0" replaces the channel number you want to erase. 7. SET/CLEAR will be highlighted. 5. Select a channel you do not normally watch. Press EXIT to return to normal :SELECT :ADJUST viewing. 7. Channel Numbers CH RTN Channel 3 4 Menu...

User Manual
Page 24
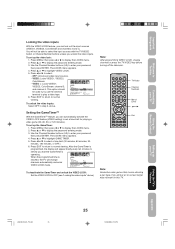
... highlight LOCKS MENU, then press or . Channel Numbers Channel 34 Menu/ Enter Exit Notes: • After programming CH LOCK, change channels before turning off the television. • To return to the LOCKS menu from the list of locked channels. Locking channels With the CH LOCK feature, you can choose to lock up to 12 TV channels and 12 cable channels. You will display the nearest unlocked channel. The LOCKS menu appears. 5. Press ENTER. 6. You can lock specific channels. Use the Channel Number buttons (0-9) to display the CH LOCK menu...
... highlight LOCKS MENU, then press or . Channel Numbers Channel 34 Menu/ Enter Exit Notes: • After programming CH LOCK, change channels before turning off the television. • To return to the LOCKS menu from the list of locked channels. Locking channels With the CH LOCK feature, you can choose to lock up to 12 TV channels and 12 cable channels. You will display the nearest unlocked channel. The LOCKS menu appears. 5. Press ENTER. 6. You can lock specific channels. Use the Channel Number buttons (0-9) to display the CH LOCK menu...
User Manual
Page 25
... enter your password, then press ENTER. Use the Channel Number buttons (0-9) to display the password entering mode. 3. To unlock the video inputs: Select OFF in step 5, above .) Note: After programming VIDEO LOCK, change channels automatically and enter VIDEO LOCK mode. Press L or M to highlight GAME TIMER. 5. Press L or M to display the password entering mode. 3. After the GameTimer is programmed, the display will appear briefly every ten minutes to remind you that involve shooting a gun type of joy-stick...
... enter your password, then press ENTER. Use the Channel Number buttons (0-9) to display the password entering mode. 3. To unlock the video inputs: Select OFF in step 5, above .) Note: After programming VIDEO LOCK, change channels automatically and enter VIDEO LOCK mode. Press L or M to highlight GAME TIMER. 5. Press L or M to display the password entering mode. 3. After the GameTimer is programmed, the display will appear briefly every ten minutes to remind you that involve shooting a gun type of joy-stick...
User Manual
Page 27
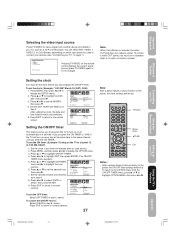
ColorStream /0-3:SELECT Pressing TV/VIDEO on which input jacks you have not already done so (see "Connecting your TV" on the TV to set the OFF timer: :ADJUST ENTER:SET E X I LY C L E A R CLEAR To set the MONTH, SETUP LANGUAGE CLOCK SET TV / CABLE CH PROGRAM ADD / ERASE ENGLISH CABLE then press M. 4. To receive a video OUT signal, you can select ANT, VIDEO 1, VIDEO 2, or ColorStream, depending on the remote control displays the current signal source (press TV/VIDEO again...
ColorStream /0-3:SELECT Pressing TV/VIDEO on which input jacks you have not already done so (see "Connecting your TV" on the TV to set the OFF timer: :ADJUST ENTER:SET E X I LY C L E A R CLEAR To set the MONTH, SETUP LANGUAGE CLOCK SET TV / CABLE CH PROGRAM ADD / ERASE ENGLISH CABLE then press M. 4. To receive a video OUT signal, you can select ANT, VIDEO 1, VIDEO 2, or ColorStream, depending on the remote control displays the current signal source (press TV/VIDEO again...
User Manual
Page 31
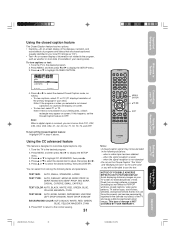
... BY YOUR WARRANTY. Press EXIT to return to the normal viewing. 31 MENU/ ENTER EXIT Notes: • A closed caption signal may appear on-screen. SERIF, MONO W/O SERIF, PROP. This type of time. Important Safeguards Welcome to Toshiba Connecting your TV Using the Remote Control Using the closed caption feature The Closed Caption feature has two options: • Captions-An on-screen display of the dialogue, narration, and sound effects of programs and videos that do...
... BY YOUR WARRANTY. Press EXIT to return to the normal viewing. 31 MENU/ ENTER EXIT Notes: • A closed caption signal may appear on-screen. SERIF, MONO W/O SERIF, PROP. This type of time. Important Safeguards Welcome to Toshiba Connecting your TV Using the Remote Control Using the closed caption feature The Closed Caption feature has two options: • Captions-An on-screen display of the dialogue, narration, and sound effects of programs and videos that do...
User Manual
Page 32
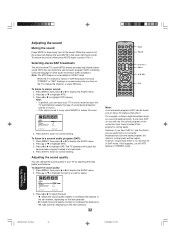
... to display the AUDIO menu. 2. Mute Recall Volume +/- AUDIO MTS BASS TREBLE BALANCE AUDIO LANGUAGE DIGITAL OUTPUT :SELECT STEREO 25 25 0 PCM :ADJUST 3. MTS also can change the channel, or press RECALL. To listen to a second audio program (SAP): 1. AUDIO MTS BASS TREBLE BALANCE AUDIO LANGUAGE DIGITAL OUTPUT :SELECT STR / SAP / MONO 25 25 0 PCM :ADJUST 4. To listen to stereo sound: 1. Adjusting the sound quality You can transmit a second audio program (SAP) containing a second language or other audio information...
... to display the AUDIO menu. 2. Mute Recall Volume +/- AUDIO MTS BASS TREBLE BALANCE AUDIO LANGUAGE DIGITAL OUTPUT :SELECT STEREO 25 25 0 PCM :ADJUST 3. MTS also can change the channel, or press RECALL. To listen to a second audio program (SAP): 1. AUDIO MTS BASS TREBLE BALANCE AUDIO LANGUAGE DIGITAL OUTPUT :SELECT STR / SAP / MONO 25 25 0 PCM :ADJUST 4. To listen to stereo sound: 1. Adjusting the sound quality You can transmit a second audio program (SAP) containing a second language or other audio information...
User Manual
Page 35
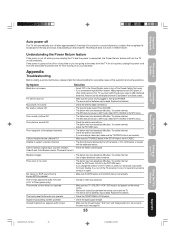
... time, unplug the power cord from a known MTS broadcast The V-Chip password does not work in the MTS menu. Try another channel. • The MTS feature may have broadcast difficulties. TV will turn on automatically. Try another channel. • Adjust the PICTURE menu. Replace the batteries. • Check the FRONT PANEL LOCK feature. • Check the digital signal strength. • Make sure the Closed Caption "Text Color" and "Background Color" are using a video input...
... time, unplug the power cord from a known MTS broadcast The V-Chip password does not work in the MTS menu. Try another channel. • The MTS feature may have broadcast difficulties. TV will turn on automatically. Try another channel. • Adjust the PICTURE menu. Replace the batteries. • Check the FRONT PANEL LOCK feature. • Check the digital signal strength. • Make sure the Closed Caption "Text Color" and "Background Color" are using a video input...
User Manual
Page 37
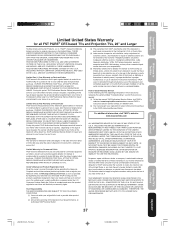
..., misaligned satellite dishes, cable television distribution, VCRs, DVD players/recorders, personal computer level IEEE-1394 devices, and any state of the U.S.A. Rental Units The warranty for a period of two (2) years after the date of antenna systems are your home when warranty service is required. Limited Warranty for Commercial Units TACP warrants televisions that are sold and used for set installation, setup, adjustment of customer controls, and installation or repair of original...
..., misaligned satellite dishes, cable television distribution, VCRs, DVD players/recorders, personal computer level IEEE-1394 devices, and any state of the U.S.A. Rental Units The warranty for a period of two (2) years after the date of antenna systems are your home when warranty service is required. Limited Warranty for Commercial Units TACP warrants televisions that are sold and used for set installation, setup, adjustment of customer controls, and installation or repair of original...


