

Owner's Manual - English
Page 4
... a) an antenna system; Never strike the screen with a sharp or heavy object. 36) • The LCD screen of this manual to a Toshiba Authorized Service Center. 38) If you leave the TV unattended or unused for the television, avoid locations where the screen may make occasional snapping or popping sounds. When...of time. 34) During normal use the TV in a room whose temperature is subject to wear or abuse. 25) Never overload wall outlets and extension cords. 26) Always operate this product contain mercury. These actions will damage the LCD screen. 23) Always place the back of ...
... a) an antenna system; Never strike the screen with a sharp or heavy object. 36) • The LCD screen of this manual to a Toshiba Authorized Service Center. 38) If you leave the TV unattended or unused for the television, avoid locations where the screen may make occasional snapping or popping sounds. When...of time. 34) During normal use the TV in a room whose temperature is subject to wear or abuse. 25) Never overload wall outlets and extension cords. 26) Always operate this product contain mercury. These actions will damage the LCD screen. 23) Always place the back of ...

Owner's Manual - English
Page 6
Leaving the TV connected to area restrictions and are printed on your DVD video disc and you do not have these numbers. Stacking or placing objects on -screen.) Some DVDs that is protected by Macrovision. Always keep discs clean. Some discs do not find 1 or ALL , disc playback will not be subject... to the wall outlet will have no region code label may still be allowed by the DVD player. (In this case, the TV will display...
Leaving the TV connected to area restrictions and are printed on your DVD video disc and you do not have these numbers. Stacking or placing objects on -screen.) Some DVDs that is protected by Macrovision. Always keep discs clean. Some discs do not find 1 or ALL , disc playback will not be subject... to the wall outlet will have no region code label may still be allowed by the DVD player. (In this case, the TV will display...

Owner's Manual - English
Page 8
...a circuit different from a normal viewing distance. If the symbol " " appears on -screen target may cause harmful interference to Part 15 of DVD Format/Logo Licensing Corporation. 8 ... harmful interference, and (2) this TV. Such pixels are trademarks of SRS Labs, Inc. FCC Declaration of Conformity Compliance Statement (Part 15): The Toshiba 26LV47 Television complies with your DVDs. ...license from SRS Labs, Inc. • Manufactured under your LCD TV/DVD combination The following two conditions: (1) this TV is not responsible for a long period of malfunction; However, ...
...a circuit different from a normal viewing distance. If the symbol " " appears on -screen target may cause harmful interference to Part 15 of DVD Format/Logo Licensing Corporation. 8 ... harmful interference, and (2) this TV. Such pixels are trademarks of SRS Labs, Inc. FCC Declaration of Conformity Compliance Statement (Part 15): The Toshiba 26LV47 Television complies with your DVDs. ...license from SRS Labs, Inc. • Manufactured under your LCD TV/DVD combination The following two conditions: (1) this TV is not responsible for a long period of malfunction; However, ...

Owner's Manual - English
Page 11
...8226; Two sets of a set -top box (in most innovative LCD TVs on the market. page 58). • PC IN (Analog RGB) computer terminal (- Certain advanced and interactive digital cable services such as video-on the screen along with Dolby® Digital optical output format (- page 22). ...video inputs (- Features of your new TV The following are just a few of the many exciting features of your new Toshiba widescreen, integrated HD, LCD TV: • Integrated digital tuning (8VSB ATSC and QAM) eliminates the need for purchasing this Toshiba LCD TV/DVD combination, one of receiving analog ...
...8226; Two sets of a set -top box (in most innovative LCD TVs on the market. page 58). • PC IN (Analog RGB) computer terminal (- Certain advanced and interactive digital cable services such as video-on the screen along with Dolby® Digital optical output format (- page 22). ...video inputs (- Features of your new TV The following are just a few of the many exciting features of your new Toshiba widescreen, integrated HD, LCD TV: • Integrated digital tuning (8VSB ATSC and QAM) eliminates the need for purchasing this Toshiba LCD TV/DVD combination, one of receiving analog ...

Owner's Manual - English
Page 12
...TOSHIBA WARRANTY. 3 Do not plug in the power cords for your other immovable structure (- page 23). 7 See "Learning about your other device(s) (- When the TV is in the remote control (- If the TV stops responding to the controls on the remote control or TV... AFTER you cannot turn on the screen. • Place the TV far enough from walls and other devices. The yellow LED will damage the TV. page 24) for the TV: • Read "Important notes ...channels into standby mode. Secure the TV to a wall, pillar, or other electronic device(s) to operate your LCD TV/DVD combination" (-
...TOSHIBA WARRANTY. 3 Do not plug in the power cords for your other immovable structure (- page 23). 7 See "Learning about your other device(s) (- When the TV is in the remote control (- If the TV stops responding to the controls on the remote control or TV... AFTER you cannot turn on the screen. • Place the TV far enough from walls and other devices. The yellow LED will damage the TV. page 24) for the TV: • Read "Important notes ...channels into standby mode. Secure the TV to a wall, pillar, or other electronic device(s) to operate your LCD TV/DVD combination" (-

Owner's Manual - English
Page 13
.../CLOSE - Press to instantly close an on-screen menu. 8 CHANNEL Bb - "Remote control effective range" on the remote control or TV control panel and you are referred to play . 13 When a menu is on-screen, the MENU button on the TV's control panel functions as up/down/left/right..., ColorStream HD2, HDMI 1, HDMI 2, HDMI 3, PC). 11 PLAY - When no menu is on-screen, these buttons change the source you cannot turn the TV on and off the TV, press and hold the POWER button on the TV control panel for additional information. 2 Remote sensor - page 33). 9 VOLUME C c - Press to...
.../CLOSE - Press to instantly close an on-screen menu. 8 CHANNEL Bb - "Remote control effective range" on the remote control or TV control panel and you are referred to play . 13 When a menu is on-screen, the MENU button on the TV's control panel functions as up/down/left/right..., ColorStream HD2, HDMI 1, HDMI 2, HDMI 3, PC). 11 PLAY - When no menu is on-screen, these buttons change the source you cannot turn the TV on and off the TV, press and hold the POWER button on the TV control panel for additional information. 2 Remote sensor - page 33). 9 VOLUME C c - Press to...
Owner's Manual - English
Page 22
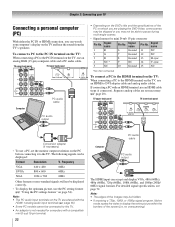
...Separate analog cables are shared with an HDMI terminal, use an HDMI cable (type A connector). Note: • The edges of the PC on the TV, use an analog RGB (15-pin) computer cable and a PC audio cable. To connect a PC to the PC IN terminal on the DVD's...-standard signals will not be able to display the entire picture within the borders of the screen (i.e. TV upper back panel TV lower back panel Computer PC audio cable • Depending on the TV: When connecting a PC to the TV. Signal name 1 R 6 Ground 11 NC 2 G 7 Ground 12 NC 3 B 8 Ground 13 H-sync 4 NC *...
...Separate analog cables are shared with an HDMI terminal, use an HDMI cable (type A connector). Note: • The edges of the PC on the TV, use an analog RGB (15-pin) computer cable and a PC audio cable. To connect a PC to the PC IN terminal on the DVD's...-standard signals will not be able to display the entire picture within the borders of the screen (i.e. TV upper back panel TV lower back panel Computer PC audio cable • Depending on the TV: When connecting a PC to the TV. Signal name 1 R 6 Ground 11 NC 2 G 7 Ground 12 NC 3 B 8 Ground 13 H-sync 4 NC *...

Owner's Manual - English
Page 24
... can also control the built-in DVD when the MODE SELECT switch on -screen, these buttons open the Channel Browser™ and tune to the previous/next channel in the main menu system. 17 MENU accesses the main TV menu system (- page 33). 8 VOL + - For DVD operation the following buttons are described... the sleep timer (- Chapter 3: Using the remote control Learning about the remote control The buttons used for a function that is not available. 1 POWER turns the TV on -screen (- page 26).
... can also control the built-in DVD when the MODE SELECT switch on -screen, these buttons open the Channel Browser™ and tune to the previous/next channel in the main menu system. 17 MENU accesses the main TV menu system (- page 33). 8 VOL + - For DVD operation the following buttons are described... the sleep timer (- Chapter 3: Using the remote control Learning about the remote control The buttons used for a function that is not available. 1 POWER turns the TV on -screen (- page 26).

Owner's Manual - English
Page 25
... lower channel. 6 GUIDE Displays the channel guide in the AUX mode. 7 INFO Displays TV status information on-screen. 8 BbC c Press to navigate DVD menus (may not operate certain features on any other devices If you have a non-Toshiba device or a Toshiba device that the remote control is not preprogrammed to operate, you must first...
... lower channel. 6 GUIDE Displays the channel guide in the AUX mode. 7 INFO Displays TV status information on-screen. 8 BbC c Press to navigate DVD menus (may not operate certain features on any other devices If you have a non-Toshiba device or a Toshiba device that the remote control is not preprogrammed to operate, you must first...
Owner's Manual - English
Page 30
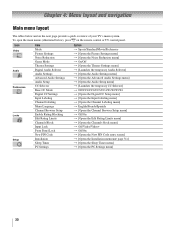
... and navigation Main menu layout The tables below ), press Y on the next page provide a quick overview of your TV's menu system. To open the main menus (illustrated below and on the remote control or TV control panel. page 31)] S [Opens the Sleep Timer menu] S [Opens the PC Settings menu] 30 Icon Video... menu] S Off/On S [Opens the Edit Rating Limits menu] S [Opens the Channels block menu] S Off/Video/Video+ S Off/On S [Opens the New PIN Code entry screen] S [Opens the Installation menu (-
... and navigation Main menu layout The tables below ), press Y on the next page provide a quick overview of your TV's menu system. To open the main menus (illustrated below and on the remote control or TV control panel. page 31)] S [Opens the Sleep Timer menu] S [Opens the PC Settings menu] 30 Icon Video... menu] S Off/On S [Opens the Edit Rating Limits menu] S [Opens the Channels block menu] S Off/Video/Video+ S Off/On S [Opens the New PIN Code entry screen] S [Opens the Installation menu (-

Owner's Manual - English
Page 31
...Installation menu layout The Installation menu contains the Terrestrial and System Status menus. This is open, use the buttons on the remote control or TV control panel to access and navigate your menu settings or select a highlighted item. (A highlighted menu item appears in a different color in ...the menu. • Press T to save your TV's on-screen menu system. • Press Y to move in the corresponding direction in the menu.) • All menus close automatically if you do not make...
...Installation menu layout The Installation menu contains the Terrestrial and System Status menus. This is open, use the buttons on the remote control or TV control panel to access and navigate your menu settings or select a highlighted item. (A highlighted menu item appears in a different color in ...the menu. • Press T to save your TV's on-screen menu system. • Press Y to move in the corresponding direction in the menu.) • All menus close automatically if you do not make...

Owner's Manual - English
Page 32
... PC Settings 3 (A new set of menus and messages. Chapter 5: Setting up your TV Selecting the menu language You can choose from three different languages (English, French and Spanish) for the ANT input on -screen display of Installation menu icons will appear, as shown below.) Open the Terrestrial menu,...C or c to your new settings, highlight Done and press T. To revert to select the input source (Cable or Antenna) for the on the TV. Configuring the antenna input source for the ANT terminal To configure the ANT input source: 1 Press Y and open the Preferences menu. 2 Highlight Menu...
... PC Settings 3 (A new set of menus and messages. Chapter 5: Setting up your TV Selecting the menu language You can choose from three different languages (English, French and Spanish) for the ANT input on -screen display of Installation menu icons will appear, as shown below.) Open the Terrestrial menu,...C or c to your new settings, highlight Done and press T. To revert to select the input source (Cable or Antenna) for the on the TV. Configuring the antenna input source for the ANT terminal To configure the ANT input source: 1 Press Y and open the Preferences menu. 2 Highlight Menu...

Owner's Manual - English
Page 33
... for Antenna. When channel programming is finished, you should not have not already done so (- Programming channels automatically Your TV can automatically detect all active channels in the channel memory. Installation Terrestrial Input Configuration Channel Program Channel Add/Delete Signal Meter... Start ANT Cable Scanning channels, please wait ... 52% Number of Installation menu icons will stop only on -screen display and press T). To add or delete channels in the channel memory: 1 Press Y and open the Setup menu. 3 Highlight ...
... for Antenna. When channel programming is finished, you should not have not already done so (- Programming channels automatically Your TV can automatically detect all active channels in the channel memory. Installation Terrestrial Input Configuration Channel Program Channel Add/Delete Signal Meter... Start ANT Cable Scanning channels, please wait ... 52% Number of Installation menu icons will stop only on -screen display and press T). To add or delete channels in the channel memory: 1 Press Y and open the Setup menu. 3 Highlight ...

Owner's Manual - English
Page 34
...up your TV To add a channel to the channel memory: Highlight the unchecked box next to the channel number you want to remove, and then press T to uncheck the box. To manually add digital subchannels on a physical channel: Use the Channel Numbers and the Dash (=) on the screen to remove...: Highlight Reset and press T, and then highlight Done and press T. Labeling channels A list of labels that can be programmed into the TV. Preferences CC Selector Off Base CC Mode Off CC1 Digital CC Settings CC2 Input Labeling CC3 Channel Labeling CC4 Menu Language English T1 Channel ...
...up your TV To add a channel to the channel memory: Highlight the unchecked box next to the channel number you want to remove, and then press T to uncheck the box. To manually add digital subchannels on a physical channel: Use the Channel Numbers and the Dash (=) on the screen to remove...: Highlight Reset and press T, and then highlight Done and press T. Labeling channels A list of labels that can be programmed into the TV. Preferences CC Selector Off Base CC Mode Off CC1 Digital CC Settings CC2 Input Labeling CC3 Channel Labeling CC4 Menu Language English T1 Channel ...

Owner's Manual - English
Page 35
...Audio setting is set to "Digital" and is grayed out in the menu. (Also see item 4 on page 14 and "Setting the PC Audio" on -screen software keyboard. 5 The highlighted character is set to "No," the HDMI 1 Audio setting changes to the HDMI input" (- If PC Audio is entered after ... ANIMAL ANT 24 Press CH UP/DOWN to the Channel Labeling window. No Yes Custom Clear All Done 4 Highlight Done and press T to save your TV 3 Press BbC c to change channels. To delete the custom label: 1 Open the Channel Labeling window. 2 Highlight the label to be displayed in alphabetical...
...Audio setting is set to "Digital" and is grayed out in the menu. (Also see item 4 on page 14 and "Setting the PC Audio" on -screen software keyboard. 5 The highlighted character is set to "No," the HDMI 1 Audio setting changes to the HDMI input" (- If PC Audio is entered after ... ANIMAL ANT 24 Press CH UP/DOWN to the Channel Labeling window. No Yes Custom Clear All Done 4 Highlight Done and press T to save your TV 3 Press BbC c to change channels. To delete the custom label: 1 Open the Channel Labeling window. 2 Highlight the label to be displayed in alphabetical...

Owner's Manual - English
Page 36
... menu icons will appear, as shown below . System Information Software Version LV07 3.2.21.0 Nov 17 2006 - 01:52:20 FW: 0B Done To close the screen and return to the Terrestrial menu: Highlight Done and press T. Note: The physical digital channel number listed in the ANT digital... TV input source only. Contact your local broadcasters to normal viewing: Press O. To return to obtain the RF channel numbers for your local digital stations. Installation ...
... menu icons will appear, as shown below . System Information Software Version LV07 3.2.21.0 Nov 17 2006 - 01:52:20 FW: 0B Done To close the screen and return to the Terrestrial menu: Highlight Done and press T. Note: The physical digital channel number listed in the ANT digital... TV input source only. Contact your local broadcasters to normal viewing: Press O. To return to obtain the RF channel numbers for your local digital stations. Installation ...

Owner's Manual - English
Page 38
...Labeling and press T. 3 Press B or b to highlight the video source you have connected to the TV (- Done 38 or c) Repeatedly press + on the screen if no signal is received in the Input Selection screen, you can label the video input sources according to the specific devices you want to change the...video input source according to the type of device you connected to each source, from the following preset list of the Input Selection screen. Chapter 6: Using the TV's features Selecting the video input source to view To select the video input source to view: 1 Press + on the remote control...
...Labeling and press T. 3 Press B or b to highlight the video source you have connected to the TV (- Done 38 or c) Repeatedly press + on the screen if no signal is received in the Input Selection screen, you can label the video input sources according to the specific devices you want to change the...video input source according to the type of device you connected to each source, from the following preset list of the Input Selection screen. Chapter 6: Using the TV's features Selecting the video input source to view To select the video input source to view: 1 Press + on the remote control...

Owner's Manual - English
Page 39
...as you highlight them in the Channel Browser™) or Select mode (to surf over channels in the Input Selection screen and skipped over when you connected a VCR to VIDEO 1, Cable TV to VIDEO 2, a video recorder to ColorStream HD1, a DTV settop box to HDMI 1, a satellite/DSS set ... DVD player to tune). • Quickly change inputs from the Favorites list. To delete a favorite channel/input: 1 Press n to Select Navigate Input Selection screen with none of the inputs labeled as a specific device). To revert to the channel or input. 2 Press and hold = for 3 seconds. Tuning channels...
...as you highlight them in the Channel Browser™) or Select mode (to surf over channels in the Input Selection screen and skipped over when you connected a VCR to VIDEO 1, Cable TV to VIDEO 2, a video recorder to ColorStream HD1, a DTV settop box to HDMI 1, a satellite/DSS set ... DVD player to tune). • Quickly change inputs from the Favorites list. To delete a favorite channel/input: 1 Press n to Select Navigate Input Selection screen with none of the inputs labeled as a specific device). To revert to the channel or input. 2 Press and hold = for 3 seconds. Tuning channels...

Owner's Manual - English
Page 41
...number each time. 1 Select the first channel you will return to the memorized channel one channel to the R button, so you press R, the TV will display. This feature also works for about 2 seconds until the message "Channel Memorized" appears on the remote control, followed by pressing R. ...and forth between two channels using the Channel Number and dash (=) on the remote control. Tuning digital channels: Press the Channel Number (0-9) on -screen. Note: If you press R, the memorized channel will be removed from any other channel by the dash (=) button and then the sub-channel ...
...number each time. 1 Select the first channel you will return to the memorized channel one channel to the R button, so you press R, the TV will display. This feature also works for about 2 seconds until the message "Channel Memorized" appears on the remote control, followed by pressing R. ...and forth between two channels using the Channel Number and dash (=) on the remote control. Tuning digital channels: Press the Channel Number (0-9) on -screen. Note: If you press R, the memorized channel will be removed from any other channel by the dash (=) button and then the sub-channel ...

Owner's Manual - English
Page 42
... Note: The "picture size" illustrations are currently watching. Some program formats will vary depending on the remote control. 2 While the Picture Size screen is open , you can do one of the TheaterWide® picture sizes, the top and bottom edges of the image (in any purpose ...other than your TV. The format of the picture (including subtitles or captions) may be hidden. Chapter 6: Using the TV's features Selecting the picture size You can view many program formats in the Picture Size...
... Note: The "picture size" illustrations are currently watching. Some program formats will vary depending on the remote control. 2 While the Picture Size screen is open , you can do one of the TheaterWide® picture sizes, the top and bottom edges of the image (in any purpose ...other than your TV. The format of the picture (including subtitles or captions) may be hidden. Chapter 6: Using the TV's features Selecting the picture size You can view many program formats in the Picture Size...


