
Owner's Manual - English
Page 1
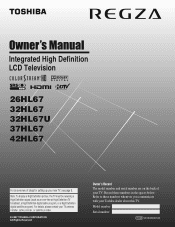
Integrated High Definition LCD Television HIGH-DEFINITION TELEVISION 26HL67 32HL67 32HL67U 37HL67 42HL67 For an overview of your TV. Model number: Serial number: YC/M1 VX1A000401A0 Refer to these numbers in the spaces below. Note: To display a High Definition picture, the TV must be receiving ..., please contact your TV antenna installer, cable provider, or satellite provider. © 2007 TOSHIBA CORPORATION All Rights Reserved Owner's Record The model number and serial number are on the back of steps for setting up your Toshiba dealer about this TV. Record these numbers whenever...
Integrated High Definition LCD Television HIGH-DEFINITION TELEVISION 26HL67 32HL67 32HL67U 37HL67 42HL67 For an overview of your TV. Model number: Serial number: YC/M1 VX1A000401A0 Refer to these numbers in the spaces below. Note: To display a High Definition picture, the TV must be receiving ..., please contact your TV antenna installer, cable provider, or satellite provider. © 2007 TOSHIBA CORPORATION All Rights Reserved Owner's Record The model number and serial number are on the back of steps for setting up your Toshiba dealer about this TV. Record these numbers whenever...
Owner's Manual - English
Page 7
...Toshiba 8 Features of your new TV 8 Overview of steps for installing, setting up, and using your new TV 9 TV front and side panel controls and connections 10 TV back panel connections 11 Chapter 2: Connecting your TV...Setting up your TV 29 Selecting the...43 Digital CC Settings 43 CC ...TV programs and movies by rating (V-Chip 48 Downloading an additional rating system for blocking TV...settings feature 51 Setting the PC Audio 52 Setting the sleep timer 52 Displaying TV...TV's advanced features 54 Using the advanced picture settings... Using the advanced audio settings features 57 Using the ...
...Toshiba 8 Features of your new TV 8 Overview of steps for installing, setting up, and using your new TV 9 TV front and side panel controls and connections 10 TV back panel connections 11 Chapter 2: Connecting your TV...Setting up your TV 29 Selecting the...43 Digital CC Settings 43 CC ...TV programs and movies by rating (V-Chip 48 Downloading an additional rating system for blocking TV...settings feature 51 Setting the PC Audio 52 Setting the sleep timer 52 Displaying TV...TV's advanced features 54 Using the advanced picture settings... Using the advanced audio settings features 57 Using the ...
Owner's Manual - English
Page 8
... services such as video-on the market. For more information call your new Toshiba widescreen, integrated HD, LCD TV: • Integrated digital tuning (8VSB ATSC and QAM) eliminates the need for purchasing this Toshiba LCD TV, one of the most cases). • Three HDMI™ digital, high... Digital Audio Out optical audio connection with the station numbers, so you always know what you to Toshiba Thank you for a separate digital converter set-top box (in most innovative LCD TVs on -demand, a cable operator's enhanced program guide and data-enhanced television services may require the ...
... services such as video-on the market. For more information call your new Toshiba widescreen, integrated HD, LCD TV: • Integrated digital tuning (8VSB ATSC and QAM) eliminates the need for purchasing this Toshiba LCD TV, one of the most cases). • Three HDMI™ digital, high... Digital Audio Out optical audio connection with the station numbers, so you always know what you to Toshiba Thank you for a separate digital converter set-top box (in most innovative LCD TVs on -demand, a cable operator's enhanced program guide and data-enhanced television services may require the ...
Owner's Manual - English
Page 9
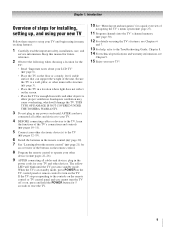
...TV: • Read "Important notes about the remote control" (- pages 22-26). 9 AFTER connecting all cables and devices to your TV. 4 BEFORE connecting cables or devices to set up your TV and other device(s) (- When the TV...TV. 10 See "Menu layout and navigation" for installing, setting up, and using your new TV Follow these steps to the TV, learn the functions of steps for a quick overview of the unit. THIS TYPE OF DAMAGE IS NOT COVERED UNDER THE TOSHIBA...TV and begin using the TV's features, see Chapter 9. 15 Enjoy your LCD TV" (- page 20). 7 See "Learning about your new TV...
...TV: • Read "Important notes about the remote control" (- pages 22-26). 9 AFTER connecting all cables and devices to your TV. 4 BEFORE connecting cables or devices to set up your TV and other device(s) (- When the TV...TV. 10 See "Menu layout and navigation" for installing, setting up, and using your new TV Follow these steps to the TV, learn the functions of steps for a quick overview of the unit. THIS TYPE OF DAMAGE IS NOT COVERED UNDER THE TOSHIBA...TV and begin using the TV's features, see Chapter 9. 15 Enjoy your LCD TV" (- page 20). 7 See "Learning about your new TV...
Owner's Manual - English
Page 11
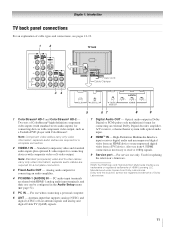
... Dolby and the double-D symbol are shared with ColorStream®. Two sets of ColorStream® high-definition component video inputs (with standard stereo audio inputs) for connecting devices with component video output, such as a Toshiba DVD player with HDMI-1 analog audio input terminals, and their use ...for connecting an audio amplifier. 4 PC/HDMI-1 (AUDIO) IN - Used for a complete connection. 2 VIDEO-1 IN - Chapter 1: Introduction TV back panel connections For an explanation of cable types and connections, see item 4. Note: Component video cables carry only video information;
... Dolby and the double-D symbol are shared with ColorStream®. Two sets of ColorStream® high-definition component video inputs (with standard stereo audio inputs) for connecting devices with component video output, such as a Toshiba DVD player with HDMI-1 analog audio input terminals, and their use ...for connecting an audio amplifier. 4 PC/HDMI-1 (AUDIO) IN - Used for a complete connection. 2 VIDEO-1 IN - Chapter 1: Introduction TV back panel connections For an explanation of cable types and connections, see item 4. Note: Component video cables carry only video information;
Owner's Manual - English
Page 12
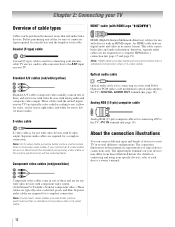
.... (ColorStream® is Toshiba's brand of component video.) These cables are for use : yellow for video, red for stereo right audio, and white for use with video devices with Dolby Digital or PCM (pulse-code modulation) optical audio input to the TV's DIGITAL AUDIO OUT terminal...digital audio and video in sets of three, and are representative of each device's owner's manual. This cable carries both video and audio information; Optical audio cable Optical audio cable is for connecting receivers with S-video output. The input/output terminals on your TV) are required for a...
.... (ColorStream® is Toshiba's brand of component video.) These cables are for use : yellow for video, red for stereo right audio, and white for use with video devices with Dolby Digital or PCM (pulse-code modulation) optical audio input to the TV's DIGITAL AUDIO OUT terminal...digital audio and video in sets of three, and are representative of each device's owner's manual. This cable carries both video and audio information; Optical audio cable Optical audio cable is for connecting receivers with S-video output. The input/output terminals on your TV) are required for a...

Owner's Manual - English
Page 14
... the video input source, press INPUT on the TV.* Tune the TV to channel 3 or 4 (whichever channel the Cable box output is prohibited under the Copyright Laws of television programs, videotapes, DVDs, and other materials is set to your TV Connecting a VCR with S-video and a cable box... An S-video connection will need: • coaxial cables • S-video cable - To program the TV remote control to change channels. The unauthorized recording, use a ...
... the video input source, press INPUT on the TV.* Tune the TV to channel 3 or 4 (whichever channel the Cable box output is prohibited under the Copyright Laws of television programs, videotapes, DVDs, and other materials is set to your TV Connecting a VCR with S-video and a cable box... An S-video connection will need: • coaxial cables • S-video cable - To program the TV remote control to change channels. The unauthorized recording, use a ...
Owner's Manual - English
Page 15
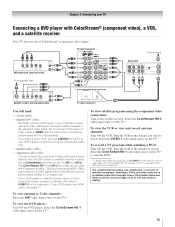
...time or the picture performance will be used with ColorStream® (component video), a VCR, and a satellite receiver Your TV has two sets of ColorStream terminals on the TV to civil and criminal liability. 15 If you to your VCR's audio out terminal using the component video connections: Turn ... (- To view antenna or Cable channels: Select the ANT video input source on the TV* to either set of ColorStream® (component video) inputs. Do not connect both types of video cable to TV Y PB PR AUDIO OUT L Satellite COMPONENT VIDEO S-VIDEO VIDEO R IN OUT OUT ...
...time or the picture performance will be used with ColorStream® (component video), a VCR, and a satellite receiver Your TV has two sets of ColorStream terminals on the TV to civil and criminal liability. 15 If you to your VCR's audio out terminal using the component video connections: Turn ... (- To view antenna or Cable channels: Select the ANT video input source on the TV* to either set of ColorStream® (component video) inputs. Do not connect both types of video cable to TV Y PB PR AUDIO OUT L Satellite COMPONENT VIDEO S-VIDEO VIDEO R IN OUT OUT ...

Owner's Manual - English
Page 17
...or uncompressed digital video from EIA/CEA-861-D-compliant[1] consumer electronic devices (such as a set-top box or DVD player with HDMI or DVI output). Conventional HDMI/DVI cable may not operate properly with the TV. TV lower back panel To connect a DVI device, you will need a Category 2 cable.... is being standardized for reception of an HDMI-to-DVI adapter cable should not exceed 9.8 ft (3m). See "Setting the HDMI™ audio mode" (- To program the TV remote control to -DVI adapter cable transfers video only. Because this is an evolving technology, it is recommended that ...
...or uncompressed digital video from EIA/CEA-861-D-compliant[1] consumer electronic devices (such as a set-top box or DVD player with HDMI or DVI output). Conventional HDMI/DVI cable may not operate properly with the TV. TV lower back panel To connect a DVI device, you will need a Category 2 cable.... is being standardized for reception of an HDMI-to-DVI adapter cable should not exceed 9.8 ft (3m). See "Setting the HDMI™ audio mode" (- To program the TV remote control to -DVI adapter cable transfers video only. Because this is an evolving technology, it is recommended that ...

Owner's Manual - English
Page 18
... audio amplifier To control the audio: 1 Turn on the TV and the digital audio device. 2 Press Y on the TV and the stereo amplifier. 2 Minimize the sound volume from Dolby Laboratories. LINE IN LR TV upper back panel Audio Digital Audio Selector Audio Settings Advanced Audio Settings Audio Setup 4 In the Optical Output Format field, select...
... audio amplifier To control the audio: 1 Turn on the TV and the digital audio device. 2 Press Y on the TV and the stereo amplifier. 2 Minimize the sound volume from Dolby Laboratories. LINE IN LR TV upper back panel Audio Digital Audio Selector Audio Settings Advanced Audio Settings Audio Setup 4 In the Optical Output Format field, select...
Owner's Manual - English
Page 19
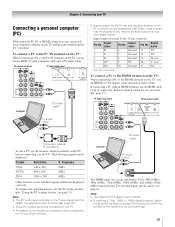
...cable and a PC audio cable. To connect a PC to the PC IN terminal on the TV: When connecting a PC to the PC IN terminal on the TV, use a PC, set the monitor output resolution on the TV are shared with an HDMI terminal, use an HDMI cable (type A connector). page 17). ...To connect a PC to the HDMI terminal on the TV: When connecting a PC to the HDMI terminal on the TV and hear the sound from the TV's speakers. Chapter 2: Connecting your computer's display on the TV, use the PC setting feature (- TV upper back panel TV lower back panel Computer PC audio cable • ...
...cable and a PC audio cable. To connect a PC to the PC IN terminal on the TV: When connecting a PC to the PC IN terminal on the TV, use a PC, set the monitor output resolution on the TV are shared with an HDMI terminal, use an HDMI cable (type A connector). page 17). ...To connect a PC to the HDMI terminal on the TV: When connecting a PC to the HDMI terminal on the TV and hear the sound from the TV's speakers. Chapter 2: Connecting your computer's display on the TV, use the PC setting feature (- TV upper back panel TV lower back panel Computer PC audio cable • ...
Owner's Manual - English
Page 21
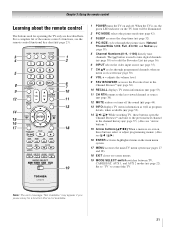
...key chart (- page 36). 6 INPUT selects the video input source (- page 38). 12 MUTE reduces or turns off . Set to "TV" to control the TV. When the TV is on -screen (- page 22). page 30). 8 VOL + - Chapter 3: Using the remote control Learning about the remote... 16 ENTER activates highlighted items in the Channel Brower™ (- Note: The error message "Not Available" may appear if you press a key for operating the TV only are described here. page 35). 7 CH Bb cycles through the picture sizes: Natural, TheaterWide 1/2/3, Full, 4:3 HD, and Native (page 39). 5 Channel...
...key chart (- page 36). 6 INPUT selects the video input source (- page 38). 12 MUTE reduces or turns off . Set to "TV" to control the TV. When the TV is on -screen (- page 22). page 30). 8 VOL + - Chapter 3: Using the remote control Learning about the remote... 16 ENTER activates highlighted items in the Channel Brower™ (- Note: The error message "Not Available" may appear if you press a key for operating the TV only are described here. page 35). 7 CH Bb cycles through the picture sizes: Natural, TheaterWide 1/2/3, Full, 4:3 HD, and Native (page 39). 5 Channel...
Owner's Manual - English
Page 22
...switch to AUX 1. • DVD player or HTIB, set the MODE SELECT switch to use the device's original remote control. Note: Even after the TV remote control is not preprogrammed to operate, you have a non-Toshiba device or a Toshiba device that the remote control is programmed, it may ...not work on any other devices. pages 24-26). page 38): B selects the next higher channel.
...switch to AUX 1. • DVD player or HTIB, set the MODE SELECT switch to use the device's original remote control. Note: Even after the TV remote control is not preprogrammed to operate, you have a non-Toshiba device or a Toshiba device that the remote control is programmed, it may ...not work on any other devices. pages 24-26). page 38): B selects the next higher channel.

Owner's Manual - English
Page 23
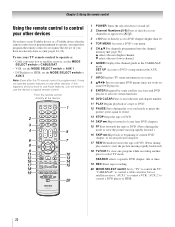
... CONTROL KEY Toshiba TV CABLE SAT (satellite) POWER SLEEP PIC SIZE PIC MODE Power Sleep timer Picture size PIC MODE Power s TV s TV s TV Power s TV s TV s TV 1-9 Digit 1-9 Digit 1-9 Digit 1-9 0 Digit 0 Digit 0 Digit 0 100/-/+10 INPUT - (sub CH) TV/Video select --s TV - (sub CH) s TV FAV BROWSER/ TOP MENU MUTE FAV BROWSER DVD TOP Menu* Sound mute --s TV --s TV SET UP/GUIDE VOL...
... CONTROL KEY Toshiba TV CABLE SAT (satellite) POWER SLEEP PIC SIZE PIC MODE Power Sleep timer Picture size PIC MODE Power s TV s TV s TV Power s TV s TV s TV 1-9 Digit 1-9 Digit 1-9 Digit 1-9 0 Digit 0 Digit 0 Digit 0 100/-/+10 INPUT - (sub CH) TV/Video select --s TV - (sub CH) s TV FAV BROWSER/ TOP MENU MUTE FAV BROWSER DVD TOP Menu* Sound mute --s TV --s TV SET UP/GUIDE VOL...
Owner's Manual - English
Page 24
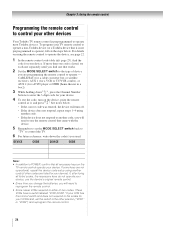
...you used: DEVICE CODE DEVICE CODE Note: • In addition to POWER, confirm that came with the device. 5 Remember to set the switch to the other devices Your Toshiba TV remote control is not preprogrammed to operate), follow the steps below . • If the correct code was entered, the device will... you find the code for your device. If your VCR has this kind of two codes. To program your TV remote control to operate a non-Toshiba device (or a Toshiba device that works. 2 Set the MODE SELECT switch to the type of device you will turn on using another code. • If the...
...you used: DEVICE CODE DEVICE CODE Note: • In addition to POWER, confirm that came with the device. 5 Remember to set the switch to the other devices Your Toshiba TV remote control is not preprogrammed to operate), follow the steps below . • If the correct code was entered, the device will... you find the code for your device. If your VCR has this kind of two codes. To program your TV remote control to operate a non-Toshiba device (or a Toshiba device that works. 2 Set the MODE SELECT switch to the type of device you will turn on using another code. • If the...
Owner's Manual - English
Page 27
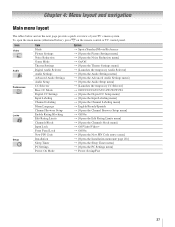
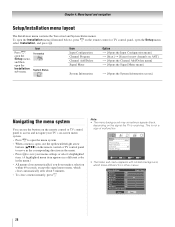
... menu layout The tables below ), press Y on the next page provide a quick overview of your TV's menu system. page 28)] S [Opens the Sleep Timer menu] S [Opens the PC Settings menu] S Power-Saving/Fast 27 To open the main menus (illustrated below and on the remote ...control or TV control panel. Icon Video Audio Preferences Locks Setup Item Mode Picture Settings Noise Reduction Game Mode Theater Settings Digital Audio Selector Audio Settings Advanced Audio Settings Audio Setup CC Selector Base CC Mode Digital CC Settings Input Labeling Channel Labeling Menu Language...
... menu layout The tables below ), press Y on the next page provide a quick overview of your TV's menu system. page 28)] S [Opens the Sleep Timer menu] S [Opens the PC Settings menu] S Power-Saving/Fast 27 To open the main menus (illustrated below and on the remote ...control or TV control panel. Icon Video Audio Preferences Locks Setup Item Mode Picture Settings Noise Reduction Game Mode Theater Settings Digital Audio Selector Audio Settings Advanced Audio Settings Audio Setup CC Selector Base CC Mode Digital CC Settings Input Labeling Channel Labeling Menu Language...
Owner's Manual - English
Page 28
...receiving. To open the Installation menu (illustrated below), press Y on the remote control or TV control panel to move in the corresponding direction in the menu. • Press T to save your menu settings or select a highlighted item. (A highlighted menu item appears in a different color in the ... 100 Back Light 100 DynaLight Brightness 50 Color 50 Tint 0 Sharpness 50 Advanced Picture Settings Reset Mode: Sports On Done 28 Video Mode Picture Settings Noise Reduction Game Mode Theater Settings Sports Off Navigate ENTER Select CH RTN Back EXIT Exit • The Video sub-...
...receiving. To open the Installation menu (illustrated below), press Y on the remote control or TV control panel to move in the corresponding direction in the menu. • Press T to save your menu settings or select a highlighted item. (A highlighted menu item appears in a different color in the ... 100 Back Light 100 DynaLight Brightness 50 Color 50 Tint 0 Sharpness 50 Advanced Picture Settings Reset Mode: Sports On Done 28 Video Mode Picture Settings Noise Reduction Game Mode Theater Settings Sports Off Navigate ENTER Select CH RTN Back EXIT Exit • The Video sub-...
Owner's Manual - English
Page 29
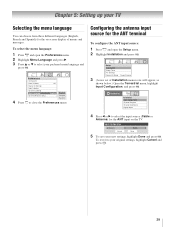
...Cancel Cable Done 5 To save your TV Selecting the menu language You can choose from three different languages (English, French and Spanish) for the on the TV. Setup Installation Sleep Timer PC Settings Power-On Mode Power-Saving 3 (A new set of menus and messages. Preferences CC ...Selector Base CC Mode Digital CC Settings Input Labeling Channel Labeling Menu Language Channel Browser Setup Off...
...Cancel Cable Done 5 To save your TV Selecting the menu language You can choose from three different languages (English, French and Spanish) for the on the TV. Setup Installation Sleep Timer PC Settings Power-On Mode Power-Saving 3 (A new set of menus and messages. Preferences CC ...Selector Base CC Mode Digital CC Settings Input Labeling Channel Labeling Menu Language Channel Browser Setup Off...

Owner's Manual - English
Page 30
... page 29). 2 Press Y and open the Setup menu. 2 Highlight Installation and press T. 3 (A new set of Channels Found - 73 Scanning Digital Channels Found Channel - 118 Abort The TV will appear, as shown below to program channels into the channel memory, you can manually add or delete individual...the memory, you press < or , on the remote control or TV control panel, your TV will stop only on -screen display and press T). Setup Installation Sleep Timer PC Settings Power-On Mode Power-Saving 4 (A new set of programmed channels (and does NOT erase channels that were previously ...
... page 29). 2 Press Y and open the Setup menu. 2 Highlight Installation and press T. 3 (A new set of Channels Found - 73 Scanning Digital Channels Found Channel - 118 Abort The TV will appear, as shown below to program channels into the channel memory, you can manually add or delete individual...the memory, you press < or , on the remote control or TV control panel, your TV will stop only on -screen display and press T). Setup Installation Sleep Timer PC Settings Power-On Mode Power-Saving 4 (A new set of programmed channels (and does NOT erase channels that were previously ...
Owner's Manual - English
Page 31
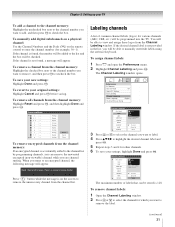
... Channel Labeling and press T. Custom Clear All Done 3 Press < or , to select the channel you want to remove the label. (continued) 31 To save your settings, highlight Done and press T. Channel Add/Delete 2 2 - 1 2 - 2 3 4 5 6 7 7 - 1 8 Analog Digital Digital Analog Analog Digital Analog Analog Digital ...Labeling channels A list of labels that can remove the unwanted encrypted (non-viewable) channel while you are channel surfing. Chapter 5: Setting up your TV To add a channel to the channel memory: Highlight the unchecked box next to the channel number you want to remove, and then...
... Channel Labeling and press T. Custom Clear All Done 3 Press < or , to select the channel you want to remove the label. (continued) 31 To save your settings, highlight Done and press T. Channel Add/Delete 2 2 - 1 2 - 2 3 4 5 6 7 7 - 1 8 Analog Digital Digital Analog Analog Digital Analog Analog Digital ...Labeling channels A list of labels that can remove the unwanted encrypted (non-viewable) channel while you are channel surfing. Chapter 5: Setting up your TV To add a channel to the channel memory: Highlight the unchecked box next to the channel number you want to remove, and then...


