Printable Spec Sheet
Page 2
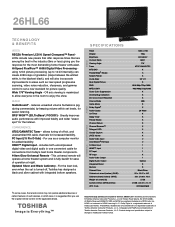
... X X X 2 2 1 1 1 X 1 Optical X X Black/Silver 26 x 19.07 x 4.61 26 x 21.08 x 10.8 27.56 29.08 x 24.51 x 14.11 022265240649 1In some cases, the remote control may not operate additional devices or certain features of HDMI Licensing L.L.C.. AUDIO StableSound&#...remote will also incorporate improvements in one convenient cable for added flexibility. during commercials) by keeping volume within set is fully backlit for picture quality. allows tuning of Toshiba America Consumer Products, L.L.C.. 26HL66 TECHNOLOGY & BENEFITS VIDEO REGZA Premium LCD Hi Speed Cinespeed™ Panel LCDs...
... X X X 2 2 1 1 1 X 1 Optical X X Black/Silver 26 x 19.07 x 4.61 26 x 21.08 x 10.8 27.56 29.08 x 24.51 x 14.11 022265240649 1In some cases, the remote control may not operate additional devices or certain features of HDMI Licensing L.L.C.. AUDIO StableSound&#...remote will also incorporate improvements in one convenient cable for added flexibility. during commercials) by keeping volume within set is fully backlit for picture quality. allows tuning of Toshiba America Consumer Products, L.L.C.. 26HL66 TECHNOLOGY & BENEFITS VIDEO REGZA Premium LCD Hi Speed Cinespeed™ Panel LCDs...
Operating Guide
Page 3
...LCD TV 2 Trademark Information 2 Chapter 1: Introduction 4 Welcome to Toshiba 4 Features of your new TV 4 Overview of steps for installing, setting up, and using your new TV 4 TV front and side panel controls and connections 5 TV back panel connections 6 Chapter 2: Using the remote control 7 Preparing the remote control for use 7 Installing the remote control batteries 7 Remote...Return 25 Switching between two channels using SurfLock™. . . . 25 Selecting the picture size 26 Scrolling the TheaterWide® picture (TheaterWide 2 and 3 only 27 Using the auto aspect ratio ...
...LCD TV 2 Trademark Information 2 Chapter 1: Introduction 4 Welcome to Toshiba 4 Features of your new TV 4 Overview of steps for installing, setting up, and using your new TV 4 TV front and side panel controls and connections 5 TV back panel connections 6 Chapter 2: Using the remote control 7 Preparing the remote control for use 7 Installing the remote control batteries 7 Remote...Return 25 Switching between two channels using SurfLock™. . . . 25 Selecting the picture size 26 Scrolling the TheaterWide® picture (TheaterWide 2 and 3 only 27 Using the auto aspect ratio ...
Operating Guide
Page 4
.... 2 Observe the following are just a few of the many exciting features of your new Toshiba widescreen, integrated HD, LCD TV: • Integrated digital tuning (8VSB ATSC and QAM) eliminates the need for a separate digital converter set-top box (in the remote control (- page 17). 12 For details on -demand, a cable operator's enhanced program guide...
.... 2 Observe the following are just a few of the many exciting features of your new Toshiba widescreen, integrated HD, LCD TV: • Integrated digital tuning (8VSB ATSC and QAM) eliminates the need for a separate digital converter set-top box (in the remote control (- page 17). 12 For details on -demand, a cable operator's enhanced program guide...
Operating Guide
Page 5
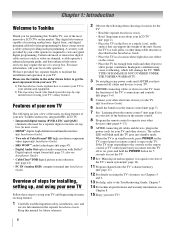
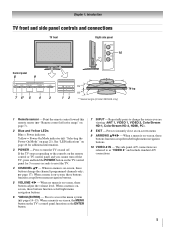
...menu navigation buttons. 10 VIDEO-2 IN - Point the remote control toward this remote sensor (- When a menu is on-screen, the MENU button on and off the TV, press and hold the POWER button on the TV control panel for additional information. 3 POWER - "...TV stops responding to the controls on the remote control or TV control panel and you are referred to access the menu system (- Chapter 1: Introduction TV front and side panel controls and connections TV front Right side panel 10 Control panel 8 9 7 6* 5 4 3 12 ** Swivel angle (model 26HL66 only) TV top 1 Remote...
...menu navigation buttons. 10 VIDEO-2 IN - Point the remote control toward this remote sensor (- When a menu is on-screen, the MENU button on and off the TV, press and hold the POWER button on the TV control panel for additional information. 3 POWER - "...TV stops responding to the controls on the remote control or TV control panel and you are referred to access the menu system (- Chapter 1: Introduction TV front and side panel controls and connections TV front Right side panel 10 Control panel 8 9 7 6* 5 4 3 12 ** Swivel angle (model 26HL66 only) TV top 1 Remote...
Operating Guide
Page 7
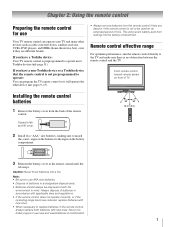
...; Be sure to operate: You can operate your TV and many other device (- Chapter 2: Using the remote control Preparing the remote control for an extended period of time. If you have a non-Toshiba device or a Toshiba device that the remote control is not to replace batteries in the remote control, always replace both batteries with the environment...
...; Be sure to operate: You can operate your TV and many other device (- Chapter 2: Using the remote control Preparing the remote control for an extended period of time. If you have a non-Toshiba device or a Toshiba device that the remote control is not to replace batteries in the remote control, always replace both batteries with the environment...
Operating Guide
Page 8
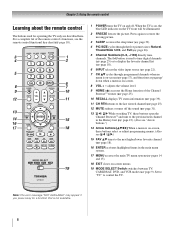
... and Full (- page 25). 12 MUTE reduces or turns off . page 31). 13 3 C / # c While watching TV, these buttons select or adjust programming menus. (Also see the remote control functional key chart (- page 18). 16 ENTER activates highlighted items in the History List (- pages 14 and 15). 18... moving picture. 3 SLEEP accesses the sleep timer (- page 10). 1 POWER turns the TV on -screen. 8 VOL + - page 26). 5 Channel Numbers (0-9, -/100) directly tune channels. page 39). 11 CH RTN returns to control the TV. For a complete list of the Channel Browser™ feature (- page 39). 4 PIC...
... and Full (- page 25). 12 MUTE reduces or turns off . page 31). 13 3 C / # c While watching TV, these buttons select or adjust programming menus. (Also see the remote control functional key chart (- page 18). 16 ENTER activates highlighted items in the History List (- pages 14 and 15). 18... moving picture. 3 SLEEP accesses the sleep timer (- page 10). 1 POWER turns the TV on -screen. 8 VOL + - page 26). 5 Channel Numbers (0-9, -/100) directly tune channels. page 39). 11 CH RTN returns to control the TV. For a complete list of the Channel Browser™ feature (- page 39). 4 PIC...

Operating Guide
Page 9
...: Even after the TV remote control is not preprogrammed to operate, you must first program the remote control to recognize the device (if you will need to use the device's original remote control. If this happens and you wish to use those features, you have a non-Toshiba device or a Toshiba device that the remote control is programmed...
...: Even after the TV remote control is not preprogrammed to operate, you must first program the remote control to recognize the device (if you will need to use the device's original remote control. If this happens and you wish to use those features, you have a non-Toshiba device or a Toshiba device that the remote control is programmed...

Operating Guide
Page 10
... not send a signal in that remote control mode. • sTV = key will affect the TV, even when the remote control is in another mode. CHBb PIC SIZE MUTE GUIDE FF PAUSE/STEP PLAY REW HOME STOP FREEZE SKIP Z SKIP z TV/VCR REC SET UP TOP MENU Toshiba TV (TV) Power Sleep timer TV/Video select Digit 1-9 Digit 0 - (sub...
... not send a signal in that remote control mode. • sTV = key will affect the TV, even when the remote control is in another mode. CHBb PIC SIZE MUTE GUIDE FF PAUSE/STEP PLAY REW HOME STOP FREEZE SKIP Z SKIP z TV/VCR REC SET UP TOP MENU Toshiba TV (TV) Power Sleep timer TV/Video select Digit 1-9 Digit 0 - (sub...

Operating Guide
Page 11
...the codes for your device. These VCRs have a switch labeled "VCR1/VCR2." Chapter 2: Using the remote control Programming the remote control to operate your other devices Your Toshiba TV remote control is preprogrammed to POWER, confirm that all listed codes, the necessary keys do not operate your...the other position ("VCR1" or "VCR2") and reprogram the remote control. 11 To program your device. If, after trying all necessary keys on the TV remote control operate your TV remote control to operate a non-Toshiba device (or a Toshiba device that came with the device. 5 Remember to set the...
...the codes for your device. These VCRs have a switch labeled "VCR1/VCR2." Chapter 2: Using the remote control Programming the remote control to operate your other devices Your Toshiba TV remote control is preprogrammed to POWER, confirm that all listed codes, the necessary keys do not operate your...the other position ("VCR1" or "VCR2") and reprogram the remote control. 11 To program your device. If, after trying all necessary keys on the TV remote control operate your TV remote control to operate a non-Toshiba device (or a Toshiba device that came with the device. 5 Remember to set the...

Operating Guide
Page 12
..., 004, 005, 006, 007, 020, 031, 056 021, 028, 030, 032, 035, 039, 043, 045, 047, 058 027 TV/VCR Combo Action GE Goldstar Panasonic Precision Quasar Realistic Sony Toshiba Totevision Zenith 078 059, 062 065 065 078 065 079 074 057 009, 010, 065 065 DVD/VCR Combo Go... Sprucer Starcom Stargate Sylvania TeleView Texscan Tocom U. S. Chapter 2: Using the remote control Remote control codes In some cases you may use the device's remote control. Your other device may not be able to operate your device with the TV remote control. If this happens, use a code that is not recognized by ...
..., 004, 005, 006, 007, 020, 031, 056 021, 028, 030, 032, 035, 039, 043, 045, 047, 058 027 TV/VCR Combo Action GE Goldstar Panasonic Precision Quasar Realistic Sony Toshiba Totevision Zenith 078 059, 062 065 065 078 065 079 074 057 009, 010, 065 065 DVD/VCR Combo Go... Sprucer Starcom Stargate Sylvania TeleView Texscan Tocom U. S. Chapter 2: Using the remote control Remote control codes In some cases you may use the device's remote control. Your other device may not be able to operate your device with the TV remote control. If this happens, use a code that is not recognized by ...

Operating Guide
Page 13
Chapter 2: Using the remote control Curtis Mathes Daewoo Daytron Denon Dimensia Electrohome Emerson Fisher Fuji Funai Garrard GE Go Video Goldstar Gradiente Harman Kardon Hitachi JBL JC Penney Jensen ... RCA Realistic Ricoh Runco Samsung Sansui Sanyo Scott Sears Sharp Shintom Signature Signature 2000 Singer Sony STS Sylvania Symphonic Tandy Tashiko Tatung Teac Technics Teknika Toshiba Totevision Unitec Unitech Vector Research Video Concepts 036, 045, 046, 057, 061, 072, 079 012, 024, 025, 035, 042, 053, 063 014 026, 027, 063...
Chapter 2: Using the remote control Curtis Mathes Daewoo Daytron Denon Dimensia Electrohome Emerson Fisher Fuji Funai Garrard GE Go Video Goldstar Gradiente Harman Kardon Hitachi JBL JC Penney Jensen ... RCA Realistic Ricoh Runco Samsung Sansui Sanyo Scott Sears Sharp Shintom Signature Signature 2000 Singer Sony STS Sylvania Symphonic Tandy Tashiko Tatung Teac Technics Teknika Toshiba Totevision Unitec Unitech Vector Research Video Concepts 036, 045, 046, 057, 061, 072, 079 012, 024, 025, 035, 042, 053, 063 014 026, 027, 063...
Operating Guide
Page 14
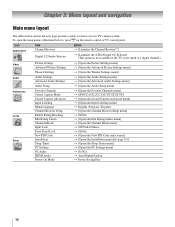
To open the main menus (illustrated below and on the remote control or TV control panel. Icon Applications Item Channel Browser Digital CC/Audio Selector Option S [Launches the Channel Browser™] S [Launches the ATSC Digital CC Selector] (This option is not available if the TV is not tuned to a digital channel.) Video Audio Preferences... S Power-Saving/Fast 14 Chapter 3: Menu layout and navigation Main menu layout The tables below ), press Y on the next page provide a quick overview of your TV's menu system.
To open the main menus (illustrated below and on the remote control or TV control panel. Icon Applications Item Channel Browser Digital CC/Audio Selector Option S [Launches the Channel Browser™] S [Launches the ATSC Digital CC Selector] (This option is not available if the TV is not tuned to a digital channel.) Video Audio Preferences... S Power-Saving/Fast 14 Chapter 3: Menu layout and navigation Main menu layout The tables below ), press Y on the next page provide a quick overview of your TV's menu system.

Operating Guide
Page 15
... Y to open the menu system. • When a menu is open, use the up/down/left/right arrow buttons (BbC c) on the remote control or TV control panel, open the Setup menu, select Installation, and press T. To open the Installation sub-menu. Open the Setup menu, and then open ...the Installation menu (illustrated below), press Y on the remote control or TV control panel to move in the corresponding direction in the menu. • Press T to save your menu settings or select a highlighted item. ...
... Y to open the menu system. • When a menu is open, use the up/down/left/right arrow buttons (BbC c) on the remote control or TV control panel, open the Setup menu, select Installation, and press T. To open the Installation sub-menu. Open the Setup menu, and then open ...the Installation menu (illustrated below), press Y on the remote control or TV control panel to move in the corresponding direction in the menu. • Press T to save your menu settings or select a highlighted item. ...
Operating Guide
Page 17
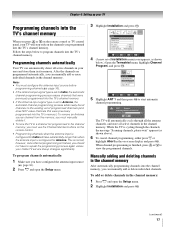
... Y and open the Setup menu. 3 Highlight Installation and press T. ANT 1 Antenna Scanning channels, please wait ... 52% Abort The TV will take substantially longer than when the antenna input is configured for Cable will automatically cycle through the channels, the message "Scanning channels, ...manually add or delete individual channels. Chapter 4: Setting up your TV Programming channels into the TV's channel memory When you press < or , on the remote control or TV control panel, your TV will stop only on the remote control. • Programming channels when the antenna input is ...
... Y and open the Setup menu. 3 Highlight Installation and press T. ANT 1 Antenna Scanning channels, please wait ... 52% Abort The TV will take substantially longer than when the antenna input is configured for Cable will automatically cycle through the channels, the message "Scanning channels, ...manually add or delete individual channels. Chapter 4: Setting up your TV Programming channels into the TV's channel memory When you press < or , on the remote control or TV control panel, your TV will stop only on the remote control. • Programming channels when the antenna input is ...

Operating Guide
Page 18
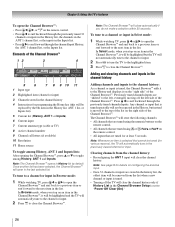
... Digital Analog Analog Digital Analog ANT 1 Reset Cancel Done Programming your favorite channels You can then scan through your changes. To save your TV 3 A new set as favorite channels. Chapter 4: Setting up favorite channels. 5b To delete the channel: Highlight a checked box and ...Channels and press T (see illustration, below . To manually add digital subchannels on a physical channel: Use the Channel Numbers and Dash (=) on the remote control to select ANT 1 and press T (see illustration, below left). 3 Use Bb to enter the channel number (for example, 56-1). Note:...
... Digital Analog Analog Digital Analog ANT 1 Reset Cancel Done Programming your favorite channels You can then scan through your changes. To save your TV 3 A new set as favorite channels. Chapter 4: Setting up favorite channels. 5b To delete the channel: Highlight a checked box and ...Channels and press T (see illustration, below . To manually add digital subchannels on a physical channel: Use the Channel Numbers and Dash (=) on the remote control to select ANT 1 and press T (see illustration, below left). 3 Use Bb to enter the channel number (for example, 56-1). Note:...

Operating Guide
Page 22
...Video 1 Video 2 ColorStream HD 1 ColorStream HD 2 HDMI PC DVD Cable Video Recorder Hide DTV -- or c) Repeatedly press + on the remote control or INPUT on the TV control panel to change the input; To label the video input sources: 1 Press Y and open the Preferences menu. 2 Highlight Input Labeling and... Selecting the video input source to view To select the video input source to view: 1 Press + on the remote control or INPUT on the TV control panel. 2 To select the input: Press 0-6 to select the input source you want to label. Input Selection 0 ANT 1 1 Video 1 2 Video 2 3 ColorStream HD1...
...Video 1 Video 2 ColorStream HD 1 ColorStream HD 2 HDMI PC DVD Cable Video Recorder Hide DTV -- or c) Repeatedly press + on the remote control or INPUT on the TV control panel to change the input; To label the video input sources: 1 Press Y and open the Preferences menu. 2 Highlight Input Labeling and... Selecting the video input source to view To select the video input source to view: 1 Press + on the remote control or INPUT on the TV control panel. 2 To select the input: Press 0-6 to select the input source you want to label. Input Selection 0 ANT 1 1 Video 1 2 Video 2 3 ColorStream HD1...
Operating Guide
Page 24
... are tuned using < or ,, M or m on the remote control. • All inputs that cannot be tuned (for at least 5 seconds. Previously tuned channels/inputs are tuned for various reasons), the TV will not be highlighted and the TV will clear the channel history. Press 3 C to surf backward...list. In Select mode, when you do not make a selection within 30 seconds. Chapter 5: Using the TV's features To open the Channel Browser™: • Press 3 C, # c, or i on the remote control. • Press 3 C to surf backward through the previously tuned 32 channels or inputs in the...
... are tuned using < or ,, M or m on the remote control. • All inputs that cannot be tuned (for at least 5 seconds. Previously tuned channels/inputs are tuned for various reasons), the TV will not be highlighted and the TV will clear the channel history. Press 3 C to surf backward...list. In Select mode, when you do not make a selection within 30 seconds. Chapter 5: Using the TV's features To open the Channel Browser™: • Press 3 C, # c, or i on the remote control. • Press 3 C to surf backward through the previously tuned 32 channels or inputs in the...

Operating Guide
Page 25
... or input. Note: If you press R from any other channel by pressing R. Chapter 5: Using the TV's features Using the Home feature When you press i on the remote control, the TV will be tuned to the last-viewed ANT input and channel. To tune to HOME: Press the i button...the Channel Number buttons (and the dash (=) button if selecting a digital channel). 3 Press R on the remote control. Tuning digital channels: Press the Channel Number buttons (0-9) on the remote control or TV control panel. page 17) or the channel add/ delete function (- The channel has been programmed into the...
... or input. Note: If you press R from any other channel by pressing R. Chapter 5: Using the TV's features Using the Home feature When you press i on the remote control, the TV will be tuned to the last-viewed ANT input and channel. To tune to HOME: Press the i button...the Channel Number buttons (and the dash (=) button if selecting a digital channel). 3 Press R on the remote control. Tuning digital channels: Press the Channel Number buttons (0-9) on the remote control or TV control panel. page 17) or the channel add/ delete function (- The channel has been programmed into the...
Operating Guide
Page 26
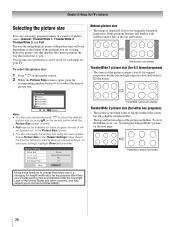
... (it will be "grayed out" in the Picture Size screen). • You also can repeatedly press I on your TV. A B C D E F G TheaterWide 2 picture size example 26 Select the picture size that displays the current program the way that looks best to select the desired picture size. Your picture...size example TheaterWide 1 picture size (for which you . To view the hidden areas, see "Scrolling the TheaterWide® picture" on the remote control while the Picture Size screen is displayed close to its original proportion, but only slightly stretched taller. • The top and bottom edges...
... (it will be "grayed out" in the Picture Size screen). • You also can repeatedly press I on your TV. A B C D E F G TheaterWide 2 picture size example 26 Select the picture size that displays the current program the way that looks best to select the desired picture size. Your picture...size example TheaterWide 1 picture size (for which you . To view the hidden areas, see "Scrolling the TheaterWide® picture" on the remote control while the Picture Size screen is displayed close to its original proportion, but only slightly stretched taller. • The top and bottom edges...
Operating Guide
Page 35
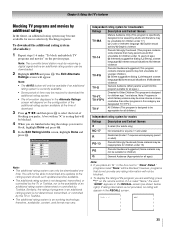
... is rated "None," the word "NONE" appears in an additional rating system is not determined, transmitted, or controlled by the TV or Toshiba. • The additional rating system is an evolving technology; TV - Note: • The Alt RS button will appear in selectively blocking programs. To download the additional rating system (if available..., content, and format may be inappropriate for children age 7 and above. however, programs that many parents would find this category are watching, press E on the remote control.
... is rated "None," the word "NONE" appears in an additional rating system is not determined, transmitted, or controlled by the TV or Toshiba. • The additional rating system is an evolving technology; TV - Note: • The Alt RS button will appear in selectively blocking programs. To download the additional rating system (if available..., content, and format may be inappropriate for children age 7 and above. however, programs that many parents would find this category are watching, press E on the remote control.


