Owner's Manual - English
Page 4
... Do not block any way, such as radiators, heat registers, stoves, or other . The LCD panel inside a wall or similar enclosed area. 19) Never modify this product at all times....cabinet or enclosure surface has been damaged or the TV does not operate normally, take the following precautions: • ALWAYS turn off the TV and unplug the power cord to avoid possible ...Never expose the apparatus to come in case the product requires service. 18) NEVER route the productʼs power cord inside the TV contains glass and a toxic liquid. Introduction SAFETY INSTRUCTIONS Important Safety ...
... Do not block any way, such as radiators, heat registers, stoves, or other . The LCD panel inside a wall or similar enclosed area. 19) Never modify this product at all times....cabinet or enclosure surface has been damaged or the TV does not operate normally, take the following precautions: • ALWAYS turn off the TV and unplug the power cord to avoid possible ...Never expose the apparatus to come in case the product requires service. 18) NEVER route the productʼs power cord inside the TV contains glass and a toxic liquid. Introduction SAFETY INSTRUCTIONS Important Safety ...
Owner's Manual - English
Page 5
... and disconnect the antenna from power and a minute amount of current is being turned on this WARNING may damage the surface of the disc slot as insecticide on the LCD screen. Failure to dangerous voltage or other hazards. Introduction SAFETY INSTRUCTIONS (Continued) ...cause serious personal injury or product damage. Never attempt to clean the LCD screen, follow these sounds become frequent or continuous, unplug the power cord and contact a Toshiba Authorized Service Center. 37) Keep your TOSHIBA TV, follow the instructions in item 31 on or off using only ...
... and disconnect the antenna from power and a minute amount of current is being turned on this WARNING may damage the surface of the disc slot as insecticide on the LCD screen. Failure to dangerous voltage or other hazards. Introduction SAFETY INSTRUCTIONS (Continued) ...cause serious personal injury or product damage. Never attempt to clean the LCD screen, follow these sounds become frequent or continuous, unplug the power cord and contact a Toshiba Authorized Service Center. 37) Keep your TOSHIBA TV, follow the instructions in item 31 on or off using only ...
Owner's Manual - English
Page 6
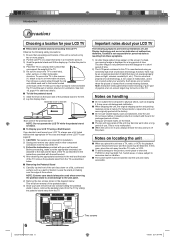
...use, always remove the disc and turn off the power. Before proceeding, make sure the appropriate bracket(s) are attached to the left . 2) Lay the display down on the screen if a fixed, non-moving image is viewed from the rear of the TV. 3) Follow the instructions provided with...period of time. therefore, Toshiba is not responsible for perceived defects resulting from these symptoms. 1) An after image (ghost) may be used when removing the pedestal stand to avoid damage to the left Back side of the pedestal stand NOTE: Do not operate the LCD TV while the pedestal stand ...
...use, always remove the disc and turn off the power. Before proceeding, make sure the appropriate bracket(s) are attached to the left . 2) Lay the display down on the screen if a fixed, non-moving image is viewed from the rear of the TV. 3) Follow the instructions provided with...period of time. therefore, Toshiba is not responsible for perceived defects resulting from these symptoms. 1) An after image (ghost) may be used when removing the pedestal stand to avoid damage to the left Back side of the pedestal stand NOTE: Do not operate the LCD TV while the pedestal stand ...
Owner's Manual - English
Page 7
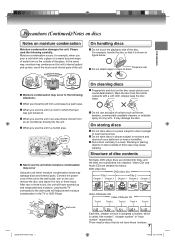
...drops of their case may damage discs and internal parts. Exacmopnldeeonfsmatoioisnt!ure Optical pick-up lens ■ Moisture condensation may occur in the TV or DVD Player. Wait! On cleaning discs Fingerprints and dust on the outside of water form on the disc cause picture and sound ... CD/Audio CD Track 1 Track 2 Track 3 Track 4 Track 5 Each title, chapter or track is assigned a number, which the heat was just turned on moisture condensation Moisture condensation damages the unit. Do not use the unit in a room in a place subject to moisture and dust such as thinner...
...drops of their case may damage discs and internal parts. Exacmopnldeeonfsmatoioisnt!ure Optical pick-up lens ■ Moisture condensation may occur in the TV or DVD Player. Wait! On cleaning discs Fingerprints and dust on the outside of water form on the disc cause picture and sound ... CD/Audio CD Track 1 Track 2 Track 3 Track 4 Track 5 Each title, chapter or track is assigned a number, which the heat was just turned on moisture condensation Moisture condensation damages the unit. Do not use the unit in a room in a place subject to moisture and dust such as thinner...
Owner's Manual - English
Page 9
... 15 Connecting to optional equipment 16 Power source 21 Basic setup Auto Setup 22 Setting the language 23 To memorize channels 24 TV operation TV operation 27 Labeling channels 29 Labeling video inputs 30 Setting the V-Chip 31 Setting the closed captions 35 CC advanced 36 Adjusting .../Second Audio Program (SAP) .... 41 Selecting the audio language 42 Selecting the HDMI audio input source .......... 42 Using the aspect feature 43 Turning off the built-in speakers (26LV610U only 44 Checking the Digital-signal strength 44 Setting the Logo Light 45 Setting the Auto Shut Off 45...
... 15 Connecting to optional equipment 16 Power source 21 Basic setup Auto Setup 22 Setting the language 23 To memorize channels 24 TV operation TV operation 27 Labeling channels 29 Labeling video inputs 30 Setting the V-Chip 31 Setting the closed captions 35 CC advanced 36 Adjusting .../Second Audio Program (SAP) .... 41 Selecting the audio language 42 Selecting the HDMI audio input source .......... 42 Using the aspect feature 43 Turning off the built-in speakers (26LV610U only 44 Checking the Digital-signal strength 44 Setting the Logo Light 45 Setting the Auto Shut Off 45...
Owner's Manual - English
Page 16
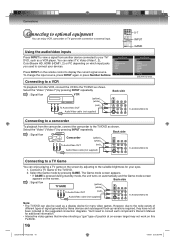
... eyes. 1. To change the input source, press INPUT again or press Number buttons. Select the "Video" ("Video1") by pressing GAME. Connect a TV Game to the TV/DVD as shown. Select the Game mode by pressing INPUT repeatedly. Back side : Signal flow (yellow) (white) To Audio/Video OUT (red...camcorder to display the current signal source. You can enjoy playing a TV game on the remote control to the TV/DVD as shown. The Game mode screen appears. • If GAME is pressed during standby mode, the unit turns on automatically and the Game mode screen appears on the screen. ...
... eyes. 1. To change the input source, press INPUT again or press Number buttons. Select the "Video" ("Video1") by pressing GAME. Connect a TV Game to the TV/DVD as shown. Select the Game mode by pressing INPUT repeatedly. Back side : Signal flow (yellow) (white) To Audio/Video OUT (red...camcorder to display the current signal source. You can enjoy playing a TV game on the remote control to the TV/DVD as shown. The Game mode screen appears. • If GAME is pressed during standby mode, the unit turns on automatically and the Game mode screen appears on the screen. ...

Owner's Manual - English
Page 17
...must also connect the audio cables to the AUDIO IN jacks as well. • When you connect the unit to other equipment, be sure to turn off the power and unplug all of the equipment from the tuner and radio. 17 52G0101A P14-29.indd 17 1/5/09 3:02:53 PM Select... the S-Video cable and the standard video cable are connected at the same time, the S-video cable takes precedence. Connecting your TV/DVD to a component video compatible DVD player, such as a Toshiba DVD player with Component video : Signal flow To COLORSTREAM HD (Y, Pb, Pr) IN Back side To Audio (L/R) OUT To...
...must also connect the audio cables to the AUDIO IN jacks as well. • When you connect the unit to other equipment, be sure to turn off the power and unplug all of the equipment from the tuner and radio. 17 52G0101A P14-29.indd 17 1/5/09 3:02:53 PM Select... the S-Video cable and the standard video cable are connected at the same time, the S-video cable takes precedence. Connecting your TV/DVD to a component video compatible DVD player, such as a Toshiba DVD player with Component video : Signal flow To COLORSTREAM HD (Y, Pb, Pr) IN Back side To Audio (L/R) OUT To...
Owner's Manual - English
Page 19
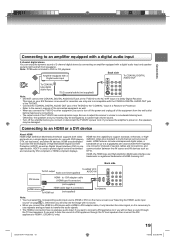
...wall outlet before you will not hear a sound through the TV loud speakers then connect the DVI appliance to 2.2 gigabytes per second (with HDTV signals), one specification. This input on , the speakers may be sure to turn off the amplifier before making any connections. •... The output sound of the TV/DVD has a wide dynamic range. HDMI has the capability to support standard, enhanced, or highdefi...
...wall outlet before you will not hear a sound through the TV loud speakers then connect the DVI appliance to 2.2 gigabytes per second (with HDTV signals), one specification. This input on , the speakers may be sure to turn off the amplifier before making any connections. •... The output sound of the TV/DVD has a wide dynamic range. HDMI has the capability to support standard, enhanced, or highdefi...

Owner's Manual - English
Page 20
...In case of a Multimedia computer, connect the audio cord to the audio output of your PC's Resolution and Refresh rate (60 Hz). Turn off the TV's built-in speakers (see "Turning off the built-in PC mode, "No signal" will have to connect the audio cord. Select "PC" by pressing INPUT repeatedly (...adjust the sound level. To HDMI IN HDMI-to-DVI adapter cable (not supplied) Note: • The on-screen displays will appear on the TV/DVD-screen. 20 52G0101A P14-29.indd 20 1/5/09 3:02:57 PM Attach the connectors firmly with HDMI cable. Connections Connecting to optional equipment (...
...In case of a Multimedia computer, connect the audio cord to the audio output of your PC's Resolution and Refresh rate (60 Hz). Turn off the TV's built-in speakers (see "Turning off the built-in PC mode, "No signal" will have to connect the audio cord. Select "PC" by pressing INPUT repeatedly (...adjust the sound level. To HDMI IN HDMI-to-DVI adapter cable (not supplied) Note: • The on-screen displays will appear on the TV/DVD-screen. 20 52G0101A P14-29.indd 20 1/5/09 3:02:57 PM Attach the connectors firmly with HDMI cable. Connections Connecting to optional equipment (...
Owner's Manual - English
Page 22
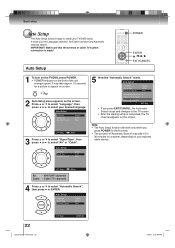
...POWER for a picture to select "Automatic Search", then press ▶ or ENTER. IMPORTANT: Make sure that the antenna or cable TV system connection is completed, the TV channel appears on the front of "Automatic Search" may take 15 to 30 minutes to complete, depending on the screen. Press .... • After the starting setup is made! VHF/UHF channels Cable - Auto Setup POWER ENTER / / / EXIT/CANCEL 1 To turn on the TV/DVD, press POWER. • POWER indicator on the screen. Auto Setup Language Signal Type Automatic Search English Cable Start Analog Channel Found : 0 ...
...POWER for a picture to select "Automatic Search", then press ▶ or ENTER. IMPORTANT: Make sure that the antenna or cable TV system connection is completed, the TV channel appears on the front of "Automatic Search" may take 15 to 30 minutes to complete, depending on the screen. Press .... • After the starting setup is made! VHF/UHF channels Cable - Auto Setup POWER ENTER / / / EXIT/CANCEL 1 To turn on the TV/DVD, press POWER. • POWER indicator on the screen. Auto Setup Language Signal Type Automatic Search English Cable Start Analog Channel Found : 0 ...

Owner's Manual - English
Page 23
... Setup Closed Caption Language Video Label Auto Shut Off Aspect TOSHIBA Logo Light Reset >> English >> Off On On >> : Select : Adjust 5 Press EXIT/CANCEL to return to select "Setup", then press ▶ or ENTER. Basic setup Setting the language This TV/DVD can display the on the front of the unit ...changes green. Setting the language POWER MENU ENTER / / / EXIT/CANCEL 1 To turn on the TV/DVD, press POWER. • POWER indicator on screen language in English, French or Spanish. Press ▲ or ▼ to the normal screen. Select the ...
... Setup Closed Caption Language Video Label Auto Shut Off Aspect TOSHIBA Logo Light Reset >> English >> Off On On >> : Select : Adjust 5 Press EXIT/CANCEL to return to select "Setup", then press ▶ or ENTER. Basic setup Setting the language This TV/DVD can display the on the front of the unit ...changes green. Setting the language POWER MENU ENTER / / / EXIT/CANCEL 1 To turn on the TV/DVD, press POWER. • POWER indicator on screen language in English, French or Spanish. Press ▲ or ▼ to the normal screen. Select the ...
Owner's Manual - English
Page 27
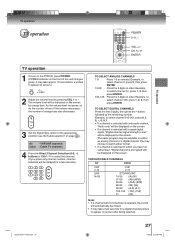
... 2, press 2, then press ENTER. 10-99: Press the 2 digits in order. Example, to appear on the screen. CH / ENTER TV operation TV operation 1 To turn on the TV/DVD, press POWER. (POWER indicator on screen.) 2 Adjust the volume level by pressing VOL + or - . The volume level will be...CHANNELS Press the first 3 digits, then press the - You may take a few seconds.) TO SELECT ANALOG CHANNELS 1-9: Press 1-9 as needed. Air - TV operation TV operation POWER 0-9, - It may choose to watch either format. • If a channel is selected to appear on the front of bars. VHF/UHF ...
... 2, press 2, then press ENTER. 10-99: Press the 2 digits in order. Example, to appear on the screen. CH / ENTER TV operation TV operation 1 To turn on the TV/DVD, press POWER. (POWER indicator on screen.) 2 Adjust the volume level by pressing VOL + or - . The volume level will be...CHANNELS Press the first 3 digits, then press the - You may take a few seconds.) TO SELECT ANALOG CHANNELS 1-9: Press 1-9 as needed. Air - TV operation TV operation POWER 0-9, - It may choose to watch either format. • If a channel is selected to appear on the front of bars. VHF/UHF ...
Owner's Manual - English
Page 28
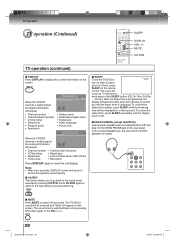
...(Off, 0h 10m, 0h 20m, ..., 2h 0m). To cancel the sleep timer, press SLEEP repeatedly until the display turns to remind you connect headphones, the sound from TV/DVD speakers is programmed, the display will be displayed for each press of time, press SLEEP on the remote control. ... were watching. ■ SLEEP To set the TV/DVD to display the current information on the rear panel. TV operation TV operation (Continued) SLEEP DISPLAY VOL +/- MUTE CH RTN TV operation (continued) ■ DISPLAY Press DISPLAY to Sleep Timer 0h 10m turn off the sound. Press CH RTN again to ...
...(Off, 0h 10m, 0h 20m, ..., 2h 0m). To cancel the sleep timer, press SLEEP repeatedly until the display turns to remind you connect headphones, the sound from TV/DVD speakers is programmed, the display will be displayed for each press of time, press SLEEP on the remote control. ... were watching. ■ SLEEP To set the TV/DVD to display the current information on the rear panel. TV operation TV operation (Continued) SLEEP DISPLAY VOL +/- MUTE CH RTN TV operation (continued) ■ DISPLAY Press DISPLAY to Sleep Timer 0h 10m turn off the sound. Press CH RTN again to ...
Owner's Manual - English
Page 29
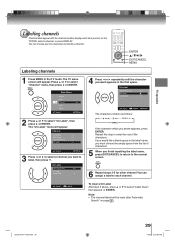
...this step to enter the rest of characters. 5 When you desire appears, press ENTER. You can choose any four characters to identify a channel. The TV menu screen will appear. Main Menu Picture Audio Channel Lock Setup : Select ENTER:Set 2 Press ▲ or ▼ to select "Channel" menu,... a channel you want to label, then press ▼. You can assign a label to each time you turn on page 24 . 52G0101A P14-29.indd 29 29 1/5/09 3:03:09 PM TV operation Labeling channels Channel label appear with the channel number display each channel. : Select : Adjust To clear ...
...this step to enter the rest of characters. 5 When you desire appears, press ENTER. You can choose any four characters to identify a channel. The TV menu screen will appear. Main Menu Picture Audio Channel Lock Setup : Select ENTER:Set 2 Press ▲ or ▼ to select "Channel" menu,... a channel you want to label, then press ▼. You can assign a label to each time you turn on page 24 . 52G0101A P14-29.indd 29 29 1/5/09 3:03:09 PM TV operation Labeling channels Channel label appear with the channel number display each channel. : Select : Adjust To clear ...
Owner's Manual - English
Page 33
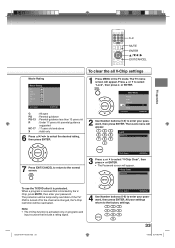
... Number buttons (0-9) to select "Lock", then press ▶ or ENTER. V-Chip Clear Password ---- The protection will be reactivated. If the TV/ DVD is turned off or the channel is blocked by the VChip, press MUTE, then enter your password. Then Lock menu will appear. All your settings return... 7 Press EXIT/CANCEL to return to the normal screen. [0-9] : Select ENTER:Set 3 Press ▲ or ▼ to select the desired rating, then press ENTER. TV operation 0-9 MUTE ENTER / / / EXIT/CANCEL Movie Rating Movie Rating G PG PG-13 R NC-17 X : Select ENTER:Set G PG PG-13 R NC-17...
... Number buttons (0-9) to select "Lock", then press ▶ or ENTER. V-Chip Clear Password ---- The protection will be reactivated. If the TV/ DVD is turned off or the channel is blocked by the VChip, press MUTE, then enter your password. Then Lock menu will appear. All your settings return... 7 Press EXIT/CANCEL to return to the normal screen. [0-9] : Select ENTER:Set 3 Press ▲ or ▼ to select the desired rating, then press ENTER. TV operation 0-9 MUTE ENTER / / / EXIT/CANCEL Movie Rating Movie Rating G PG PG-13 R NC-17 X : Select ENTER:Set G PG PG-13 R NC-17...
Owner's Manual - English
Page 44
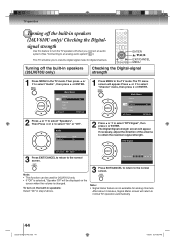
... or ▶ to obtain the maximum signal strength. If necessary, adjust the direction of the antenna to select "On" or "Off". To turn the TV speakers off the built-in speakers (26LV610U only) Checking the Digital-signal strength 1 Press MENU in step 2 above. 3 Press EXIT/CANCEL to... strength screen will appear. Audio HDMI 1 Audio Speakers HDMI On 1 Press MENU in speakers (26LV610U only)/ Checking the Digital- TV operation Turning off the built-in the TV mode. Main Menu Picture Audio Channel Lock Setup : Select ENTER:Set 2 Press ▲ or ▼ to view the digital...
... or ▶ to obtain the maximum signal strength. If necessary, adjust the direction of the antenna to select "On" or "Off". To turn the TV speakers off the built-in speakers (26LV610U only) Checking the Digital-signal strength 1 Press MENU in step 2 above. 3 Press EXIT/CANCEL to... strength screen will appear. Audio HDMI 1 Audio Speakers HDMI On 1 Press MENU in speakers (26LV610U only)/ Checking the Digital- TV operation Turning off the built-in the TV mode. Main Menu Picture Audio Channel Lock Setup : Select ENTER:Set 2 Press ▲ or ▼ to view the digital...
Owner's Manual - English
Page 47
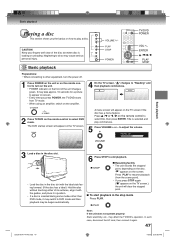
... touching either of the disc slot when disc is inserted during some modes other equipment, turn on the unit. • POWER indicator on the front of the unit changes green...remote control to select DVD mode. " " appears on the remote control to turn the power off. Press PLAY to resume playback (from TV mode. • When using an amplifier, switch on the amplifi...not operate properly: Static electricity, etc., may cause serious personal injury. VOLUME +/- Reading 2 Press TV/DVD on the screen. DVD VCD Basic playback CD Preparations: • When connecting to "Reading" ...
... touching either of the disc slot when disc is inserted during some modes other equipment, turn on the unit. • POWER indicator on the front of the unit changes green...remote control to select DVD mode. " " appears on the remote control to turn the power off. Press PLAY to resume playback (from TV mode. • When using an amplifier, switch on the amplifi...not operate properly: Static electricity, etc., may cause serious personal injury. VOLUME +/- Reading 2 Press TV/DVD on the screen. DVD VCD Basic playback CD Preparations: • When connecting to "Reading" ...
Owner's Manual - English
Page 48
... stop playback Press STOP. In this unit plays DVDs according to the disc contents the software producers designed, some picture noise may appear on the TV screen while playing a DVD video disc because the high resolution pictures on -screen menu may damage your disc again 8 67 . • Some discs... 52G0101A P47-49.indd 48 1/5/09 3:05:41 PM Doing so may damage the disc. • Use the EJECT to the type of information. To turn off the PBC, see page 37 ). VCD : You can use this function with Video CDs. Basic playback Playing a disc (Continued) EJECT POWER To obtain...
... stop playback Press STOP. In this unit plays DVDs according to the disc contents the software producers designed, some picture noise may appear on the TV screen while playing a DVD video disc because the high resolution pictures on -screen menu may damage your disc again 8 67 . • Some discs... 52G0101A P47-49.indd 48 1/5/09 3:05:41 PM Doing so may damage the disc. • Use the EJECT to the type of information. To turn off the PBC, see page 37 ). VCD : You can use this function with Video CDs. Basic playback Playing a disc (Continued) EJECT POWER To obtain...

Owner's Manual - English
Page 50
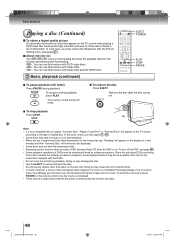
... switching the position of VCD/Audio CD discs, time and track are used for DivX® CD. 50 52G0101A P50-57.indd 50 1/5/09 3:06:18 PM Each press of ZOOM will change the title, playback starts from Chapter 1 of the Video-CD playback with the disc to check the numbers... the zoom mode. • Some discs may not respond to zoom feature. • Zoom function can be used for DivX® CD. 4 Press ENTER. To turn off PBC, see page 56 . • Only Time search function can be used to locate the desired point to view a different part of the image...
... switching the position of VCD/Audio CD discs, time and track are used for DivX® CD. 50 52G0101A P50-57.indd 50 1/5/09 3:06:18 PM Each press of ZOOM will change the title, playback starts from Chapter 1 of the Video-CD playback with the disc to check the numbers... the zoom mode. • Some discs may not respond to zoom feature. • Zoom function can be used for DivX® CD. 4 Press ENTER. To turn off PBC, see page 56 . • Only Time search function can be used to locate the desired point to view a different part of the image...

Owner's Manual - English
Page 51
... scenes MARKER DVD VCD Returning to clear the display. 3 Press ENTER. Marking desired scenes The unit stores the points that you eject the disc or turn the power off. • Some subtitles recorded around the marker may not work with PBC, Marker function is cancelled when you want to watch again...
... scenes MARKER DVD VCD Returning to clear the display. 3 Press ENTER. Marking desired scenes The unit stores the points that you eject the disc or turn the power off. • Some subtitles recorded around the marker may not work with PBC, Marker function is cancelled when you want to watch again...

