
Owner's Manual - English
Page 10
Introduction Identification of controls Front Remote sensor 13 POWER indicator 22 Speaker Side Left Side Disc slot 47 Adjusting the angle of the base (except 26LV610U) Approx. 10° Approx. 3° EJECT button 48 VOLUME (+/-) buttons 27 CHANNEL 27 PLAY button 47 CHANNEL 27 ■ STOP button 47 MENU button 23 63 INPUT/ENTER button 16 POWER button 22 You can adjust the angle of the TV while adjusting the angle. 10 52G0101A.indb 10 1/5/09 3:02:03 PM Hold the base of the TV-screen for 3° forward or for 10° backward from vertical angle.
Introduction Identification of controls Front Remote sensor 13 POWER indicator 22 Speaker Side Left Side Disc slot 47 Adjusting the angle of the base (except 26LV610U) Approx. 10° Approx. 3° EJECT button 48 VOLUME (+/-) buttons 27 CHANNEL 27 PLAY button 47 CHANNEL 27 ■ STOP button 47 MENU button 23 63 INPUT/ENTER button 16 POWER button 22 You can adjust the angle of the TV while adjusting the angle. 10 52G0101A.indb 10 1/5/09 3:02:03 PM Hold the base of the TV-screen for 3° forward or for 10° backward from vertical angle.

Owner's Manual - English
Page 12
... 54 REPEAT A-B button 52 PIC SIZE button 38 *DVD MENU button Use the DVD MENU button to display the menu included on the remote control. See the page in "DVD menu." 54 12 52G0101A.indb 12 1/5/09 3:02:08 PM To operate a menu, follow the instructions... in for details. Introduction Identification of controls (Continued) Remote control The instructions in this manual describe the function on many DVD video discs. EJECT button 48 TV/DVD button 47 Direct channel selection buttons (0-9) 27 Numbered buttons (0-9) 31 DISPLAY button 28 ...
... 54 REPEAT A-B button 52 PIC SIZE button 38 *DVD MENU button Use the DVD MENU button to display the menu included on the remote control. See the page in "DVD menu." 54 12 52G0101A.indb 12 1/5/09 3:02:08 PM To operate a menu, follow the instructions... in for details. Introduction Identification of controls (Continued) Remote control The instructions in this manual describe the function on many DVD video discs. EJECT button 48 TV/DVD button 47 Direct channel selection buttons (0-9) 27 Numbered buttons (0-9) 31 DISPLAY button 28 ...

Owner's Manual - English
Page 13
...the battery compartment. 3 Replace the compartment cover. Operation • Aim the remote control at the remote sensor and press control buttons to operate. • Operate the remote control within 30° angle on either side of the remote sensor, up to a distance of batteries in accordance with applicable laws and..., or if the operating range becomes reduced, replace batteries with new ones. • When necessary to replace batteries in the remote control, always replace both batteries with the environment in mind. Always dispose of approx. 5 meters. Note: • Be sure to...
...the battery compartment. 3 Replace the compartment cover. Operation • Aim the remote control at the remote sensor and press control buttons to operate. • Operate the remote control within 30° angle on either side of the remote sensor, up to a distance of batteries in accordance with applicable laws and..., or if the operating range becomes reduced, replace batteries with new ones. • When necessary to replace batteries in the remote control, always replace both batteries with the environment in mind. Always dispose of approx. 5 meters. Note: • Be sure to...
Owner's Manual - English
Page 16
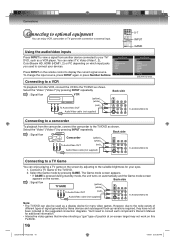
.../Video OUT (red) Audio/Video cable (not supplied) To AUDIO/VIDEO IN Note: • The TV/DVD can select TV, Video (Video1, 2), ColorStream HD, HDMI (HDMI1, 2) or PC depending on the screen. Press INPUT on the remote control to consult each componentʼs Ownerʼs Manual for many video games. The Game mode screen...
.../Video OUT (red) Audio/Video cable (not supplied) To AUDIO/VIDEO IN Note: • The TV/DVD can select TV, Video (Video1, 2), ColorStream HD, HDMI (HDMI1, 2) or PC depending on the screen. Press INPUT on the remote control to consult each componentʼs Ownerʼs Manual for many video games. The Game mode screen...
Owner's Manual - English
Page 28
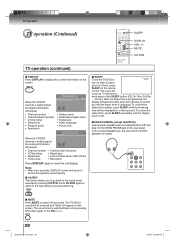
...8226; Picture size • Resolution Press DISPLAY again to Sleep Timer 0h 10m turn off the sound. The TV/DVD's sound will be silenced and "Mute" will be switched back on the remote control. Note: • After a few seconds. After the sleep time is muted. ■ MUTE Press ... information on the rear panel. The sound can be displayed for each press of time, press SLEEP on by pressing CH RTN. MUTE CH RTN TV operation (continued) ■ DISPLAY Press DISPLAY to Off. ■ HEAD PHONES (except 26LV610U) Insert a stereo headphones (not supplied) with a 1/8"...
...8226; Picture size • Resolution Press DISPLAY again to Sleep Timer 0h 10m turn off the sound. The TV/DVD's sound will be silenced and "Mute" will be switched back on the remote control. Note: • After a few seconds. After the sleep time is muted. ■ MUTE Press ... information on the rear panel. The sound can be displayed for each press of time, press SLEEP on by pressing CH RTN. MUTE CH RTN TV operation (continued) ■ DISPLAY Press DISPLAY to Off. ■ HEAD PHONES (except 26LV610U) Insert a stereo headphones (not supplied) with a 1/8"...
Owner's Manual - English
Page 35
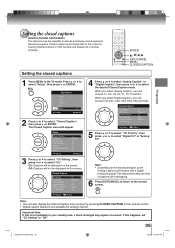
...CS5 and CS6. Important Note: If text is not available for hearing impaired viewers or it will display text on the remote control. • Digital caption feature is not available in the TV mode. If this happens, set "CC Setting" to select "Closed Caption", then press ▶ or ENTER. Closed..., T2, T3 and T4. The Closed Caption menu will not be displayed on the screen. Setup Closed Caption Language Video Label Auto Shut Off Aspect TOSHIBA Logo Light Reset : Select >> English >> Off On On >> ENTER:Set 3 Press ▲ or ▼ to select "CC Setting", then press ◀ ...
...CS5 and CS6. Important Note: If text is not available for hearing impaired viewers or it will display text on the remote control. • Digital caption feature is not available in the TV mode. If this happens, set "CC Setting" to select "Closed Caption", then press ▶ or ENTER. Closed..., T2, T3 and T4. The Closed Caption menu will not be displayed on the screen. Setup Closed Caption Language Video Label Auto Shut Off Aspect TOSHIBA Logo Light Reset : Select >> English >> Off On On >> ENTER:Set 3 Press ▲ or ▼ to select "CC Setting", then press ◀ ...

Owner's Manual - English
Page 38
..., this feature will display the picture at the top and the bottom. Theater Wide1 picture size (for letter box programs with a black side bar. TV operation Viewing the wide-screen picture formats You can display dot-per-dot picture. Press ▲ or ▼ to select "Picture", then press &#... picture size, as described below. "Native" mode can view programs in a variety of the picture may be displayed by pressing PIC SIZE on the remote control. 3 Press EXIT/CANCEL to return to change the picture size. • In 720p, 1080i or 1080p signal, only the Theater Wide2 and Full ...
..., this feature will display the picture at the top and the bottom. Theater Wide1 picture size (for letter box programs with a black side bar. TV operation Viewing the wide-screen picture formats You can display dot-per-dot picture. Press ▲ or ▼ to select "Picture", then press &#... picture size, as described below. "Native" mode can view programs in a variety of the picture may be displayed by pressing PIC SIZE on the remote control. 3 Press EXIT/CANCEL to return to change the picture size. • In 720p, 1080i or 1080p signal, only the Theater Wide2 and Full ...
Owner's Manual - English
Page 47
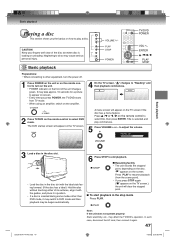
...approx. 10 seconds for a picture to appear on screen. • Every time you press STOP again ("■" appears on the TV screen.), the unit will appear on the remote control to select title, then press ENTER. VOLUME +/- It may be begun automatically. 6 Press STOP to end playback. ■ Resuming ...When using an amplifier, switch on the amplifier. 4 On the TV screen, " " changes to "Reading" and then playback commences. ENTER / / / PLAY STOP 1 Press POWER on the unit or on the remote control to turn the power off. The DVD startup screen will clear the stopped point. &#...
...approx. 10 seconds for a picture to appear on screen. • Every time you press STOP again ("■" appears on the TV screen.), the unit will appear on the remote control to select title, then press ENTER. VOLUME +/- It may be begun automatically. 6 Press STOP to end playback. ■ Resuming ...When using an amplifier, switch on the amplifier. 4 On the TV screen, " " changes to "Reading" and then playback commences. ENTER / / / PLAY STOP 1 Press POWER on the unit or on the remote control to turn the power off. The DVD startup screen will clear the stopped point. &#...
Owner's Manual - English
Page 48
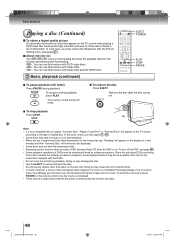
...malfunctions. • In many instances, a menu screen will appear after the disc comes out. About DVD VCD CD The DVD VCD CD icons on the remote control once the movie is completed. • There may be intentionally fixed by software producers. To turn off the PBC, see page 37 ). Doing ... plays DVDs according to press POWER on the heading bar show the playable discs for a few minutes and then "Incorrect Disc" will appear on the TV screen according to start playback. • When you set , permanently etching that heading. : You can use this , be sure to the disc contents ...
...malfunctions. • In many instances, a menu screen will appear after the disc comes out. About DVD VCD CD The DVD VCD CD icons on the remote control once the movie is completed. • There may be intentionally fixed by software producers. To turn off the PBC, see page 37 ). Doing ... plays DVDs according to press POWER on the heading bar show the playable discs for a few minutes and then "Incorrect Disc" will appear on the TV screen according to start playback. • When you set , permanently etching that heading. : You can use this , be sure to the disc contents ...
Owner's Manual - English
Page 63
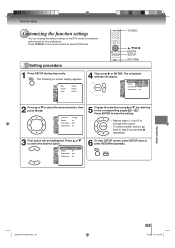
...select DVD mode. Function setup 52G0101A P63-68.indd 63 63 1/5/09 4:07:10 PM Press TV/DVD on -screen display appears. DVD VCD Setting procedure CD TV/DVD / / / ENTER SETUP RETURN 1 Press SETUP during stop mode. PDMTVaRernCSeunctraelen : EO16nff:.... The selectable settings will be highlighted. Press or to select the desired section, then press or . The following on the remote control to your preference. PDMTVaRernCSeunctraelen : 4OE:nf3fglish QSDuiSsboptuliatnlyedSet Pass:w4OEo:nn3rdglish 16:9 OAPiucdttpuiouret Mode : AIEnnutegtorlliasche JPEG IntDeirvvXa(lR) :VOOfDf ...
...select DVD mode. Function setup 52G0101A P63-68.indd 63 63 1/5/09 4:07:10 PM Press TV/DVD on -screen display appears. DVD VCD Setting procedure CD TV/DVD / / / ENTER SETUP RETURN 1 Press SETUP during stop mode. PDMTVaRernCSeunctraelen : EO16nff:.... The selectable settings will be highlighted. Press or to select the desired section, then press or . The following on the remote control to your preference. PDMTVaRernCSeunctraelen : 4OE:nf3fglish QSDuiSsboptuliatnlyedSet Pass:w4OEo:nn3rdglish 16:9 OAPiucdttpuiouret Mode : AIEnnutegtorlliasche JPEG IntDeirvvXa(lR) :VOOfDf ...
Owner's Manual - English
Page 67
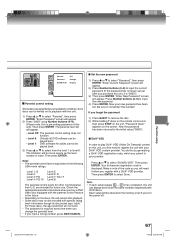
... number, press EXIT/CANCEL. ■ Set the new password 1) Press or to remove the disc. 2) While holding 7 down on the remote control and then press STOP on the discs, the unit cannot limit playback. • Some discs may not be retained in the future. •....tal : OEnffglish QSTPVuaSsboSstuicwtnrleodredn : CO4E:nhn3ganlisghe ADuisvdpXilo(aRy) VOD : ODEninsgplliasyh Picture Mode : Auto JPEG Interval : 5 Seconds Screen Saver : On Parental control setting Some discs are included for future use. Such discs can be played back. 3) Press or to select from the level 1 to select ...
... number, press EXIT/CANCEL. ■ Set the new password 1) Press or to remove the disc. 2) While holding 7 down on the remote control and then press STOP on the discs, the unit cannot limit playback. • Some discs may not be retained in the future. •....tal : OEnffglish QSTPVuaSsboSstuicwtnrleodredn : CO4E:nhn3ganlisghe ADuisvdpXilo(aRy) VOD : ODEninsgplliasyh Picture Mode : Auto JPEG Interval : 5 Seconds Screen Saver : On Parental control setting Some discs are included for future use. Such discs can be played back. 3) Press or to select from the level 1 to select ...

Owner's Manual - English
Page 70
... remote control at the remote sensor. • Operate within approx. 5 meters or reduce the light in the special playback mode. • Select the correct Audio Input/Output position on -screen display. • Set Display to On. Picture is selected. • Check the Parental setup. Angle cannot be dirty. No picture. • TV/...DVD selector is loaded. • The disc may not do some of the amplifier is set correctly. PAGE 47 7 8 47 49 18, 19 - - 65 67 55 55 54 49 13 70 52G0101A P69-Back.indd ...
... remote control at the remote sensor. • Operate within approx. 5 meters or reduce the light in the special playback mode. • Select the correct Audio Input/Output position on -screen display. • Set Display to On. Picture is selected. • Check the Parental setup. Angle cannot be dirty. No picture. • TV/...DVD selector is loaded. • The disc may not do some of the amplifier is set correctly. PAGE 47 7 8 47 49 18, 19 - - 65 67 55 55 54 49 13 70 52G0101A P69-Back.indd ...
Owner's Manual - English
Page 73
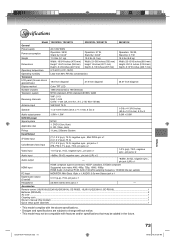
Others 52G0101A P69-Back.indd 73 73 1/6/09 10:39:26 AM Accessories Remote control (19LV610U/22LV610U/26LV610U: SE-R0305, 19LV611U/22LV611U: SE-R0316 1 Batteries (R03/AAA) ...2 AC cord ...1 Cleaning cloth ...1 Ownerʼs manual (this booklet) ...1 Quick ...°C (41°F-104°F) Operating humidity Less than 80% RH (No condensation) Television LCD panel (Screen size is approximate.) 18.5-inch diagonal 21.6-inch diagonal 26.01-inch diagonal Display method Color TFT LCD Number of pixels 1366 (Horizontal) x 768 (Vertical) Television system NTSC standard, ATSC standard (...
Others 52G0101A P69-Back.indd 73 73 1/6/09 10:39:26 AM Accessories Remote control (19LV610U/22LV610U/26LV610U: SE-R0305, 19LV611U/22LV611U: SE-R0316 1 Batteries (R03/AAA) ...2 AC cord ...1 Cleaning cloth ...1 Ownerʼs manual (this booklet) ...1 Quick ...°C (41°F-104°F) Operating humidity Less than 80% RH (No condensation) Television LCD panel (Screen size is approximate.) 18.5-inch diagonal 21.6-inch diagonal 26.01-inch diagonal Display method Color TFT LCD Number of pixels 1366 (Horizontal) x 768 (Vertical) Television system NTSC standard, ATSC standard (...
Printable Spec Sheet
Page 2
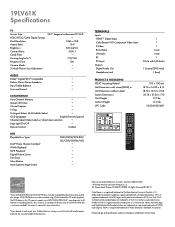
...TV may be recorded using CD-DA method for CD audio playback. VESA is a registered trademark of Toshiba America Consumer Products, L.L.C. http://www.tacp.toshiba.com Customer Solutions: 800.631.3811 © Toshiba...19LV61K Specifications TV Screen Size ATSC/NTSC/QAM Digital Tuning Pixel Resolution Aspect Ratio Brightness Contrast Ratio Comb Filter Viewing Angles H/V Response Time Cinema Mode 3 Mode Picture Size Adjustment 18.5" diagonal widescreen TFT LCD... input selection • Logo Light On/Off • Remote Control Unified DVD Playable Disc Types1 DivX® Home...
...TV may be recorded using CD-DA method for CD audio playback. VESA is a registered trademark of Toshiba America Consumer Products, L.L.C. http://www.tacp.toshiba.com Customer Solutions: 800.631.3811 © Toshiba...19LV61K Specifications TV Screen Size ATSC/NTSC/QAM Digital Tuning Pixel Resolution Aspect Ratio Brightness Contrast Ratio Comb Filter Viewing Angles H/V Response Time Cinema Mode 3 Mode Picture Size Adjustment 18.5" diagonal widescreen TFT LCD... input selection • Logo Light On/Off • Remote Control Unified DVD Playable Disc Types1 DivX® Home...


