Brochure
Page 2
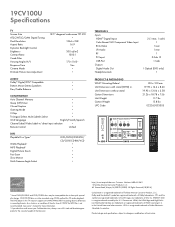
...Solutions: 800.631.3811 © Toshiba America Consumer Products, L.L.C. 82 Totowa Road, Wayne, NJ 07470 (2009). VESA is not recommended). HDMI, the HDMI logo and High-Definition Multimedia Interface are registered trademarks of DTS, Inc. 19CV100U Specifications TV Screen Size ATSC/NTSC...Tri-Lingual Select, Multi-Subtitle Select • OSD Language English/French/Spanish Channel Label/Video Label w/ direct input selection • Remote Control Unified DVD Playable Disc Types1 WMA Playback1 MP3 Playback1 Digital Picture Zoom Fast Scan Slow-Motion Multi-Camera Angle Select DVD/DVD...
...Solutions: 800.631.3811 © Toshiba America Consumer Products, L.L.C. 82 Totowa Road, Wayne, NJ 07470 (2009). VESA is not recommended). HDMI, the HDMI logo and High-Definition Multimedia Interface are registered trademarks of DTS, Inc. 19CV100U Specifications TV Screen Size ATSC/NTSC...Tri-Lingual Select, Multi-Subtitle Select • OSD Language English/French/Spanish Channel Label/Video Label w/ direct input selection • Remote Control Unified DVD Playable Disc Types1 WMA Playback1 MP3 Playback1 Digital Picture Zoom Fast Scan Slow-Motion Multi-Camera Angle Select DVD/DVD...
User Manual
Page 10
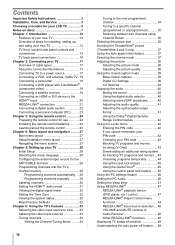
...-LINK® connection 21 Connecting a digital audio system 22 Connecting a personal computer (PC) .........23 Chapter 3: Using the remote control 24 Preparing the remote control for use 24 Installing the remote control batteries ..........24 Learning about the remote control 25 Chapter 4: Menu layout and navigation ..........27 Main menu layout 27 Setup/Installation menu layout 27...
...-LINK® connection 21 Connecting a digital audio system 22 Connecting a personal computer (PC) .........23 Chapter 3: Using the remote control 24 Preparing the remote control for use 24 Installing the remote control batteries ..........24 Learning about the remote control 25 Chapter 4: Menu layout and navigation ..........27 Main menu layout 27 Setup/Installation menu layout 27...
User Manual
Page 12
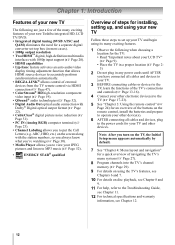
...adjustment function that allows HDMI source devices to accurately perform synchronization automatically. • REGZA-LINK® allows control of external devices from the TV remote control via HDMI connection ( Page 47). • ColorStream® HD high-resolution component video input ( Page 19). • QSound®...connecting cables or devices to the TV, learn the functions of the TV's connections and controls ( Page 13-16). 4 Connect your new Toshiba integrated HD, LCD TV/DVD: • Integrated digital tuning (8VSB ATSC and QAM) eliminates the need for a separate digital converter set-...
...adjustment function that allows HDMI source devices to accurately perform synchronization automatically. • REGZA-LINK® allows control of external devices from the TV remote control via HDMI connection ( Page 47). • ColorStream® HD high-resolution component video input ( Page 19). • QSound®...connecting cables or devices to the TV, learn the functions of the TV's connections and controls ( Page 13-16). 4 Connect your new Toshiba integrated HD, LCD TV/DVD: • Integrated digital tuning (8VSB ATSC and QAM) eliminates the need for a separate digital converter set-...

User Manual
Page 13
... DVD).When a menu is on Page 77 for additional information. 4 Disc slot ─ Load the disc into the disc slot to the controls on the remote control or TV control panel and you cannot turn the TV on and off the TV, press and hold the POWER button on Page 51... for additional information. 2 Remote sensor (embedded) ─ Point the remote control toward this remote sensor. Effective range: 3 Auto Brightness Sensor ─ This sensor will mute the sound from a DVI device. If the TV stops responding...
... DVD).When a menu is on Page 77 for additional information. 4 Disc slot ─ Load the disc into the disc slot to the controls on the remote control or TV control panel and you cannot turn the TV on and off the TV, press and hold the POWER button on Page 51... for additional information. 2 Remote sensor (embedded) ─ Point the remote control toward this remote sensor. Effective range: 3 Auto Brightness Sensor ─ This sensor will mute the sound from a DVI device. If the TV stops responding...
User Manual
Page 14
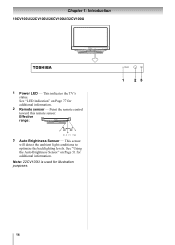
See "LED indication" on Page 51 for additional information. See "Using the Auto Brightness Sensor" on Page 77 for illustration purposes. 14 Effective range: 3 Auto Brightness Sensor ─ This sensor will detect the ambient light conditions to optimize the backlighting levels. Chapter 1: Introduction 19CV100U/22CV100U/26CV100U/32CV100U 1 Power LED ─ This indicates the TV's status. Note: 22CV100U is used for additional information. 2 Remote sensor ─ Point the remote control toward this remote sensor.
See "LED indication" on Page 51 for additional information. See "Using the Auto Brightness Sensor" on Page 77 for illustration purposes. 14 Effective range: 3 Auto Brightness Sensor ─ This sensor will detect the ambient light conditions to optimize the backlighting levels. Chapter 1: Introduction 19CV100U/22CV100U/26CV100U/32CV100U 1 Power LED ─ This indicates the TV's status. Note: 22CV100U is used for additional information. 2 Remote sensor ─ Point the remote control toward this remote sensor.
User Manual
Page 15
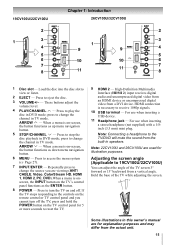
ARROW ─ When a menu is on the remote control or TV control panel and you are viewing (ANT/ CABLE, Video, ColorStream... button on the TV's control panel functions as up menu navigation button. 5 STOP/CHANNEL ─ Press to 19CV100U/22CV100U) You can adjust the angle of the TV while adjusting the screen. 3 15 Some illustrations in speakers....illustration purposes. Hold the base of the TV screen 3° forward or 15° backward from a DVI device. 19CV100U/22CV100U Chapter 1: Introduction 26CV100U/32CV100U 1 Disc slot ─ Load the disc into the disc slot to view or listen...
ARROW ─ When a menu is on the remote control or TV control panel and you are viewing (ANT/ CABLE, Video, ColorStream... button on the TV's control panel functions as up menu navigation button. 5 STOP/CHANNEL ─ Press to 19CV100U/22CV100U) You can adjust the angle of the TV while adjusting the screen. 3 15 Some illustrations in speakers....illustration purposes. Hold the base of the TV screen 3° forward or 15° backward from a DVI device. 19CV100U/22CV100U Chapter 1: Introduction 26CV100U/32CV100U 1 Disc slot ─ Load the disc into the disc slot to view or listen...

User Manual
Page 18
Use the Cable box controls to civil and criminal liability. * To select the video input source, press remote control ( Page 33). To view the VCR: Turn ON the VCR. The unauthorized recording, use the remote control to ). on the TV.* To view basic and premium Cable channels: Turn OFF the VCR. Select the...; standard A/V cables To view the camcorder video: Select the Video video input source on the TV.* * To select the video input source, press on the remote control ( Page 33). To view the antenna or Cable signal: Select the ANT/CABLE video input source on the 18
Use the Cable box controls to civil and criminal liability. * To select the video input source, press remote control ( Page 33). To view the VCR: Turn ON the VCR. The unauthorized recording, use the remote control to ). on the TV.* To view basic and premium Cable channels: Turn OFF the VCR. Select the...; standard A/V cables To view the camcorder video: Select the Video video input source on the TV.* * To select the video input source, press on the remote control ( Page 33). To view the antenna or Cable signal: Select the ANT/CABLE video input source on the 18
User Manual
Page 19
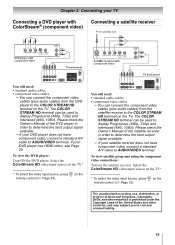
... input source on the You will need : • standard audio cables • component video cables - on the TV.* * To select the video input source, press remote control ( Page 33). Select the ColorStream HD video input source on the TV.* * To select the video input source, press...
... input source on the You will need : • standard audio cables • component video cables - on the TV.* * To select the video input source, press remote control ( Page 33). Select the ColorStream HD video input source on the TV.* * To select the video input source, press...
User Manual
Page 20
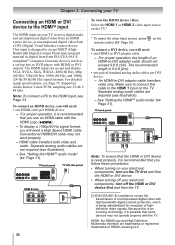
.... - See "Setting the HDMITM audio mode" ( Page 31). HDMI cable transfers both video and audio. on the TV.* * To select the video input source, press remote control ( Page 33). Make sure to connect this is an evolving technology, it is designed to -DVI adapter cable should not exceed 9.8 ft (3m).
.... - See "Setting the HDMITM audio mode" ( Page 31). HDMI cable transfers both video and audio. on the TV.* * To select the video input source, press remote control ( Page 33). Make sure to connect this is an evolving technology, it is designed to -DVI adapter cable should not exceed 9.8 ft (3m).
User Manual
Page 21
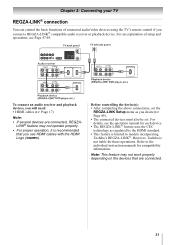
... liable for compatibility information. For details, see Page 47-49. Refer to models incorporating Toshiba's REGZA-LINK®. For an explanation of connected audio/video devices using the TV's remote control if you connect a REGZA-LINK® compatible audio receiver or playback device. However..., Toshiba is limited to the individual instruction manuals for those operations. Note: This feature may not...
... liable for compatibility information. For details, see Page 47-49. Refer to models incorporating Toshiba's REGZA-LINK®. For an explanation of connected audio/video devices using the TV's remote control if you connect a REGZA-LINK® compatible audio receiver or playback device. However..., Toshiba is limited to the individual instruction manuals for those operations. Note: This feature may not...

User Manual
Page 22
...: • optical audio cable (Use an optical audio cable that may not output some digital audio sources because of 5.1 channel DTS encoded soundtracks on the remote control and open the Sound menu. 3 Press or to select either Dolby Digital or PCM, depending on your TV Connecting a digital audio system The TV...
...: • optical audio cable (Use an optical audio cable that may not output some digital audio sources because of 5.1 channel DTS encoded soundtracks on the remote control and open the Sound menu. 3 Press or to select either Dolby Digital or PCM, depending on your TV Connecting a digital audio system The TV...

User Manual
Page 24
... of time. symbols on the batteries to be used batteries in mind. Always dispose of with new ones. Chapter 3: Using the remote control Preparing the remote control for an extended period of batteries in a designated disposal area. • Batteries should always be exposed to excessive heat such ...fire or the like. Caution: Batteries must not be disposed of batteries in accordance with applicable laws and regulations. • If the remote control does not operate correctly, or if the operating range becomes reduced, replace batteries with new ones. • When necessary to replace...
... of time. symbols on the batteries to be used batteries in mind. Always dispose of with new ones. Chapter 3: Using the remote control Preparing the remote control for an extended period of batteries in a designated disposal area. • Batteries should always be exposed to excessive heat such ...fire or the like. Caution: Batteries must not be disposed of batteries in accordance with applicable laws and regulations. • If the remote control does not operate correctly, or if the operating range becomes reduced, replace batteries with new ones. • When necessary to replace...

User Manual
Page 25
... 27); zooms into the center of the loaded disc ( Page 56). 25 For the REGZA-LINK® remote control functions, see the section "Using REGZALINK®" ( Page 47). Chapter 3: Using the remote control Learning about the remote control The buttons used for a function that is not available. 1 POWER turns the TV on and...
... 27); zooms into the center of the loaded disc ( Page 56). 25 For the REGZA-LINK® remote control functions, see the section "Using REGZALINK®" ( Page 47). Chapter 3: Using the remote control Learning about the remote control The buttons used for a function that is not available. 1 POWER turns the TV on and...
User Manual
Page 26
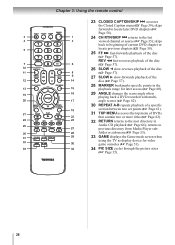
... 57). 28 MARKER bookmarks specific points in Audio CD playback ( Page 66); returns to the last viewed channel or source ( Page 35); Chapter 3: Using the remote control 23 CLOSED CAPTION/SKIP accesses the Closed Caption menu ( Page 39);
... 57). 28 MARKER bookmarks specific points in Audio CD playback ( Page 66); returns to the last viewed channel or source ( Page 35); Chapter 3: Using the remote control 23 CLOSED CAPTION/SKIP accesses the Closed Caption menu ( Page 39);
User Manual
Page 27
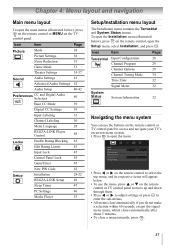
.../Installation menu layout The Installation menu contains the Terrestrial and System Status menus. To open the Installation menu (illustrated below), press on the remote control or TV control panel to move up and down through them. • Press or to adjust settings or press to select the ...top menu, and its respective items will appear below ), press on the remote control or MENU on the TV control panel. Icon Item Terrestrial Input Configuration Channel Program Channel Options Channel Tuning Mode Time Zone Signal Meter ...
.../Installation menu layout The Installation menu contains the Terrestrial and System Status menus. To open the Installation menu (illustrated below), press on the remote control or TV control panel to move up and down through them. • Press or to adjust settings or press to select the ...top menu, and its respective items will appear below ), press on the remote control or MENU on the TV control panel. Icon Item Terrestrial Input Configuration Channel Program Channel Options Channel Tuning Mode Time Zone Signal Meter ...

User Manual
Page 29
...active channels in the channel memory To prevent certain channels from being viewed, channel positions can still be accessed using the number keys on the remote control. • Programming channels when the ANT/ CABLE input is configured for Antenna. A tick will appear in its memory. Note: &#...8226; You must use the Channel Number buttons on the remote control. 29 This is finished, press or to view the programmed channels. When Auto Tuning is normal; The list of channels will appear. ...
...active channels in the channel memory To prevent certain channels from being viewed, channel positions can still be accessed using the number keys on the remote control. • Programming channels when the ANT/ CABLE input is configured for Antenna. A tick will appear in its memory. Note: &#...8226; You must use the Channel Number buttons on the remote control. 29 This is finished, press or to view the programmed channels. When Auto Tuning is normal; The list of channels will appear. ...

User Manual
Page 30
..., you want to label. 3 Press to select {No Label} and then press . 4 Repeat steps 2 and 3 for which you will appear. Press 1 on remote to remove channel Press 1 while the message is found , a message will be added to view and assign these logos from the channel list. The Channel...to manually enter/edit labels using the software keyboard. Enter your TV To block channels in the box. If the channel is on the remote control to an encrypted channel, the following message will be able to select Channel Labeling and then press . If the channel is 128....
..., you want to label. 3 Press to select {No Label} and then press . 4 Repeat steps 2 and 3 for which you will appear. Press 1 on remote to remove channel Press 1 while the message is found , a message will be added to view and assign these logos from the channel list. The Channel...to manually enter/edit labels using the software keyboard. Enter your TV To block channels in the box. If the channel is on the remote control to an encrypted channel, the following message will be able to select Channel Labeling and then press . If the channel is 128....
User Manual
Page 31
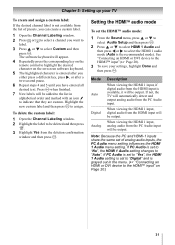
... or to select Audio Setup and then press . 2 Press or to select HDMI 1 Audio and then press or to the HDMI™ input" on the remote control to assign. Chapter 5: Setting up your settings, highlight Done and then press . Setting the HDMITM audio mode To set to "Digital" and is grayed...
... or to select Audio Setup and then press . 2 Press or to select HDMI 1 Audio and then press or to the HDMI™ input" on the remote control to assign. Chapter 5: Setting up your settings, highlight Done and then press . Setting the HDMITM audio mode To set to "Digital" and is grayed...

User Manual
Page 33
...• If CEC device is connected to actually select a particular device from the popup window. Audio Receiver) is not used, you press on the remote control or INPUT/ENTER on . • When selecting input sources using or , you have connected to highlight HDMI 1or HDMI 2. Labeling the video...the TV control panel. 2 And then either: a) Press 0-6; Note: • You can label the video input sources according to view 1 Press on the remote control or INPUT/ ENTER on the TV control panel to change the input. HDMI 1 - 1 Audio Receiver HDMI 1 - 2 Player Press repeatedly to the factory...
...• If CEC device is connected to actually select a particular device from the popup window. Audio Receiver) is not used, you press on the remote control or INPUT/ENTER on . • When selecting input sources using or , you have connected to highlight HDMI 1or HDMI 2. Labeling the video...the TV control panel. 2 And then either: a) Press 0-6; Note: • You can label the video input sources according to view 1 Press on the remote control or INPUT/ ENTER on the TV control panel to change the input. HDMI 1 - 1 Audio Receiver HDMI 1 - 2 Player Press repeatedly to the factory...
User Manual
Page 34
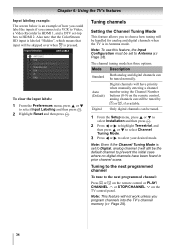
... by or , if available. Tuning to the next programmed channel To tune to the next programmed channel: Press or on the remote control or PLAY/ CHANNEL or STOP/CHANNEL on the remote control, analog channels can still be skipped over when is pressed. Auto (Default) Digital Digital channels will have been found...
... by or , if available. Tuning to the next programmed channel To tune to the next programmed channel: Press or on the remote control or PLAY/ CHANNEL or STOP/CHANNEL on the remote control, analog channels can still be skipped over when is pressed. Auto (Default) Digital Digital channels will have been found...

