

User Manual
Page 18
Contents Introduction 27 This guide 27 Safety icons 28 Other icons used 29 Other documentation 29 Service options 30 Chapter 1: Finding Your Way Around 31 Making sure you have everything 31 Front with the display closed 32 Back 33 Right side 34 Left side 35 Front with the display open 36 Keyboard indicator lights 38 System indicator panel 39 CD/DVD control buttons 40 Underside 41 Chapter 2: Getting Started 43 Selecting a place to work 43 18
Contents Introduction 27 This guide 27 Safety icons 28 Other icons used 29 Other documentation 29 Service options 30 Chapter 1: Finding Your Way Around 31 Making sure you have everything 31 Front with the display closed 32 Back 33 Right side 34 Left side 35 Front with the display open 36 Keyboard indicator lights 38 System indicator panel 39 CD/DVD control buttons 40 Underside 41 Chapter 2: Getting Started 43 Selecting a place to work 43 18

User Manual
Page 19
...-friendly environment....... 43 Keeping yourself comfortable 44 Precautions 47 Setting up your computer 48 Setting up your software 49 Registering your computer with Toshiba ......... 50 Adding external devices 50 Installing additional memory (optional 51 Connecting a mouse 58 Connecting a printer 58 Connecting a USB printer...60 Adjusting the quality of the external display..... 60 Display limitations 61 Connecting an external diskette drive 62 Using an external keyboard 62 Connecting to a power source 63 Charging the battery 65 Using the computer for the first time 66 Opening the...
...-friendly environment....... 43 Keeping yourself comfortable 44 Precautions 47 Setting up your computer 48 Setting up your software 49 Registering your computer with Toshiba ......... 50 Adding external devices 50 Installing additional memory (optional 51 Connecting a mouse 58 Connecting a printer 58 Connecting a USB printer...60 Adjusting the quality of the external display..... 60 Display limitations 61 Connecting an external diskette drive 62 Using an external keyboard 62 Connecting to a power source 63 Charging the battery 65 Using the computer for the first time 66 Opening the...
User Manual
Page 20
... 77 Cleaning the computer 78 Moving the computer 78 Using a computer lock 78 Chapter 3: Learning the Basics 80 Computing tips 80 Using the keyboard 81 Character keys 82 Ctrl, Fn, and Alt keys 82 Function keys 82 Windows® special keys 83 Overlay keys 83 Emulating a full-size... keyboard 85 TOSHIBA Console button 85 Starting a program 86 Saving your work 86 Printing your work 87 Using diskettes 88 Inserting and removing diskettes 89 Caring for ...
... 77 Cleaning the computer 78 Moving the computer 78 Using a computer lock 78 Chapter 3: Learning the Basics 80 Computing tips 80 Using the keyboard 81 Character keys 82 Ctrl, Fn, and Alt keys 82 Function keys 82 Windows® special keys 83 Overlay keys 83 Emulating a full-size... keyboard 85 TOSHIBA Console button 85 Starting a program 86 Saving your work 86 Printing your work 87 Using diskettes 88 Inserting and removing diskettes 89 Caring for ...

User Manual
Page 25
...conflicts on your own .... 213 Fixing a problem with Device Manager .......... 214 Memory module problems 216 Power and the batteries 217 Keyboard problems 218 Display problems 219 Disk drive problems 221 DVD-ROM or multi-function drive problems.. 223 Sound system problems 224 PC ...227 Modem problems 228 Develop good computing habits 229 If you need further assistance 230 Before you call 230 Contacting Toshiba 231 Other Toshiba Internet Web sites 232 Toshiba's worldwide offices 233 Appendix A: Hot Keys 236 Volume Mute 236 Instant password security 237 Without a password 237 With...
...conflicts on your own .... 213 Fixing a problem with Device Manager .......... 214 Memory module problems 216 Power and the batteries 217 Keyboard problems 218 Display problems 219 Disk drive problems 221 DVD-ROM or multi-function drive problems.. 223 Sound system problems 224 PC ...227 Modem problems 228 Develop good computing habits 229 If you need further assistance 230 Before you call 230 Contacting Toshiba 231 Other Toshiba Internet Web sites 232 Toshiba's worldwide offices 233 Appendix A: Hot Keys 236 Volume Mute 236 Instant password security 237 Without a password 237 With...

User Manual
Page 26
26 Contents Disabling or enabling the TouchPad 243 Keyboard hot keys 243 Appendix B: Power Cable Connectors 244 USA and Canada 244 United Kingdom 244 Australia 244 Europe 244 Glossary 245 Index 261
26 Contents Disabling or enabling the TouchPad 243 Keyboard hot keys 243 Appendix B: Power Cable Connectors 244 USA and Canada 244 United Kingdom 244 Australia 244 Europe 244 Glossary 245 Index 261
User Manual
Page 33
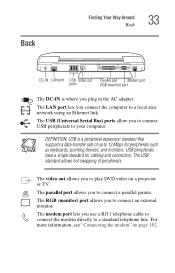
... modem directly to connect an external monitor. The modem port lets you to a standard telephone line. USB peripherals have a single standard for peripherals such as keyboards, pointing devices, and monitors. The parallel port allows you plug in the AC adapter. Back Finding Your Way Around Back 33 DC-IN LAN port...
... modem directly to connect an external monitor. The modem port lets you to a standard telephone line. USB peripherals have a single standard for peripherals such as keyboards, pointing devices, and monitors. The parallel port allows you plug in the AC adapter. Back Finding Your Way Around Back 33 DC-IN LAN port...
User Manual
Page 36
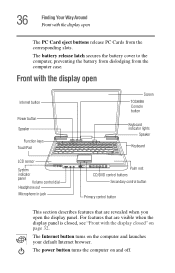
... open Internet button Power button Speaker Function keys TouchPad LCD sensor System indicator panel Volume control dial Headphone out Microphone in jack Screen TOSHIBA Console button Keyboard indicator lights Speaker Keyboard Palm rest CD/DVD control buttons Secondary control button Primary control button This section describes features that are revealed when you open...
... open Internet button Power button Speaker Function keys TouchPad LCD sensor System indicator panel Volume control dial Headphone out Microphone in jack Screen TOSHIBA Console button Keyboard indicator lights Speaker Keyboard Palm rest CD/DVD control buttons Secondary control button Primary control button This section describes features that are revealed when you open...

User Manual
Page 38
...using the computer. When this light is on page 242. For more information on your viewing options, see "Using the keyboard" on , pressing an overlay key See "TOSHIBA Console" on . The computer's screen is on page 38. When this light is on page 197. The... TOSHIBA Console button allows quick access to assist you in the direction of the arrow printed on the front of the key instead of typing the letter printed on the top of a fullsize keyboard. The keyboard indicator lights provide information about various keyboard functions. Keyboard indicator lights Cursor...
...using the computer. When this light is on page 242. For more information on your viewing options, see "Using the keyboard" on , pressing an overlay key See "TOSHIBA Console" on . The computer's screen is on page 38. When this light is on page 197. The... TOSHIBA Console button allows quick access to assist you in the direction of the arrow printed on the front of the key instead of typing the letter printed on the top of a fullsize keyboard. The keyboard indicator lights provide information about various keyboard functions. Keyboard indicator lights Cursor...
User Manual
Page 45
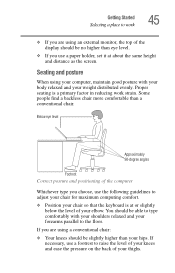
... higher than your weight distributed evenly. If necessary, use a paper holder, set it at or slightly below the level of your chair so that the keyboard is a primary factor in reducing work 45 ❖ If you use a footrest to raise the level of your knees and ease the pressure on the...
... higher than your weight distributed evenly. If necessary, use a paper holder, set it at or slightly below the level of your chair so that the keyboard is a primary factor in reducing work 45 ❖ If you use a footrest to raise the level of your knees and ease the pressure on the...
User Manual
Page 46
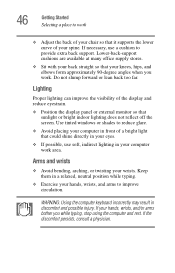
... that sunlight or bright indoor lighting does not reflect off the screen. Do not slump forward or lean back too far. WARNING: Using the computer keyboard incorrectly may result in front of a bright light that it supports the lower curve of the display and reduce eyestrain. ❖ Position the display panel...
... that sunlight or bright indoor lighting does not reflect off the screen. Do not slump forward or lean back too far. WARNING: Using the computer keyboard incorrectly may result in front of a bright light that it supports the lower curve of the display and reduce eyestrain. ❖ Position the display panel...
User Manual
Page 48
If you do spill a liquid that gets into the computer's keyboard. Leave the computer turned off overnight to let it dry out before you can use it. Turning off the computer while it again. ❖ Never ... used for viruses. Overheating of a PC Card can erase important files. ❖ Scan all new files for a long period. ❖ Avoid spilling liquids into the keyboard, turn off the computer if a drive-in its operation. 48 Getting Started Setting up your computer Your computer contains a rechargeable high-capacity battery that needs...
If you do spill a liquid that gets into the computer's keyboard. Leave the computer turned off overnight to let it dry out before you can use it. Turning off the computer while it again. ❖ Never ... used for viruses. Overheating of a PC Card can erase important files. ❖ Scan all new files for a long period. ❖ Avoid spilling liquids into the keyboard, turn off the computer if a drive-in its operation. 48 Getting Started Setting up your computer Your computer contains a rechargeable high-capacity battery that needs...
User Manual
Page 51
Getting Started Installing additional memory (optional) 51 ❖ Connect a full-size keyboard (see "Using an external keyboard" on page 62) ❖ Connect an external monitor (see "Using external display devices" on page 59) ❖ Connect a local printer (see "Connecting a printer" on page ...
Getting Started Installing additional memory (optional) 51 ❖ Connect a full-size keyboard (see "Using an external keyboard" on page 62) ❖ Connect an external monitor (see "Using external display devices" on page 59) ❖ Connect a local printer (see "Connecting a printer" on page ...
User Manual
Page 62
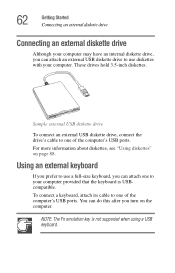
To connect a keyboard, attach its cable to one of the computer's USB ports. NOTE: The Fn emulation key is USBcompatible. For more ... the computer's USB ports. You can do this after you can attach an external USB diskette drive to use a full-size keyboard, you can attach one to use diskettes with your computer. 62 Getting Started Connecting an external diskette drive Connecting an external diskette ... have an internal diskette drive, you turn on page 88. These drives hold 3.5-inch diskettes. Using an external keyboard If you prefer to your computer provided that the...
To connect a keyboard, attach its cable to one of the computer's USB ports. NOTE: The Fn emulation key is USBcompatible. For more ... the computer's USB ports. You can do this after you can attach an external USB diskette drive to use a full-size keyboard, you can attach one to use diskettes with your computer. 62 Getting Started Connecting an external diskette drive Connecting an external diskette ... have an internal diskette drive, you turn on page 88. These drives hold 3.5-inch diskettes. Using an external keyboard If you prefer to your computer provided that the...

User Manual
Page 66
Turning on /off light changes to the right and lift the display panel. 66 Getting Started Using the computer for the first time Using the computer for the first time Opening the display panel Slide the display latch to green. On 2 Turn on the computer by pressing the power button, located above the keyboard, until the on the power 1 Check that all the drives are empty. Lift Slide Opening the display panel CAUTION: To avoid damaging the display panel, don't force it beyond the point where it moves easily. Never lift or move the computer using the display panel.
Turning on /off light changes to the right and lift the display panel. 66 Getting Started Using the computer for the first time Using the computer for the first time Opening the display panel Slide the display latch to green. On 2 Turn on the computer by pressing the power button, located above the keyboard, until the on the power 1 Check that all the drives are empty. Lift Slide Opening the display panel CAUTION: To avoid damaging the display panel, don't force it beyond the point where it moves easily. Never lift or move the computer using the display panel.
User Manual
Page 70
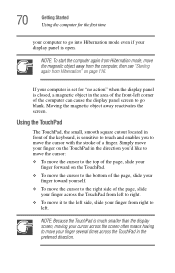
Using the TouchPad The TouchPad, the small, smooth square cutout located in front of the keyboard, is closed, a magnetic object in the area of the front-left . Simply move your finger on page 116. NOTE: To start the computer again from ...
Using the TouchPad The TouchPad, the small, smooth square cutout located in front of the keyboard, is closed, a magnetic object in the area of the front-left . Simply move your finger on page 116. NOTE: To start the computer again from ...

User Manual
Page 78
... stop flashing) and all external peripheral cables are located). You can purchase a carrying case from your Toshiba dealer or network administrator for suggestions for appropriate cleaning products. Ask your Toshiba dealer or through Toshiba's Web site at toshiba.com. The easiest way to do this is built to clean the computer. Using a computer lock... the computer by its display panel or by the back (where the ports are disconnected. CAUTION: Keep liquid, including cleaning fluid, out of the computer's keyboard, speaker grille, and other openings.
... stop flashing) and all external peripheral cables are located). You can purchase a carrying case from your Toshiba dealer or network administrator for suggestions for appropriate cleaning products. Ask your Toshiba dealer or through Toshiba's Web site at toshiba.com. The easiest way to do this is built to clean the computer. Using a computer lock... the computer by its display panel or by the back (where the ports are disconnected. CAUTION: Keep liquid, including cleaning fluid, out of the computer's keyboard, speaker grille, and other openings.
User Manual
Page 81
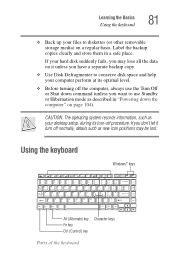
...8 PgUp 9 ∗ 4 5 6 - End 1 2 PgDn 3 + Ins 0 Del / Alt (Alternate) key Fn key Ctrl (Control) key Character keys Parts of the keyboard If your computer perform at its turn off procedure. If you don't let it unless you have a separate backup copy. ❖ Use Disk Defragmenter to ...your hard disk suddenly fails, you want to diskettes (or other removable storage media) on a regular basis. Learning the Basics Using the keyboard 81 ❖ Back up your desktop setup, during its optimal level. ❖ Before turning off the computer, always use Standby or ...
...8 PgUp 9 ∗ 4 5 6 - End 1 2 PgDn 3 + Ins 0 Del / Alt (Alternate) key Fn key Ctrl (Control) key Character keys Parts of the keyboard If your computer perform at its turn off procedure. If you don't let it unless you have a separate backup copy. ❖ Use Disk Defragmenter to ...your hard disk suddenly fails, you want to diskettes (or other removable storage media) on a regular basis. Learning the Basics Using the keyboard 81 ❖ Back up your desktop setup, during its optimal level. ❖ Before turning off the computer, always use Standby or ...
User Manual
Page 82
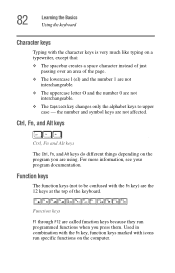
...is very much like typing on a typewriter, except that: ❖ The spacebar creates a space character instead of just passing over an area of the keyboard. For more information, see your program documentation. Ctrl, Fn, and Alt keys Ctrl Fn Alt . Function keys F1 through F12 are called function keys ... affected. Ctrl, Fn and Alt keys The Ctrl, Fn, and Alt keys do different things depending on the computer. 82 Learning the Basics Using the keyboard Character keys Typing with the Fn key) are the 12 keys at the top of the page. ❖ The lowercase l (el) and the number...
...is very much like typing on a typewriter, except that: ❖ The spacebar creates a space character instead of just passing over an area of the keyboard. For more information, see your program documentation. Ctrl, Fn, and Alt keys Ctrl Fn Alt . Function keys F1 through F12 are called function keys ... affected. Ctrl, Fn and Alt keys The Ctrl, Fn, and Alt keys do different things depending on the computer. 82 Learning the Basics Using the keyboard Character keys Typing with the Fn key) are the 12 keys at the top of the page. ❖ The lowercase l (el) and the number...

User Manual
Page 83
...) control button. Overlay keys & 7 Home 7 U ∗ 8 8 ( 9 PgUp 9 I O ) 0 ∗ P 4 5 J K End 1 2 M Ins 0 6 - Learning the Basics Using the keyboard 83 Windows® special keys Application key Windows® logo key Windows® special keys The keyboard provides two keys that have special functions in the operating system: ❖ The Windows® logo key... same function as you would using the ten-key keypad on the front of them form the numeric and cursor overlay. Del . / / Sample keyboard overlay keys The keys with numbers and symbols on a desktop computer...
...) control button. Overlay keys & 7 Home 7 U ∗ 8 8 ( 9 PgUp 9 I O ) 0 ∗ P 4 5 J K End 1 2 M Ins 0 6 - Learning the Basics Using the keyboard 83 Windows® special keys Application key Windows® logo key Windows® special keys The keyboard provides two keys that have special functions in the operating system: ❖ The Windows® logo key... same function as you would using the ten-key keypad on the front of them form the numeric and cursor overlay. Del . / / Sample keyboard overlay keys The keys with numbers and symbols on a desktop computer...

User Manual
Page 84
... the letters. To use the overlay keys to type alphabetic characters while the numeric overlay is on. 84 Learning the Basics Using the keyboard Using the numeric keypad overlay To turn on the cursor control overlay, press Fn and F10 simultaneously. Using the cursor control overlay To ...hold down Fn while you type the letters. ❖ For uppercase letters, hold down the Fn key and press F10 again. The numeric mode keyboard indicator light glows when the numeric overlay is on . To return to the cursor control overlay, release Shift. To return to the numeric overlay...
... the letters. To use the overlay keys to type alphabetic characters while the numeric overlay is on. 84 Learning the Basics Using the keyboard Using the numeric keypad overlay To turn on the cursor control overlay, press Fn and F10 simultaneously. Using the cursor control overlay To ...hold down Fn while you type the letters. ❖ For uppercase letters, hold down the Fn key and press F10 again. The numeric mode keyboard indicator light glows when the numeric overlay is on . To return to the cursor control overlay, release Shift. To return to the numeric overlay...

