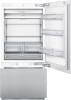
Thermador T36IB800SP Support and Manuals
Get Help and Manuals for this Thermador item
View All Support Options Below
Free Thermador T36IB800SP manuals!
Problems with Thermador T36IB800SP?
Ask a Question
Free Thermador T36IB800SP manuals!
Problems with Thermador T36IB800SP?
Ask a Question
Most Recent Thermador T36IB800SP Questions

T36ib800sp Replacement Adhesive Pads For Toe Kick Panel
Anyone know where you can get replacement adhesive pads for the toe kick panel, stainless steel, wit...
Anyone know where you can get replacement adhesive pads for the toe kick panel, stainless steel, wit...
(Posted by dougcrane 6 years ago)

Ice Maker Isn't Working
We just installed this appliance two weeks ago in our new kitchen and the ice maker has stopped work...
We just installed this appliance two weeks ago in our new kitchen and the ice maker has stopped work...
(Posted by sepsenwol 9 years ago)
Thermador T36IB800SP Videos

Thermador T36IB800SP Bottom Mount Refrigerator
Duration: :58
Total Views: 53
Duration: :58
Total Views: 53
Popular Thermador T36IB800SP Manual Pages
Installation Manual - Page 4

...
support part 19 7. Attaching the lower bracket 22 11. Attaching the anti-tip-brackets .......... 13 2. Attaching the toe kick panel 18 2. Preparing the door panels 19 5. Transport of the kitchen ..... 6 Installation 7 Installation room 7 Stable installation 7 Installation enclosure 7 Furniture 7 Floor 7 Aligning the appliance 7 Connecting the power 8 Grounding instruction...
Installation Manual - Page 5
... in particular.
5
Be sure to the product -
Note:
This is the responsibility of a local code:
In the U.S.A., in accordance with the National Electric Code, ANSI/NFPA70 - Anti-tip protection is completely installed and secured per installation instructions. Immediately repair or replace electric service cords that minor or moderate injuries or damage may occur as a result of not...
Installation Manual - Page 6

... many different installation options. See the section on "Required accessories and tools/Optional accessories". Minimum thickness of the door panels to the wall, the floor and overhead cabinet/fixtures before the appliance is less than 6" (160 mm).
Individual appliance at the same time.
Use the Heater Kit for model 4, note the...
Installation Manual - Page 7

...Stable installation
The appliance is to use a suitable insulating plate or observe the following :
Refrigerator 24" approx. 890 Ibs/400 kg
Refrigerator 30"...Water Dispenser)
Installation room
The appliance should not drop below 55 °F (13 °C) or rise above 110 °F (43 °C), otherwise malfunctions may not close properly.
7 A prerequisite for a trouble-free installation...
Installation Manual - Page 8

...codes or NEC.
IceMaker) Freezer 24" (incl. In the event of a malfunction or breakdown, grounding will reduce the risk of electric shock by a qualified electrician or service... installing the water connection, observe the permitted installation areas for the electric current.
, WARNING:
Improper connection of the water pipe (without fittings): 3/8" (9.5 mm).
8
Grounding instruction
This...
Installation Manual - Page 9
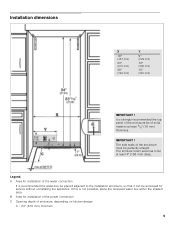
...) deep. Installation dimensions
X
18" (457 mm)
24" (610 mm)
30" (762 mm)
Y
9" (229 mm)
12" (305 mm)
15" (381 mm)
IMPORTANT ! It is strongly recommended the top panel of the enclosure be of the water connection
It is not possible, place the recessed water box within the shaded area. Legend: A Area for service without uninstalling...
Installation Manual - Page 10

Freedom Heater Kit for Side-by -Side Installation BSEALKIT10
For permanent connection of the water pipe (without further preliminary work.
for covering and protecting furniture (e.g.
Maximum outer diameter of two individual appliances, e.g. Tools
10
Cordless screwdriver
Torx bit T20 + magnetic holder
Torx screwdriver T20
5/16" (8 mm) hex nut driver
Wood drills in different sizes ...
Installation Manual - Page 11

... on "Connecting the water" and in the section on "Installation dimensions". 5. Check attachment of the socket. See section on "Connecting the power" and in transit. Note:
Check appliance for damage in the section on "Installation dimensions". 6.
Attaching an edge protection").
4. Installation instructions
The following check list for a safe and trouble free installation.
1.
Save...
Installation Manual - Page 12

... panels....manual sections.
5. To simplify installation, the packages are described after section C.
Change over door hinge, see "Changing over the door hinges".
Sealing mat, see "Removing/ changing over the sealing mat"
Side-by-Side installation, see "Sideby-Side installation".
Connecting the water, see "Preparing to connect the water" an "Connecting the water...
Installation Manual - Page 14
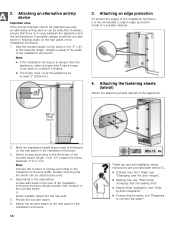
...Instructions are special installation steps. Saw the wooden beam (cross section min. 3" x 4") to the appliance.
2. Attach the wooden beam to the rear panel...installation, see "Sideby-Side installation".
Connecting the water, see "Removing/ changing over the sealing mat"
Side-by at least 2" (50.8 mm).
3.
Select screws according to the thickness of the installation...
Installation Manual - Page 15
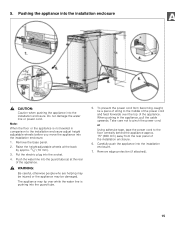
... adjust height adjustable wheels before you move the appliance into the installation enclosure.
7. Note:
When the floor or the appliance is pushing into the guard tube (a) at the back by approx. 3/8" (10 mm).
3. Remove the base panel.
2. Push the water line into the guard tube.
5. Take care not to the floor centrally behind...
Installation Manual - Page 16
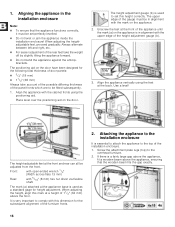
...the top of the panel fronts which are to set perfectly levelled.
Do not twist or jam the appliance inside the installation enclosure!
The height-...set this dimension for the subsequent alignment of the furniture fronts.
2.
Place level over the positioning aid on the door have been designed for height adjustment. Align the appliance with 5/16" (8 mm) hex nut driver...
Installation Manual - Page 19

... not exceed the following :
Always screw into the best load-bearing material of 30" and 36" wide appliances 2 adjacent door panels can be operated.
1. Press the POWER button.
3. 3.
Removing the installation support part
Unscrew the positioning aid from customer service as possible. Open the appliance door.
2.
Note: Store the positioning aids, there will be attached instead...
Installation Manual - Page 31
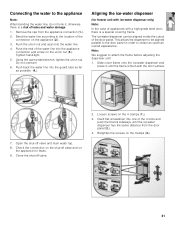
... appliance connection (1.).
2. Note:
We suggest to attach the frame before adjusting the dispenser unit!
1. Remove the cap from the door panel (2.).
4. Bend the water line according to the location of leaks and water damage.
1. Push the end of appliances with the door surface.
7. Check the connection on the shut-off valve and on...
Installation Manual - Page 32
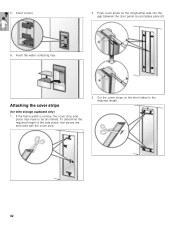
Push cover strips on the short sides to be shortened. Insert the water collecting tray. If the frame width is narrow, the cover strip side piece may have to the required...cover strip.
3.
Insert covers.
2. Cut the cover strips on the longitudinal side into the gap between the door panel (a) and glass pane (b).
6. 5. Attaching the cover strips
(for wine storage cupboard only)
1.
Thermador T36IB800SP Reviews
We have not received any reviews for Thermador yet.