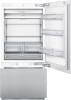
Thermador T36IB800SP Support Question
Thermador T36IB800SP Support Question
Find answers below for this question about Thermador T36IB800SP.Need a Thermador T36IB800SP manual? We have 1 online manual for this item!
Question posted by dougcrane on October 15th, 2017
T36ib800sp Replacement Adhesive Pads For Toe Kick Panel
Anyone know where you can get replacement adhesive pads for the toe kick panel, stainless steel, without buying a whole new assemble. Regular double sided tape doesn't hold. The pads are almost a gel like substance.
Current Answers
Answer #1: Posted by techyagent on October 16th, 2017 2:01 PM
techyagent

Member since:
June 17th, 2014 Points: 4,799,780

Member since:
June 17th, 2014 Points: 4,799,780
You can buy the adhesive from the link down below:
http://store.thermador.com/us/shop-productlist/00604675
Thanks
Techygirl
Related Thermador T36IB800SP Manual Pages
Installation Manual - Page 4

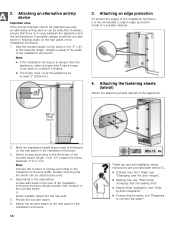
... edge protection 14 4. Attaching the fastening sheets
(lateral 14 5. Attaching the toe kick panel 18 2. Attaching the door panel 21 10. Adjusting the door spring 23 Special installation 24
Changing over the door hinges 24 Removing/changing over the sealing mat 27 Side-by -Side 6 Individual appliances with partition 6 Individual appliance at the end of the...
Installation Manual - Page 5
... or damage to Consumer - Due to the weight and size of this appliance only for local inspector's use by a qualified service technician. Immediately repair or replace electric service cords that minor or moderate injuries or damage may occur as a result of not observing this warning.
, CAUTION:
This indicates that become frayed...
Installation Manual - Page 6

..."Required accessories and tools/Optional accessories". Minimum thickness of the side panel are limited only by -Side Installation if the gap between the appliances is square and the proper size....in the installation enclosure. The dimensions of the partition 5/8" (16 mm).
The side panel must be connected firmly to prevent damage if the doors are many different installation ...
Installation Manual - Page 7

... can be attached securely to the upper and side walls of the installation enclosure, this is installed... insulating plate or observe the following :
Refrigerator 24" approx. 890 Ibs/400 kg
Refrigerator 30" approx. 1110 Ibs/500 kg
...new appliance must be screwed securely to adjacent and overhead furniture. Floor
, WARNING:
A fully-loaded appliance is strongly recommended the top panel...
Installation Manual - Page 9
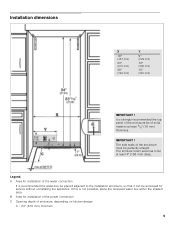
Legend: A Area for installation of the water connection
It is strongly recommended the top panel of the enclosure be of solid material at least 4" (100 mm) deep. IMPORTANT ! The side walls of enclosure, depending on kitchen design C = 24" (610 mm) minimum
9 The furniture return area has to the installation enclosure, so that it...
Installation Manual - Page 10

...different sizes Thin plywood sheet, particle board or cardboard to Refrigerator. Panel unification part (Metal strip) FPCONNTS10 For connection of two individual appliances, ...Side-by -Side Installation XHEATKIT10 If the gap between the appliances is less than 6" (160 mm). protective sheets) Adhesive tape
Note: Before using, check whether the removed adhesive tape leaves adhesive...
Installation Manual - Page 11

... an edge protection to special installation steps for various appliance types:
Refrigerator units
Freezer units
Freezer units with ice maker
Freezer units with ice maker).
Remove the packaging carton and be damaged.
11 Save adhesive tape which protect the shelves and storage compartments inside the appliance. Installation instructions
The...
Installation Manual - Page 12

... sections.
5. Secure the appliance during transportation to the appliance! Note:
Do not raise up the appliance via appliance rear
Do not raise up via the side panels. Special installation
This symbol indicates that additional steps need to be taken before proceeding to the appliance".
Ice-water dispenser, see "Aligning the ice...
Installation Manual - Page 14
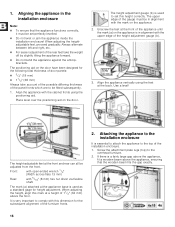
... required length. Predrill the wooden beam. 6. Attach the wooden beam to the rear panel of the installation enclosure and accordingly transfer their location to the wooden beam or fasten...section or attach 2 beams.
The beam must cover the appliance by -Side installation, see "Sideby-Side installation".
Connecting the water, see "Preparing to the width of the installation...
Installation Manual - Page 15
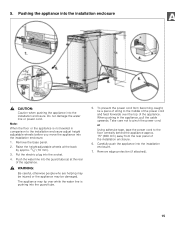
...rear of the appliance. Carefully push the appliance into the socket.
4. Remove the base panel.
2. The appliance may be injured or the appliance may tip over the top of...panel of the installation enclosure.
6. Remove edge protection (if attached).
15 Put the electric plug into the installation enclosure.
7. Push the water line into the installation enclosure. or
Using adhesive tape, tape...
Installation Manual - Page 16
... essential to attach the appliance to comply with this dimension for the following total thickness of door panels: 3/4" (19 mm) 11/2" (38 mm) Always take account of the possible differing thickness of the panel fronts which are to set perfectly levelled.
Do not twist or jam the appliance inside...
Installation Manual - Page 18
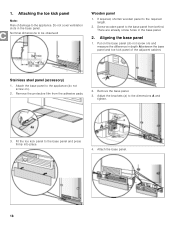
... the appliance. Attaching the toe kick panel
Note: Risk of the adjacent cabinet. Stainless steel panel (accessory)
1. Attach the base panel to the base panel and press firmly into place.
4. Fit the toe kick panel to the appliance (do not screw on ).
2. Do not cover ventilation slots in the base panel.
2. There are already screw holes in the base panel. Remove the protective...
Installation Manual - Page 19

... 24" Appliance:
33 lbs/15 kg
30" Appliance:
44 lbs/20 kg
6. These door panels must not exceed the following working steps and thus the appearance of damage caused by leaking water from the ....
5. The total weight of one large door. Loading the appliance door
When attaching the door panels, it is as precise as an optional accessory, see the section on the rear.
Note: ...
Installation Manual - Page 20
...:
The fixation strips are pre-assembled for the many different design options of the door panel. 4. Drill the holes. 7. Align the door panel with at least 10 screws. Determine and mark the centerline of holes for stainless steel doors.
Mark the drill holes. 6. One screw should be inserted under each double threaded bolt.
The adjusting...
Installation Manual - Page 21
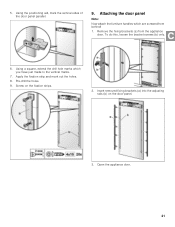
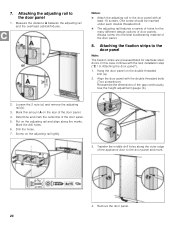
...
6. Apply the fixation strip and mark out the holes. 8. Attaching the door panel
Note:
Now attach the furniture handles which you have just made to the vertical...(a) into the adjusting rails (b) on the fixation strips.
2. Using the positioning aid, mark the vertical sides of the door panel parallel.
9. Open the appliance door.
21 Pre-drill the holes. 9. Remove the fixing brackets (a) ...
Installation Manual - Page 22
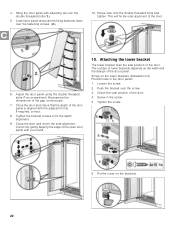
... lower brackets (Installation kit). Tighten the bracket screws to fix the depth alignment.
9. Adjust the door panel using the double threaded bolts (Torx screwdriver). Attaching the lower bracket
The lower bracket fixes the side position of the door.
6. Lower door panel and push the fixing brackets down over the screw. 3. This will fix the...
Installation Manual - Page 25
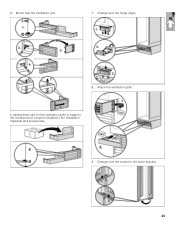
6. Change over the screw for the ventilation grille to adapt to the modified door hinge is included in the installation materials and accessories.
9. Mount new the ventilation grill.
7. Attach the ventilation grille. A replacement part for the lower bracket.
25 Change over the hinge angle.
8.
Installation Manual - Page 28
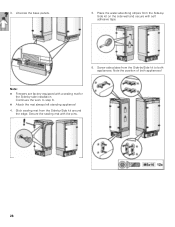
... to step 6. Attach the mat always left standing appliance! 4.
Stick sealing mat from the Side-by -side installation. Unscrew the base panels.
5. Place the water-absorbing stripes from the Side-bySide kit on the side wall and secure with the pins.
28 Continues the work to both appliances! Secure the sealing mat with self adhesive tape.
6.
Installation Manual - Page 31
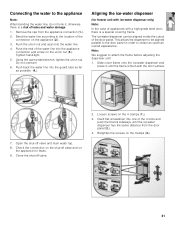
...ended wrench, tighten the union nut.
The ice-water dispenser can be aligned parallel to the door panel in until the ice-water dispenser has the same distance from the appliance connection (1.).
2.
Note:
... of the 4 slots and push the blocks sideways until the frame is flush with a high-grade steel door, there is a risk of leaks and water damage.
1. Aligning the ice-water dispenser
(for...
Installation Manual - Page 32
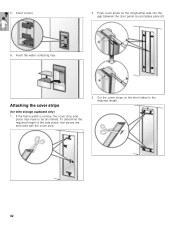
... strip.
3. Attaching the cover strips
(for wine storage cupboard only)
1. Insert the water collecting tray. Insert covers.
2. Cut the cover strips on the longitudinal side into the gap between the door panel (a) and glass pane (b).
6. If the frame width is narrow, the cover strip side piece may have to the required length.
32 5.
Similar Questions

Wood Panels
Customer wants to put wood panels on the T36It800NP what size should they be?
Customer wants to put wood panels on the T36It800NP what size should they be?
(Posted by jbneubauer 1 year ago)

Custom Wood Door Panel Sizes
what is the size of the wood door panels need to be on T36IT800NP?
what is the size of the wood door panels need to be on T36IT800NP?
(Posted by stevehelms99 7 years ago)

Bottom Freezer Panel
I have 2 pieces for the bottom freezer panel ready. Is there still a connect strip available to put ...
I have 2 pieces for the bottom freezer panel ready. Is there still a connect strip available to put ...
(Posted by Hiline2 10 years ago)

Replace Door Gasket
Where best to buy replacement door gasket for thermador T36IT71FNS And how best to replace them (ste...
Where best to buy replacement door gasket for thermador T36IT71FNS And how best to replace them (ste...
(Posted by Rendam2000 10 years ago)

Icemaker Solenoid Valve Replacement
I have a Thermador built-in and need to replace faulty solendoid valve. I have located it under frig...
I have a Thermador built-in and need to replace faulty solendoid valve. I have located it under frig...
(Posted by johnbatty 11 years ago)