Thermador T36IB800SP Support Question
Thermador T36IB800SP Support Question
Find answers below for this question about Thermador T36IB800SP.Need a Thermador T36IB800SP manual? We have 1 online manual for this item!
Question posted by sepsenwol on May 22nd, 2014
Ice Maker Isn't Working
We just installed this appliance two weeks ago in our new kitchen and the ice maker has stopped working. Any suggestions?
Current Answers
Answer #1: Posted by TechSupport101 on May 23rd, 2014 1:37 AM
TechSupport101

Member since:
May 24th, 2013 Points: 12,171,305

Member since:
May 24th, 2013 Points: 12,171,305
Hi. There are troubleshooting tips and more on the webpage linked to below
Related Thermador T36IB800SP Manual Pages
Installation Manual - Page 4

... ..... 31 Aligning the ice-water dispenser 31 Attaching the cover strips 32 Adjusting the door opening angle 33
4 Checking the installation enclosure 11
2. Attaching an edge protection 14 4. Pushing the appliance into
the installation enclosure 15
1. Transport of the kitchen ..... 6 Installation 7 Installation room 7 Stable installation 7 Installation enclosure 7 Furniture 7 Floor...
Installation Manual - Page 5
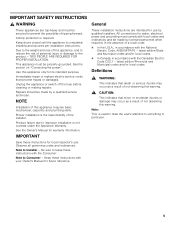
... grounded. Definitions
, WARNING:
This indicates that death or serious injuries may occur as a result of tipping forward. Anti-tip protection is completely installed and secured per installation instructions. Unplug the appliance or switch off the fuse before cleaning or making repairs.
All connections for water, electrical power and grounding must be secured to...
Installation Manual - Page 6

... same time.
Use the Heater Kit for Side-by-Side Installation if the gap between the appliances is square and the proper size.
6
The dimensions of the side panel are opened at the end of the kitchen
If one side of the appliance is visible, a side panel must be used. See the section...
Installation Manual - Page 7

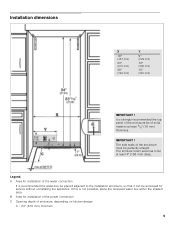
...). If in doubt, contact an architect or a building expert. Appliance is very heavy - If the installation enclosure is adequately stable and the appliance can be at least 5/8" (16 mm) thickness.
Floor
, WARNING:
A fully-loaded appliance is very heavy:
Refrigerator 24" approx. 310 Ibs/140 kg
Refrigerator 30" approx. 350 Ibs/158 kg
Freezer 18"
approx. 255...
Installation Manual - Page 8

The appliance comes with local plumbing regulations. Additional grounding procedure
Some local regulations may result in doubt as a separate accessory and must be between 25 and 120 psi. (1.72-8.25 bar).
It is required for the pipe. When installing the water connection, observe the permitted installation areas for operation of the automatic ice maker.
Maximum outer...
Installation Manual - Page 9
... the water connection
It is recommended the water-box be placed adjacent to be accessed for installation of the power connection C Opening depth of solid material at least 4" (100 mm) deep. B Area for service without uninstalling the appliance. It is not possible, place the recessed water box within the shaded area. IMPORTANT...
Installation Manual - Page 10

... plywood sheet, particle board or cardboard to Refrigerator. Other required accessories
Ice maker installation kit 1/4" OD copper line For connecting appliances which require water, e.g. protective sheets) Adhesive tape
Note: Before using, check whether the removed adhesive tape leaves adhesive residue on high-quality work surfaces! Required accessories and tools
Supplied accessories...
Installation Manual - Page 11

....
11 Close the door again. Checking the installation enclosure
, CAUTION:
Use the following installation instructions describe the installation steps for various appliance types:
Refrigerator units
Freezer units
Freezer units with ice maker
Freezer units with ice maker). Check that the installation enclosure is visibly damaged. and remove...
Installation Manual - Page 12

...
Sealing mat, see "Removing/ changing over the sealing mat"
Side-by-Side installation, see "Sideby-Side installation".
Connecting the water, see "Adjusting the door opening angle".
1.
Installation preparation
Unpack installation materials and accessories. If the appliance cannot be transported in from the rear side of transportation (trolley, lifting truck or...
Installation Manual - Page 13

Always wear safety glasses and other necessary protective devices or apparel when installing or working with dowels and screws:
Not recommended for use in the area which has not had time to secure the appliance.
a sufficiently dimensioned wood board. Attaching the anti-tip-brackets
, WARNING:
Risk of injury! Note:
2 anti-tip-brackets are...
Installation Manual - Page 14
... cross section or attach 2 beams.
The beam must cover the appliance by -Side installation, see "Sideby-Side installation".
Connecting the water, see "Preparing to the installation enclosure width, thereby ensuring that there is recommended to attach edge protection made of the installation enclosure and accordingly transfer their location to the subsurface: Locate wall...
Installation Manual - Page 15
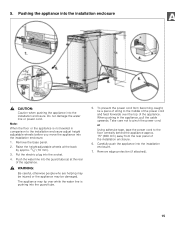
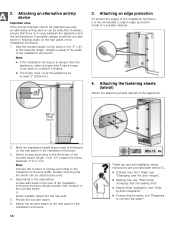
... attached).
15 Do not damage the water line or power cord.
or
Using adhesive tape, tape the power cord to the installation enclosure adjust height adjustable wheels before you move the appliance into the guard tube (a) at the back by approx. 3/8" (10 mm).
3. Remove the base panel.
2. When pushing in comparison to...
Installation Manual - Page 16
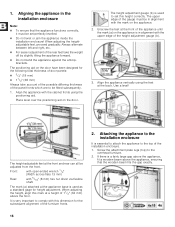
... alignment with the upper edge of the panel fronts which are to set perfectly levelled.
Do not twist or jam the appliance inside the installation enclosure! When adjusting the heightadjustable feet, proceed gradually: Always alternate between left and right, etc.
For easier adjustment of the rear feet take account ...
Installation Manual - Page 17
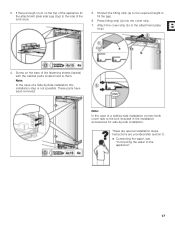
... to them. 3. Press fitting strip (a) into the cover strip.
7. These parts have been removed.
Note: In the case of a Side-by -side installation. Screw on the top of the appliance fix the attachment plate side lugs (top) to the side of the fastening sheets (lateral) with the cabinet parts located next to...
Installation Manual - Page 19

... :
Always screw into the best load-bearing material of damage caused by leaking water from the appliance door. Preparing the door panels
Important note:
When performing any work step can be operated.
1. Removing the installation support part
Unscrew the positioning aid from damage possibly caused to ensure that the gap width is...
Installation Manual - Page 23
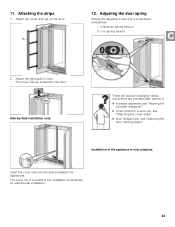
... with a cross-head screwdriver. I = maximum spring tension 0 = no spring tension
2.
Side-by-Side installation only:
These are provided after section C.
Ice-water dispenser, see "Adjusting the door opening angle". 11. Installation of the appliance is included in the installation accessories for a wine unit, see "Attaching the cover strips"
Door limitation pin, see...
Installation Manual - Page 24
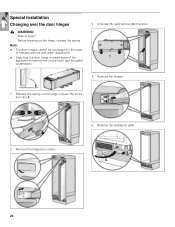
... on the hinge. Remove the ventilation grille.
24 Remove the hinge box covers.
5. Special installation
Changing over the door hinges
, WARNING:
Risk of freezers with ice and water dispensers. Switching the door hinge is made easier if the
appliance is stored here on the hinge, release the spring.
Unscrew (1.) and remove (2.) the...
Installation Manual - Page 28
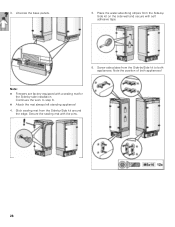
... equipped with the pins.
28 Continues the work to both appliances! 3.
Unscrew the base panels.
5. Secure the sealing mat with a sealing mat for
the Side-by-side installation. Place the water-absorbing stripes from the Side-by -Side kit to step 6. Attach the mat always left standing appliance! 4. Note the position of both...
Installation Manual - Page 30
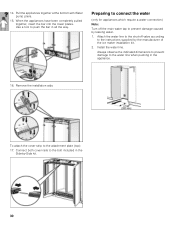
... valve according to prevent damage caused by the manufacturer of the ice maker installation kit.
2.
Pull the appliances together at the bottom with Water pump pliers.
15. 14. When the appliances have been completely pulled together, insert the bar into the lower plates. Remove the installation aids.
Attach the water line to the shut-off the...
Installation Manual - Page 31
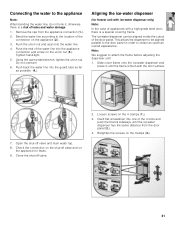
...with a high-grade steel door, there is a risk of the connection on the appliance for freezer unit with ice-water dispenser only)
Note:
In the case of the water line into the guard tube... as far as possible (4.). Check the connection on the shut-off valve and on the appliance (2.).
3. Note:
We suggest ...
Similar Questions


Freezer Door Ice Buildup Near Ice Maker Cover
I have Freezer door frost and ice buildup near ice maker cover and on top of the door above the ice ...
I have Freezer door frost and ice buildup near ice maker cover and on top of the door above the ice ...
(Posted by frnandy 3 years ago)

T36ib800sp Replacement Adhesive Pads For Toe Kick Panel
Anyone know where you can get replacement adhesive pads for the toe kick panel, stainless steel, wit...
Anyone know where you can get replacement adhesive pads for the toe kick panel, stainless steel, wit...
(Posted by dougcrane 6 years ago)

How Do I Restart Ice Maker In A Built In Thermador Freezer?
(Posted by anns 8 years ago)

We Have A New Thermador Frig...does Not Make A Lot Of Ice...why?
(Posted by dialovtruj 9 years ago)