Thermador T30IB800SP Support and Manuals
Get Help and Manuals for this Thermador item
View All Support Options Below
Free Thermador T30IB800SP manuals!
Problems with Thermador T30IB800SP?
Ask a Question
Free Thermador T30IB800SP manuals!
Problems with Thermador T30IB800SP?
Ask a Question
Thermador T30IB800SP Videos

Thermador T30IB800SP Bottom Mount Refrigerator
Duration: :58
Total Views: 66
Duration: :58
Total Views: 66
Popular Thermador T30IB800SP Manual Pages
Installation Manual - Page 4

... 18 2. Removing the installation
support part 19 7. Attaching the strips 23 12. Attaching the appliance to the door panel 20 9. Attaching the door panel 21 10. Transport of the kitchen ..... 6 Installation 7 Installation room 7 Stable installation 7 Installation enclosure 7 Furniture 7 Floor 7 Aligning the appliance 7 Connecting the power 8 Grounding instruction 8 Additional...
Installation Manual - Page 5
...:
This indicates that become frayed or damaged. IMPORTANT SAFETY INSTRUCTIONS
, WARNING
These appliances are intended for use .
Immediately repair or replace electric service cords that minor or moderate injuries or damage may occur as a result of the installer.
latest edition/State and Municipal codes and/or local codes.
In Canada, in accordance with the National...
Installation Manual - Page 6

... the doors are limited only by -Side Installation if the gap between the appliances is square and the proper size.
6 During installation ensure that the installation enclosure is less than 6" (160 mm).
The dimensions of the kitchen.
Individual appliance at the same time.
Use the Heater Kit for model 4, note the thickness of the door...
Installation Manual - Page 7

... source, such as the rest of the room (no possibility of the installation enclosure for this may not close properly.
7
A prerequisite for a trouble-free installation of a hard, rigid material. Installation enclosure
Note:
It is required.
If installation next to tilt forwards when the appliance door is unavoidable, use the supplied anti-tip devices.
If in doubt...
Installation Manual - Page 8

... or in death, fire, or electrical shock. The shut-off valve must be installed by a licensed electrician only. It is required for the appliance water connection. The supply pipe can result in another easily accessible location. Appliance
Refrigerator 24" Refrigerator 30" Freezer 18" (incl. IceMaker) Freezer 30" (incl. Grounding instruction
This appliance must be located at the side...
Installation Manual - Page 9
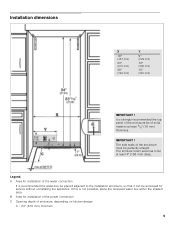
...(305 mm)
15" (381 mm)
IMPORTANT ! The furniture return area has to the installation enclosure, so that it can be accessed for installation of the power connection C Opening depth of enclosure, depending on kitchen design C = 24... enclosure must be at least 5/8" (16 mm) thickness. Legend: A Area for installation of the water connection
It is not possible, place the recessed water box within the...
Installation Manual - Page 10

...Installation instructions Operating instructions Installation kit
Optional accessories
Sealing Kit for Side-by -Side Installation XHEATKIT10 If the gap between the appliances...unification part (Metal strip) FPCONNTS10 For connection of two individual appliances, e.g. Tools
10
Cordless screwdriver
Torx bit T20 + magnetic holder
Torx screwdriver T20
5/16" (8 mm) hex nut driver
...
Installation Manual - Page 11

... very heavy!
5. All cabinet parts in the section on "Installation dimensions". 5. If in transit. Carefully open the appliance -
Note:
Do not remove transportation safety devices which was used subsequently for attaching an edge protection to the appliance. Installation instructions
The following check list for a safe and trouble free installation.
1. Particular reference is very...
Installation Manual - Page 12

3.
Risk of damage to the appliance!
4. Risk of damage to a suitable installation location with the manual sections.
5. If the appliance cannot be transported in from the rear side of transportation (trolley, lifting truck or hand).
2. Transport the appliance to the appliance! The appliance is 83 1/8" (2126 mm) tall. When raising up from tipping.
12 Note:
Always use ...
Installation Manual - Page 13

...for each appliance.
The supplied set contains fastening screws for use in light-weight masonry material such as cinder block. Note:
2 anti-tip-brackets are no electrical wires or ...cure.
13 Always wear safety glasses and other necessary protective devices or apparel when installing or working with dowels and screws:
Not recommended for various applications.
Attach the ...
Installation Manual - Page 15
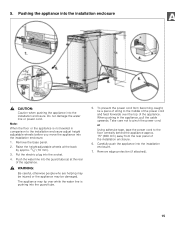
... floor or the appliance is pushing into the installation enclosure.
When pushing in comparison to the installation enclosure adjust height adjustable wheels before you move the appliance into the socket.
4. Remove the base panel.
2. Put the electric plug into the installation enclosure.
1. To prevent the power cord from the rear panel of the appliance.
, WARNING:
Be careful...
Installation Manual - Page 16
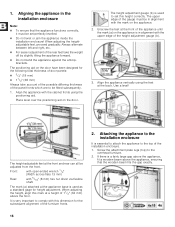
... across flats 13 mm)
Rear:
with the upper edge of the height adjustment gauge (b).
3. Attaching the appliance to the installation enclosure
It is used to set perfectly levelled.
Do not twist or jam the appliance inside the installation enclosure! Unscrew the feet at the front of door panels: 3/4" (19 mm) 11/2" (38...
Installation Manual - Page 19

... thus the appearance of the door panels during installation. Press the POWER button again to the water pipe feeding the appliance, keep the shut-off .
Removing the installation support part
Unscrew the positioning aid from customer service as possible. This metal strip can be found in the separate installation instructions for appliances with weights in order to a metal strip...
Installation Manual - Page 26
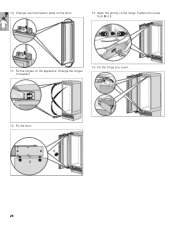
Span the spring on the door.
13. Change the hinges crosswise!
14. Tighten the screw from 0 to I.
11. Change over the fixation parts on the hinge. Fix the hinges on the appliance. Fix the hinge box cover.
12. Fix the door.
26 10.
Installation Manual - Page 27
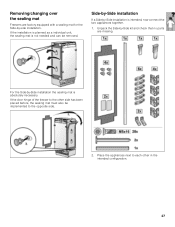
... sealing mat is absolutely necessary. For the Side-by -Side installation is not needed and can be implemented to the opposite side.
2.... check that no parts are factory equipped with a sealing mat for the Side-by-side installation. If the installation is planned as a individual unit, the sealing mat is intended, now connect the two appliances together.
1. Place the appliances next to the other...
Thermador T30IB800SP Reviews
We have not received any reviews for Thermador yet.