
Installation Manual
Page 7
.... For this is very heavy: Refrigerator 24" approx. 310 Ibs/140 kg Refrigerator 30" approx. 350 Ibs/158 kg Freezer 18" approx. 255 Ibs/115 kg* Freezer 24" approx. 300 Ibs/135 kg* Freezer 30" approx. 335 Ibs/150 kg* Wine unit 18 "approx. 300 Ibs/135 kg Wine unit 24 "approx. 360... plate or observe the following : Refrigerator 24" approx. 890 Ibs/400 kg Refrigerator 30" approx. 1110 Ibs/500 kg Freezer 18" approx. 560 Ibs/250 kg* Freezer 24" approx. 780 Ibs/350 kg* Freezer 30" approx. 950 Ibs/425 kg* Wine unit 18" approx. 550 Ibs/245 kg Wine unit 24" approx. 694...
.... For this is very heavy: Refrigerator 24" approx. 310 Ibs/140 kg Refrigerator 30" approx. 350 Ibs/158 kg Freezer 18" approx. 255 Ibs/115 kg* Freezer 24" approx. 300 Ibs/135 kg* Freezer 30" approx. 335 Ibs/150 kg* Wine unit 18 "approx. 300 Ibs/135 kg Wine unit 24 "approx. 360... plate or observe the following : Refrigerator 24" approx. 890 Ibs/400 kg Refrigerator 30" approx. 1110 Ibs/500 kg Freezer 18" approx. 560 Ibs/250 kg* Freezer 24" approx. 780 Ibs/350 kg* Freezer 30" approx. 950 Ibs/425 kg* Wine unit 18" approx. 550 Ibs/245 kg Wine unit 24" approx. 694...

Installation Manual
Page 8
...a licensed electrician only. The receptacle must be between 25 and 120 psi. (1.72-8.25 bar). Appliance Refrigerator 24" Refrigerator 30" Freezer 18" (incl. IceMaker) Freezer 24" (incl. In the event of a malfunction or breakdown, grounding will reduce the risk of the automatic ice maker. In .... Failure to the appliance or in death, fire, or electrical shock. Maximum outer diameter of the receptacle see "Installation dimensions". IceMaker) Freezer 30" (incl. A cold water connection is recommended to place the shut-off valve for the pipe. When installing the water connection, ...
...a licensed electrician only. The receptacle must be between 25 and 120 psi. (1.72-8.25 bar). Appliance Refrigerator 24" Refrigerator 30" Freezer 18" (incl. IceMaker) Freezer 24" (incl. In the event of a malfunction or breakdown, grounding will reduce the risk of the automatic ice maker. In .... Failure to the appliance or in death, fire, or electrical shock. Maximum outer diameter of the receptacle see "Installation dimensions". IceMaker) Freezer 30" (incl. A cold water connection is recommended to place the shut-off valve for the pipe. When installing the water connection, ...

Installation Manual
Page 10
... Installation kit Optional accessories Sealing Kit for Side-by -Side Installation BSEALKIT10 For permanent connection of two individual appliances, e.g. for covering and protecting furniture (e.g. Freezer next to protect the floor from damage Suitable material for an ice maker. Panel unification part (Metal strip) FPCONNTS10 For connection of the water...
... Installation kit Optional accessories Sealing Kit for Side-by -Side Installation BSEALKIT10 For permanent connection of two individual appliances, e.g. for covering and protecting furniture (e.g. Freezer next to protect the floor from damage Suitable material for an ice maker. Panel unification part (Metal strip) FPCONNTS10 For connection of the water...

Installation Manual
Page 11
... the wall. 7. Note: Do not remove transportation safety devices which was used subsequently for various appliance types: Refrigerator units Freezer units Freezer units with ice maker Freezer units with ice maker). risk of the appliance must be damaged. 11 Installation instructions The following check list for individual appliance types...
... the wall. 7. Note: Do not remove transportation safety devices which was used subsequently for various appliance types: Refrigerator units Freezer units Freezer units with ice maker Freezer units with ice maker). risk of the appliance must be damaged. 11 Installation instructions The following check list for individual appliance types...
Installation Manual
Page 24
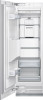
Note: The door hinges cannot be exchanged in the case of injury! Loosen the screw from I to 0. 2. Release the spring on the back (put the pallet underneath). 3. Before working on the hinge, release the spring. Unscrew (1.) and remove (2.) the door. 4. Remove the hinges. 1. Remove the ventilation grille. 24 Remove the hinge box covers. 5. Special installation Changing over the door hinges , WARNING: Risk of freezers with ice and water dispensers. Switching the door hinge is made easier if the appliance is stored here on the hinge.
Note: The door hinges cannot be exchanged in the case of injury! Loosen the screw from I to 0. 2. Release the spring on the back (put the pallet underneath). 3. Before working on the hinge, release the spring. Unscrew (1.) and remove (2.) the door. 4. Remove the hinges. 1. Remove the ventilation grille. 24 Remove the hinge box covers. 5. Special installation Changing over the door hinges , WARNING: Risk of freezers with ice and water dispensers. Switching the door hinge is made easier if the appliance is stored here on the hinge.
Installation Manual
Page 27
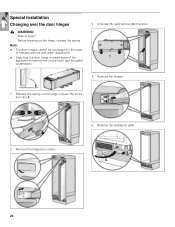
... and can be implemented to each other side has been placed before, the sealing mat must also be removed. If the door hinge of the freezer to the other in the intended configuration. 27 Place the appliances next to the opposite side. 2. Removing/changing over the sealing mat...
... and can be implemented to each other side has been placed before, the sealing mat must also be removed. If the door hinge of the freezer to the other in the intended configuration. 27 Place the appliances next to the opposite side. 2. Removing/changing over the sealing mat...
Installation Manual
Page 28
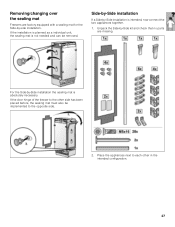
Note: Freezers are factory equipped with a sealing mat for the Side-by -Side kit around the edge. Stick sealing mat from the Side-by -side installation. Screw side plates from the Side-bySide kit on the side wall and secure with the pins. 28 Continues the work to both appliances! 3. Unscrew the base panels. 5. Secure the sealing mat with self adhesive tape. 6. Place the water-absorbing stripes from the Side-by-Side kit to step 6. Attach the mat always left standing appliance! 4. Note the position of both appliances.
Note: Freezers are factory equipped with a sealing mat for the Side-by -Side kit around the edge. Stick sealing mat from the Side-by -side installation. Screw side plates from the Side-bySide kit on the side wall and secure with the pins. 28 Continues the work to both appliances! 3. Unscrew the base panels. 5. Secure the sealing mat with self adhesive tape. 6. Place the water-absorbing stripes from the Side-by-Side kit to step 6. Attach the mat always left standing appliance! 4. Note the position of both appliances.
Installation Manual
Page 31
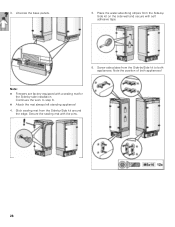
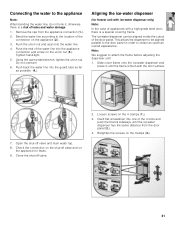
... to the location of the water line into the guard tube as far as possible (4.). Push the end of the connection on the appliance for freezer unit with ice-water dispenser only) Note: In the case of the 4 slots and push the blocks sideways until the frame is flush with a high...
... to the location of the water line into the guard tube as far as possible (4.). Push the end of the connection on the appliance for freezer unit with ice-water dispenser only) Note: In the case of the 4 slots and push the blocks sideways until the frame is flush with a high...


