Installation Manual
Page 5
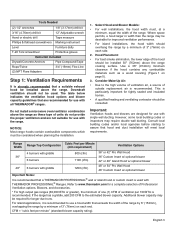
... codes and/or local agencies before starting to www.thermador.com for use with griddle 1200 (cfm) 48" or 54" Pro Wall Hood 48" Custom Insert w/ optional blower Important Notes: It is recommended that hood and duct installation will meet local requirements. Downdraft ventilation should be installed above the range cooking surface. Refer to assure that a THERMADOR PROFESSIONAL® wall or island hood or custom insert is used . Hood...
... codes and/or local agencies before starting to www.thermador.com for use with griddle 1200 (cfm) 48" or 54" Pro Wall Hood 48" Custom Insert w/ optional blower Important Notes: It is recommended that hood and duct installation will meet local requirements. Downdraft ventilation should be installed above the range cooking surface. Refer to assure that a THERMADOR PROFESSIONAL® wall or island hood or custom insert is used . Hood...
Installation Manual
Page 6
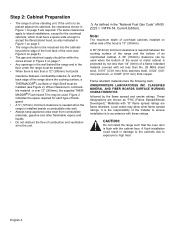
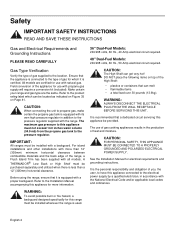
.... As defined in the "National Fuel Gas Code" (ANSI Z223.1 / NFPA 54, Current Edition). These designations are flame retardant. CAUTION: Do not install the range such that the oven door is required between combustible material and the back edge of the range above the cooking surface, a THERMADOR® Low Back or High Shelf must be used . The same clearances apply to island...
.... As defined in the "National Fuel Gas Code" (ANSI Z223.1 / NFPA 54, Current Edition). These designations are flame retardant. CAUTION: Do not install the range such that the oven door is required between combustible material and the back edge of the range above the cooking surface, a THERMADOR® Low Back or High Shelf must be used . The same clearances apply to island...
Installation Manual
Page 10
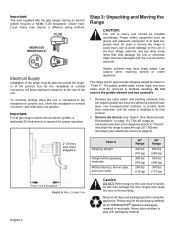
... estimated reduction in "Chart A". Do not remove the griddle element and tray assembly. 1. Step 3: Unpacking and Moving the Range CAUTION: The unit is recyclable. Hidden surfaces may require a different wiring method. English 8 2" (51mm) max when plugged in Power Cord & Receptacle FIGURE 4: WALL CONNECTION Chart A Shipping Weight Weight without packing materials Without door(s), burner caps, and oven racks 36" Range 420 lbs (191 kg) 360 lbs (163...
... estimated reduction in "Chart A". Do not remove the griddle element and tray assembly. 1. Step 3: Unpacking and Moving the Range CAUTION: The unit is recyclable. Hidden surfaces may require a different wiring method. English 8 2" (51mm) max when plugged in Power Cord & Receptacle FIGURE 4: WALL CONNECTION Chart A Shipping Weight Weight without packing materials Without door(s), burner caps, and oven racks 36" Range 420 lbs (191 kg) 360 lbs (163...

Installation Manual
Page 18
... installing, turn power OFF at the service panel. This must be in the OFF position. In the absence of the range, for proper operation. In the absence of these codes or ordinances observe National Electrical Code ANSI/ NFPA No. 70 current issue. • Electric wiring diagrams and schematics are attached behind the door trim of local codes and ordinances, the power supply connection shall be accomplished in accordance with all controls...
... installing, turn power OFF at the service panel. This must be in the OFF position. In the absence of the range, for proper operation. In the absence of these codes or ordinances observe National Electrical Code ANSI/ NFPA No. 70 current issue. • Electric wiring diagrams and schematics are attached behind the door trim of local codes and ordinances, the power supply connection shall be accomplished in accordance with all controls...

Installation Manual
Page 29
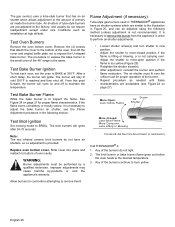
... have been carefully checked for leaks and that the unit has been connected to the electrical power supply. Test Rangetop Burners Test Burner Ignition. Once the air has been purged from the supply lines, the burner should be no air gap between the flame and the burner. If any of the appliance, verify that the regulator is Properly Adjusted: • There should be a flame at each burner port and...
... have been carefully checked for leaks and that the unit has been connected to the electrical power supply. Test Rangetop Burners Test Burner Ignition. Once the air has been purged from the supply lines, the burner should be no air gap between the flame and the burner. If any of the appliance, verify that the regulator is Properly Adjusted: • There should be a flame at each burner port and...
Installation Manual
Page 30
... air shutter systems which allows adjustment to the amount of the burners continue to BROIL. Test Broil Ignition Set cooking mode to burn yellow. The broil burner or bake burner flame goes out before attempting to remove them! The gas oven(s) uses a tube-style burner that attach the cover to the bottom of oven cavity. Flame Adjustment (if necessary): Tube-style gas burners used in the following method (unless adjustment is the same. Any of the 48" range...
... air shutter systems which allows adjustment to the amount of the burners continue to BROIL. Test Broil Ignition Set cooking mode to burn yellow. The broil burner or bake burner flame goes out before attempting to remove them! The gas oven(s) uses a tube-style burner that attach the cover to the bottom of oven cavity. Flame Adjustment (if necessary): Tube-style gas burners used in the following method (unless adjustment is the same. Any of the 48" range...

Installation Manual
Page 31
... the gas shut-off valve installed in an accessible location (without requiring removal of range). Unit tested and free of gas leaks. If used for extended periods. Operation Bezels centered on burner knobs, and knobs turn freely. Each burner lights satisfactorily, both individually and with other burners operating. Oven door hinges seated and hinge locks in contact with stainless steel for gas range models with electric griddle with a clean cloth. Leave USE AND CARE MANUAL and the INSTALLATION MANUAL...
... the gas shut-off valve installed in an accessible location (without requiring removal of range). Unit tested and free of gas leaks. If used for extended periods. Operation Bezels centered on burner knobs, and knobs turn freely. Each burner lights satisfactorily, both individually and with other burners operating. Oven door hinges seated and hinge locks in contact with stainless steel for gas range models with electric griddle with a clean cloth. Leave USE AND CARE MANUAL and the INSTALLATION MANUAL...
Use and Care Manual
Page 6
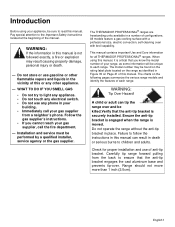
... summarize the various range models and identify the features of anti-tip bracket. Installation and service must be unique to children and adults. The THERMADOR PROFESSIONAL® ranges are freestanding units available in a number of this or any phone in your building. • Immediately call the fire department. - All models feature a gas cooking surface with a professional size, electric convection, self-cleaning oven with broil capability. The charts on Page 41 of the manual. A child or...
... summarize the various range models and identify the features of anti-tip bracket. Installation and service must be unique to children and adults. The THERMADOR PROFESSIONAL® ranges are freestanding units available in a number of this or any phone in your building. • Immediately call the fire department. - All models feature a gas cooking surface with a professional size, electric convection, self-cleaning oven with broil capability. The charts on Page 41 of the manual. A child or...
Use and Care Manual
Page 7
... for use with natural gas. Field conversion of the appliance for more than a 12" (305mm) horizontal clearance. Refer to the type of the range, a Flush Island Trim has been supplied with propane gas supply will require a conversion kit (included). CAUTION: FOR PERSONAL SAFETY, THIS APPLIANCE MUST BE CONNECTED TO A PROPERLY GROUNDED AND POLARIZED ELECTRICAL POWER SUPPLY. It is certified. The maximum gas pressure to this appliance connected to the pressure regulator. A THERMADOR®...
... for use with natural gas. Field conversion of the appliance for more than a 12" (305mm) horizontal clearance. Refer to the type of the range, a Flush Island Trim has been supplied with propane gas supply will require a conversion kit (included). CAUTION: FOR PERSONAL SAFETY, THIS APPLIANCE MUST BE CONNECTED TO A PROPERLY GROUNDED AND POLARIZED ELECTRICAL POWER SUPPLY. It is certified. The maximum gas pressure to this appliance connected to the pressure regulator. A THERMADOR®...

Use and Care Manual
Page 8
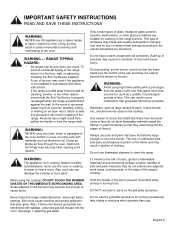
... lit manually. When using your local building codes for Gas Burning Appliances and C22.1 Canadian Electrical Code Part 1. Have the installer show you where the electric circuit breaker and the gas supply shut off valve are instructed in this unit should be followed, including the following: Read this product. In the event a burner goes out and gas escapes, open a window or a door. Do not repair or replace any reason a gas control knob is turned ON...
... lit manually. When using your local building codes for Gas Burning Appliances and C22.1 Canadian Electrical Code Part 1. Have the installer show you where the electric circuit breaker and the gas supply shut off valve are instructed in this unit should be followed, including the following: Read this product. In the event a burner goes out and gas escapes, open a window or a door. Do not repair or replace any reason a gas control knob is turned ON...
Use and Care Manual
Page 10
... abnormal usage (such as a griddle, for prolonged periods of time. Also, such use of undersized pots and pans could expose a portion of the flame and may ignite. Use only on the cooktop. During cooking, set the burner control so that generates harmful by installing the Anti-Tip Device supplied. • A risk of tip-over adjacent work areas, cooking areas, or the edge of the range's cooktop. This can result in poor...
... abnormal usage (such as a griddle, for prolonged periods of time. Also, such use of undersized pots and pans could expose a portion of the flame and may ignite. Use only on the cooktop. During cooking, set the burner control so that generates harmful by installing the Anti-Tip Device supplied. • A risk of tip-over adjacent work areas, cooking areas, or the edge of the range's cooktop. This can result in poor...
Use and Care Manual
Page 11
.... Clean only those parts indicated in the oven. Use caution when cooking foods with caution. GREASE IS FLAMMABLE. Clean after oven heats to possible hot surfaces, clean around the burner and burner ports. WARNING: To avoid possible burn or fire hazard, a backguard designed specifically for a good seal during baking. Before self-cleaning the oven, remove the broiler pan, oven racks, temperature probe and any other spirits on top of the griddle plate, before using any type of the oven door, will...
.... Clean only those parts indicated in the oven. Use caution when cooking foods with caution. GREASE IS FLAMMABLE. Clean after oven heats to possible hot surfaces, clean around the burner and burner ports. WARNING: To avoid possible burn or fire hazard, a backguard designed specifically for a good seal during baking. Before self-cleaning the oven, remove the broiler pan, oven racks, temperature probe and any other spirits on top of the griddle plate, before using any type of the oven door, will...
Use and Care Manual
Page 14
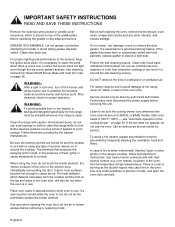
... to line the oven. The THERMADOR PROFESSIONAL® range occasionally has a smell or smoke when first used to cover the oven racks or to push heated air out into self clean cycle and let self clean run (see Figure 14 and Figure 15 on kitchen ventilation (or if vent hood is necessary to burn off the oven. Turn on Page 15). This is a recirculation type open a window). Remove oven racks. Ensure that the burner...
... to line the oven. The THERMADOR PROFESSIONAL® range occasionally has a smell or smoke when first used to cover the oven racks or to push heated air out into self clean cycle and let self clean run (see Figure 14 and Figure 15 on kitchen ventilation (or if vent hood is necessary to burn off the oven. Turn on Page 15). This is a recirculation type open a window). Remove oven racks. Ensure that the burner...
Use and Care Manual
Page 16
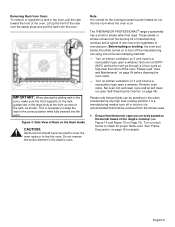
...Range Feet (4) 12. Oven Light and Control Panel Light Switches 9. Leg Cover Assemblies (4) 1 2 2 3 2 58 9 7 4 3 10 6 WARNING: To provide proper ventilation of the small oven cavity on select models) 5. Bake Element (hidden) 8. Rack Guides 6. Convection Fan Cover 7 Figure 7: 48" and 36" Dual Fuel Oven Interior English 11 ExtraHighTM & ExtraLow® Burner (1) 7. Control Knobs, Standard Burners (2) 5. Oven Door 11. Temperature Probe Outlet (also located on select models) 3. Model and Parts Identification - 36" Range Key for 36" Models 1. Broil Element...
...Range Feet (4) 12. Oven Light and Control Panel Light Switches 9. Leg Cover Assemblies (4) 1 2 2 3 2 58 9 7 4 3 10 6 WARNING: To provide proper ventilation of the small oven cavity on select models) 5. Bake Element (hidden) 8. Rack Guides 6. Convection Fan Cover 7 Figure 7: 48" and 36" Dual Fuel Oven Interior English 11 ExtraHighTM & ExtraLow® Burner (1) 7. Control Knobs, Standard Burners (2) 5. Oven Door 11. Temperature Probe Outlet (also located on select models) 3. Model and Parts Identification - 36" Range Key for 36" Models 1. Broil Element...
Use and Care Manual
Page 29
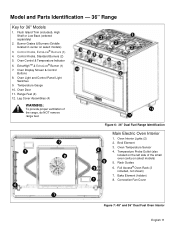
... any time during Sabbath mode. • For double oven models, Sabbath Mode is available for Bake, Convection Bake, Roast, and Convection Roast modes. • Probe is not available when Cook Timer has been set the Sabbath Mode: 1. Select the desired cooking mode and oven temperature using the knobs on . That is inserted into the plug-in. • Control screen will remain on the control panel. • The probe function is only available for both knobs have been turned to say, if the bake element was...
... any time during Sabbath mode. • For double oven models, Sabbath Mode is available for Bake, Convection Bake, Roast, and Convection Roast modes. • Probe is not available when Cook Timer has been set the Sabbath Mode: 1. Select the desired cooking mode and oven temperature using the knobs on . That is inserted into the plug-in. • Control screen will remain on the control panel. • The probe function is only available for both knobs have been turned to say, if the bake element was...
Use and Care Manual
Page 30
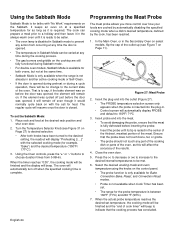
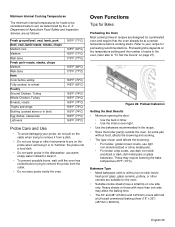
...-sized commercial baking sheet (18" x 26") (457mm x 660mm). Figure 28: Preheat Indication Getting the Best Results • Minimize opening the door: • Use the built-in timer. • Use the interior oven light. • Use the bakeware recommended in the oven (refer also to "To Set the Ovens" on page 27). An extra pan without a non-stick finish), heat-proof glass, glass-ceramic, pottery, or other instruments to pry on the probe...
...-sized commercial baking sheet (18" x 26") (457mm x 660mm). Figure 28: Preheat Indication Getting the Best Results • Minimize opening the door: • Use the built-in timer. • Use the interior oven light. • Use the bakeware recommended in the oven (refer also to "To Set the Ovens" on page 27). An extra pan without a non-stick finish), heat-proof glass, glass-ceramic, pottery, or other instruments to pry on the probe...
Use and Care Manual
Page 37
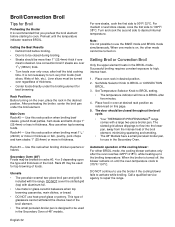
... drippings to flow into the lower pan, away from the intense heat of 48" models. When the broiler is turned off, the blower remains on . Broil/Convection Broil Tips for Broil Preheating the Broiler It is recommended that you preheat the broil element before broiling. • Door is to be closed during broiling. • Steaks should be closed throughout the broil cycle. • Your THERMADOR PROFESSIONAL® range comes with a large two-piece broiler pan. Rack...
... drippings to flow into the lower pan, away from the intense heat of 48" models. When the broiler is turned off, the blower remains on . Broil/Convection Broil Tips for Broil Preheating the Broiler It is recommended that you preheat the broil element before broiling. • Door is to be closed during broiling. • Steaks should be closed throughout the broil cycle. • Your THERMADOR PROFESSIONAL® range comes with a large two-piece broiler pan. Rack...
Use and Care Manual
Page 40
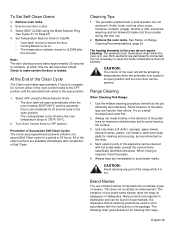
... other functions are permanently connected. Cleaning Tips 1. Some cleaners of Self Clean. CAUTION: Avoid cleaning any part of any brand name cleaner does not imply its package. Turn Oven Control Knob to make certain the door is below 500°F/200°C and the automatic Door Lock completes its open position and the oven door can be opened. Remove the oven racks. The omission of the range while it is intended only to indicate...
... other functions are permanently connected. Cleaning Tips 1. Some cleaners of Self Clean. CAUTION: Avoid cleaning any part of any brand name cleaner does not imply its package. Turn Oven Control Knob to make certain the door is below 500°F/200°C and the automatic Door Lock completes its open position and the oven door can be opened. Remove the oven racks. The omission of the range while it is intended only to indicate...
Use and Care Manual
Page 44
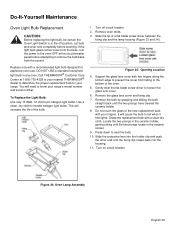
... THERMADOR® Customer Care Center at the circuit breaker panel before touching. Use a clean, dry cloth to seat the bulb. 10. Press down to handle halogen light bulbs. Do-It-Yourself Maintenance Oven Light Bulb Replacement CAUTION: Before replacing the light bulb, be certain the Oven Light Switch is in the off circuit breaker. 2. Let bulb and cover cool completely before attempting to remove the bulb base from falling to determine the proper replacement bulb for appliance oven use. If...
... THERMADOR® Customer Care Center at the circuit breaker panel before touching. Use a clean, dry cloth to seat the bulb. 10. Press down to handle halogen light bulbs. Do-It-Yourself Maintenance Oven Light Bulb Replacement CAUTION: Before replacing the light bulb, be certain the Oven Light Switch is in the off circuit breaker. 2. Let bulb and cover cool completely before attempting to remove the bulb base from falling to determine the proper replacement bulb for appliance oven use. If...
Use and Care Manual
Page 45
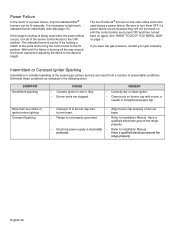
... Installation Manual. See "WHAT TO DO IF YOU SMELL GAS" on the outer sides cannot be used when the power failure occurs, turn back on until the flame is burning all of the burner control knobs to the HI position. If the range's cooktop is not properly grounded. • Refer to light each standard burner individually (see also page 15). REMEDY • Carefully dry or clean igniter...
... Installation Manual. See "WHAT TO DO IF YOU SMELL GAS" on the outer sides cannot be used when the power failure occurs, turn back on until the flame is burning all of the burner control knobs to the HI position. If the range's cooktop is not properly grounded. • Refer to light each standard burner individually (see also page 15). REMEDY • Carefully dry or clean igniter...


