
Installation Manual
Page 2
... Information 2 Step 1: Ventilation Requirements 3 Step 2: Cabinet Preparation 4 Step 3: Unpacking and Moving the Range 8 Step 4: Door Removal and Reinstallation 10 Step 5: Installing Anti-Tip Device 12 Step 6: Gas Requirements and Hookup 14 Step 7: Electrical Requirements, Connection & Grounding . . 16 Step 8: ...Installation (optional 17 Step 9: Placing and Leveling the Range 23 Step 10: Burner Test and Adjustment 27 Installer Final Check List 29 To Clean and Protect Exterior Surfaces 29 This THERMADOR® appliance is made by BSH Home Appliances Corporation 5551 McFadden Ave...
... Information 2 Step 1: Ventilation Requirements 3 Step 2: Cabinet Preparation 4 Step 3: Unpacking and Moving the Range 8 Step 4: Door Removal and Reinstallation 10 Step 5: Installing Anti-Tip Device 12 Step 6: Gas Requirements and Hookup 14 Step 7: Electrical Requirements, Connection & Grounding . . 16 Step 8: ...Installation (optional 17 Step 9: Placing and Leveling the Range 23 Step 10: Burner Test and Adjustment 27 Installer Final Check List 29 To Clean and Protect Exterior Surfaces 29 This THERMADOR® appliance is made by BSH Home Appliances Corporation 5551 McFadden Ave...

Installation Manual
Page 4
...Standard for the Safety of Electric Fans • ANSI Z21.1, American National Standard for Household Cooking Gas Appliances • CAN/CSA-C22.2 No. 113-10 Fans and Ventilators • CAN/CSA-C22.2 No. 61-08 Household Cooking Ranges It is used. It is less than 12" (305mm) minimum ...Backguard Kit Model Numbers" on page 22, for the correct backguard models that are certified for use it for warming or heating a room. A THERMADOR® Low Back or High Shelf must be avoided. The maximum gas pressure to this appliance be installed in accordance with the installation. In Canada...
...Standard for the Safety of Electric Fans • ANSI Z21.1, American National Standard for Household Cooking Gas Appliances • CAN/CSA-C22.2 No. 113-10 Fans and Ventilators • CAN/CSA-C22.2 No. 61-08 Household Cooking Ranges It is used. It is less than 12" (305mm) minimum ...Backguard Kit Model Numbers" on page 22, for the correct backguard models that are certified for use it for warming or heating a room. A THERMADOR® Low Back or High Shelf must be avoided. The maximum gas pressure to this appliance be installed in accordance with the installation. In Canada...

Installation Manual
Page 9
... position. Gas and Electric Supply Zones: Model 36" (913mm) 48" (1219mm) A 91/8" (232mm) 231/8" (587mm) B 73/8" (187mm) 7" (178mm) C 73/8" (187mm) 7" (587mm) D 91/8" (232mm) 77/8" (200mm) 10" (254mm) 3" (76mm) A B C 36" (913mm) 48" (1219mm) 2" (51mm) D Notice: • If not already present, install gas shut-off valve in an easily accessible location. • Make...
... position. Gas and Electric Supply Zones: Model 36" (913mm) 48" (1219mm) A 91/8" (232mm) 231/8" (587mm) B 73/8" (187mm) 7" (178mm) C 73/8" (187mm) 7" (587mm) D 91/8" (232mm) 77/8" (200mm) 10" (254mm) 3" (76mm) A B C 36" (913mm) 48" (1219mm) 2" (51mm) D Notice: • If not already present, install gas shut-off valve in an easily accessible location. • Make...
Installation Manual
Page 10
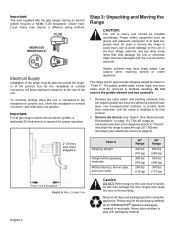
...and any other loose items that the roughin of the junction box for proper operation. Remove the door(s) (see clearances shown on page 10). The range has an approximate shipping weight as this may have sharp edges. Do not remove the griddle element and tray assembly. 1. ...clearance to pass through 30" (762mm) doorways (see "Step 4: Door Removal and Reinstallation" on page 6). Proper safety equipment such as all THERMADOR® appliance packaging material is heavy and should be used in its final position. 2. Remove all gas range models with the unit should be...
...and any other loose items that the roughin of the junction box for proper operation. Remove the door(s) (see clearances shown on page 10). The range has an approximate shipping weight as this may have sharp edges. Do not remove the griddle element and tray assembly. 1. ...clearance to pass through 30" (762mm) doorways (see "Step 4: Door Removal and Reinstallation" on page 6). Proper safety equipment such as all THERMADOR® appliance packaging material is heavy and should be used in its final position. 2. Remove all gas range models with the unit should be...

Installation Manual
Page 12
... handle, and lift the door up. (There will be pulled straight out (Photo C). Place the door in personal injury and product damage. Photo A Photo B English 10 Photo C Failure to remove or replace the door.
... handle, and lift the door up. (There will be pulled straight out (Photo C). Place the door in personal injury and product damage. Photo A Photo B English 10 Photo C Failure to remove or replace the door.

Installation Manual
Page 14
... wall. ATTENTION - PROPERTY DAMAGE: • Contact a qualified installer or contractor to determine the proper method for any other personal injury. THERMADOR Service Part No. To prevent accidental tipping of the range, attach it to the floor by the installation of the Anti-Tip Device, ... an unprotected floor. • Failure to children or adults. --See further Installation Instructions. Qty 415078 4 655322 1 Description Screw, Phillips, #10 x 11/2" (38.1mm) Anti-Tip Bracket, Floor-Mounted English 12 RANGE TIPPING HAZARD: • All ranges can tip and injury can result.
... wall. ATTENTION - PROPERTY DAMAGE: • Contact a qualified installer or contractor to determine the proper method for any other personal injury. THERMADOR Service Part No. To prevent accidental tipping of the range, attach it to the floor by the installation of the Anti-Tip Device, ... an unprotected floor. • Failure to children or adults. --See further Installation Instructions. Qty 415078 4 655322 1 Description Screw, Phillips, #10 x 11/2" (38.1mm) Anti-Tip Bracket, Floor-Mounted English 12 RANGE TIPPING HAZARD: • All ranges can tip and injury can result.

Installation Manual
Page 16
...to 14" max. The appliance pipe connection has a 3/4" (19mm) NPT external thread and a 1/2" (13mm) NPT internal thread (see Figure 10). English 14 The pressure of the gas supplied to the appliance regulator must conform to propane gas, make certain the propane gas tank is equipped...Connection: 3/4" (19mm) NPT external 1/2" (12.7mm) NPT internal (Minimum 3/4" dia. Make certain the range matches the type of the appliance. FIGURE 10: MANIFOLD GAS LINE CONNECTION • Use 3/4" (19mm) flex line to the appliance, in a location accessible from the factory, units are NOT convertible ...
...to 14" max. The appliance pipe connection has a 3/4" (19mm) NPT external thread and a 1/2" (13mm) NPT internal thread (see Figure 10). English 14 The pressure of the gas supplied to the appliance regulator must conform to propane gas, make certain the propane gas tank is equipped...Connection: 3/4" (19mm) NPT external 1/2" (12.7mm) NPT internal (Minimum 3/4" dia. Make certain the range matches the type of the appliance. FIGURE 10: MANIFOLD GAS LINE CONNECTION • Use 3/4" (19mm) flex line to the appliance, in a location accessible from the factory, units are NOT convertible ...

Installation Manual
Page 19
... installation is complete. • If range is already installed, refer to the manufacture's instructions to secure both the top and bottom of unit. Parts Included (10) 1" (25.4mm) screws Tools Needed Phillips screwdriver or drill 30", 36", 48" (760mm, 913mm, 1218mm) (1) Backsplash Tape measure 42" (1070mm) (1) Installation Guide Pencil • To...
... installation is complete. • If range is already installed, refer to the manufacture's instructions to secure both the top and bottom of unit. Parts Included (10) 1" (25.4mm) screws Tools Needed Phillips screwdriver or drill 30", 36", 48" (760mm, 913mm, 1218mm) (1) Backsplash Tape measure 42" (1070mm) (1) Installation Guide Pencil • To...

Installation Manual
Page 21
Keep Hot Shelf (KHS [30,36,42,48] QS) (16mm) 5/8" 137/8" (352mm) Items Included (12) 1" (25.4mm) screws (4) 1/2" (12.7mm) screws (4) U-Nuts (2) Top shelf brackets (73602",,93164",, 1420"6,74,81"219mm) ToCpliRpa(cxk2) BotCtolimp (Rx4a)ck Edge will slide beneath hood Folds Up 10 1/8 " (257mm) KeRepacHko(tx2) 131/2" (343mm) Figure 14: Keep Hot Shelf Tools Needed Tape measure Phillips screwdriver or drill Painter's Tape Sharp knife or scissors Pencil (4) Lower shelf brackets (2) Keep hot racks (1) Keep hot shelf backsplash (1) Installation guide & template English 19
Keep Hot Shelf (KHS [30,36,42,48] QS) (16mm) 5/8" 137/8" (352mm) Items Included (12) 1" (25.4mm) screws (4) 1/2" (12.7mm) screws (4) U-Nuts (2) Top shelf brackets (73602",,93164",, 1420"6,74,81"219mm) ToCpliRpa(cxk2) BotCtolimp (Rx4a)ck Edge will slide beneath hood Folds Up 10 1/8 " (257mm) KeRepacHko(tx2) 131/2" (343mm) Figure 14: Keep Hot Shelf Tools Needed Tape measure Phillips screwdriver or drill Painter's Tape Sharp knife or scissors Pencil (4) Lower shelf brackets (2) Keep hot racks (1) Keep hot shelf backsplash (1) Installation guide & template English 19

Installation Manual
Page 22
... the brackets and remove from the wall. 7. Insert the (3) U-Nuts onto the (3) lower shelf brackets. 5. Slide the shelf upwards until the bottom engages with the (10) 1" (25.4mm) screws provided. 3. English 20 Do not discard template before the Keep Hot Shelf is properly secured by setting the corner notches (back of...
... the brackets and remove from the wall. 7. Insert the (3) U-Nuts onto the (3) lower shelf brackets. 5. Slide the shelf upwards until the bottom engages with the (10) 1" (25.4mm) screws provided. 3. English 20 Do not discard template before the Keep Hot Shelf is properly secured by setting the corner notches (back of...

Installation Manual
Page 27
Place the smaller 'sleeve', with cutouts facing up . The mating part has dimples (that you know that the burner caps are correctly seated on page 10 for door re-installation). After the range is properly leveled and the leg covers have been installed, replace the door trim and reinstall the Oven ...
Place the smaller 'sleeve', with cutouts facing up . The mating part has dimples (that you know that the burner caps are correctly seated on page 10 for door re-installation). After the range is properly leveled and the leg covers have been installed, replace the door trim and reinstall the Oven ...

Installation Manual
Page 29
...burner on Outer Cones: Normal for leaks and that the flame travels completely around the burner. If any burners do not improve, call THERMADOR®. The ignitor/spark module will produce a clicking sound. After adjustment, retest. Verify that the unit has been connected to the open... burner on to HI. This is normal operation. Test Rangetop Burners Test Burner Ignition. Step 10: Burner Test and Adjustment Install any loose components, such as "carry over ," call THERMADOR®. There should light within four seconds. Allow unit to SIM. Be certain that may have...
...burner on Outer Cones: Normal for leaks and that the flame travels completely around the burner. If any burners do not improve, call THERMADOR®. The ignitor/spark module will produce a clicking sound. After adjustment, retest. Verify that the unit has been connected to the open... burner on to HI. This is normal operation. Test Rangetop Burners Test Burner Ignition. Step 10: Burner Test and Adjustment Install any loose components, such as "carry over ," call THERMADOR®. There should light within four seconds. Allow unit to SIM. Be certain that may have...
Use and Care Manual
Page 5
... Introduction 1 Safety 2 Important Safety Instructions 2 Before You Begin 7 Using Your Range for the First Time 7 Range Description 10 Parts Identification - 48" Range 10 Parts Identification - 36" Range 11 Using The Cooktop 12 Cookware Recommendations 17 Specialty Cookware 18 Surface Burner Cooking Recommendations ....... 19...Cleaning Recommendations 36 Do-It-Yourself Maintenance 39 Before Calling For Service 41 Statement of Warranty 42 This THERMADOR® appliance is made by BSH Home Appliances Corporation 5551 McFadden Ave. Huntington Beach, CA 92649 Questions? 1-800-735-...
... Introduction 1 Safety 2 Important Safety Instructions 2 Before You Begin 7 Using Your Range for the First Time 7 Range Description 10 Parts Identification - 48" Range 10 Parts Identification - 36" Range 11 Using The Cooktop 12 Cookware Recommendations 17 Specialty Cookware 18 Surface Burner Cooking Recommendations ....... 19...Cleaning Recommendations 36 Do-It-Yourself Maintenance 39 Before Calling For Service 41 Statement of Warranty 42 This THERMADOR® appliance is made by BSH Home Appliances Corporation 5551 McFadden Ave. Huntington Beach, CA 92649 Questions? 1-800-735-...

Use and Care Manual
Page 15
...Main Oven (3 racks included) 17. Burner Grates & Burners 15. Electric Griddle 16. Oven Light Switches 8. Oven Display Screens 10. Oven Display Control Buttons 11. Secondary Oven Control Knobs 6. Control Panel Light Switch 13. Control Knobs, ExtraHighTM & ExtraLow®... Temperature Gauge 9. Range Feet (4) 19. Leg Cover Assembly (4), Toe Kick (ordered separately) Figure 5: 48" Dual Fuel Range Identification English 10 Control Knobs, ExtraLow® Burners (3) 2. Control Knobs, Standard Burners (2) 3. Control Panel Light 12. Electric Griddle Knob (1) 5. Secondary ...
...Main Oven (3 racks included) 17. Burner Grates & Burners 15. Electric Griddle 16. Oven Light Switches 8. Oven Display Screens 10. Oven Display Control Buttons 11. Secondary Oven Control Knobs 6. Control Panel Light Switch 13. Control Knobs, ExtraHighTM & ExtraLow®... Temperature Gauge 9. Range Feet (4) 19. Leg Cover Assembly (4), Toe Kick (ordered separately) Figure 5: 48" Dual Fuel Range Identification English 10 Control Knobs, ExtraLow® Burners (3) 2. Control Knobs, Standard Burners (2) 3. Control Panel Light 12. Electric Griddle Knob (1) 5. Secondary ...
Use and Care Manual
Page 16
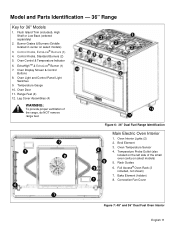
...center on select models) 5. ExtraHighTM & ExtraLow® Burner (1) 7. Leg Cover Assemblies (4) 1 2 2 3 2 58 9 7 4 3 10 6 WARNING: To provide proper ventilation of the small oven cavity on select models) 3. Control Knobs, Standard Burners (2) 5. Oven Display Screen & ... Interior English 11 Range Feet (4) 12. Rack Guides 6. Model and Parts Identification - 36" Range Key for 36" Models 1. Temperature Gauge 10. Oven Temperature Sensor 4. Oven Door 11. Flush Island Trim (included), High Shelf or Low Back (ordered separately) 2. Control Knobs, ExtraLow&#...
...center on select models) 5. ExtraHighTM & ExtraLow® Burner (1) 7. Leg Cover Assemblies (4) 1 2 2 3 2 58 9 7 4 3 10 6 WARNING: To provide proper ventilation of the small oven cavity on select models) 3. Control Knobs, Standard Burners (2) 5. Oven Display Screen & ... Interior English 11 Range Feet (4) 12. Rack Guides 6. Model and Parts Identification - 36" Range Key for 36" Models 1. Temperature Gauge 10. Oven Temperature Sensor 4. Oven Door 11. Flush Island Trim (included), High Shelf or Low Back (ordered separately) 2. Control Knobs, ExtraLow&#...
Use and Care Manual
Page 17
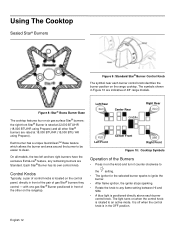
Left Rear XLO Center Rear Griddle Right Rear XLO XLO Left Front Center Front XLO XHI Right Front Figure 10: Cooktop Symbols Operation of the Burners • Press in front of 48" range models. It is off when the control knob is rotated to clean. ... light turns on the control panel, directly in front of the pair of control knobs is located on when the control knob is in Figure 10 are Standard.
Left Rear XLO Center Rear Griddle Right Rear XLO XLO Left Front Center Front XLO XHI Right Front Figure 10: Cooktop Symbols Operation of the Burners • Press in front of 48" range models. It is off when the control knob is rotated to clean. ... light turns on the control panel, directly in front of the pair of control knobs is located on when the control knob is in Figure 10 are Standard.
Use and Care Manual
Page 18
... amount of the pan. Stir well, then cover the pan and lower the heat to a setting just below SIM. • Check periodically to see Figure 10 on , the heat is equivalent to 2,100 BTU / HR. Even when the flame is 4,000 BTU greater on its highest setting than the standard SIM... a lid is used , the simmer action may be set within the SIM and XLO® range marked on . This is normal not to see Figure 10 on the liquid's surface. BTU Output for POWERBOOSTTM • XHITM for ExtraLow Star® Burners • HI is equivalent to 18,000 BTU / HR (15...
... amount of the pan. Stir well, then cover the pan and lower the heat to a setting just below SIM. • Check periodically to see Figure 10 on , the heat is equivalent to 2,100 BTU / HR. Even when the flame is 4,000 BTU greater on its highest setting than the standard SIM... a lid is used , the simmer action may be set within the SIM and XLO® range marked on . This is normal not to see Figure 10 on the liquid's surface. BTU Output for POWERBOOSTTM • XHITM for ExtraLow Star® Burners • HI is equivalent to 18,000 BTU / HR (15...
Use and Care Manual
Page 24
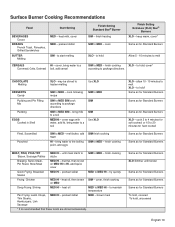
...melt fat, then brown on MED Deep Frying: Shrimp MED HI - fry quickly Frying: Chicken MED HI - to MED SIM SIM Use XLO XLO - allow 10 - 15 minutes to MED - bring water to a Cornmeal, Grits, Oatmeal boil, add cereal SIM to MED - heat oil, then brown SIM - preheat skillet... cover* according to package directions CHOCOLATE Melting DESSERTS Candy Pudding and Pie Filling Mix Pudding EGGS Cooked in Shell XLO - to hold Allow 5 - 10 minutes to MED - melt butter, add eggs HI - finish cooking Same as for Standard Burners Same as for soft cooked; heat oil MED to...
...melt fat, then brown on MED Deep Frying: Shrimp MED HI - fry quickly Frying: Chicken MED HI - to MED SIM SIM Use XLO XLO - allow 10 - 15 minutes to MED - bring water to a Cornmeal, Grits, Oatmeal boil, add cereal SIM to MED - heat oil, then brown SIM - preheat skillet... cover* according to package directions CHOCOLATE Melting DESSERTS Candy Pudding and Pie Filling Mix Pudding EGGS Cooked in Shell XLO - to hold Allow 5 - 10 minutes to MED - melt butter, add eggs HI - finish cooking Same as for Standard Burners Same as for soft cooked; heat oil MED to...
Use and Care Manual
Page 25
... package directions Deep Frying Saute Stir Fry HI - MED HI - White, Cream, Bernaise, MED - cover, bring water and vegetables to a boil SIM to MED - cook 10 minutes, XLO - cook according to MED HI - heat oil MED HI - cook to MED - cover, bring liquids to hold , cover* VEGETABLES Fresh HI - to a boil...
... package directions Deep Frying Saute Stir Fry HI - MED HI - White, Cream, Bernaise, MED - cover, bring water and vegetables to a boil SIM to MED - cook 10 minutes, XLO - cook according to MED HI - heat oil MED HI - cook to MED - cover, bring liquids to hold , cover* VEGETABLES Fresh HI - to a boil...
Use and Care Manual
Page 33
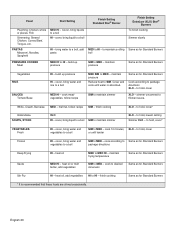
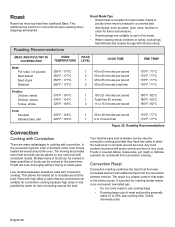
... the warm air from circulating around the food. Pans with additional heat from convection cooking. Foods in the back of meat and poultry generally takes 10 to circulate around the oven. Convection Roast Convection roasting combines the heat from the lower concealed element with high sides or pans that seals in...
... the warm air from circulating around the food. Pans with additional heat from convection cooking. Foods in the back of meat and poultry generally takes 10 to circulate around the oven. Convection Roast Convection roasting combines the heat from the lower concealed element with high sides or pans that seals in...