Thermador PRD366GHU Support and Manuals
Get Help and Manuals for this Thermador item
View All Support Options Below
Free Thermador PRD366GHU manuals!
Problems with Thermador PRD366GHU?
Ask a Question
Free Thermador PRD366GHU manuals!
Problems with Thermador PRD366GHU?
Ask a Question
Popular Thermador PRD366GHU Manual Pages
Design Guide - Pro Harmony Ranges - Page 5
... surface. A dedicated circuit breaker is required.
Before installing a Thermador Pro Harmony Range, be ordered separately from the factory. A manual gas shutoff valve must be done by a qualified technician.
PLUG
NEMA 5-20 RECEPTACLE
44 Please refer to the LP Conversion Instructions packed with gas ranges having an electric griddle requires a NEMA 5-20 receptacle...
Design Guide - Pro Harmony Ranges - Page 8
... cooking surface to the LP Conversion Instructions packed with all applications. Note: Most hoods contain combustible components that a Thermador Professional Wall or Island Hood or Custom Insert be considered when planning the installation. An island trim is used. PRO hARMONY® RANGES 30-iNch DuAL-FuEL
Model: PRD304Ghu
30-INCH CuTOuT AND RANGE DIMENSIONS
*min. 30"- 40"
30...
Design Guide - Pro Harmony Ranges - Page 10

... 23"
447/8"
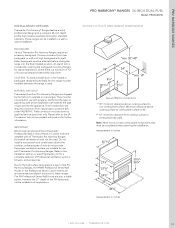
measurement in a wall or island installation. An island trim is a minimum of 12" of the Pro Harmony Ranges, the HPWB Professional Series Wall Hoods or the Professional Series Custom Inserts are shipped by the appliance. NATuRAL GAS OR LP
Thermador Dual-Fuel Pro Harmony Ranges are recommended ventilation solutions for island installations, where there is included for covering...
Design Guide - Pro Harmony Ranges - Page 12
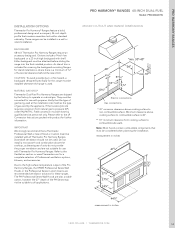
... surface to all Thermador Pro Harmony Ranges. Field conversion must be installed whenever the range is 40".
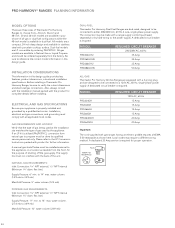
** 10" minimum clearance from natural gas to the LP Conversion Instructions packed with propane. Please refer to propane (LP), order PALPKITHC. PRO hARMONY® RANGES 36-iNch DuAL-FuEL
Model: PRD366Ghu
36-INCH CuTOuT AND RANGE DIMENSIONS
*min. 30"- 40"
36"
24"
81/8" 1913...
Design Guide - Pro Harmony Ranges - Page 14
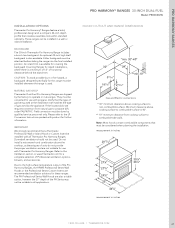
... to the LP Conversion Instructions packed with shelf. Minimum clearance above the cooktop, as these ranges. Downdraft ventilation should not be used by the appliance. Refer to non-combustible surface. measurement in inches
477/8"
271/4" 275/8" 243/4" 23"
447/8"
measurement in a wall or island installation. NATuRAL GAS OR LP
Thermador Dual-Fuel Pro Harmony Ranges are also a viable...
Design Guide - Pro Harmony Ranges - Page 16
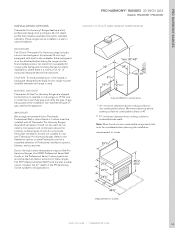
... within standard cabinetry. PRO hARMONY RANGES
iNSTALLATiON OPTiONS
Thermador Pro Harmony® Ranges feature a bold, professional design and a compact, 24-inch depth profile that a Thermador Professional Wall or Island Hood or Custom Insert be installed whenever the range is also available. Either backguard must be installed with all applications. An island trim is available for...
Design Guide - Pro Harmony Ranges - Page 18
...64257;nal installed position. Due to the high surface temperature output of the Pro Harmony Ranges, the HPWB Professional Series Wall Hoods or the Professional Series Custom Inserts are not suitable for a complete selection of horizontal clearance behind the island trim. PRO hARMONY® RANGES 36-iNch GAS
Models: PRG366Gh / PRL366Gh
36-INCH CuTOuT AND RANGE DIMENSIONS
*min. 30"- 40"
36"
24...
Design Guide - Pro Harmony Ranges - Page 20

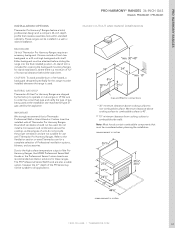
...a seamless look within standard cabinetry. BaCkGuaRD
36-inch Thermador Pro Harmony Ranges require an accessory backguard. ImPORTanT
We strongly recommend that a Thermador Professional Wall or Island Hood or Custom Insert be installed with shelf. PRO HaRmOny® RanGES 36-InCH GaS
models: PRG364GDH / PRL364GDH
36-INCH CuTOuT AND RANGE DIMENSIONS
*min. 30"- 40"
36"
24"
81/8" 1913/16"
33/16...
Installation Instructions - Page 4
... 17, for the correct backguard models that the appliance is certified.
OWNER: Please retain these Instructions with all other installations with a Flush Island Trim.
It is NOT designed for installation in manufactured (mobile) homes or for installation in the OFF position. WARNING:
To avoid possible burn or fire hazard, a backguard designed specifically for this unit for the...
Installation Instructions - Page 12
...
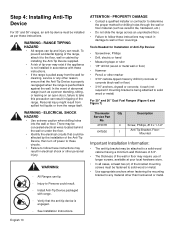
For 30" and 36" Dual Fuel Ranges (Figure 6 and Figure 7)
Thermador Service Part
No. 415078
647936
Qty
Description
4 Screw, Phillips, #10 x 1-1/2"
1
Anti-Tip Bracket, FloorMounted
Important Installation Information:
•...hardwood, etc.)
• Do not slide the range across an unprotected floor. • Failure to follow these instructions may require use of longer screws, available at ...
Installation Instructions - Page 18

...; The backguard must be attached before sliding the range into the flange at the back of the range's cooktop.
• The Pot-and-Pan Shelf models provide a shelf above the cooking surface.
• A Flush Island Trim is positioned inside the guide channels on models with griddle.) Using a T-20 size Torx driver, fasten the backguard with four (4) Torx-head...
User Manual - Page 3
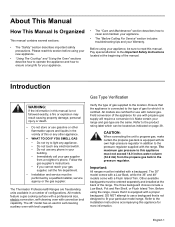
...-pressure regulator in your range and gas type are certified for more information.
All models feature a gas cooking surface with a professional size, electric convection, self-cleaning oven with a Flush Island Trim. Make certain your
building. • Immediately call the fire department.
• Installation and service must be performed by a qualified installer, service agency or the...
User Manual - Page 9
... and Secondary
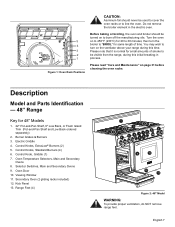
Ovens 8. English 7 Selector Switches, Main and Secondary Ovens 9. Secondary Oven (2 gliding racks included) 12. Description
Model and Parts Identification - 48" Range
Key for 48" Models
1. 22" Pot-and-Pan Shelf, 9" Low Back, or Flush Island Trim (Pot-and-Pan Shelf and Low Back ordered separately)
2. Viewing Window 11. Turn the oven
5
on to 30...
User Manual - Page 10
... 3. Oven Temperature Selector 6. Oven Door 8. Electric Oven Interior
14. Convection Fan Cover
15
15
14
16 18 17
20
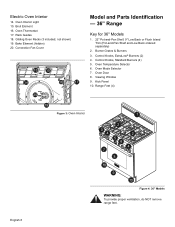
Model and Parts Identification - 36" Range
Key for 36" Models
1. 22" Pot-and-Pan Shelf, 9" Low Back or Flush Island Trim (Pot-and-Pan Shelf and Low Back ordered separately)
2. Bake Element (hidden) 20. Control Knobs, ExtraLow® Burners...
User Manual - Page 23

...#3 used when baking on rack level #2 to make sure the front supports on a rack, pull the rack out to the stop position. Pies...Bake mode should be baked using these two levels.
Figure 23: Rack Installation Detail
English 21 The racks are roasted, such as a prime rib ... the oven, pull the rack toward the front of the rail guides. Three Rack Baking
• If three-rack baking is the ...
Thermador PRD366GHU Reviews
We have not received any reviews for Thermador yet.