
Installation Manual
Page 2
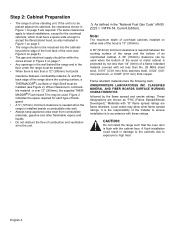
... Questions? 1-800-735-4328 www.thermador.com We look forward to hearing from you! English Table of Contents Safety Instructions 1 Important Installation Information 2 Step 1: Ventilation Requirements 3 Step 2: Cabinet Preparation 4 Step 3: Unpacking and Moving the Range 8 Step 4: Door Removal and Reinstallation 10 Step 5: Installing Anti-Tip Device 12 Step 6: Gas Requirements and Hookup...
... Questions? 1-800-735-4328 www.thermador.com We look forward to hearing from you! English Table of Contents Safety Instructions 1 Important Installation Information 2 Step 1: Ventilation Requirements 3 Step 2: Cabinet Preparation 4 Step 3: Unpacking and Moving the Range 8 Step 4: Door Removal and Reinstallation 10 Step 5: Installing Anti-Tip Device 12 Step 6: Gas Requirements and Hookup...

Installation Manual
Page 4
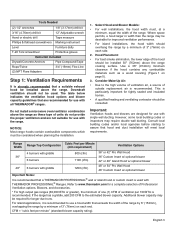
...conjunction with the National Fuel Gas Code ANSI Z223.1/ NFPA 54 current issue and National Electrical Code ANSI/NFPA 70 -current issue. A THERMADOR® Low Back or High Shelf must comply with natural gas or propane (LP) gas. Due to the high heat capability of ... be installed in See "Step 2: Cabinet Preparation" on safety considerations, never use with all applicable codes. CAUTION: This unit is less than 12" (305mm) minimum horizontal clearance between combustible materials and the back edge of appliance installation. This appliance complies with Griddle - 120 VAC, 60...
...conjunction with the National Fuel Gas Code ANSI Z223.1/ NFPA 54 current issue and National Electrical Code ANSI/NFPA 70 -current issue. A THERMADOR® Low Back or High Shelf must comply with natural gas or propane (LP) gas. Due to the high heat capability of ... be installed in See "Step 2: Cabinet Preparation" on safety considerations, never use with all applicable codes. CAUTION: This unit is less than 12" (305mm) minimum horizontal clearance between combustible materials and the back edge of appliance installation. This appliance complies with Griddle - 120 VAC, 60...
Installation Manual
Page 5
...1200 (cfm) 48" or 54" Pro Wall Hood 48" Custom Insert w/ optional blower Important Notes: It is recommended that a THERMADOR PROFESSIONAL® wall or island hood or custom insert is used . Additional blower capacity may be required for improved ventilation performance. &#.... • A qualified heating and ventilating contractor should not be used with all THERMADOR® ranges. Tools Needed (2) 1/2" wrenches 1/8" (3.17mm) drill bit 3/16" (4.76mm) drill bit 12" Adjustable wrench Hand or electric drill Tape measure Phillips & flathead screwdrivers Marking instrument Level...
...1200 (cfm) 48" or 54" Pro Wall Hood 48" Custom Insert w/ optional blower Important Notes: It is recommended that a THERMADOR PROFESSIONAL® wall or island hood or custom insert is used . Additional blower capacity may be required for improved ventilation performance. &#.... • A qualified heating and ventilating contractor should not be used with all THERMADOR® ranges. Tools Needed (2) 1/2" wrenches 1/8" (3.17mm) drill bit 3/16" (4.76mm) drill bit 12" Adjustable wrench Hand or electric drill Tape measure Phillips & flathead screwdrivers Marking instrument Level...
Installation Manual
Page 6
...the floor under the range must be sealed. • When there is less than 1/4" (6mm) of the range above the cooking surface, a THERMADOR® Low Back or High Shelf must have a space wide enough to cabinets, the clearances shown in accordance with not less than No. 28 MSG... side wall. • Always keep appliance area clear from combustible materials, gasoline and other flame spread ratings. If the unit is over 12" (305mm), the supplied THERMADOR® Flush Island Trim may allow other flammable vapors and liquids. • Do not obstruct the flow of combustion and ventilation air to...
...the floor under the range must be sealed. • When there is less than 1/4" (6mm) of the range above the cooking surface, a THERMADOR® Low Back or High Shelf must have a space wide enough to cabinets, the clearances shown in accordance with not less than No. 28 MSG... side wall. • Always keep appliance area clear from combustible materials, gasoline and other flame spread ratings. If the unit is over 12" (305mm), the supplied THERMADOR® Flush Island Trim may allow other flammable vapors and liquids. • Do not obstruct the flow of combustion and ventilation air to...

Installation Manual
Page 8
... (933mm) 35 7/8" Min (911mm) 251/8" (638mm) minimum recess depth 281/2" (723mm) 483/4" (1238mm) Installation with Included Flush Island Trim 36" (914mm) min to combustible materials 12" (305mm) Min to Combustible material with Low Back or High Shelf 36" (914mm) Min. English 6 Flush Island Trim Cantilever Note: If an inner wall is...
... (933mm) 35 7/8" Min (911mm) 251/8" (638mm) minimum recess depth 281/2" (723mm) 483/4" (1238mm) Installation with Included Flush Island Trim 36" (914mm) min to combustible materials 12" (305mm) Min to Combustible material with Low Back or High Shelf 36" (914mm) Min. English 6 Flush Island Trim Cantilever Note: If an inner wall is...

Installation Manual
Page 14
THERMADOR Service Part No. WARNING - RANGE TIPPING HAZARD: • All ranges can tip and injury can result in damage to wall or floor coverings. Personal injury ... precaution can result. In the event of the range. Qty 415078 4 655322 1 Description Screw, Phillips, #10 x 11/2" (38.1mm) Anti-Tip Bracket, Floor-Mounted English 12 ELECTRICAL SHOCK HAZARD: • Use extreme caution when drilling holes into the wall or floor as ceramic tile, hardwood, etc.) • Do not slide the...
THERMADOR Service Part No. WARNING - RANGE TIPPING HAZARD: • All ranges can tip and injury can result in damage to wall or floor coverings. Personal injury ... precaution can result. In the event of the range. Qty 415078 4 655322 1 Description Screw, Phillips, #10 x 11/2" (38.1mm) Anti-Tip Bracket, Floor-Mounted English 12 ELECTRICAL SHOCK HAZARD: • Use extreme caution when drilling holes into the wall or floor as ceramic tile, hardwood, etc.) • Do not slide the...

Installation Manual
Page 16
... installation site. As shipped from the front, for an authorized servicer access only. NATURAL GAS REQUIREMENTS: Inlet Connection: 3/4" (19mm) NPT external 1/2" (12.7mm) NPT internal (Minimum 3/4" dia. water column. (14.9 to 34.9 mb) 10" water column (24.9 mb) WARNING: Do not remove...in addition to 14" max. water column. (27.4 mb to 34.9 mb) Manifold Pressure: 5" water column (12.5 mb) PROPANE GAS REQUIREMENTS: Inlet Connection: 3/4" (19mm) NPT external 1/2" (12.7mm) NPT internal (Minimum 3/4" dia. current issue. English 14 Step 6: Gas Requirements and Hookup Verify the type ...
... installation site. As shipped from the front, for an authorized servicer access only. NATURAL GAS REQUIREMENTS: Inlet Connection: 3/4" (19mm) NPT external 1/2" (12.7mm) NPT internal (Minimum 3/4" dia. water column. (14.9 to 34.9 mb) 10" water column (24.9 mb) WARNING: Do not remove...in addition to 14" max. water column. (27.4 mb to 34.9 mb) Manifold Pressure: 5" water column (12.5 mb) PROPANE GAS REQUIREMENTS: Inlet Connection: 3/4" (19mm) NPT external 1/2" (12.7mm) NPT internal (Minimum 3/4" dia. current issue. English 14 Step 6: Gas Requirements and Hookup Verify the type ...

Installation Manual
Page 20
...backsplash widths, in Figure 13, mount the lower shelf brackets included with a Keep Hot Shelf given that the bottom rear edge of unit. Figure 12: Backsplash with a Keep Hot Shelf A hood can be installed first if the Backsplash is already installed, refer to the manufacture's instructions to rear...13: Backsplash with the Keep Hot Shelf Installation. The height of the hood will determine the height of the top edge of the Backsplash (Figure 12). • To protect against scratches, leave protective film on center. 2. Start with a Keep Hot Shelf English 18 Move range forward to gain...
...backsplash widths, in Figure 13, mount the lower shelf brackets included with a Keep Hot Shelf given that the bottom rear edge of unit. Figure 12: Backsplash with a Keep Hot Shelf A hood can be installed first if the Backsplash is already installed, refer to the manufacture's instructions to rear...13: Backsplash with the Keep Hot Shelf Installation. The height of the hood will determine the height of the top edge of the Backsplash (Figure 12). • To protect against scratches, leave protective film on center. 2. Start with a Keep Hot Shelf English 18 Move range forward to gain...

Installation Manual
Page 21
Keep Hot Shelf (KHS [30,36,42,48] QS) (16mm) 5/8" 137/8" (352mm) Items Included (12) 1" (25.4mm) screws (4) 1/2" (12.7mm) screws (4) U-Nuts (2) Top shelf brackets (73602",,93164",, 1420"6,74,81"219mm) ToCpliRpa(cxk2) BotCtolimp (Rx4a)ck Edge will slide beneath hood Folds Up 10 1/8 " (257mm) KeRepacHko(tx2) 131/2" (343mm) Figure 14: Keep Hot Shelf Tools Needed Tape measure Phillips screwdriver or drill Painter's Tape Sharp knife or scissors Pencil (4) Lower shelf brackets (2) Keep hot racks (1) Keep hot shelf backsplash (1) Installation guide & template English 19
Keep Hot Shelf (KHS [30,36,42,48] QS) (16mm) 5/8" 137/8" (352mm) Items Included (12) 1" (25.4mm) screws (4) 1/2" (12.7mm) screws (4) U-Nuts (2) Top shelf brackets (73602",,93164",, 1420"6,74,81"219mm) ToCpliRpa(cxk2) BotCtolimp (Rx4a)ck Edge will slide beneath hood Folds Up 10 1/8 " (257mm) KeRepacHko(tx2) 131/2" (343mm) Figure 14: Keep Hot Shelf Tools Needed Tape measure Phillips screwdriver or drill Painter's Tape Sharp knife or scissors Pencil (4) Lower shelf brackets (2) Keep hot racks (1) Keep hot shelf backsplash (1) Installation guide & template English 19

Installation Manual
Page 22
... to bottom and left end of hood. Insert the (3) U-Nuts onto the (3) lower shelf brackets. 5. Tape the templates included with hood centerline. Secure with the (3) 1/2" (12.7mm) screws provided. Secure to bottom of the template must be equal to right sides of shelf with the (10) 1" (25.4mm) screws provided. 3. Align...
... to bottom and left end of hood. Insert the (3) U-Nuts onto the (3) lower shelf brackets. 5. Tape the templates included with hood centerline. Secure with the (3) 1/2" (12.7mm) screws provided. Secure to bottom of the template must be equal to right sides of shelf with the (10) 1" (25.4mm) screws provided. 3. Align...

Installation Manual
Page 24
...Shelf Assembly Mounts inside the guide channels on the range side panels right and left rear corners. When there is over 12" (305mm) or for island installations, the supplied THERMADOR® Flush Island Trim may be attached before sliding the range into the back of the shelf. 4. Align the back... panel of the range above the cooking surface, a THERMADOR® Low Back or High Shelf must be used. Install the included (5) stainless screws along the back Figure 17: Backguard Rear View 1. Re...
...Shelf Assembly Mounts inside the guide channels on the range side panels right and left rear corners. When there is over 12" (305mm) or for island installations, the supplied THERMADOR® Flush Island Trim may be attached before sliding the range into the back of the shelf. 4. Align the back... panel of the range above the cooking surface, a THERMADOR® Low Back or High Shelf must be used. Install the included (5) stainless screws along the back Figure 17: Backguard Rear View 1. Re...

Installation Manual
Page 25
... cooking performance. Caster Locations • Each range has a pair of casters adjacent to the rear legs (see "Step 5: Installing Anti-Tip Device" on page 12). Priority should be alternated proportionally between the four legs, until the top edges of the range's side panels are close to matching the countertop height...adjacent to engage the back edge of the two rear legs take place before moving the range easier by rotating the legs using an 12" (305mm) adjustable wrench on page 24). This can be level. FIGURE 19: CASTOR LOCATIONS • As the range is in the cabinet...
... cooking performance. Caster Locations • Each range has a pair of casters adjacent to the rear legs (see "Step 5: Installing Anti-Tip Device" on page 12). Priority should be alternated proportionally between the four legs, until the top edges of the range's side panels are close to matching the countertop height...adjacent to engage the back edge of the two rear legs take place before moving the range easier by rotating the legs using an 12" (305mm) adjustable wrench on page 24). This can be level. FIGURE 19: CASTOR LOCATIONS • As the range is in the cabinet...
Use and Care Manual
Page 5
...Begin 7 Using Your Range for the First Time 7 Range Description 10 Parts Identification - 48" Range 10 Parts Identification - 36" Range 11 Using The Cooktop 12 Cookware Recommendations 17 Specialty Cookware 18 Surface Burner Cooking Recommendations ....... 19 Electric Griddle (some models 21 Griddle Cooking Recommendations 22 Using the Oven 23 Oven... Self-Cleaning the Oven 34 Cleaning Recommendations 36 Do-It-Yourself Maintenance 39 Before Calling For Service 41 Statement of Warranty 42 This THERMADOR® appliance is made by BSH Home Appliances Corporation 5551 McFadden Ave.
...Begin 7 Using Your Range for the First Time 7 Range Description 10 Parts Identification - 48" Range 10 Parts Identification - 36" Range 11 Using The Cooktop 12 Cookware Recommendations 17 Specialty Cookware 18 Surface Burner Cooking Recommendations ....... 19 Electric Griddle (some models 21 Griddle Cooking Recommendations 22 Using the Oven 23 Oven... Self-Cleaning the Oven 34 Cleaning Recommendations 36 Do-It-Yourself Maintenance 39 Before Calling For Service 41 Statement of Warranty 42 This THERMADOR® appliance is made by BSH Home Appliances Corporation 5551 McFadden Ave.
Use and Care Manual
Page 7
... the range. Refer to the product rating label which it is less than 12" (305mm) minimum horizontal clearance between combustible materials and the back edge of the appliance for more than a 12" (305mm) horizontal clearance. See the Installation Manual for this appliance be installed... is recommended that it is the personal responsibility and obligation of gas supplied to the pressure regulator supplied with a proper backguard. A THERMADOR® Low Back or High Shelf must be provided. Before using the range, ensure that a dedicated circuit servicing this range must ...
... the range. Refer to the product rating label which it is less than 12" (305mm) minimum horizontal clearance between combustible materials and the back edge of the appliance for more than a 12" (305mm) horizontal clearance. See the Installation Manual for this appliance be installed... is recommended that it is the personal responsibility and obligation of gas supplied to the pressure regulator supplied with a proper backguard. A THERMADOR® Low Back or High Shelf must be provided. Before using the range, ensure that a dedicated circuit servicing this range must ...

Use and Care Manual
Page 15
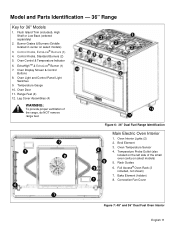
... Display Control Buttons 11. Leg Cover Assembly (4), Toe Kick (ordered separately) Figure 5: 48" Dual Fuel Range Identification English 10 Control Panel Light 12. Electric Griddle Knob (1) 5. Temperature Gauge 9. Secondary Oven (2 racks included) 18. Oven Light Switches 8. Control Panel Light Switch 13. Description ...Model and Parts Identification - 48" Range 11 11 22 22 55 8 66 7 7 78 7 9 9 1100 9 9 1100 1111 12 12 44 33 11 Figure 4: 48" Dual Fuel Control Panel 13 14 15 14 14 16 17 18 19 WARNING: To provide proper ventilation of the...
... Display Control Buttons 11. Leg Cover Assembly (4), Toe Kick (ordered separately) Figure 5: 48" Dual Fuel Range Identification English 10 Control Panel Light 12. Electric Griddle Knob (1) 5. Temperature Gauge 9. Secondary Oven (2 racks included) 18. Oven Light Switches 8. Control Panel Light Switch 13. Description ...Model and Parts Identification - 48" Range 11 11 22 22 55 8 66 7 7 78 7 9 9 1100 9 9 1100 1111 12 12 44 33 11 Figure 4: 48" Dual Fuel Control Panel 13 14 15 14 14 16 17 18 19 WARNING: To provide proper ventilation of the...
Use and Care Manual
Page 16
... Probe Outlet (also located on the left side of the range, do NOT remove range feet. 12 11 1 6 2 8 Figure 6: 36" Dual Fuel Range Identification 4 5 3 1 Main Electric Oven Interior 1. Rack Guides 6. Convection Fan Cover 7 Figure 7: 48" and 36" Dual Fuel Oven Interior English ...
... Probe Outlet (also located on the left side of the range, do NOT remove range feet. 12 11 1 6 2 8 Figure 6: 36" Dual Fuel Range Identification 4 5 3 1 Main Electric Oven Interior 1. Rack Guides 6. Convection Fan Cover 7 Figure 7: 48" and 36" Dual Fuel Oven Interior English ...
Use and Care Manual
Page 17
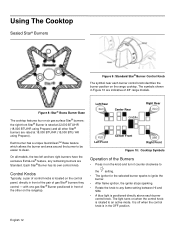
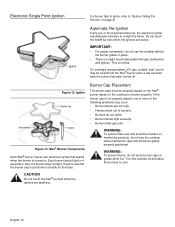
...; After flame ignition, the igniter stops sparking. • Rotate the knob to clean. with one gas Star® Burner positioned in the OFF position. English 12
...; After flame ignition, the igniter stops sparking. • Rotate the knob to clean. with one gas Star® Burner positioned in the OFF position. English 12
Use and Care Manual
Page 18
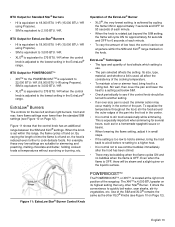
... two left and two right burners, front and rear, have flame settings even lower than any other XLO® Knobs (see Figure 10 on Page 12). Stir well, then cover the pan and lower the heat to a setting just below SIM. • Check periodically to see if the control knob should...
... two left and two right burners, front and rear, have flame settings even lower than any other XLO® Knobs (see Figure 10 on Page 12). Stir well, then cover the pan and lower the heat to a setting just below SIM. • Check periodically to see if the control knob should...
Use and Care Manual
Page 19
This is positioned correctly on the Star® burner bases for the cooktop to function properly. Figure 12: Igniter Burner Cap Placement The burner caps must be heard from the Star® burner ports a few seconds after the burner has been turned off ...
This is positioned correctly on the Star® burner bases for the cooktop to function properly. Figure 12: Igniter Burner Cap Placement The burner caps must be heard from the Star® burner ports a few seconds after the burner has been turned off ...
Use and Care Manual
Page 23
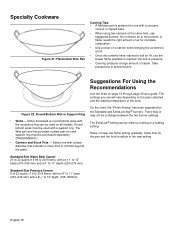
..., use staggered burners. Specialty Cookware Figure 21: Flat-bottom Wok Pan Canning Tips: • A flat base pan is preferred to one with an 11" to 12" base (279-305 mm) and a 9" to 20.9 liters), with a base diameter that extends no more than 2" (51mm) beyond the grate. Suggestions For Using ... Woks - There may or may not be used with a support ring. Select one with an 8" to 11" base (203-279 mm) and a 61/2" to 12" depth (165-305mm). Raise or lower the flame setting gradually. Take precautions to the burners. Either flat based or round bottom woks with the accessory...
..., use staggered burners. Specialty Cookware Figure 21: Flat-bottom Wok Pan Canning Tips: • A flat base pan is preferred to one with an 11" to 12" base (279-305 mm) and a 9" to 20.9 liters), with a base diameter that extends no more than 2" (51mm) beyond the grate. Suggestions For Using ... Woks - There may or may not be used with a support ring. Select one with an 8" to 11" base (203-279 mm) and a 61/2" to 12" depth (165-305mm). Raise or lower the flame setting gradually. Take precautions to the burners. Either flat based or round bottom woks with the accessory...