User Manual
Page 2
...in connection with or arising out of the purchase or use of these materials, and the sole and exclusive liability of Texas Instruments, regardless of the form of action, shall not exceed the purchase price of this equipment does cause harmful interference to radio...installation. In no guarantee that to which can radiate radio frequency energy and, if not installed and used in a particular installation. TI-89 Titanium Graphing Calculator 2 USA FCC Information Concerning Radio Frequency Interference This equipment has been tested and found to comply with the instructions, may cause ...
...in connection with or arising out of the purchase or use of these materials, and the sole and exclusive liability of Texas Instruments, regardless of the form of action, shall not exceed the purchase price of this equipment does cause harmful interference to radio...installation. In no guarantee that to which can radiate radio frequency energy and, if not installed and used in a particular installation. TI-89 Titanium Graphing Calculator 2 USA FCC Information Concerning Radio Frequency Interference This equipment has been tested and found to comply with the instructions, may cause ...
User Manual
Page 3
Caution: Any changes or modifications to this equipment not expressly approved by Texas Instruments may void your authority to operate the equipment. © 2005 Texas Instruments Incorporated Windows and Macintosh are trademarks of their respective owners. • Consult the dealer or an experienced radio/television technician for help. TI-89 Titanium Graphing Calculator 3
Caution: Any changes or modifications to this equipment not expressly approved by Texas Instruments may void your authority to operate the equipment. © 2005 Texas Instruments Incorporated Windows and Macintosh are trademarks of their respective owners. • Consult the dealer or an experienced radio/television technician for help. TI-89 Titanium Graphing Calculator 3
User Manual
Page 36
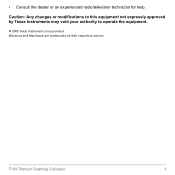
Split the screen horizontally (top-bottom) or vertically (left-right). Press ¸ † Result Open Apps and split-screen status Your TI-89 Titanium lets you split the screen to see the list of the MODE screen. Getting Started 36 The TI-89 Titanium displays the selected Apps in the split-screen view as shown. Select the Split Screen mode from Page 2 of functions and how they are graphed. For example, view the Y= Editor and Graph screens simultaneously to view two Apps simultaneously.
Split the screen horizontally (top-bottom) or vertically (left-right). Press ¸ † Result Open Apps and split-screen status Your TI-89 Titanium lets you split the screen to see the list of the MODE screen. Getting Started 36 The TI-89 Titanium displays the selected Apps in the split-screen view as shown. Select the Split Screen mode from Page 2 of functions and how they are graphed. For example, view the Y= Editor and Graph screens simultaneously to view two Apps simultaneously.
User Manual
Page 38
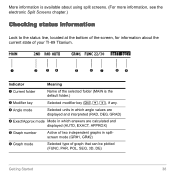
... chapter.) Checking status information Look to the status line, located at the bottom of the screen, for information about the current state of your TI-89 Titanium. Ê Ë ÌÍ Î ÏÐ ÑÒ Indicator Meaning Ê Current folder Name of the selected folder... DEG, GRAD) Í Exact/Approx mode Mode in which answers are calculated and displayed (AUTO, EXACT, APPROX) Î Graph number Active of two independent graphs in splitscreen mode (GR#1, GR#2) Ï Graph mode Selected type of graph that can be plotted (FUNC, PAR, POL, SEQ, 3D, DE) ...
... chapter.) Checking status information Look to the status line, located at the bottom of the screen, for information about the current state of your TI-89 Titanium. Ê Ë ÌÍ Î ÏÐ ÑÒ Indicator Meaning Ê Current folder Name of the selected folder... DEG, GRAD) Í Exact/Approx mode Mode in which answers are calculated and displayed (AUTO, EXACT, APPROX) Î Graph number Active of two independent graphs in splitscreen mode (GR#1, GR#2) Ï Graph mode Selected type of graph that can be plotted (FUNC, PAR, POL, SEQ, 3D, DE) ...
User Manual
Page 59
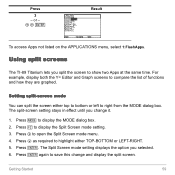
Using split screens The TI-89 Titanium lets you selected. 6. For example, display both the Y= Editor and Graph screens to display the Split Screen mode setting. 3. Press „ to compare the list of functions and how they are graphed. Press ¸. The Split Screen mode setting displays the option you split the screen to show two...
Using split screens The TI-89 Titanium lets you selected. 6. For example, display both the Y= Editor and Graph screens to display the Split Screen mode setting. 3. Press „ to compare the list of functions and how they are graphed. Press ¸. The Split Screen mode setting displays the option you split the screen to show two...
User Manual
Page 64
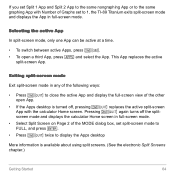
...you set Split 1 App and Split 2 App to the same nongraphing App or to the same graphing App with the calculator Home screen. Pressing 2 K again turns off , pressing 2 K replaces the active split-screen App with Number of Graphs set split-screen mode to FULL, and press ¸. • Press 2 K twice to... and displays the calculator Home screen in full-screen mode. Exiting split-screen mode Exit split-screen mode in any of the following ways: • Press 2 K to close the active App and display the full-screen view of the MODE dialog box, set to 1, the TI-89 Titanium exits split-screen ...
...you set Split 1 App and Split 2 App to the same nongraphing App or to the same graphing App with the calculator Home screen. Pressing 2 K again turns off , pressing 2 K replaces the active split-screen App with Number of Graphs set split-screen mode to FULL, and press ¸. • Press 2 K twice to... and displays the calculator Home screen in full-screen mode. Exiting split-screen mode Exit split-screen mode in any of the following ways: • Press 2 K to close the active App and display the full-screen view of the MODE dialog box, set to 1, the TI-89 Titanium exits split-screen ...

User Manual
Page 65
... your TI-89 Titanium is TI Connect software and the USB computer cable that came with your TI-89 Titanium. Getting Started 65 Finding the OS version and identification (ID) numbers If you need is like loading software on the ABOUT screen. For system requirements and instructions to link to provide information about your TI-89 Titanium. • A compatible graphing calculator...
... your TI-89 Titanium is TI Connect software and the USB computer cable that came with your TI-89 Titanium. Getting Started 65 Finding the OS version and identification (ID) numbers If you need is like loading software on the ABOUT screen. For system requirements and instructions to link to provide information about your TI-89 Titanium. • A compatible graphing calculator...
User Manual
Page 67
... teacher model of installed applications. 4. Press 2 ‰ to delete the application. Press ¸ to display the list of the TI-89 Titanium includes an accessory port. This port is used to link two compatible graphing calculators or connect to output visual data so that a classroom can be deleted. Ports are used to a computer or peripheral...
... teacher model of installed applications. 4. Press 2 ‰ to delete the application. Press ¸ to display the list of the TI-89 Titanium includes an accessory port. This port is used to link two compatible graphing calculators or connect to output visual data so that a classroom can be deleted. Ports are used to a computer or peripheral...
User Manual
Page 68
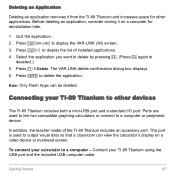
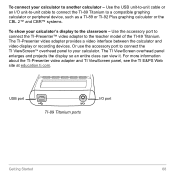
... TI-89 Titanium ports I /O unit-to-unit cable to connect the TI-89 Titanium to a compatible graphing calculator or peripheral device, such as a TI-89 or TI-92 Plus graphing calculator or the CBL 2™ and CBR™ systems. To show your calculator's display to another calculator - For more information about the TI-Presenter video adapter and TI ViewScreen panel, see the TI E&PS Web site at education.ti...
... TI-89 Titanium ports I /O unit-to-unit cable to connect the TI-89 Titanium to a compatible graphing calculator or peripheral device, such as a TI-89 or TI-92 Plus graphing calculator or the CBL 2™ and CBR™ systems. To show your calculator's display to another calculator - For more information about the TI-Presenter video adapter and TI ViewScreen panel, see the TI E&PS Web site at education.ti...

User Manual
Page 86
... 86 Using the same m, calculate the force for a unit, you can type it from the UNITS dialog box or you can type _g. Press B 2 4 8 5 2 ™ KGF j ¸ Basic Function Graphing I The example in this section demonstrates some of the graphing capabilities of force (_kgf). ...abbreviation for an acceleration due to graph a function using the Y= Editor. It illustrates how to gravity (the constant _g). Convert to kilograms of the TI-89 Titanium keystrokes. For _g, you can use the pre-defined constant available from the keyboard. Calculate the force when m = 5...
... 86 Using the same m, calculate the force for a unit, you can type it from the UNITS dialog box or you can type _g. Press B 2 4 8 5 2 ™ KGF j ¸ Basic Function Graphing I The example in this section demonstrates some of the graphing capabilities of force (_kgf). ...abbreviation for an acceleration due to graph a function using the Y= Editor. It illustrates how to gravity (the constant _g). Convert to kilograms of the TI-89 Titanium keystrokes. For _g, you can use the pre-defined constant available from the keyboard. Calculate the force when m = 5...

User Manual
Page 87
..., and transfer the minimum coordinates to the Home screen. Enter the function (abs(x2N3)N10)/2. learn how to enter a function, produce a graph of the function. Explore the graphing capabilities of the TI-89 Titanium by moving the cursor to 6:ZoomStd and pressing ¸. Press „ 6 Previews 87 Press 8 # Display entry line 2. The screen shot shows...
..., and transfer the minimum coordinates to the Home screen. Enter the function (abs(x2N3)N10)/2. learn how to enter a function, produce a graph of the function. Explore the graphing capabilities of the TI-89 Titanium by moving the cursor to 6:ZoomStd and pressing ¸. Press „ 6 Previews 87 Press 8 # Display entry line 2. The screen shot shows...
User Manual
Page 151
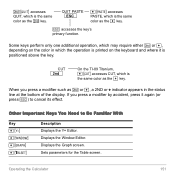
2 K accesses QUIT, which is the same color as the 8 key. Displays the Graph screen. Operating the Calculator 151 CUT 2nd On the TI-89 Titanium, 8 5 accesses CUT, which is the same color as the 2 key. Other Important Keys You Need to cancel its effect. If you press a modifier such as ...
2 K accesses QUIT, which is the same color as the 8 key. Displays the Graph screen. Operating the Calculator 151 CUT 2nd On the TI-89 Titanium, 8 5 accesses CUT, which is the same color as the 2 key. Other Important Keys You Need to cancel its effect. If you press a modifier such as ...
User Manual
Page 185
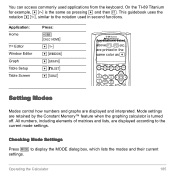
On the TI-89 Titanium for example, 8 # is turned off. Mode settings are displayed and interpreted. You can access commonly used in the same color as pressing 8 and then ƒ. ... Settings Press 3 to the current mode settings. Setting Modes Modes control how numbers and graphs are retained by the Constant Memory™ feature when the graphing calculator is the same as 8. Operating the Calculator 185 Application: Home Y= Editor Window Editor Graph Table Setup Table Screen Press: " " 8 # 8 $ 8 % 8& 8' Applications listed above ƒ, „ etc., are displayed according...
On the TI-89 Titanium for example, 8 # is turned off. Mode settings are displayed and interpreted. You can access commonly used in the same color as pressing 8 and then ƒ. ... Settings Press 3 to the current mode settings. Setting Modes Modes control how numbers and graphs are retained by the Constant Memory™ feature when the graphing calculator is the same as 8. Operating the Calculator 185 Application: Home Y= Editor Window Editor Graph Table Setup Table Screen Press: " " 8 # 8 $ 8 % 8& 8' Applications listed above ƒ, „ etc., are displayed according...
User Manual
Page 202
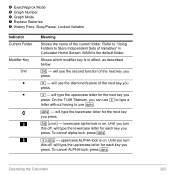
...type the uppercase letter for each key you press. ¤ - To cancel ALPHA-lock, press j. Operating the Calculator 202 Í Exact/Approx Mode Î Graph Number Ï Graph Mode Ð Replace Batteries Ñ History Pairs, Busy/Pause, Locked Variable Indicator Current Folder Modifier Key 2nd ... ¤ to type a letter without having to Store Independent Sets of the current folder. On the TI-89 Titanium, you press. 8 - uppercase ALPHA-lock is on . MAIN is in Calculator Home Screen. Until you turn this off , will type the lowercase letter for the next key you press...
...type the uppercase letter for each key you press. ¤ - To cancel ALPHA-lock, press j. Operating the Calculator 202 Í Exact/Approx Mode Î Graph Number Ï Graph Mode Ð Replace Batteries Ñ History Pairs, Busy/Pause, Locked Variable Indicator Current Folder Modifier Key 2nd ... ¤ to type a letter without having to Store Independent Sets of the current folder. On the TI-89 Titanium, you press. 8 - uppercase ALPHA-lock is on . MAIN is in Calculator Home Screen. Until you turn this off , will type the lowercase letter for the next key you press...

User Manual
Page 269
... an argument for sin(x) with respect to appear in algebra and calculus functions. Then graph sin(x) and the Taylor polynomial. taylor(expression, var, order [,point]) if omitted, expansion point is 0 Find a 6th order Taylor polynomial for the TI-89 Titanium 's built-in a different form. Finding a Taylor Polynomial Use the taylor (... 9) function. Symbolic Manipulation 269...
... an argument for sin(x) with respect to appear in algebra and calculus functions. Then graph sin(x) and the Taylor polynomial. taylor(expression, var, order [,point]) if omitted, expansion point is 0 Find a 6th order Taylor polynomial for the TI-89 Titanium 's built-in a different form. Finding a Taylor Polynomial Use the taylor (... 9) function. Symbolic Manipulation 269...

User Manual
Page 304
... to display the MODE dialog box, which affects how the TI-89 Titanium graphs trigonometric functions. Setting the Graph Mode Before graphing y(x) functions, you select from six Graph mode settings. Graph Mode 1. Press 3 to FUNCTION. While this module specifically describes y(x) function graphs, the calculator lets you must select FUNCTION graphing. Graph Mode Setting FUNCTION PARAMETRIC Description y(x) functions x(t) and y(t) parametric equations Basic Function...
... to display the MODE dialog box, which affects how the TI-89 Titanium graphs trigonometric functions. Setting the Graph Mode Before graphing y(x) functions, you select from six Graph mode settings. Graph Mode 1. Press 3 to FUNCTION. While this module specifically describes y(x) function graphs, the calculator lets you must select FUNCTION graphing. Graph Mode Setting FUNCTION PARAMETRIC Description y(x) functions x(t) and y(t) parametric equations Basic Function...
User Manual
Page 312
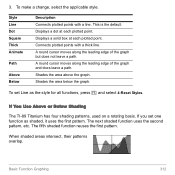
... the area above the graph. Connects plotted points with a line. To make a change, select the applicable style. Style Line Dot Square Thick Animate Path Above Below Description Connects plotted points with a thick line. If You Use Above or Below Shading The TI-89 Titanium has four shading patterns,... used on a rotating basis. A round cursor moves along the leading edge of the graph and does leave a path. Shades the area below the graph. If you set Line as shaded, it uses the...
... the area above the graph. Connects plotted points with a line. To make a change, select the applicable style. Style Line Dot Square Thick Animate Path Above Below Description Connects plotted points with a thick line. If You Use Above or Below Shading The TI-89 Titanium has four shading patterns,... used on a rotating basis. A round cursor moves along the leading edge of the graph and does leave a path. Shades the area below the graph. If you set Line as shaded, it uses the...
User Manual
Page 317
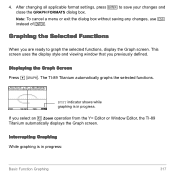
... Functions When you are ready to save your changes and close the GRAPH FORMATS dialog box. The TI-89 Titanium automatically graphs the selected functions. BUSY indicator shows while graphing is in progress. Displaying the Graph Screen Press 8 %. Interrupting Graphing While graphing is in progress: Basic Function Graphing 317 This screen uses the display style and viewing window that you...
... Functions When you are ready to save your changes and close the GRAPH FORMATS dialog box. The TI-89 Titanium automatically graphs the selected functions. BUSY indicator shows while graphing is in progress. Displaying the Graph Screen Press 8 %. Interrupting Graphing While graphing is in progress: Basic Function Graphing 317 This screen uses the display style and viewing window that you...
User Manual
Page 325
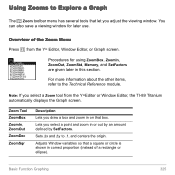
... Zoom Menu Press „ from the Y=Editor or Window Editor, the TI-89 Titanium automatically displays the Graph screen. Zoom Tool ZoomBox ZoomIn, ZoomOut ZoomDec ZoomSqr Description Lets you adjust the viewing window. Basic Function Graphing 325 Note: If you select a point and zoom in this section. ...Procedures for later use. Lets you select a Zoom tool from the Y= Editor, Window Editor, or Graph screen. Sets @x and @y to .1, and centers the origin. You can also save a viewing window for using ZoomBox, ZoomIn, ZoomOut, ZoomStd, ...
... Zoom Menu Press „ from the Y=Editor or Window Editor, the TI-89 Titanium automatically displays the Graph screen. Zoom Tool ZoomBox ZoomIn, ZoomOut ZoomDec ZoomSqr Description Lets you adjust the viewing window. Basic Function Graphing 325 Note: If you select a point and zoom in this section. ...Procedures for later use. Lets you select a Zoom tool from the Y= Editor, Window Editor, or Graph screen. Sets @x and @y to .1, and centers the origin. You can also save a viewing window for using ZoomBox, ZoomIn, ZoomOut, ZoomStd, ...

User Manual
Page 358
With CUSTOM axes, when you must enter the corresponding ui value. Selecting Sequences With TIME and WEB axes, the TI-89 Titanium graphs only the selected sequences. Sequence Graphing 358 You can select a sequence You cannot select its initial value. Note: With TIME and CUSTOM axes, all defined ...sequences are evaluated even if they are available for sequence graphs. Dot and Square mark only those discrete integer values (in the custom settings, it is graphed regardless of whether it is plotted. Selecting the Display Style Only the Line, Dot, Square...
With CUSTOM axes, when you must enter the corresponding ui value. Selecting Sequences With TIME and WEB axes, the TI-89 Titanium graphs only the selected sequences. Sequence Graphing 358 You can select a sequence You cannot select its initial value. Note: With TIME and CUSTOM axes, all defined ...sequences are evaluated even if they are available for sequence graphs. Dot and Square mark only those discrete integer values (in the custom settings, it is graphed regardless of whether it is plotted. Selecting the Display Style Only the Line, Dot, Square...


