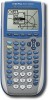
User Guide
Page 4
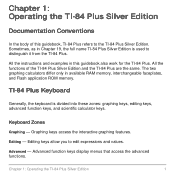
... the TI-84 Plus. Keyboard Zones Graphing - Chapter 1: Operating the TI-84 Plus Silver Edition 1 TI-84 Plus Keyboard Generally, the keyboard is used to distinguish it from the TI-84 Plus. Editing - Advanced function keys display menus that access the advanced functions. The two graphing calculators differ only in this guidebook, TI-84 Plus refers to edit expressions and values. Graphing keys access the interactive graphing features. Editing keys allow you to the TI-84 Plus Silver Edition. Sometimes...
... the TI-84 Plus. Keyboard Zones Graphing - Chapter 1: Operating the TI-84 Plus Silver Edition 1 TI-84 Plus Keyboard Generally, the keyboard is used to distinguish it from the TI-84 Plus. Editing - Advanced function keys display menus that access the advanced functions. The two graphing calculators differ only in this guidebook, TI-84 Plus refers to edit expressions and values. Graphing keys access the interactive graphing features. Editing keys allow you to the TI-84 Plus Silver Edition. Sometimes...

User Guide
Page 5
Scientific calculator keys access the capabilities of a standard scientific calculator. TI-84 Plus Graphing Keys Editing Keys Advanced Function Keys Scientific Calculator Keys Chapter 1: Operating the TI-84 Plus Silver Edition 2 Scientific -
Scientific calculator keys access the capabilities of a standard scientific calculator. TI-84 Plus Graphing Keys Editing Keys Advanced Function Keys Scientific Calculator Keys Chapter 1: Operating the TI-84 Plus Silver Edition 2 Scientific -
User Guide
Page 6
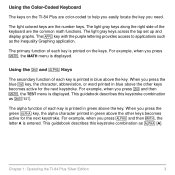
...for the next keystroke. Chapter 1: Operating the TI-84 Plus Silver Edition 3 Using the Color.Coded Keyboard The keys on the keys. The light colored keys are the common math functions. The light gray keys across the top set up and display graphs. This guidebook describes this keystroke combination as y... easily locate the key you press ƒ and then , the letter A is printed on the TI-84 Plus are color-coded to applications such as the Inequality Graphing application. Using the y and ƒ Keys The secondary function of each key is printed in blue above...
...for the next keystroke. Chapter 1: Operating the TI-84 Plus Silver Edition 3 Using the Color.Coded Keyboard The keys on the keys. The light colored keys are the common math functions. The light gray keys across the top set up and display graphs. This guidebook describes this keystroke combination as y... easily locate the key you press ƒ and then , the letter A is printed on the TI-84 Plus are color-coded to applications such as the Inequality Graphing application. Using the y and ƒ Keys The secondary function of each key is printed in blue above...

User Guide
Page 7
Chapter 1: Operating the TI-84 Plus Silver Edition 4 The y key accesses the second function printed in green above each key. Turning On and Turning Off the TI-84 Plus Turning On the Graphing Calculator To turn on the TI-84 Plus, press É. • If you previously had turned off the graphing calculator by pressing y M, the TI-84 Plus displays the home screen as it was when you last used it and clears any error. The ƒ key accesses the alpha function printed in blue above each key.
Chapter 1: Operating the TI-84 Plus Silver Edition 4 The y key accesses the second function printed in green above each key. Turning On and Turning Off the TI-84 Plus Turning On the Graphing Calculator To turn on the TI-84 Plus, press É. • If you previously had turned off the graphing calculator by pressing y M, the TI-84 Plus displays the home screen as it was when you last used it and clears any error. The ƒ key accesses the alpha function printed in blue above each key.
User Guide
Page 8
... TI-84 Plus Silver Edition 5 The silver oxide battery provides auxiliary power to another graphing calculator or personal computer, any communication activity will return exactly as you replace the AAA batteries. Turning Off the Graphing Calculator To turn off the TI-84 Plus automatically after about five minutes without losing any activity. To prolong the life of the batteries, APD turns off the TI-84 Plus...
... TI-84 Plus Silver Edition 5 The silver oxide battery provides auxiliary power to another graphing calculator or personal computer, any communication activity will return exactly as you replace the AAA batteries. Turning Off the Graphing Calculator To turn off the TI-84 Plus automatically after about five minutes without losing any activity. To prolong the life of the batteries, APD turns off the TI-84 Plus...
User Guide
Page 9
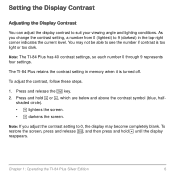
The TI-84 Plus retains the contrast setting in the top-right corner indicates the current level. Press and hold } until the display reappears. To restore the screen, press ... contrast, follow these steps. 1. Note: If you change the contrast setting, a number from 0 (lightest) to suit your viewing angle and lighting conditions. Chapter 1: Operating the TI-84 Plus Silver Edition 6 You may become completely blank. Setting the Display Contrast Adjusting the Display Contrast You can adjust the display contrast to 9 (darkest) in memory when it...
The TI-84 Plus retains the contrast setting in the top-right corner indicates the current level. Press and hold } until the display reappears. To restore the screen, press ... contrast, follow these steps. 1. Note: If you change the contrast setting, a number from 0 (lightest) to suit your viewing angle and lighting conditions. Chapter 1: Operating the TI-84 Plus Silver Edition 6 You may become completely blank. Setting the Display Contrast Adjusting the Display Contrast You can adjust the display contrast to 9 (darkest) in memory when it...
User Guide
Page 10
... 1: Operating the TI-84 Plus Silver Edition 7 To replace the batteries without losing any information in memory, follow the steps in Appendix C. Note: The operating period following the first low-battery message could be replaced. The answers are low, a low-battery message is displayed when you use the graphing calculator infrequently. Chapter 9 describes how the TI-84 Plus can display...
... 1: Operating the TI-84 Plus Silver Edition 7 To replace the batteries without losing any information in memory, follow the steps in Appendix C. Note: The operating period following the first low-battery message could be replaced. The answers are low, a low-battery message is displayed when you use the graphing calculator infrequently. Chapter 9 describes how the TI-84 Plus can display...
User Guide
Page 11
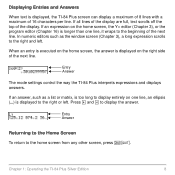
...Returning to the Home Screen To return to display the answer. Displaying Entries and Answers When text is displayed, the TI-84 Plus screen can display a maximum of 8 lines with a maximum of the next line. If an expression on one... line, it wraps to the beginning of the display. Entry Answer The mode settings control the way the TI-84 Plus interprets expressions and displays answers. If all lines of the display are full, text scrolls off the top of...window screen (Chapter 3), a long expression scrolls to the right or left . Chapter 1: Operating the TI-84 Plus Silver Edition 8
...Returning to the Home Screen To return to display the answer. Displaying Entries and Answers When text is displayed, the TI-84 Plus screen can display a maximum of 8 lines with a maximum of the next line. If an expression on one... line, it wraps to the beginning of the display. Entry Answer The mode settings control the way the TI-84 Plus interprets expressions and displays answers. If all lines of the display are full, text scrolls off the top of...window screen (Chapter 3), a long expression scrolls to the right or left . Chapter 1: Operating the TI-84 Plus Silver Edition 8
User Guide
Page 12
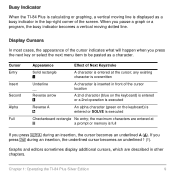
...in front of the cursor indicates what will happen when you press ƒ during an insertion, the underlined cursor becomes an underlined # (#). Chapter 1: Operating the TI-84 Plus Silver Edition 9 the maximum characters are described in the top-right corner of Next Keystroke Solid rectangle $ A character is entered at # a prompt or memory is full...executed Reverse A Ø An alpha character (green on the keyboard) is entered or SOLVE is executed Checkerboard rectangle No entry; Busy Indicator When the TI-84 Plus is calculating or graphing, a vertical moving dotted line.
...in front of the cursor indicates what will happen when you press ƒ during an insertion, the underlined cursor becomes an underlined # (#). Chapter 1: Operating the TI-84 Plus Silver Edition 9 the maximum characters are described in the top-right corner of Next Keystroke Solid rectangle $ A character is entered at # a prompt or memory is full...executed Reverse A Ø An alpha character (green on the keyboard) is entered or SOLVE is executed Checkerboard rectangle No entry; Busy Indicator When the TI-84 Plus is calculating or graphing, a vertical moving dotted line.
User Guide
Page 13
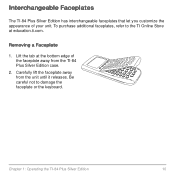
Lift the tab at education.ti.com. Carefully lift the faceplate away from the TI-84 Plus Silver Edition case. 2. Interchangeable Faceplates The TI-84 Plus Silver Edition has interchangeable faceplates that let you customize the appearance of the faceplate away from the unit until it releases. Be careful not to the TI Online Store at the bottom edge of your unit. Removing a Faceplate 1. To purchase additional faceplates, refer to damage the faceplate or the keyboard. Chapter 1: Operating the TI-84 Plus Silver Edition 10
Lift the tab at education.ti.com. Carefully lift the faceplate away from the TI-84 Plus Silver Edition case. 2. Interchangeable Faceplates The TI-84 Plus Silver Edition has interchangeable faceplates that let you customize the appearance of the faceplate away from the unit until it releases. Be careful not to the TI Online Store at the bottom edge of your unit. Removing a Faceplate 1. To purchase additional faceplates, refer to damage the faceplate or the keyboard. Chapter 1: Operating the TI-84 Plus Silver Edition 10
User Guide
Page 14
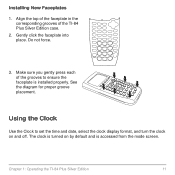
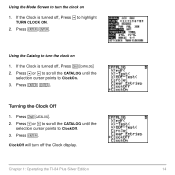
Make sure you gently press each of the TI-84 Plus Silver Edition case. 2. Using the Clock Use the Clock to ensure the faceplate is accessed from the mode screen. Gently click the faceplate into place. See the diagram for proper groove placement. The clock is turned on and off. Do not force. 3. Installing New Faceplates 1. Chapter 1: Operating the TI-84 Plus Silver Edition 11 Align the top of the faceplate in the corresponding grooves of the grooves to set the time and date, select the clock display format, and turn the clock on by default and is installed properly.
Make sure you gently press each of the TI-84 Plus Silver Edition case. 2. Using the Clock Use the Clock to ensure the faceplate is accessed from the mode screen. Gently click the faceplate into place. See the diagram for proper groove placement. The clock is turned on and off. Do not force. 3. Installing New Faceplates 1. Chapter 1: Operating the TI-84 Plus Silver Edition 11 Align the top of the faceplate in the corresponding grooves of the grooves to set the time and date, select the clock display format, and turn the clock on by default and is installed properly.
User Guide
Page 15
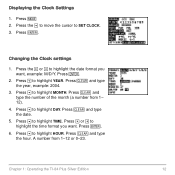
... SET CLOCK. 3. Press Í. 6. Press † to highlight HOUR. Press ' and type the date. 5. Press † to highlight YEAR. A number from 1- 12). 4. Chapter 1: Operating the TI-84 Plus Silver Edition 12 Press the ~ or | to highlight the time format you want . Press ' and type the year, example: 2004. 3. Press † to highlight MONTH. Press ' and...
... SET CLOCK. 3. Press Í. 6. Press † to highlight HOUR. Press ' and type the date. 5. Press † to highlight YEAR. A number from 1- 12). 4. Chapter 1: Operating the TI-84 Plus Silver Edition 12 Press the ~ or | to highlight the time format you want . Press ' and type the year, example: 2004. 3. Press † to highlight MONTH. Press ' and...
User Guide
Page 16
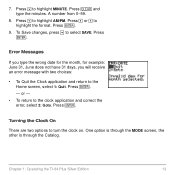
... 31 days, you will receive an error message with two choices: • To Quit the Clock application and return to select SAVE. Chapter 1: Operating the TI-84 Plus Silver Edition 13 or - • To return to turn the clock on. Press Í. 9. 7. Press ' and type the minutes. Turning the Clock On There are two options...
... 31 days, you will receive an error message with two choices: • To Quit the Clock application and return to select SAVE. Chapter 1: Operating the TI-84 Plus Silver Edition 13 or - • To return to turn the clock on. Press Í. 9. 7. Press ' and type the minutes. Turning the Clock On There are two options...
User Guide
Page 17
... 1. Press Í. Press y N. 2. If the Clock is turned off, Press y N 2. Press Í Í. Using the Mode Screen to turn the clock on 1. Chapter 1: Operating the TI-84 Plus Silver Edition 14 If the Clock is turned off the Clock display.
... 1. Press Í. Press y N. 2. If the Clock is turned off, Press y N 2. Press Í Í. Using the Mode Screen to turn the clock on 1. Chapter 1: Operating the TI-84 Plus Silver Edition 14 If the Clock is turned off the Clock display.
User Guide
Page 18
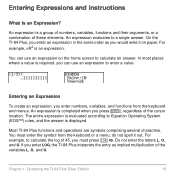
An expression evaluates to calculate an answer. The entire expression is evaluated according to Equation Operating System (EOS™) rules, and the answer is an expression. For example, to enter a value. Do not enter the letters L, O, and G. Chapter 1: Operating the TI-84 Plus Silver Edition 15 For example, pR2 is displayed. In most places where a value is...
An expression evaluates to calculate an answer. The entire expression is evaluated according to Equation Operating System (EOS™) rules, and the answer is an expression. For example, to enter a value. Do not enter the letters L, O, and G. Chapter 1: Operating the TI-84 Plus Silver Edition 15 For example, pR2 is displayed. In most places where a value is...
User Guide
Page 19
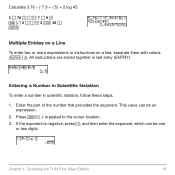
Calculate 3.76 P (L7.9 + ‡5) + 2 log 45. 3 Ë 76 ¥ £ Ì 7 Ë 9 Ã y C 5 ¤ ¤ Ã 2 « 45 ¤ Í Multiple Entries on a Line To enter ... notation, follow these steps. 1. Entering a Number in Scientific Notation To enter a number in last entry (ENTRY). This value can be an expression. 2. Chapter 1: Operating the TI-84 Plus Silver Edition 16 If the exponent is pasted to the cursor location. 3. Press y D. â is negative, press Ì, and then enter the exponent, which can be one...
Calculate 3.76 P (L7.9 + ‡5) + 2 log 45. 3 Ë 76 ¥ £ Ì 7 Ë 9 Ã y C 5 ¤ ¤ Ã 2 « 45 ¤ Í Multiple Entries on a Line To enter ... notation, follow these steps. 1. Entering a Number in Scientific Notation To enter a number in last entry (ENTRY). This value can be an expression. 2. Chapter 1: Operating the TI-84 Plus Silver Edition 16 If the exponent is pasted to the cursor location. 3. Press y D. â is negative, press Ì, and then enter the exponent, which can be one...
User Guide
Page 20
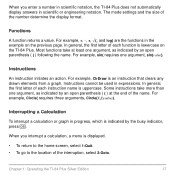
...247;, L, +, ‡(, and log( are the functions in expressions. Instructions An instruction initiates an action. Chapter 1: Operating the TI-84 Plus Silver Edition 17 For example, ClrDraw is displayed. • To return to the home screen, select 1:Quit. • To go to the...É. In general, the first letter of the name. Instructions cannot be used in the example on the TI-84 Plus. Interrupting a Calculation To interrupt a calculation or graph in scientific or engineering notation. In general, the first letter of the number determine the display format. Most functions...
...247;, L, +, ‡(, and log( are the functions in expressions. Instructions An instruction initiates an action. Chapter 1: Operating the TI-84 Plus Silver Edition 17 For example, ClrDraw is displayed. • To return to the home screen, select 1:Quit. • To go to the...É. In general, the first letter of the name. Instructions cannot be used in the example on the TI-84 Plus. Interrupting a Calculation To interrupt a calculation or graph in scientific or engineering notation. In general, the first letter of the number determine the display format. Most functions...
User Guide
Page 21
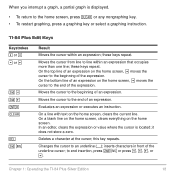
...everything on the home screen, clears the current line. Deletes a character at the cursor; to an underline (__); When you interrupt a graph, a partial graph is located; these keys repeat. In an editor, clears the expression or value where the cursor is displayed. • To return to... it does not store a zero. Changes the cursor to end insertion, press y 6 or press |, }, ~, or †. Chapter 1: Operating the TI-84 Plus Silver Edition 18 On the bottom line of an expression on the home screen, } moves the cursor to line within an expression; this key repeats. these keys...
...everything on the home screen, clears the current line. Deletes a character at the cursor; to an underline (__); When you interrupt a graph, a partial graph is located; these keys repeat. In an editor, clears the expression or value where the cursor is displayed. • To return to... it does not store a zero. Changes the cursor to end insertion, press y 6 or press |, }, ~, or †. Chapter 1: Operating the TI-84 Plus Silver Edition 18 On the bottom line of an expression on the home screen, } moves the cursor to line within an expression; this key repeats. these keys...
User Guide
Page 22
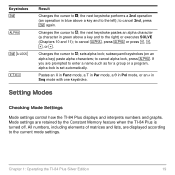
... n in blue above a key and to Þ; Setting Modes Checking Mode Settings Mode settings control how the TI-84 Plus displays and interprets numbers and graphs. the next keystroke performs a 2nd operation (an operation in Seq mode with one keystroke. All numbers, including ...8224;. the next keystroke pastes an alpha character (a character in green above a key and to the current mode settings. Chapter 1: Operating the TI-84 Plus Silver Edition 19 Keystrokes y ƒ y 7 „ Result Changes the cursor to the right) or executes SOLVE (Chapters 10 and 11); sets alpha...
... n in blue above a key and to Þ; Setting Modes Checking Mode Settings Mode settings control how the TI-84 Plus displays and interprets numbers and graphs. the next keystroke performs a 2nd operation (an operation in Seq mode with one keystroke. All numbers, including ...8224;. the next keystroke pastes an alpha character (a character in green above a key and to the current mode settings. Chapter 1: Operating the TI-84 Plus Silver Edition 19 Keystrokes y ƒ y 7 „ Result Changes the cursor to the right) or executes SOLVE (Chapters 10 and 11); sets alpha...
User Guide
Page 23
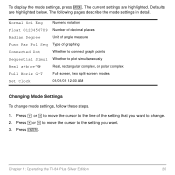
...Numeric notation Float 0123456789 Number of decimal places Radian Degree Unit of angle measure Func Par Pol Seq Type of graphing Connected Dot Whether to connect graph points Sequential Simul Whether to the line of the setting that you want to change mode settings, follow these steps...screen, two split-screen modes Set Clock 01/01/01 12:00 AM Changing Mode Settings To change . 2. Chapter 1: Operating the TI-84 Plus Silver Edition 20 The following pages describe the mode settings in detail. The current settings are highlighted below. Press Í. To display the mode settings,...
...Numeric notation Float 0123456789 Number of decimal places Radian Degree Unit of angle measure Func Par Pol Seq Type of graphing Connected Dot Whether to connect graph points Sequential Simul Whether to the line of the setting that you want to change mode settings, follow these steps...screen, two split-screen modes Set Clock 01/01/01 12:00 AM Changing Mode Settings To change . 2. Chapter 1: Operating the TI-84 Plus Silver Edition 20 The following pages describe the mode settings in detail. The current settings are highlighted below. Press Í. To display the mode settings,...


