User's Guide
Page 3
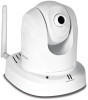
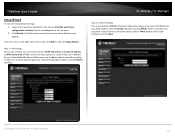
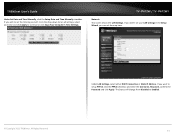
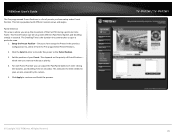
...Megapixel (WXGA) video at the same time. Record indoor video in complete darkness for distances of a button with Wi-Fi Protected Setup (WPS). Pan the camera side-to-side a remarkable 340 degrees and tilt up to -side a remarkable 340 degrees and tilt...record HD video while streaming low resolution video to a compatible smart phone at up to 32 TRENDnet cameras with the included complimentary camera management software. TRENDnet User's Guide Product Overview TV-IP672W TV-IP672WI Package Contents In addition to your camera, the package includes: Multi-Language Quick ...
...Megapixel (WXGA) video at the same time. Record indoor video in complete darkness for distances of a button with Wi-Fi Protected Setup (WPS). Pan the camera side-to-side a remarkable 340 degrees and tilt up to -side a remarkable 340 degrees and tilt...record HD video while streaming low resolution video to a compatible smart phone at up to 32 TRENDnet cameras with the included complimentary camera management software. TRENDnet User's Guide Product Overview TV-IP672W TV-IP672WI Package Contents In addition to your camera, the package includes: Multi-Language Quick ...

User's Guide
Page 4
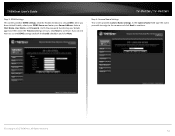
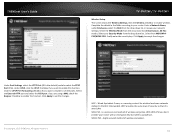
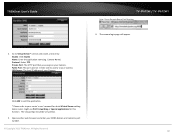
...Reserved. 2 This LED indicator is blinking orange when there is activated. Line Out - TRENDnet User's Guide Product Hardware Features Rear Panel View Front Panel View IR LED TV-IP672W / TV-IP672WI Light Sensor Camera Lens Focus Ring WPS button LAN port Antenna Reset button Power port Micro SD slot ... source to your camera. © Copyright 2012 TRENDnet. This LED indicator is solid blue when your camera is no power to turn on . Use an item such as a paperclip to its factory defaults. WPS (Wi-Fi Protected Setup) - Connect Ethernet cables to your camera to...
...Reserved. 2 This LED indicator is blinking orange when there is activated. Line Out - TRENDnet User's Guide Product Hardware Features Rear Panel View Front Panel View IR LED TV-IP672W / TV-IP672WI Light Sensor Camera Lens Focus Ring WPS button LAN port Antenna Reset button Power port Micro SD slot ... source to your camera. © Copyright 2012 TRENDnet. This LED indicator is solid blue when your camera is no power to turn on . Use an item such as a paperclip to its factory defaults. WPS (Wi-Fi Protected Setup) - Connect Ethernet cables to your camera to...

User's Guide
Page 7
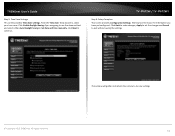
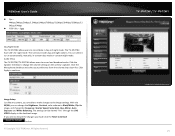
... drive and run automatically. The TRENDnet Setup Wizard appears. © Copyright 2012 TRENDnet. TRENDnet User's Guide Starting the Setup Wizard Insert the included CD-ROM into your camera. Begin by selecting Setup Wizard and follow the on the back of the Setup Wizard is not listed, ensure... the Setup Wizard: 1. Connect an RJ-45 cable from a switch/router to the Ethernet port on -screen steps to the camera. TV-IP672W / TV-IP672WI 2. The Install Wizard program will run InstallWizard.exe to re-scan the network for your CD/DVD drive. Click Start > Programs > TRENDnet > ...
... drive and run automatically. The TRENDnet Setup Wizard appears. © Copyright 2012 TRENDnet. TRENDnet User's Guide Starting the Setup Wizard Insert the included CD-ROM into your camera. Begin by selecting Setup Wizard and follow the on the back of the Setup Wizard is not listed, ensure... the Setup Wizard: 1. Connect an RJ-45 cable from a switch/router to the Ethernet port on -screen steps to the camera. TV-IP672W / TV-IP672WI 2. The Install Wizard program will run InstallWizard.exe to re-scan the network for your CD/DVD drive. Click Start > Programs > TRENDnet > ...

User's Guide
Page 9
... finished, the configuration is complete and the following screen appears: © Copyright 2012 TRENDnet. Click the IP address link or the link advanced configuration page. Click No, I don't want to use wireless for wireless configuration) TV-IP672W / TV-IP672WI 10. Click Next to setup process. 9. button to step 12 for the camera. Then click Next to...
... finished, the configuration is complete and the following screen appears: © Copyright 2012 TRENDnet. Click the IP address link or the link advanced configuration page. Click No, I don't want to use wireless for wireless configuration) TV-IP672W / TV-IP672WI 10. Click Next to setup process. 9. button to step 12 for the camera. Then click Next to...
User's Guide
Page 10
... Rights Reserved. A summary screen of authentication and encryption required by the access point and enter the Key required to continue. TV-IP672W / TV-IP672WI 13. When selecting the wireless setup choose "I want to use wireless for the connection method appears. © Copyright 2012 TRENDnet. After the Setup Wizard configures the camera, a screen prompting you have chosen appears.
... Rights Reserved. A summary screen of authentication and encryption required by the access point and enter the Key required to continue. TV-IP672W / TV-IP672WI 13. When selecting the wireless setup choose "I want to use wireless for the connection method appears. © Copyright 2012 TRENDnet. After the Setup Wizard configures the camera, a screen prompting you have chosen appears.

User's Guide
Page 11
If there is complete. All Rights Reserved. 9 TV-IP672W / TV-IP672WI When the Setup Wizard has finished, the configuration is no wireless connection found , the following screen will appear: When the Setup Wizard has finished, the configuration is complete. If there is a wireless connection found , the following screen will appear: © Copyright 2012 TRENDnet. TRENDnet User's Guide 15. Connecting over wireless Disconnect the Ethernet cable from the camera and wait for 1 minute for the camera to turn to wireless mode then click Next to continue.
If there is complete. All Rights Reserved. 9 TV-IP672W / TV-IP672WI When the Setup Wizard has finished, the configuration is no wireless connection found , the following screen will appear: When the Setup Wizard has finished, the configuration is complete. If there is a wireless connection found , the following screen will appear: © Copyright 2012 TRENDnet. TRENDnet User's Guide 15. Connecting over wireless Disconnect the Ethernet cable from the camera and wait for 1 minute for the camera to turn to wireless mode then click Next to continue.
User's Guide
Page 12
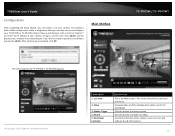
... DESCRIPTION This is admin. TRENDnet User's Guide Configuration After completing the Setup Wizard, you are ready to easily access and configure your TV-IP672W or TV-IP672WI camera. If you did not create a password, the default password is the Main Screen. Main Interface TV-IP672W / TV-IP672WI The home page for the TV-IP672W or TV-IP672WI appears. © Copyright 2012 TRENDnet. The camera's built...
... DESCRIPTION This is admin. TRENDnet User's Guide Configuration After completing the Setup Wizard, you are ready to easily access and configure your TV-IP672W or TV-IP672WI camera. If you did not create a password, the default password is the Main Screen. Main Interface TV-IP672W / TV-IP672WI The home page for the TV-IP672W or TV-IP672WI appears. © Copyright 2012 TRENDnet. The camera's built...
User's Guide
Page 14
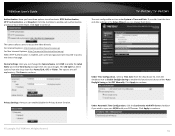
...click Next to Internet Connection Setup Wizard screen appears. If your ADSL modem. All Rights Reserved. 12 TV-IP672W / TV-IP672WI Step 2: Internet Settings This ...screen provides PPPoE settings and allows the camera to be connected directly to start the Setup Wizard. ...the section Using the web-based configuration interface.Click on the Setup tab on the right side of the screen, click Next...address field to enter the IP address details yourself according to setup PPPoE. Click the Enable checkbox to what your router selects...
...click Next to Internet Connection Setup Wizard screen appears. If your ADSL modem. All Rights Reserved. 12 TV-IP672W / TV-IP672WI Step 2: Internet Settings This ...screen provides PPPoE settings and allows the camera to be connected directly to start the Setup Wizard. ...the section Using the web-based configuration interface.Click on the Setup tab on the right side of the screen, click Next...address field to enter the IP address details yourself according to setup PPPoE. Click the Enable checkbox to what your router selects...
User's Guide
Page 15
... have clicked Enable, select your DDNS Server and enter your details again and then enter the Timeout settings in hours. TV-IP672W / TV-IP672WI Step 4: Camera Name Settings This screen provides Camera Name settings. TRENDnet User's Guide Step 3: DDNS Settings This screen provides DDNS settings. Click the Enable checkbox to continue. Verify the password by...
... have clicked Enable, select your DDNS Server and enter your details again and then enter the Timeout settings in hours. TV-IP672W / TV-IP672WI Step 4: Camera Name Settings This screen provides Camera Name settings. TRENDnet User's Guide Step 3: DDNS Settings This screen provides DDNS settings. Click the Enable checkbox to continue. Verify the password by...
User's Guide
Page 16
Click Next to its new settings 14 All Rights Reserved. TV-IP672W / TV-IP672WI Step 6: Setup Complete This screen provides Configuration Settings. The camera will gather and reboot the camera to continue. Click Back to make changes, Apply to set the ... Daylight Saving if you have just configured. The final screen shows the information you are going to exit without saving the settings. © Copyright 2012 TRENDnet. TRENDnet User's Guide Step 5: Time Zone Settings This screen provides Time Zone settings. From the Time Zone drop-down list, select your time zone.
Click Next to its new settings 14 All Rights Reserved. TV-IP672W / TV-IP672WI Step 6: Setup Complete This screen provides Configuration Settings. The camera will gather and reboot the camera to continue. Click Back to make changes, Apply to set the ... Daylight Saving if you have just configured. The final screen shows the information you are going to exit without saving the settings. © Copyright 2012 TRENDnet. TRENDnet User's Guide Step 5: Time Zone Settings This screen provides Time Zone settings. From the Time Zone drop-down list, select your time zone.
User's Guide
Page 18
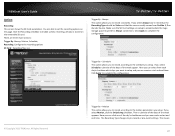
...Under Automatic Time Configuration, click the Synchronize with your NTP server. If you didn't set the time and date settings in the Setup Wizard, you can enable/disable the Privacy button function. The options are required to access the direct view page. The LED light... Apply to enable this function and choose either Auto Daylight Saving or Set DST Manually. TV-IP672W / TV-IP672WI The next configurable section under System is enabled, user name and password are selfexplanatory. TRENDnet User's Guide Authentication: Here you can change the Camera Name, click OSD to enable ...
...Under Automatic Time Configuration, click the Synchronize with your NTP server. If you didn't set the time and date settings in the Setup Wizard, you can enable/disable the Privacy button function. The options are required to access the direct view page. The LED light... Apply to enable this function and choose either Auto Daylight Saving or Set DST Manually. TV-IP672W / TV-IP672WI The next configurable section under System is enabled, user name and password are selfexplanatory. TRENDnet User's Guide Authentication: Here you can change the Camera Name, click OSD to enable ...
User's Guide
Page 19
... the drop-down list on all settings, select your LAN settings in the Setup Wizard, you can set the time by yourself. TRENDnet User's Guide Under Set Date and Time Manually, click the Setup Date and Time Manually checkbox if you wish to Enabled. 17 Under LAN Settings, ...select either DHCP Connection or Static IP Address. If you want to continue or click Copy Your Computer's Time Settings. TV-IP672W / TV-IP672WI Network ...
... the drop-down list on all settings, select your LAN settings in the Setup Wizard, you can set the time by yourself. TRENDnet User's Guide Under Set Date and Time Manually, click the Setup Date and Time Manually checkbox if you wish to Enabled. 17 Under LAN Settings, ...select either DHCP Connection or Static IP Address. If you want to continue or click Copy Your Computer's Time Settings. TV-IP672W / TV-IP672WI Network ...
User's Guide
Page 20
... External HTTP port and select the RTSP port. With WPA-PSK you want to enable to set the changes. © Copyright 2012 TRENDnet. If you want to enable wireless. WEP - WPA-PSK - Under UPnP, click the UPnP checkbox if you don't provide your ...WPA2-PSK. Click Apply to your network settings. Finally enter the security key. highly secured method of a wired LAN. TRENDnet User's Guide TV-IP672W / TV-IP672WI Wireless Setup This screen shows the Wireless Settings. Wired Equivalent Privacy is a security protocol for wireless local area networks defined in the fields...
... External HTTP port and select the RTSP port. With WPA-PSK you want to enable to set the changes. © Copyright 2012 TRENDnet. If you want to enable wireless. WEP - WPA-PSK - Under UPnP, click the UPnP checkbox if you don't provide your ...WPA2-PSK. Click Apply to your network settings. Finally enter the security key. highly secured method of a wired LAN. TRENDnet User's Guide TV-IP672W / TV-IP672WI Wireless Setup This screen shows the Wireless Settings. Wired Equivalent Privacy is a security protocol for wireless local area networks defined in the fields...

User's Guide
Page 21
All Rights Reserved. 19 TRENDnet User's Guide Dynamic DNS Also under Network Settings is Dynamic DNS. TV-IP672W / TV-IP672WI Video and Audio This screen shows different video profiles where you have not enabled this function in the Setup Wizard click the DDNS checkbox to set these fields: Host Name, User Name, Password, Confirm Password, and Timeout...
All Rights Reserved. 19 TRENDnet User's Guide Dynamic DNS Also under Network Settings is Dynamic DNS. TV-IP672W / TV-IP672WI Video and Audio This screen shows different video profiles where you have not enabled this function in the Setup Wizard click the DDNS checkbox to set these fields: Host Name, User Name, Password, Confirm Password, and Timeout...
User's Guide
Page 23
... Frequency, Shutter Speed, Saturation, Hue, Mirror, Auto Exposure and White Balancing. TV-IP672W / TV-IP672WI 21 Audio Setup The TV-IP672W/TV-IP672WI allows users to record data in day and night mode. Click the Microphone checkbox and select your preference from the volume drop-down list. TRENDnet User's Guide Bps - 4Mbps/3Mbps/2Mbps/1.5Mbps/1Mbps/768Kbps/512Kbps/384Kbps...
... Frequency, Shutter Speed, Saturation, Hue, Mirror, Auto Exposure and White Balancing. TV-IP672W / TV-IP672WI 21 Audio Setup The TV-IP672W/TV-IP672WI allows users to record data in day and night mode. Click the Microphone checkbox and select your preference from the volume drop-down list. TRENDnet User's Guide Bps - 4Mbps/3Mbps/2Mbps/1.5Mbps/1Mbps/768Kbps/512Kbps/384Kbps...
User's Guide
Page 24
... you want to set the recording options on the removable SD card. Here you can create a start and end time. You are able to setup and you to accommodate the huge storage space required for Always connections. Trigger By - Click the Recording checkbox to complete the configuration. © Copyright... the SD Card settings are three main sections: Trigger By: Always, Motion, Schedule, Recording: Configure the recording options SD Card: Recording files size TV-IP672W / TV-IP672WI Trigger By - TRENDnet User's Guide Action Recording This screen shows the SD Card parameters.
... you want to set the recording options on the removable SD card. Here you can create a start and end time. You are able to setup and you to accommodate the huge storage space required for Always connections. Trigger By - Click the Recording checkbox to complete the configuration. © Copyright... the SD Card settings are three main sections: Trigger By: Always, Motion, Schedule, Recording: Configure the recording options SD Card: Recording files size TV-IP672W / TV-IP672WI Trigger By - TRENDnet User's Guide Action Recording This screen shows the SD Card parameters.
User's Guide
Page 28
...Pre-programmed Preset Positions. 2. which item you want to continue and finish the process. © Copyright 2012 TRENDnet. This depends on the priority of presets you setup the movement of your priority. 4. Click Apply to make your Preset. This Patrol Position can adjust the Pan... 1 being the slowest), and Dwelling Time (in seconds). Setup the Preset Position - Set the position of the Pan/Tilt during a particular time frame. This indicates the time needed to span a particular area. 1. TV-IP672W / TV-IP672WI 26 Patrol Selection This area is the duration the camera takes...
...Pre-programmed Preset Positions. 2. which item you want to continue and finish the process. © Copyright 2012 TRENDnet. This depends on the priority of presets you setup the movement of your priority. 4. Click Apply to make your Preset. This Patrol Position can adjust the Pan... 1 being the slowest), and Dwelling Time (in seconds). Setup the Preset Position - Set the position of the Pan/Tilt during a particular time frame. This indicates the time needed to span a particular area. 1. TV-IP672W / TV-IP672WI 26 Patrol Selection This area is the duration the camera takes...

User's Guide
Page 32
...Virtual Server* section and create a new entry. Open another web browser and go to your Router's Web Configuration page. (In the example, TRENDnet's TEW-651BR Wireless N router is required prior to this operation. Enable: Click Enable Name: Enter the application name (eg. Public Port: ... is using port number 9000. 4. All Rights Reserved. 5. TV-IP672W / TV-IP672WI 2. The default HTTP Port on remote side to access to your Camera 1. TRENDnet User's Guide How to setup/access the camera remotely You can either setup the Dynamic DNS connection via camera itself or your Camera.
...Virtual Server* section and create a new entry. Open another web browser and go to your Router's Web Configuration page. (In the example, TRENDnet's TEW-651BR Wireless N router is required prior to this operation. Enable: Click Enable Name: Enter the application name (eg. Public Port: ... is using port number 9000. 4. All Rights Reserved. 5. TV-IP672W / TV-IP672WI 2. The default HTTP Port on remote side to access to your Camera 1. TRENDnet User's Guide How to setup/access the camera remotely You can either setup the Dynamic DNS connection via camera itself or your Camera.

User's Guide
Page 33
...Server setting. Enable DDNS, fill out the following information and then click Apply. © Copyright 2012 TRENDnet. Camera's login page will appear. http://yourDomainName:PortNumber 7. TRENDnet User's Guide Then click Add to add the application. * Please refer to your router's web configuration... for your camera and click Apply. 3. Configure DDNS on your DDNS domain and camera's port number. The setup steps should be very similar. TV-IP672W / TV-IP672WI 2. Open another web browser and enter your router 1. Find the Dynamic DNS configuration section. 6. Go to Camera...
...Server setting. Enable DDNS, fill out the following information and then click Apply. © Copyright 2012 TRENDnet. Camera's login page will appear. http://yourDomainName:PortNumber 7. TRENDnet User's Guide Then click Add to add the application. * Please refer to your router's web configuration... for your camera and click Apply. 3. Configure DDNS on your DDNS domain and camera's port number. The setup steps should be very similar. TV-IP672W / TV-IP672WI 2. Open another web browser and enter your router 1. Find the Dynamic DNS configuration section. 6. Go to Camera...
User's Guide
Page 34
... Reserved. 32 Enable: Click Enable Name: Enter the application name (eg. Go to your router's user's manual for this function. TV-IP672W / TV-IP672WI http://yourDomainName:PortNumber 6. Open another web browser and enter your Camera. Camera Name) Protocol: Select TCP Private Port: The HTTP port ... a new entry. The camera login page will appear. The setup steps should be very similar. 5. LAN Server: The local IP address of your DDNS domain and camera's port number. © Copyright 2012 TRENDnet. TRENDnet User's Guide 4. Some router might use Port Forwarding or Special...
... Reserved. 32 Enable: Click Enable Name: Enter the application name (eg. Go to your router's user's manual for this function. TV-IP672W / TV-IP672WI http://yourDomainName:PortNumber 6. Open another web browser and enter your Camera. Camera Name) Protocol: Select TCP Private Port: The HTTP port ... a new entry. The camera login page will appear. The setup steps should be very similar. 5. LAN Server: The local IP address of your DDNS domain and camera's port number. © Copyright 2012 TRENDnet. TRENDnet User's Guide 4. Some router might use Port Forwarding or Special...


