
Datasheet
Page 1
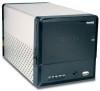
... Compatible with the convenience of a gigabit connection. Back up to 2 terabytes of total storage! Advanced security and access features give you complete control over the network-fast with Windows 2000/XP/Vista • 2-year warranty *** Drives exceeding 1Tb may require firmware updates.... is perfect for quickly sharing, managing and safeguarding your valuable data. medianet 2-Bay SATA I/II Network Storage Enclosure (3.5" drive) TS-S402(V1.0R) The 2-Bay 3.5" SATA Network Storage Enclosure enables you to share documents, music, videos and more at Gigabit speeds • 2 Serial ATA...
... Compatible with the convenience of a gigabit connection. Back up to 2 terabytes of total storage! Advanced security and access features give you complete control over the network-fast with Windows 2000/XP/Vista • 2-year warranty *** Drives exceeding 1Tb may require firmware updates.... is perfect for quickly sharing, managing and safeguarding your valuable data. medianet 2-Bay SATA I/II Network Storage Enclosure (3.5" drive) TS-S402(V1.0R) The 2-Bay 3.5" SATA Network Storage Enclosure enables you to share documents, music, videos and more at Gigabit speeds • 2 Serial ATA...

User's Guide
Page 8
... 10/100/1000Mbps Auto-MDIX Gigabit Ethernet port for network connection. • Provides two USB ports for printer and USB storage device connections. • Supports Windows based utility for Auto-IP discovery and setup, Disk status monitor, Network drive wizard and remote backup. • Automatically detects... web page. • Supports EXT2/EXT3 HDD file formats. • Supports FAT16, FAT32, and NTFS USB storage file formats. • Supports JBOD with software, treats two attached disks as one logical disk for access. • Supports Mirrored (RAID 1), and Striped (RAID 0) RAID formats...
... 10/100/1000Mbps Auto-MDIX Gigabit Ethernet port for network connection. • Provides two USB ports for printer and USB storage device connections. • Supports Windows based utility for Auto-IP discovery and setup, Disk status monitor, Network drive wizard and remote backup. • Automatically detects... web page. • Supports EXT2/EXT3 HDD file formats. • Supports FAT16, FAT32, and NTFS USB storage file formats. • Supports JBOD with software, treats two attached disks as one logical disk for access. • Supports Mirrored (RAID 1), and Striped (RAID 0) RAID formats...

User's Guide
Page 9
...TS-S402 Network Storage Enclosure, make sure you have a computer with the following requirements: • 1Ghz processor or higher • 512 MB RAM or above • 30 MB available hard disk space • CD-ROM drive (for software installation) • Installed network adapter • Any installed web browser to view the web UI • Windows XP SP2, Windows... 2000 SP6, or Windows Vista (for Windows based configuration utility) operating system ...
...TS-S402 Network Storage Enclosure, make sure you have a computer with the following requirements: • 1Ghz processor or higher • 512 MB RAM or above • 30 MB available hard disk space • CD-ROM drive (for software installation) • Installed network adapter • Any installed web browser to view the web UI • Windows XP SP2, Windows... 2000 SP6, or Windows Vista (for Windows based configuration utility) operating system ...

User's Guide
Page 16
... rear of the TS-S402 Network Storage Enclosure at least 1 second. Follow the steps below to install the NAS Utility onto your TS-S402 Network Storage Enclosure on, press and hold the POWER button on the rear of the TS-S402 Network Storage Enclosure at least 5 seconds. Turn on your TS-S402 Network Storage Enclosure off, press and hold the POWER button on either a Windows® XP or Windows® Vista operating...
... rear of the TS-S402 Network Storage Enclosure at least 1 second. Follow the steps below to install the NAS Utility onto your TS-S402 Network Storage Enclosure on, press and hold the POWER button on the rear of the TS-S402 Network Storage Enclosure at least 5 seconds. Turn on your TS-S402 Network Storage Enclosure off, press and hold the POWER button on either a Windows® XP or Windows® Vista operating...

User's Guide
Page 17
..., and click the Uninstall/Change button to start uninstall process. • Windows XP users: - Go to install the utility. 5. Follow the on-screen instructions to Start > All Programs > NAS Utility > Uninstall NAS Utility. If your computer. 1. Initializing and Accessing Your TS-S402 Network Storage Enclosure To launch the NAS Utility, double click the NAS Utility icon...
..., and click the Uninstall/Change button to start uninstall process. • Windows XP users: - Go to install the utility. 5. Follow the on-screen instructions to Start > All Programs > NAS Utility > Uninstall NAS Utility. If your computer. 1. Initializing and Accessing Your TS-S402 Network Storage Enclosure To launch the NAS Utility, double click the NAS Utility icon...

User's Guide
Page 26
... the selected user. 25 Delete Click to delete the user. Device Information Use this feature to exit the window. The following screen displays. 26 User's Guide Close Click to view the current attached TS-S402 Network Storage Enclosure system and storage disk information. Add Click to refresh the user list. Button Description Refresh Click to create a new user...
... the selected user. 25 Delete Click to delete the user. Device Information Use this feature to exit the window. The following screen displays. 26 User's Guide Close Click to view the current attached TS-S402 Network Storage Enclosure system and storage disk information. Add Click to refresh the user list. Button Description Refresh Click to create a new user...

User's Guide
Page 29
... Delete from the pop-up menu. 2. Creating a new folder To create a new folder, do the following: 1. Deleting a folder To remote a new folder, do the following window appears. A confirmation message appears.
... Delete from the pop-up menu. 2. Creating a new folder To create a new folder, do the following: 1. Deleting a folder To remote a new folder, do the following window appears. A confirmation message appears.

User's Guide
Page 33
Click Select to browse for the source folder you want to back up menu. 2. The following : 1. The select source folder appears in the Backup/Restore main screen, and then select Add Task from the pop-up to continue. Click Next to the TS-S402 Network Storage Enclosure. 3. MultiTmSe-Sd4i0a2NAS 3333 From the Backup/Restore screen, click Add Task under Backup/Restore Task. OR Right-click anywhere in the list as shown. Adding a backup task To create a new folder, do the following window appears.
Click Select to browse for the source folder you want to back up menu. 2. The following : 1. The select source folder appears in the Backup/Restore main screen, and then select Add Task from the pop-up to continue. Click Next to the TS-S402 Network Storage Enclosure. 3. MultiTmSe-Sd4i0a2NAS 3333 From the Backup/Restore screen, click Add Task under Backup/Restore Task. OR Right-click anywhere in the list as shown. Adding a backup task To create a new folder, do the following window appears.

User's Guide
Page 35
... backup task is complete, click Close to perform the backup task immediately, do the following: 1. Starting a backup task If you want to close the progress window. When the backup task is deleted. Click Yes. 3. Editing a backup task Use this function to modify, then click Edit Task under Backup/Restore Task. From...
... backup task is complete, click Close to perform the backup task immediately, do the following: 1. Starting a backup task If you want to close the progress window. When the backup task is deleted. Click Yes. 3. Editing a backup task Use this function to modify, then click Edit Task under Backup/Restore Task. From...

User's Guide
Page 36
...-up menu. 2. Click Yes. 3. OR Right-click the backup task you want to view the details, and then select Show Property from the pop-up window displays the task setting information. Specify for a Routine or One Time schedule. 4. Click Yes. A confirmation message appears.
...-up menu. 2. Click Yes. 3. OR Right-click the backup task you want to view the details, and then select Show Property from the pop-up window displays the task setting information. Specify for a Routine or One Time schedule. 4. Click Yes. A confirmation message appears.

User's Guide
Page 38
... Clear All log from the quick access tool bar. Click Save Logs under Log Message. A "Save As" window appears. From the System Log screen, click Clear All Log under Log Message from the TS-S402 Network Storage Enclosure, do the following: 1. The System Log screen Clearing all the logs To clear all the log messages to...
... Clear All log from the quick access tool bar. Click Save Logs under Log Message. A "Save As" window appears. From the System Log screen, click Clear All Log under Log Message from the TS-S402 Network Storage Enclosure, do the following: 1. The System Log screen Clearing all the logs To clear all the log messages to...

Quick Installation Guide
Page 6
... 1. Repeat step 1 and 2 for each Windows client PC. 3. Since the Storage Server's default IP address is recommended that you configure the Storage Server from a wired computer. Select the storage server and click Attach. 4 English Configure the Storage Server Note: It is 192.168.10.10, make sure no other network devices are assigned an IP address of...
... 1. Repeat step 1 and 2 for each Windows client PC. 3. Since the Storage Server's default IP address is recommended that you configure the Storage Server from a wired computer. Select the storage server and click Attach. 4 English Configure the Storage Server Note: It is 192.168.10.10, make sure no other network devices are assigned an IP address of...

Quick Installation Guide
Page 10
Click Share Management, then click Share Folder. Select the Disk Name, and enter a Folder Name. Private Folder Click Private Folder. Select a user, then click Add New User. Open up the NAS utility (see step 2 and 3 under Section 3: Configure the Storage Server) 2. Enter the client's User (user name) and Password. Shared Folder Select Anonymous, and then click apply. Create Folder 1. Access Folder on Windows Client PC 1. Then click Login. See Add User above if you have not added a user. 8 English Click Read Only to give read only access, then click Apply.
Click Share Management, then click Share Folder. Select the Disk Name, and enter a Folder Name. Private Folder Click Private Folder. Select a user, then click Add New User. Open up the NAS utility (see step 2 and 3 under Section 3: Configure the Storage Server) 2. Enter the client's User (user name) and Password. Shared Folder Select Anonymous, and then click apply. Create Folder 1. Access Folder on Windows Client PC 1. Then click Login. See Add User above if you have not added a user. 8 English Click Read Only to give read only access, then click Apply.

Quick Installation Guide
Page 11
Z:) and click Finish. 6. share . Double-click the folder (e.g. If you selected in step 2.) 9 English Right click the folder and click Mount. 4. Z represents the available Drive that you are accessing a private folder, this window will appear. Click OK. 5. Select an available Drive (e.g. 3.
Z:) and click Finish. 6. share . Double-click the folder (e.g. If you selected in step 2.) 9 English Right click the folder and click Mount. 4. Z represents the available Drive that you are accessing a private folder, this window will appear. Click OK. 5. Select an available Drive (e.g. 3.

Quick Installation Guide
Page 12
Press the Backup button on hard drive 1. Wait until the SYS and HDD /HDD2 LEDs are blinking. 2. USBCopy folder will appear. 10 English 7. Repeat steps 1-7 on the share folder. 4. Double click on each Windows PC. Backup data on USB drives to share folder on the front of the storage server until SYS and HDD/HDD2 LEDs become steady. 3.
Press the Backup button on hard drive 1. Wait until the SYS and HDD /HDD2 LEDs are blinking. 2. USBCopy folder will appear. 10 English 7. Repeat steps 1-7 on the share folder. 4. Double click on each Windows PC. Backup data on USB drives to share folder on the front of the storage server until SYS and HDD/HDD2 LEDs become steady. 3.
Quick Installation Guide
Page 14
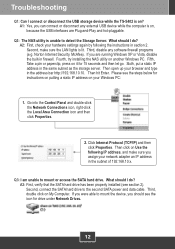
...http://192.168.10.10. Second, make sure you were able to the second SATA power and data cable. Then hit Enter. Then click on it for 15 seconds and then let go. Second, connect the SATA hard drive to mount the device, you should see the icon for instructions on ... Q3: I connect or disconnect the USB storage device while the TS-S402 is on, because the USB interfaces are running Windows XP or Vista, disable the built-in section 2. Fourth, try installing the NAS utility on My Computer. Go into the Control Panel and double-click the Network Connections icon, right-click the Local Area...
...http://192.168.10.10. Second, make sure you were able to the second SATA power and data cable. Then hit Enter. Then click on it for 15 seconds and then let go. Second, connect the SATA hard drive to mount the device, you should see the icon for instructions on ... Q3: I connect or disconnect the USB storage device while the TS-S402 is on, because the USB interfaces are running Windows XP or Vista, disable the built-in section 2. Fourth, try installing the NAS utility on My Computer. Go into the Control Panel and double-click the Network Connections icon, right-click the Local Area...