
Datasheet
Page 1
... with DLNA certified digital media players, iTunes server • Supports 32 concurrent users (Samba & FTP) • Receive notification via email for quickly sharing, managing and safeguarding your valuable data. Hot swap any Internet connection • Control content and user access with the feature rich management interface • Schedule data backups via FTP and HTTP servers without turning on , an FTP server allows you complete control over the network-fast with 2 external USB ports • Manage your data from the Internet. medianet 2-Bay SATA I /II hard drives of...
... with DLNA certified digital media players, iTunes server • Supports 32 concurrent users (Samba & FTP) • Receive notification via email for quickly sharing, managing and safeguarding your valuable data. Hot swap any Internet connection • Control content and user access with the feature rich management interface • Schedule data backups via FTP and HTTP servers without turning on , an FTP server allows you complete control over the network-fast with 2 external USB ports • Manage your data from the Internet. medianet 2-Bay SATA I /II hard drives of...

Datasheet
Page 2
... SATA I/II Network Storage Enclosure (3.5" drive) TS-S402(V1.0R) Specifications Hardware Standards Microprocessor Flash ROM / RAM IDE Controller Interface LED Power Consumption Power Dimensions Weight Temperature Humidity Certification Software Real Time OS Network Transfer Protocol Network File Protocols Supported HD Type File System Type Disk Management System Management System Monitoring • IEEE 802.3 / IEEE 802.3u • USB 2.0, 1.1 • Marvell 88F5182 • 4MB Flash / 32MB SDRAM • ITE IT8211F • 1 x 10/100/1000Mbps Auto-MDIX RJ-45 Port • 1 x Power Button...
... SATA I/II Network Storage Enclosure (3.5" drive) TS-S402(V1.0R) Specifications Hardware Standards Microprocessor Flash ROM / RAM IDE Controller Interface LED Power Consumption Power Dimensions Weight Temperature Humidity Certification Software Real Time OS Network Transfer Protocol Network File Protocols Supported HD Type File System Type Disk Management System Management System Monitoring • IEEE 802.3 / IEEE 802.3u • USB 2.0, 1.1 • Marvell 88F5182 • 4MB Flash / 32MB SDRAM • ITE IT8211F • 1 x 10/100/1000Mbps Auto-MDIX RJ-45 Port • 1 x Power Button...

Datasheet
Page 3
...://www.trendnet.com. 2-Bay SATA I/II Network Storage Enclosure (3.5" drive) TS-S402(V1.0R) NETWORKING SOLUTIONS 2-Bay SATA I/II Network Storage Enclosure (TS-S402) Internet 300Mbps Wireless N Gigabit Router (TEW-633GR) Cable/DSL Modem Printers 10/100Mbps 10/100Mbps Multi-Port Print Server (TE100-P21) Workstation with Gigabit PCI Adapter (TEG-PCITXR) Gigabit Wireless 300Mbps Notebook with 300Mbps Wireless N PC Card (TEW-621PC) Package Contents • TS-S402 • Multi-language quick installation guide • CD-ROM (user's guide & utility) •...
...://www.trendnet.com. 2-Bay SATA I/II Network Storage Enclosure (3.5" drive) TS-S402(V1.0R) NETWORKING SOLUTIONS 2-Bay SATA I/II Network Storage Enclosure (TS-S402) Internet 300Mbps Wireless N Gigabit Router (TEW-633GR) Cable/DSL Modem Printers 10/100Mbps 10/100Mbps Multi-Port Print Server (TE100-P21) Workstation with Gigabit PCI Adapter (TEG-PCITXR) Gigabit Wireless 300Mbps Notebook with 300Mbps Wireless N PC Card (TEW-621PC) Package Contents • TS-S402 • Multi-language quick installation guide • CD-ROM (user's guide & utility) •...
User's Guide
Page 4
...NAS Utility ...16 Uninstalling the NAS Utility...17 Initializing and Accessing Your TS‐S402 Network Storage Enclosure 17 Formatting the installed hard disks 18 Attaching the TS‐S402 via NAS Utility 19 Network configuration 20 Login...20 USING EXTERNAL USB DEVICES...21 Connecting USB Devices ...21 Using the USB One‐Click Backup Button 21 Disconnecting USB Devices ...22 USING THE NAS UTILITY ...24 NAS Utility Overview...24 Attach Other NAS ...25 User Management ...25 Device Information ...26 NAS Share Folder...28 Creating a new folder...29 4 User's Guide
...NAS Utility ...16 Uninstalling the NAS Utility...17 Initializing and Accessing Your TS‐S402 Network Storage Enclosure 17 Formatting the installed hard disks 18 Attaching the TS‐S402 via NAS Utility 19 Network configuration 20 Login...20 USING EXTERNAL USB DEVICES...21 Connecting USB Devices ...21 Using the USB One‐Click Backup Button 21 Disconnecting USB Devices ...22 USING THE NAS UTILITY ...24 NAS Utility Overview...24 Attach Other NAS ...25 User Management ...25 Device Information ...26 NAS Share Folder...28 Creating a new folder...29 4 User's Guide
User's Guide
Page 5
...Removing a backup schedule 36 Viewing task properties 36 Device Setting ...37 Change User ...37 System Log ...38 Clearing all the logs ...38 Saving logs to a file...38 USING THE WEB‐BASED CONFIGURATION TOOL 39 Launching the Web‐based Configuration Tool 39 Web‐based Configuration Tool Overview 40 System Status ...41 Configuration ...42 Networking...42 Basic ...43 Server Preference...44 Firmware Upgrade ...44 Backup/Restore ...45 Factory Defaults ...46 Reboot/Shutdown ...47 Remote Package ...48 Share Management...49 Share Folder ...49 User Management ...51 Group Management...
...Removing a backup schedule 36 Viewing task properties 36 Device Setting ...37 Change User ...37 System Log ...38 Clearing all the logs ...38 Saving logs to a file...38 USING THE WEB‐BASED CONFIGURATION TOOL 39 Launching the Web‐based Configuration Tool 39 Web‐based Configuration Tool Overview 40 System Status ...41 Configuration ...42 Networking...42 Basic ...43 Server Preference...44 Firmware Upgrade ...44 Backup/Restore ...45 Factory Defaults ...46 Reboot/Shutdown ...47 Remote Package ...48 Share Management...49 Share Folder ...49 User Management ...51 Group Management...

User's Guide
Page 8
... NTFS USB storage file formats. • Supports JBOD with software, treats two attached disks as one logical disk for access. • Supports Mirrored (RAID 1), and Striped (RAID 0) RAID formats. • Supports firmware upgrade via Web UI. • Supports installation of packages from remote devices. • Built-in FTP server for users to transfer files using FTP client. • Supports CIFS/SMB/NFS for Microsoft Network remote users easily retrieve files through "My Neighborhood". • Supports NTP protocol to synchronize clock time. • Supports unified account management to...
... NTFS USB storage file formats. • Supports JBOD with software, treats two attached disks as one logical disk for access. • Supports Mirrored (RAID 1), and Striped (RAID 0) RAID formats. • Supports firmware upgrade via Web UI. • Supports installation of packages from remote devices. • Built-in FTP server for users to transfer files using FTP client. • Supports CIFS/SMB/NFS for Microsoft Network remote users easily retrieve files through "My Neighborhood". • Supports NTP protocol to synchronize clock time. • Supports unified account management to...

User's Guide
Page 9
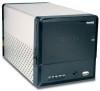
... disk space • CD-ROM drive (for software installation) • Installed network adapter • Any installed web browser to view the web UI • Windows XP SP2, Windows 2000 SP6, or Windows Vista (for Windows based configuration utility) operating system Product Overview Front View Rear View 4 PWR SYS HDD1 HDD2 LAN 1 2 3 1 Front panel LED indicators 2 USB one-click backup button 3 USB port 4 HDD enclosure door MuTltSim-Se40d2ia NAS 5 6 78 9 5 LAN port 6 USB port 7 Reset button 8 Power button 9 Power jack 9 • Support Jumbo Frame. • Power Management Setting...
... disk space • CD-ROM drive (for software installation) • Installed network adapter • Any installed web browser to view the web UI • Windows XP SP2, Windows 2000 SP6, or Windows Vista (for Windows based configuration utility) operating system Product Overview Front View Rear View 4 PWR SYS HDD1 HDD2 LAN 1 2 3 1 Front panel LED indicators 2 USB one-click backup button 3 USB port 4 HDD enclosure door MuTltSim-Se40d2ia NAS 5 6 78 9 5 LAN port 6 USB port 7 Reset button 8 Power button 9 Power jack 9 • Support Jumbo Frame. • Power Management Setting...
User's Guide
Page 14
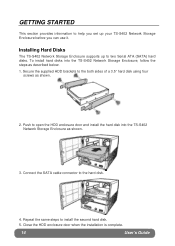
...and install the hard disk into the TS-S402 Network Storage Enclosure, follow the steps as shown. 3. Secure the supplied HDD brackets to the hard disk. 4. Installing Hard Disks The TS-S402 Network Storage Enclosure supports up your TS-S402 Network Storage Enclosure before you set up to two Serial ATA (SATA) hard disks. Connect the SATA cable connector to the both sides of a 3.5" hard disk using four screws as shown. 2. Repeat the same steps to install the second hard disk. 5. Close the HDD enclosure door when the installation is complete. 14 User's Guide GETTING STARTED...
...and install the hard disk into the TS-S402 Network Storage Enclosure, follow the steps as shown. 3. Secure the supplied HDD brackets to the hard disk. 4. Installing Hard Disks The TS-S402 Network Storage Enclosure supports up your TS-S402 Network Storage Enclosure before you set up to two Serial ATA (SATA) hard disks. Connect the SATA cable connector to the both sides of a 3.5" hard disk using four screws as shown. 2. Repeat the same steps to install the second hard disk. 5. Close the HDD enclosure door when the installation is complete. 14 User's Guide GETTING STARTED...

User's Guide
Page 17
...; Windows Vista users: - Initializing and Accessing Your TS-S402 Network Storage Enclosure To launch the NAS Utility, double click the NAS Utility icon ( ) from your CD-ROM drive and double click the Setup.exe file. 4. If you can remove the NAS Utility from the directory you specified for the first time, you need to initialize the disks before you are being installed for the NAS Utility. 2. If the CD does not start to uninstall the NAS Utility...
...; Windows Vista users: - Initializing and Accessing Your TS-S402 Network Storage Enclosure To launch the NAS Utility, double click the NAS Utility icon ( ) from your CD-ROM drive and double click the Setup.exe file. 4. If you can remove the NAS Utility from the directory you specified for the first time, you need to initialize the disks before you are being installed for the NAS Utility. 2. If the CD does not start to uninstall the NAS Utility...

User's Guide
Page 20
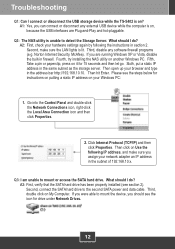
... not have connected to change the IP address of the TS-S402 Network Storage Enclosure is inconsistent with your network domain. Click Login to type in the username and password for each time login. 20 Multimedia NAS 20 User's Guide Enter the default administration username (admin) and password (admin). Check the Remember my password option so that you to a TS-S402 Network Storage Enclosure, the following screen appears. Network configuration If the IP address of the TS-S402 Network Storage Enclosure. Login After you have to launch the NAS Utility.
... not have connected to change the IP address of the TS-S402 Network Storage Enclosure is inconsistent with your network domain. Click Login to type in the username and password for each time login. 20 Multimedia NAS 20 User's Guide Enter the default administration username (admin) and password (admin). Check the Remember my password option so that you to a TS-S402 Network Storage Enclosure, the following screen appears. Network configuration If the IP address of the TS-S402 Network Storage Enclosure. Login After you have to launch the NAS Utility.

User's Guide
Page 24
... NAS Utility main screen. Shows the current NAP IP address Menu bar Lists the tasks can be applied to learn about the main features of the NAS Utility. Quick access tool bar Main screen The following illustrates the layout of the attached TS-S402 Network Storage Enclosure. 24 User's Guide File Attach Other NAS Allows you to help through the operation. View Share Folder Allows you to attach other TS-S402 Network Storage Enclosure on your TS-S402 Network Storage Enclosure. Backup/Restore Allows you to configure...
... NAS Utility main screen. Shows the current NAP IP address Menu bar Lists the tasks can be applied to learn about the main features of the NAS Utility. Quick access tool bar Main screen The following illustrates the layout of the attached TS-S402 Network Storage Enclosure. 24 User's Guide File Attach Other NAS Allows you to help through the operation. View Share Folder Allows you to attach other TS-S402 Network Storage Enclosure on your TS-S402 Network Storage Enclosure. Backup/Restore Allows you to configure...

User's Guide
Page 25
... User Management ( displays. ) from the quick access tool bar. Setting Device Setting Opens the Web-based Configuration Tool. Select File > Attach Other NAS from the menu bar, OR click Attach Other NAS ( ) from the quick access tool bar. The NAS Discovery screen displays. Select a TS-S402 Network Storage Enclosure and log in with the correct username and password. User Management Use this feature to connect to manage and view all the log messages generated from the TS-S402 Network Storage Enclosure. Help About Displays the current firmware version of a user...
... User Management ( displays. ) from the quick access tool bar. Setting Device Setting Opens the Web-based Configuration Tool. Select File > Attach Other NAS from the menu bar, OR click Attach Other NAS ( ) from the quick access tool bar. The NAS Discovery screen displays. Select a TS-S402 Network Storage Enclosure and log in with the correct username and password. User Management Use this feature to connect to manage and view all the log messages generated from the TS-S402 Network Storage Enclosure. Help About Displays the current firmware version of a user...

User's Guide
Page 29
... (default), FTP, or NFS • Folder Type: Public (default), or Private 3. OR Right-click anywhere in the NAS Share Folder main screen, and then select Add Folder from the pop-up menu. 2. Deleting a folder To remote a new folder, do the following: 1. Click OK. 3. A new folder is deleted. Editing folder properties Use this function to delete, then click Delete under Folder Management. The selected folder is created. Creating a new folder To create a new folder, do the following: 1. From the NAS Share Folder screen, click Add Folder under Folder Management. From...
... (default), FTP, or NFS • Folder Type: Public (default), or Private 3. OR Right-click anywhere in the NAS Share Folder main screen, and then select Add Folder from the pop-up menu. 2. Deleting a folder To remote a new folder, do the following: 1. Click OK. 3. A new folder is deleted. Editing folder properties Use this function to delete, then click Delete under Folder Management. The selected folder is created. Creating a new folder To create a new folder, do the following: 1. From the NAS Share Folder screen, click Add Folder under Folder Management. From...

User's Guide
Page 30
... at login option to mount this network drive automatically each time you cannot delete it or modify its settings. The selected folder is the system default folder, you log in to the folder. The share folder is mounted to the network. 30 User's Guide To edit a folder, do the following : 1. OR Right-click the folder you want to edit, and then click Edit under Folder Management. From the NAS Share Folder screen, select the folder you...
... at login option to mount this network drive automatically each time you cannot delete it or modify its settings. The selected folder is the system default folder, you log in to the folder. The share folder is mounted to the network. 30 User's Guide To edit a folder, do the following : 1. OR Right-click the folder you want to edit, and then click Edit under Folder Management. From the NAS Share Folder screen, select the folder you...

User's Guide
Page 39
... username and password.) MultiTmSe-Sd4i0a2NAS 3939 USING THE WEB-BASED CONFIGURATION TOOL Launching the Web-based Configuration Tool You can also use the NAS Utility to change the network configurations of your TS-S402 Network Storage Enclosure through the web browser. Enter the IP address of your TS-S402 Network Storage Enclosure. xxx.xxx), you are not in the NAS Utility (see "Device Setting") to access the configuration settings. Enter the username and password. (The default is http://192.168.10.10) to open the Web- based configuration...
... username and password.) MultiTmSe-Sd4i0a2NAS 3939 USING THE WEB-BASED CONFIGURATION TOOL Launching the Web-based Configuration Tool You can also use the NAS Utility to change the network configurations of your TS-S402 Network Storage Enclosure through the web browser. Enter the IP address of your TS-S402 Network Storage Enclosure. xxx.xxx), you are not in the NAS Utility (see "Device Setting") to access the configuration settings. Enter the username and password. (The default is http://192.168.10.10) to open the Web- based configuration...
User's Guide
Page 73
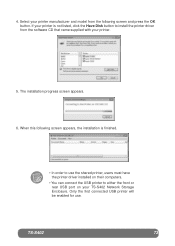
... 73 Only the first connected USB printer will be enabled for use the shared printer, users must have the printer driver installed on their computers. • You can connect the USB printer to install the printer driver from the following screen appears, the installation is not listed, click the Have Disk button to either the front or rear USB port on your printer. 5. Select your printer manufacturer and model from the software CD that came supplied with your TS-S402 Network Storage Enclosure. 4.
... 73 Only the first connected USB printer will be enabled for use the shared printer, users must have the printer driver installed on their computers. • You can connect the USB printer to install the printer driver from the following screen appears, the installation is not listed, click the Have Disk button to either the front or rear USB port on your printer. 5. Select your printer manufacturer and model from the software CD that came supplied with your TS-S402 Network Storage Enclosure. 4.
User's Guide
Page 74
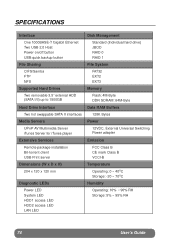
SPECIFICATIONS Interface One 1000BASE-T Gigabit Ethernet Two USB 2.0 Host Power on/off button USB quick backup button File Sharing CIFS/Samba FTP NFS Supported Hard Drives Two removable 3.5" external HDD (SATA I/II) up to 1500GB Hard Drive Interface Two hot swappable SATA II interfaces Media Servers UPnP AV Multimedia Server iTunes Server for iTunes player Extensive Services Remote package installation Bit-torrent client USB Print server Dimensions (W x D x H) 204 x 120 x 120 mm Diagnostic LEDs Power LED System LED HDD1 access LED HDD2 access LED LAN LED Disk Management Standard (Individual ...
SPECIFICATIONS Interface One 1000BASE-T Gigabit Ethernet Two USB 2.0 Host Power on/off button USB quick backup button File Sharing CIFS/Samba FTP NFS Supported Hard Drives Two removable 3.5" external HDD (SATA I/II) up to 1500GB Hard Drive Interface Two hot swappable SATA II interfaces Media Servers UPnP AV Multimedia Server iTunes Server for iTunes player Extensive Services Remote package installation Bit-torrent client USB Print server Dimensions (W x D x H) 204 x 120 x 120 mm Diagnostic LEDs Power LED System LED HDD1 access LED HDD2 access LED LAN LED Disk Management Standard (Individual ...
User's Guide
Page 75
... OR IN CONNECTION WITH THE SALE, INSTALLATION, MAINTENANCE, USE, PERFORMANCE, FAILURE, OR INTERRUPTION OF THE POSSIBILITY OF SUCH DAMAGES, AND LIMITS ITS LIABILITY TO REPAIR, REPLACEMENT, OR REFUND OF THE PURCHASE PRICE PAID, AT TRENDNET'S OPTION. Replacement products may be governed by any unauthorized service center. Note: AC/DC Power Adapter, Cooling Fan, cables and Power Supply carry 1-Year Warranty MuTltSim-Se40d2ia NAS 755 TRENDNET NEITHER ASSUMES...
... OR IN CONNECTION WITH THE SALE, INSTALLATION, MAINTENANCE, USE, PERFORMANCE, FAILURE, OR INTERRUPTION OF THE POSSIBILITY OF SUCH DAMAGES, AND LIMITS ITS LIABILITY TO REPAIR, REPLACEMENT, OR REFUND OF THE PURCHASE PRICE PAID, AT TRENDNET'S OPTION. Replacement products may be governed by any unauthorized service center. Note: AC/DC Power Adapter, Cooling Fan, cables and Power Supply carry 1-Year Warranty MuTltSim-Se40d2ia NAS 755 TRENDNET NEITHER ASSUMES...

Quick Installation Guide
Page 9
In the browser configuration, click Share Management, then user management. Then click on one computer at a time. Add a user name for each client that will have access to Create Folder. 2. Enter a User Name and Password, confirm the password and then click Apply. 3. Note: A User Name can only be used on the green plus sign to add additional users. 4. Using the TS-S402 Add User 1. If you are creating a shared folder, skip this step and continue on to the TS-S402. 7 English Click the green plus sign.
In the browser configuration, click Share Management, then user management. Then click on one computer at a time. Add a user name for each client that will have access to Create Folder. 2. Enter a User Name and Password, confirm the password and then click Apply. 3. Note: A User Name can only be used on the green plus sign to add additional users. 4. Using the TS-S402 Add User 1. If you are creating a shared folder, skip this step and continue on to the TS-S402. 7 English Click the green plus sign.
Quick Installation Guide
Page 14
Troubleshooting Q1: Can I connect or disconnect the USB storage device while the TS-S402 is on My Computer. Q2: The NAS utility is unable to the second SATA power and data cable. Second, make sure you should see section 2). Norton Internet Security, McAfee). Then open up your hardware settings again by following IP address, and make sure the LAN lights is on your network adapter an IP address in the same subnet as the storage server. What...
Troubleshooting Q1: Can I connect or disconnect the USB storage device while the TS-S402 is on My Computer. Q2: The NAS utility is unable to the second SATA power and data cable. Second, make sure you should see section 2). Norton Internet Security, McAfee). Then open up your hardware settings again by following IP address, and make sure the LAN lights is on your network adapter an IP address in the same subnet as the storage server. What...

