User's Guide
Page 5
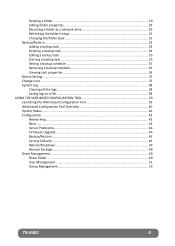
Deleting a folder...29 Editing folder properties 29 Mounting a folder as a network drive 30 Refreshing the folder listings 31 Changing the folder style 31 Backup/Restore ...32 Adding a backup task ...33 Deleting a backup task 34 ... CONFIGURATION TOOL 39 Launching the Web‐based Configuration Tool 39 Web‐based Configuration Tool Overview 40 System Status ...41 Configuration ...42 Networking...42 Basic ...43 Server Preference...44 Firmware Upgrade ...44 Backup/Restore ...45 Factory Defaults ...46 Reboot/Shutdown ...47 Remote Package ...48 Share Management...49 Share Folder...
Deleting a folder...29 Editing folder properties 29 Mounting a folder as a network drive 30 Refreshing the folder listings 31 Changing the folder style 31 Backup/Restore ...32 Adding a backup task ...33 Deleting a backup task 34 ... CONFIGURATION TOOL 39 Launching the Web‐based Configuration Tool 39 Web‐based Configuration Tool Overview 40 System Status ...41 Configuration ...42 Networking...42 Basic ...43 Server Preference...44 Firmware Upgrade ...44 Backup/Restore ...45 Factory Defaults ...46 Reboot/Shutdown ...47 Remote Package ...48 Share Management...49 Share Folder...
User's Guide
Page 6
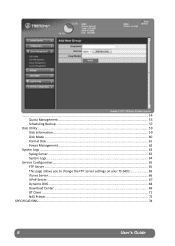
...54 Quota Management...55 Scheduling Backup ...57 Disk Utility ...59 Disk Information...59 Disk Mode ...60 Format Disk ...61 Power Management...62 System Logs ...63 Syslog Server ...63 System Logs...64 Service Configuration...65 FTP Server ...65 This page allows you to change the FTP server settings on your TS‐S402 65 iTunes Server ...66 UPnP Server ...67 Dynamic DNS...68 Download Center ...69 BT Client ...71 NAS Printer...72 SPECIFICATIONS...74 6 User's Guide
...54 Quota Management...55 Scheduling Backup ...57 Disk Utility ...59 Disk Information...59 Disk Mode ...60 Format Disk ...61 Power Management...62 System Logs ...63 Syslog Server ...63 System Logs...64 Service Configuration...65 FTP Server ...65 This page allows you to change the FTP server settings on your TS‐S402 65 iTunes Server ...66 UPnP Server ...67 Dynamic DNS...68 Download Center ...69 BT Client ...71 NAS Printer...72 SPECIFICATIONS...74 6 User's Guide
User's Guide
Page 42
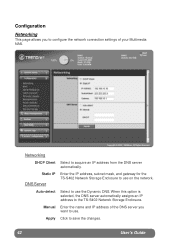
... and gateway for the TS-S402 Network Storage Enclosure to the TS-S402 Network Storage Enclosure. When this option is selected, the DNS server automatically assigns an IP address to use on the network. Apply Click to use . Auto-detect Select to save the changes. 42 User's Guide Networking DHCP Client Select to ...use the Dynamic DNS. Manual Enter the name and IP address of the DNS server you to configure the network connection settings of your Multimedia NAS. Configuration Networking This page allows you want to ...
... and gateway for the TS-S402 Network Storage Enclosure to the TS-S402 Network Storage Enclosure. When this option is selected, the DNS server automatically assigns an IP address to use on the network. Apply Click to use . Auto-detect Select to save the changes. 42 User's Guide Networking DHCP Client Select to ...use the Dynamic DNS. Manual Enter the name and IP address of the DNS server you to configure the network connection settings of your Multimedia NAS. Configuration Networking This page allows you want to ...

User's Guide
Page 67
...TS-S402 Network Storage Enclosure. Apply Click to the Share List. Share List Displays the folders to be shared on UPnP compatible media players or computers running an appropriate client software, such as the shared folder. Delete Click to remove the sharing folder from this server and playback them on the UPnP server. MuTltSim-Se40d2ia NAS 677 UPnP A/V Server... Name Enter the name for the UPnP A/V server. UPnP Server This page allows you to ...
...TS-S402 Network Storage Enclosure. Apply Click to the Share List. Share List Displays the folders to be shared on UPnP compatible media players or computers running an appropriate client software, such as the shared folder. Delete Click to remove the sharing folder from this server and playback them on the UPnP server. MuTltSim-Se40d2ia NAS 677 UPnP A/V Server... Name Enter the name for the UPnP A/V server. UPnP Server This page allows you to ...

User's Guide
Page 70
Like http:// or FTP:// Download Directory Select the download directory in your Multimedia NAS. Retry Limit Enter the limit for the download. This option is only available when Anonymous is disabled. Password Enter the password for the retry. User .... Add Download To add a download, click the Add Download Setting page displays. from the Download Center page. The URL Enter the address of the download server.
Like http:// or FTP:// Download Directory Select the download directory in your Multimedia NAS. Retry Limit Enter the limit for the download. This option is only available when Anonymous is disabled. Password Enter the password for the retry. User .... Add Download To add a download, click the Add Download Setting page displays. from the Download Center page. The URL Enter the address of the download server.

User's Guide
Page 72
... installed. The following : 1. Double click the NAS-Printer icon. 3. Click OK to an available USB port on your TS-S402 Network Storage Enclosure. (See "Using External USB Devices" on page 20 for connections.) Users can print out anything on this printer. NAS Printer Your TS-S402 Network Storage Enclosure has a built-in printer server. To enable NAS printer sharing, connect a USB printer to continue...
... installed. The following : 1. Double click the NAS-Printer icon. 3. Click OK to an available USB port on your TS-S402 Network Storage Enclosure. (See "Using External USB Devices" on page 20 for connections.) Users can print out anything on this printer. NAS Printer Your TS-S402 Network Storage Enclosure has a built-in printer server. To enable NAS printer sharing, connect a USB printer to continue...

Quick Installation Guide
Page 6
...-ROM into your computer's CD-ROM Drive and then click Install Utility. 2. Select the storage server and click Attach. 4 English Double-click the NAS Utility icon. 4. 3. Configure the Storage Server Note: It is 192.168.10.10, make sure no other network devices are assigned an IP address of 192.168.10.10. Follow the Installation Wizard...
...-ROM into your computer's CD-ROM Drive and then click Install Utility. 2. Select the storage server and click Attach. 4 English Double-click the NAS Utility icon. 4. 3. Configure the Storage Server Note: It is 192.168.10.10, make sure no other network devices are assigned an IP address of 192.168.10.10. Follow the Installation Wizard...

Quick Installation Guide
Page 10
Private Folder Click Private Folder. Click Share Management, then click Share Folder. Select a user, then click Add New User. See Add User above if you have not added a user. 8 English Create Folder 1. Open up the NAS utility (see step 2 and 3 under Section 3: Configure the Storage Server) 2. Then click Login. Access Folder on Windows Client PC 1. Enter the client's User (user name) and Password. Select the Disk Name, and enter a Folder Name. Shared Folder Select Anonymous, and then click apply. Click Read Only to give read only access, then click Apply.
Private Folder Click Private Folder. Click Share Management, then click Share Folder. Select a user, then click Add New User. See Add User above if you have not added a user. 8 English Create Folder 1. Open up the NAS utility (see step 2 and 3 under Section 3: Configure the Storage Server) 2. Then click Login. Access Folder on Windows Client PC 1. Enter the client's User (user name) and Password. Select the Disk Name, and enter a Folder Name. Shared Folder Select Anonymous, and then click apply. Click Read Only to give read only access, then click Apply.
Quick Installation Guide
Page 14
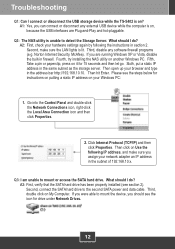
...storage device while the TS-S402 is lit. Second, connect the SATA hard drive to mount or access the SATA hard drive. Then hit Enter. Click Internet Protocol (TCP/IP) and then click Properties. What should I do ? If you can connect or disconnect any software firewall programs (e.g. Then click on your network... adapter an IP address in the same subnet as the storage server. What should see the steps below for 15 seconds and then let go. Q2: The NAS utility is on ? A2: First, check your browser ...
...storage device while the TS-S402 is lit. Second, connect the SATA hard drive to mount or access the SATA hard drive. Then hit Enter. Click Internet Protocol (TCP/IP) and then click Properties. What should I do ? If you can connect or disconnect any software firewall programs (e.g. Then click on your network... adapter an IP address in the same subnet as the storage server. What should see the steps below for 15 seconds and then let go. Q2: The NAS utility is on ? A2: First, check your browser ...