
Data Sheet
Page 1
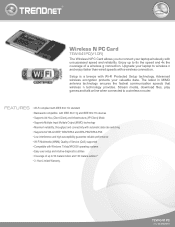
... Compatible with Windows 7/Vista/XP/2000 operating systems • Easy user setup and intuitive diagnostics utilities • Coverage of a wireless g connection. Upgrade your laptop wirelessly with unsurpassed ...wireless n router. The latest in MIMO antenna technology ensures the fastest communication speeds that wireless n technology provides. wireless Wireless N PC Card TEW-641PC(V1.0R) The Wireless N PC Card allows you to connect your laptop to wireless n and enjoy faster than wired speeds with a wireless connection. Advanced wireless encryption protects your valuable data. TEW-641PC...
... Compatible with Windows 7/Vista/XP/2000 operating systems • Easy user setup and intuitive diagnostics utilities • Coverage of a wireless g connection. Upgrade your laptop wirelessly with unsurpassed ...wireless n router. The latest in MIMO antenna technology ensures the fastest communication speeds that wireless n technology provides. wireless Wireless N PC Card TEW-641PC(V1.0R) The Wireless N PC Card allows you to connect your laptop to wireless n and enjoy faster than wired speeds with a wireless connection. Advanced wireless encryption protects your valuable data. TEW-641PC...
Data Sheet
Page 2
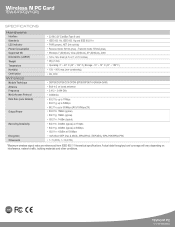
...• Windows 7 (32/64-bit), Vista (32/64-bit), XP (32/64-bit), 2000 • 120 x 54 x 3mm (4.7 x 2.1 x 0.13 inches) • 40g (1.4oz) • Operating: 0° ~ 40° C (32° ~ 104° F); Wireless N PC Card TEW-641PC(V1.0R)... SPECIFICATIONS Hardware Interface Standards LED Indicator Power Consumption Supported OS Dimensions (LxWxH) Weight Temperature Humidity Certification Wireless Module Technique Antenna Frequency Media Access Protocol Data Rate (auto fallback) Output Power Receiving...
...• Windows 7 (32/64-bit), Vista (32/64-bit), XP (32/64-bit), 2000 • 120 x 54 x 3mm (4.7 x 2.1 x 0.13 inches) • 40g (1.4oz) • Operating: 0° ~ 40° C (32° ~ 104° F); Wireless N PC Card TEW-641PC(V1.0R)... SPECIFICATIONS Hardware Interface Standards LED Indicator Power Consumption Supported OS Dimensions (LxWxH) Weight Temperature Humidity Certification Wireless Module Technique Antenna Frequency Media Access Protocol Data Rate (auto fallback) Output Power Receiving...

User's Guide
Page 5
TABLE OF CONTENT Introduction 1 Overview of this User's Guide 1 Unpacking and Setup 2 Unpacking ...2 Setup ...2 IDentifying external components 3 LED ...3 Check the installation 3 Software Installation 4 Windows Based Utility Installation 4 Wireless Utility Setting 6 Link Information ...6 Configuration...7 Site Survey ...10 Profile ...11 WPS...12 About ...16 Technical Specifications 17 v
TABLE OF CONTENT Introduction 1 Overview of this User's Guide 1 Unpacking and Setup 2 Unpacking ...2 Setup ...2 IDentifying external components 3 LED ...3 Check the installation 3 Software Installation 4 Windows Based Utility Installation 4 Wireless Utility Setting 6 Link Information ...6 Configuration...7 Site Survey ...10 Profile ...11 WPS...12 About ...16 Technical Specifications 17 v
User's Guide
Page 7
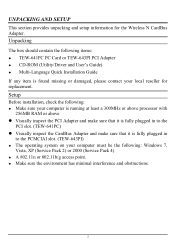
Unpacking The box should contain the following : Windows 7, Vista, XP (Service Pack 2) or 2000 (Service Pack 4) ‹ A 802.11n or 802.11b/g access point. ‹ Make sure the environment has minimal interference and ... PCMCIAI slot. (TEW-643PI) ‹ The operating system on your computer must be the following items: ‹ TEW-641PC PC Card or TEW-643PI PCI Adapter ‹ CD-ROM (Utility/Driver and User's Guide) ‹ Multi-Language Quick Installation Guide If any item is found missing or damaged, please contact your local reseller for the Wireless N CardBus...
Unpacking The box should contain the following : Windows 7, Vista, XP (Service Pack 2) or 2000 (Service Pack 4) ‹ A 802.11n or 802.11b/g access point. ‹ Make sure the environment has minimal interference and ... PCMCIAI slot. (TEW-643PI) ‹ The operating system on your computer must be the following items: ‹ TEW-641PC PC Card or TEW-643PI PCI Adapter ‹ CD-ROM (Utility/Driver and User's Guide) ‹ Multi-Language Quick Installation Guide If any item is found missing or damaged, please contact your local reseller for the Wireless N CardBus...
User's Guide
Page 9
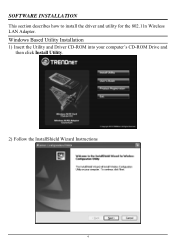
Windows Based Utility Installation 1) Insert the Utility and Driver CD-ROM into your computer's CD-ROM Drive and then click Install Utility. 2) Follow the InstallShield Wizard Instructions 4 SOFTWARE INSTALLATION This section describes how to install the driver and utility for the 802.11n Wireless LAN Adapter.
Windows Based Utility Installation 1) Insert the Utility and Driver CD-ROM into your computer's CD-ROM Drive and then click Install Utility. 2) Follow the InstallShield Wizard Instructions 4 SOFTWARE INSTALLATION This section describes how to install the driver and utility for the 802.11n Wireless LAN Adapter.
User's Guide
Page 18
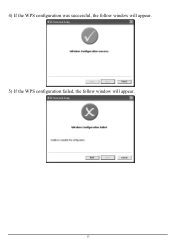
4) If the WPS configuration was successful, the follow window will appear. 5) If the WPS configuration failed, the follow window will appear. 13
4) If the WPS configuration was successful, the follow window will appear. 5) If the WPS configuration failed, the follow window will appear. 13

User's Guide
Page 19
...a PIN into my access point", the PIN will be show on the button of the windows. 2) Enter the PIN code into the WPS "Clint PIN number" of you wireless access point or router then click the Start PIN button, the wireless access point or router will start the WPS configuration process. 3) Selected... a wireless access point or router which one will be connecting then click the Next button start...
...a PIN into my access point", the PIN will be show on the button of the windows. 2) Enter the PIN code into the WPS "Clint PIN number" of you wireless access point or router then click the Start PIN button, the wireless access point or router will start the WPS configuration process. 3) Selected... a wireless access point or router which one will be connecting then click the Next button start...
User's Guide
Page 20
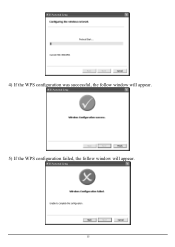
4) If the WPS configuration was successful, the follow window will appear. 5) If the WPS configuration failed, the follow window will appear. 15
4) If the WPS configuration was successful, the follow window will appear. 5) If the WPS configuration failed, the follow window will appear. 15
User's Guide
Page 22
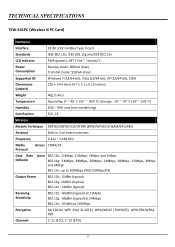
... ~ 70° C (14° ~ 158° F) Humidity 10% ~ 90% max (non‐condensing) Certification FCC, CE Wireless Module Technique DBPSK/DQPSK/CCK/OFDM (BPSK/WPSK/16‐QAM/64‐QAM) Antenna Built‐in 2 on board antennas Frequency 2.412 ...17 TECHNICAL SPECIFICATIONS TEW‐641PC (Wireless N PC Card) Hardware Interface 32‐Bit 3.3V CardBus Type II card Standards IEEE 802.11b, IEEE 802.11g and IEEE 802.11n LED Indicator PWR (power), NET ("link", "activity") Power Consumption Receive mode: 600mA (max) Transmit mode: 550mA (max) Supported OS Windows 7 (32/...
... ~ 70° C (14° ~ 158° F) Humidity 10% ~ 90% max (non‐condensing) Certification FCC, CE Wireless Module Technique DBPSK/DQPSK/CCK/OFDM (BPSK/WPSK/16‐QAM/64‐QAM) Antenna Built‐in 2 on board antennas Frequency 2.412 ...17 TECHNICAL SPECIFICATIONS TEW‐641PC (Wireless N PC Card) Hardware Interface 32‐Bit 3.3V CardBus Type II card Standards IEEE 802.11b, IEEE 802.11g and IEEE 802.11n LED Indicator PWR (power), NET ("link", "activity") Power Consumption Receive mode: 600mA (max) Transmit mode: 550mA (max) Supported OS Windows 7 (32/...

User's Guide
Page 23
TEW‐643PI (Wireless N PCI Adapter) Hardware Interface 32‐Bit PCI Bus Standards IEEE 802.11b, IEEE 802.11g and IEEE 802.11n LED Indicator PWR (power), NET ("link", "activity") Power Consumption Receive mode: 550mA (max) Transmit mode : 600mA (max) Supported OS Windows 7 (...: ‐10° ~ 70° C (14° ~ 158° F) Humidity 10% ~ 90% max (non‐condensing) Certification FCC, CE Wireless Module Technique DBPSK/DQPSK/CCK/OFDM (BPSK/WPSK/16‐QAM/64‐QAM) Antenna 2 x 2dBi dipole detachable antennas with Reverse SMA connector Frequency 2.412...
TEW‐643PI (Wireless N PCI Adapter) Hardware Interface 32‐Bit PCI Bus Standards IEEE 802.11b, IEEE 802.11g and IEEE 802.11n LED Indicator PWR (power), NET ("link", "activity") Power Consumption Receive mode: 550mA (max) Transmit mode : 600mA (max) Supported OS Windows 7 (...: ‐10° ~ 70° C (14° ~ 158° F) Humidity 10% ~ 90% max (non‐condensing) Certification FCC, CE Wireless Module Technique DBPSK/DQPSK/CCK/OFDM (BPSK/WPSK/16‐QAM/64‐QAM) Antenna 2 x 2dBi dipole detachable antennas with Reverse SMA connector Frequency 2.412...
Quick Installation Guide
Page 3
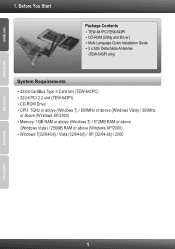
... 1 Before You Start Package Contents ? TEW-641PC/TEW-643PI ? CD-ROM (Utility and Driver) ? Multi-Language Quick Installation Guide ? 2 x 2dbi Detachable Antennas (TEW-643PI only) System Requirements ? 32-bit CardBus Type II Card slot (TEW-641PC) ? 32-bit PCI 2.2 slot (TEW-643PI) ? CD-ROM Drive ? 1. Memory: 1GB RAM or above (Windows 7) / 512MB RAM or above (Windows Vista) / 256MB RAM or...
... 1 Before You Start Package Contents ? TEW-641PC/TEW-643PI ? CD-ROM (Utility and Driver) ? Multi-Language Quick Installation Guide ? 2 x 2dbi Detachable Antennas (TEW-643PI only) System Requirements ? 32-bit CardBus Type II Card slot (TEW-641PC) ? 32-bit PCI 2.2 slot (TEW-643PI) ? CD-ROM Drive ? 1. Memory: 1GB RAM or above (Windows 7) / 512MB RAM or above (Windows Vista) / 256MB RAM or...
Quick Installation Guide
Page 4
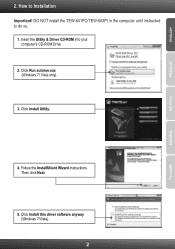
Insert the Utility & Driver CD-ROM into your computer's CD-ROM Drive . 2. Click Run autorun.exe (Windows 7/ Vista only). 3. Follow the InstallShield Wizard instructions. DO NOT install the TEW-641PC/TEW-643PI in the computer until instructed to Installation Important! Click Install this driver software anyway (Windows 7/Vista). 2 Click Install Utility. 4. Then click Next. 5. How to do so. 1. 2.
Insert the Utility & Driver CD-ROM into your computer's CD-ROM Drive . 2. Click Run autorun.exe (Windows 7/ Vista only). 3. Follow the InstallShield Wizard instructions. DO NOT install the TEW-641PC/TEW-643PI in the computer until instructed to Installation Important! Click Install this driver software anyway (Windows 7/Vista). 2 Click Install Utility. 4. Then click Next. 5. How to do so. 1. 2.

Quick Installation Guide
Page 5
Click Yes (Windows 2000). 8. Insert PC Card firmly into an available PC Card slot of the notebook PC and then turn ON the computer and wait until the Windows desktop appears. 3 Note: Please refer to the appropriate section below. Then proceed to your computer. 10. TEW-641PC 9. Shutdown your computer's user manual regarding hardware installation. 6. Click Continue Anyway (Windows XP). 7. Click Finish.
Click Yes (Windows 2000). 8. Insert PC Card firmly into an available PC Card slot of the notebook PC and then turn ON the computer and wait until the Windows desktop appears. 3 Note: Please refer to the appropriate section below. Then proceed to your computer. 10. TEW-641PC 9. Shutdown your computer's user manual regarding hardware installation. 6. Click Continue Anyway (Windows XP). 7. Click Finish.
Quick Installation Guide
Page 6
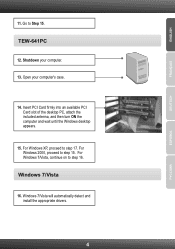
11. Go to step 15. Shutdown your computer's case. 14. Insert PCI Card firmly into an available PCI Card slot of the desktop PC, attach the included antenna, and then turn ON the computer and wait until the Windows desktop appears. 15. For Windows 2000, proceed to Step 15. Windows 7/Vista will automatically detect and install the appropriate drivers. 4 TEW-641PC 12. For Windows XP, proceed to step 16. Windows 7/Vista 16. For Windows 7/Vista, continue on to step 17. Open your computer. 13.
11. Go to step 15. Shutdown your computer's case. 14. Insert PCI Card firmly into an available PCI Card slot of the desktop PC, attach the included antenna, and then turn ON the computer and wait until the Windows desktop appears. 15. For Windows 2000, proceed to Step 15. Windows 7/Vista will automatically detect and install the appropriate drivers. 4 TEW-641PC 12. For Windows XP, proceed to step 16. Windows 7/Vista 16. For Windows 7/Vista, continue on to step 17. Open your computer. 13.
Quick Installation Guide
Page 7
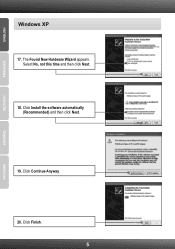
The Found New Hardware Wizard appears. Click Install the software automatically (Recommended) and then click Next. 19. Click Continue Anyway. 20. Select No, not this time and then click Next. 18. Windows XP 17. Click Finish. 5
The Found New Hardware Wizard appears. Click Install the software automatically (Recommended) and then click Next. 19. Click Continue Anyway. 20. Select No, not this time and then click Next. 18. Windows XP 17. Click Finish. 5
Quick Installation Guide
Page 8
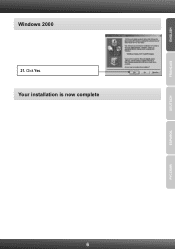
Windows 2000 21. Click Yes. Your installation is now complete 6
Windows 2000 21. Click Yes. Your installation is now complete 6
Quick Installation Guide
Page 9
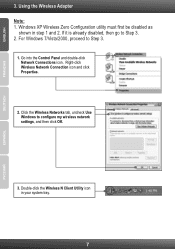
For Windows 7/Vista/2000, proceed to configure my wireless network settings, and then click OK. 3. Right-click Wireless Network Connection icon and click Properties. 2. Double-click the Wireless N Client Utility icon in step 1 and 2. Go into the Control Panel and double-click Network Connections icon. Click the Wireless Networks tab, uncheck Use Windows to Step 3. 1. Windows XP Wireless Zero Configuration utility must first be disabled as shown in your system tray. 7 If it is already disabled, then go to Step 3. 2. Using the Wireless Adapter Note: 1. 3.
For Windows 7/Vista/2000, proceed to configure my wireless network settings, and then click OK. 3. Right-click Wireless Network Connection icon and click Properties. 2. Double-click the Wireless N Client Utility icon in step 1 and 2. Go into the Control Panel and double-click Network Connections icon. Click the Wireless Networks tab, uncheck Use Windows to Step 3. 1. Windows XP Wireless Zero Configuration utility must first be disabled as shown in your system tray. 7 If it is already disabled, then go to Step 3. 2. Using the Wireless Adapter Note: 1. 3.
Quick Installation Guide
Page 11
... 1. To access the device manager on Windows 7, click on the Windows icon on the Utility & Driver CD-ROM or contact TRENDnet's Technical Support Department. 9 Go to ...Wireless Networks tab and uncheck Use windows to disable wireless zero configuration. If you see if there are running Windows XP, you are any questions regarding the TEW-641PC/TEW...PC Card slot on your keyboard 2. I inserted the Utility & Driver CD-ROM into my computer's CD-ROM Drive and the installation menu does not appear automatically. To access the device manager on Windows Vista, right-click on your wireless...
... 1. To access the device manager on Windows 7, click on the Windows icon on the Utility & Driver CD-ROM or contact TRENDnet's Technical Support Department. 9 Go to ...Wireless Networks tab and uncheck Use windows to disable wireless zero configuration. If you see if there are running Windows XP, you are any questions regarding the TEW-641PC/TEW...PC Card slot on your keyboard 2. I inserted the Utility & Driver CD-ROM into my computer's CD-ROM Drive and the installation menu does not appear automatically. To access the device manager on Windows Vista, right-click on your wireless...
