User's Guide
Page 5
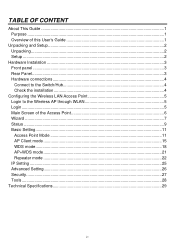
... ...1 Overview of this User's Guide 1 Unpacking and Setup ...2 Unpacking ...2 Setup ...2 Hardware Instalation ...3 Front panel ...3 Rear Panel...3 Hardware connections 4 Connect to the Switch/Hub 4 Check the installation 4 Configuring the Wireless LAN Access Point 5 Login to the Wireless AP through WLAN 5 Login ...5 Main Screen of the Access Point 6 Wizard ...7 Status ...9 Basic Setting...11 Access Point Mode 11 AP Client mode ...15 WDS...
... ...1 Overview of this User's Guide 1 Unpacking and Setup ...2 Unpacking ...2 Setup ...2 Hardware Instalation ...3 Front panel ...3 Rear Panel...3 Hardware connections 4 Connect to the Switch/Hub 4 Check the installation 4 Configuring the Wireless LAN Access Point 5 Login to the Wireless AP through WLAN 5 Login ...5 Main Screen of the Access Point 6 Wizard ...7 Status ...9 Basic Setting...11 Access Point Mode 11 AP Client mode ...15 WDS...
User's Guide
Page 6
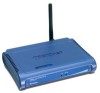
.... Overview of the WLAN Access Point. Unpacking and Setup. Describes the LED indicators of the WLAN Access Point. 1 Lists the technical (general, physical and environmental) specifications of the AP. With a WLAN (IEEE 802.11g) Access Point, a mobile computer can wirelessly transmit and receive data, ... access to -use utilities are not available under wired networks. The Access Point has an integrated 802.3af Power over Ethernet (PoE) support, allowing installation of this IEEE 802.11g Wireless LAN Access Point. Helps you get started with another mobile computer in a wireless ...
.... Overview of the WLAN Access Point. Unpacking and Setup. Describes the LED indicators of the WLAN Access Point. 1 Lists the technical (general, physical and environmental) specifications of the AP. With a WLAN (IEEE 802.11g) Access Point, a mobile computer can wirelessly transmit and receive data, ... access to -use utilities are not available under wired networks. The Access Point has an integrated 802.3af Power over Ethernet (PoE) support, allowing installation of this IEEE 802.11g Wireless LAN Access Point. Helps you get started with another mobile computer in a wireless ...
User's Guide
Page 7
... power jack. 2 Unpacking Open the box of the Wireless Access Point can best cover your wireless network. Normally, the higher you place the antenna, the better the performance will be performed using the following items: ‹ One Wireless PoE Access Point ‹ One Quick Installation Guide ‹ One external...to place the AP in to the system's Ethernet switch/hub port. ‹ Fix the direction of the antennas. Setup The setup of the Access Point and carefully unpack it is found missing or damaged, please contact your mobile stations. ‹ Visually inspect the Ethernet...
... power jack. 2 Unpacking Open the box of the Wireless Access Point can best cover your wireless network. Normally, the higher you place the antenna, the better the performance will be performed using the following items: ‹ One Wireless PoE Access Point ‹ One Quick Installation Guide ‹ One external...to place the AP in to the system's Ethernet switch/hub port. ‹ Fix the direction of the antennas. Setup The setup of the Access Point and carefully unpack it is found missing or damaged, please contact your mobile stations. ‹ Visually inspect the Ethernet...
User's Guide
Page 12
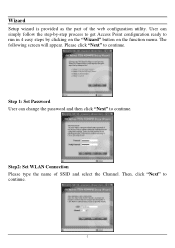
Step 1: Set Password User can simply follow the step-by-step process to get Access Point configuration ready to continue. Please click "Next" to continue. 7 Step2: Set WLAN Connection Please type the name of the web configuration utility. The following screen will appear. Wizard Setup wizard is provided as the part of SSID and select the Channel. Then, click "Next" to continue. User can change the password and then click "Next" to run in 4 easy steps by clicking on the "Wizard" button on the function menu.
Step 1: Set Password User can simply follow the step-by-step process to get Access Point configuration ready to continue. Please click "Next" to continue. 7 Step2: Set WLAN Connection Please type the name of the web configuration utility. The following screen will appear. Wizard Setup wizard is provided as the part of SSID and select the Channel. Then, click "Next" to continue. User can change the password and then click "Next" to run in 4 easy steps by clicking on the "Wizard" button on the function menu.
User's Guide
Page 13
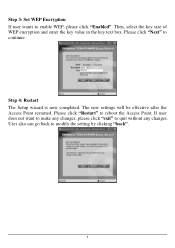
Step 4: Restart The Setup wizard is now completed. Please click "Next" to reboot the Access Point. The new settings will be effective after the Access Point restarted. Please click "Restart" to continue. User also can go back to quit without any changes. Then, select the key size of WEP encryption and enter the key value in the key text box. If user does not want to make any changes, please click "exit" to modify the setting by clicking "back". 8 Step 3: Set WEP Encryption If user wants to enable WEP, please click "Enabled".
Step 4: Restart The Setup wizard is now completed. Please click "Next" to reboot the Access Point. The new settings will be effective after the Access Point restarted. Please click "Restart" to continue. User also can go back to quit without any changes. Then, select the key size of WEP encryption and enter the key value in the key text box. If user does not want to make any changes, please click "exit" to modify the setting by clicking "back". 8 Step 3: Set WEP Encryption If user wants to enable WEP, please click "Enabled".