User's Guide
Page 5
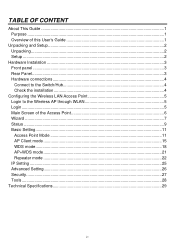
... Instalation ...3 Front panel ...3 Rear Panel...3 Hardware connections 4 Connect to the Switch/Hub 4 Check the installation 4 Configuring the Wireless LAN Access Point 5 Login to the Wireless AP through WLAN 5 Login ...5 Main Screen of the Access Point 6 Wizard ...7 Status ...9 Basic Setting...11 Access Point Mode 11 AP Client mode ...15 WDS mode...18 AP+WDS mode...21 Repeater mode ...22...
... Instalation ...3 Front panel ...3 Rear Panel...3 Hardware connections 4 Connect to the Switch/Hub 4 Check the installation 4 Configuring the Wireless LAN Access Point 5 Login to the Wireless AP through WLAN 5 Login ...5 Main Screen of the Access Point 6 Wizard ...7 Status ...9 Basic Setting...11 Access Point Mode 11 AP Client mode ...15 WDS mode...18 AP+WDS mode...21 Repeater mode ...22...
User's Guide
Page 10
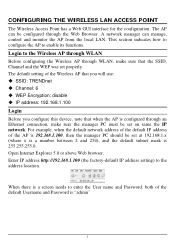
... Browser. Open Internet Explorer 5.0 or above Web browser. The default setting of the Wireless AP that you will use: ‹ SSID: TRENDnet ‹ Channel: 6 ‹ WEP Encryption: disable ‹ IP address: 192.168.1.100 Login Before you configure this device, note that the SSID,... address of the default IP address of the default Username and Password is configured through an Ethernet connection, make sure the manager PC must be configured through WLAN, make sure that when the AP is "admin" 5 CONFIGURING THE WIRELESS LAN ACCESS POINT The Wireless Access Point has a Web GUI interface...
... Browser. Open Internet Explorer 5.0 or above Web browser. The default setting of the Wireless AP that you will use: ‹ SSID: TRENDnet ‹ Channel: 6 ‹ WEP Encryption: disable ‹ IP address: 192.168.1.100 Login Before you configure this device, note that the SSID,... address of the default IP address of the default Username and Password is configured through an Ethernet connection, make sure the manager PC must be configured through WLAN, make sure that when the AP is "admin" 5 CONFIGURING THE WIRELESS LAN ACCESS POINT The Wireless Access Point has a Web GUI interface...

User's Guide
Page 11
There are seven main functions included in the top side of the menu screen. 6 Point the selections in the top side of the AP when you login to the AP. Main Screen of the Access Point The screen will show the status of the main screen: Wizard, Status, Basic Setting, IP Setting, Advanced Setting, Security and Tools.
There are seven main functions included in the top side of the menu screen. 6 Point the selections in the top side of the AP when you login to the AP. Main Screen of the Access Point The screen will show the status of the main screen: Wizard, Status, Basic Setting, IP Setting, Advanced Setting, Security and Tools.

User's Guide
Page 14
LAN: Shows the Mac address, IP address (default: 192.168.1.100), Subnet Mask, Gateway Address. Wireless: Shows the Mac address, current SSID, the status of packets sent and received by AP through wired connection is also displayed. 9 The current wireless traffic calculated in terms of number of Encryption Function (Enable or Disable), the current... This page as below shows the following information. The current LAN traffic calculated in terms of number of packets sent and received by AP through wireless communication is also displayed.
LAN: Shows the Mac address, IP address (default: 192.168.1.100), Subnet Mask, Gateway Address. Wireless: Shows the Mac address, current SSID, the status of packets sent and received by AP through wired connection is also displayed. 9 The current wireless traffic calculated in terms of number of Encryption Function (Enable or Disable), the current... This page as below shows the following information. The current LAN traffic calculated in terms of number of packets sent and received by AP through wireless communication is also displayed.
User's Guide
Page 19
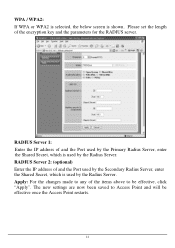
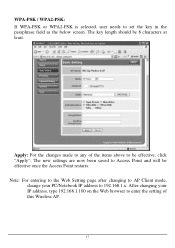
... the IP address of and the Port used by the Primary Radius Server, enter the Shared Secret, which is used by the Radius Server. Apply: For the changes made to any of the encryption key and the parameters for the RADIUS server. Please set the length of the items above to Access Point... "Apply". The new settings are now been saved to be effective once the Access Point restarts. 14 WPA / WPA2: If WPA or WPA2 is selected, the below screen is used by the Radius Server. RADIUS Server 1: Enter the IP address of and the Port used by the Secondary Radius Server, enter the Shared...
... the IP address of and the Port used by the Primary Radius Server, enter the Shared Secret, which is used by the Radius Server. Apply: For the changes made to any of the encryption key and the parameters for the RADIUS server. Please set the length of the items above to Access Point... "Apply". The new settings are now been saved to be effective once the Access Point restarts. 14 WPA / WPA2: If WPA or WPA2 is selected, the below screen is used by the Radius Server. RADIUS Server 1: Enter the IP address of and the Port used by the Secondary Radius Server, enter the Shared...
User's Guide
Page 22
... WPA2-PSK is selected, user needs to 192.168.1.x. The new settings are now been saved to Access Point and will be effective, click "Apply". Apply: For the changes made to be effective once the Access Point restarts. The key length should be 8 characters at least. Note: For entering to the Web Setting... page after changing to AP Client mode, change your IP address, type 192.168.1.100 on the Web browser to enter the setting of the items above to any of this Wireless AP. 17...
... WPA2-PSK is selected, user needs to 192.168.1.x. The new settings are now been saved to Access Point and will be effective, click "Apply". Apply: For the changes made to be effective once the Access Point restarts. The key length should be 8 characters at least. Note: For entering to the Web Setting... page after changing to AP Client mode, change your IP address, type 192.168.1.100 on the Web browser to enter the setting of the items above to any of this Wireless AP. 17...

User's Guide
Page 30
... 255.255.255.0. DHCP Server: It is not recommended. User can also set the Access Point to obtain the IP from a DHCP server, but it probably will provide you with the subnet mask of this access point is 192.168.1.100 with this information. Click "Apply" for the changes to be effective... Gateway and click "Apply" button for the changes to be effective 25 Your ISP will cause possible the conflict of the Access Point. IP Setting This page allows user to configure the IP and DHCP settings of IP assignment. Enable the DHCP server function by selecting the option "On", and enter the...
... 255.255.255.0. DHCP Server: It is not recommended. User can also set the Access Point to obtain the IP from a DHCP server, but it probably will provide you with the subnet mask of this access point is 192.168.1.100 with this information. Click "Apply" for the changes to be effective... Gateway and click "Apply" button for the changes to be effective 25 Your ISP will cause possible the conflict of the Access Point. IP Setting This page allows user to configure the IP and DHCP settings of IP assignment. Enable the DHCP server function by selecting the option "On", and enter the...
Quick Installation Guide
Page 7
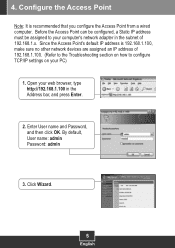
... and Password, and then click OK. Configure the Access Point Note: It is 192.168.1.100, make sure no other network devices are assigned an IP address of 192.168.1.x. Since the Access Point's default IP address is recommended that you configure the Access Point from a wired computer. Click Wizard. 5 English ...of 192.168.1.100. (Refer to the Troubleshooting section on how to your PC) 1. Before the Access Point can be configured, a Static IP address must be assigned to configure TCP/IP settings on your computer's network adapter in the Address bar, and press Enter. 2. By default, ...
... and Password, and then click OK. Configure the Access Point Note: It is 192.168.1.100, make sure no other network devices are assigned an IP address of 192.168.1.x. Since the Access Point's default IP address is recommended that you configure the Access Point from a wired computer. Click Wizard. 5 English ...of 192.168.1.100. (Refer to the Troubleshooting section on how to your PC) 1. Before the Access Point can be configured, a Static IP address must be assigned to configure TCP/IP settings on your computer's network adapter in the Address bar, and press Enter. 2. By default, ...
Quick Installation Guide
Page 10
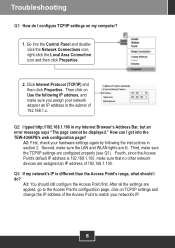
Go into the TEW-434APB's web configuration page? Click Internet Protocol (TCP/IP) and then click Properties. How can I get into the Control Panel and doubleclick the Network Connections icon, right-click the Local Area Connection icon...but an error message says "The page cannot be displayed." Then click on TCP/IP settings and change the IP address of 192.168.1.x. Fourth, since the Access Point's default IP address is different than the Access Point's range, what should still configure the Access Point first. Troubleshooting Q1: How do ? Second, make sure you assign your hardware ...
Go into the TEW-434APB's web configuration page? Click Internet Protocol (TCP/IP) and then click Properties. How can I get into the Control Panel and doubleclick the Network Connections icon, right-click the Local Area Connection icon...but an error message says "The page cannot be displayed." Then click on TCP/IP settings and change the IP address of 192.168.1.x. Fourth, since the Access Point's default IP address is different than the Access Point's range, what should still configure the Access Point first. Troubleshooting Q1: How do ? Second, make sure you assign your hardware ...
Quick Installation Guide
Page 11
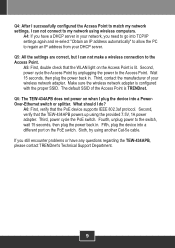
...to my network using wireless computers. Second, power cycle the Access Point by unplugging the power to regain an IP address from your DHCP server. A6: First, verify that the WLAN light on the PoE switch. Sixth, ...Access Point. The default SSID of your network, you still encounter problems or have any questions regarding the TEW-434APB, please contact TRENDnet's Technical Support Department. 9 Wait 15 seconds, then plug the power back in . Second, verify that the TEW-434APB powers up using another Cat-5e cable. A4: If you have a DHCP server in your wireless...
...to my network using wireless computers. Second, power cycle the Access Point by unplugging the power to regain an IP address from your DHCP server. A6: First, verify that the WLAN light on the PoE switch. Sixth, ...Access Point. The default SSID of your network, you still encounter problems or have any questions regarding the TEW-434APB, please contact TRENDnet's Technical Support Department. 9 Wait 15 seconds, then plug the power back in . Second, verify that the TEW-434APB powers up using another Cat-5e cable. A4: If you have a DHCP server in your wireless...