User Guide
Page 7
Introduction 1 1.1 Product Overview ...1 1.2 Main Features ...1 Chapter 2. Software Configuration 10 3.1 Login ...10 3.2 Status ...10 3.3 Quick Setup...11 3.4 Network ...12 3.4.1 LAN...12 3.4.2 WAN ...12 3.4.3 MAC Clone ...23 3.5 Wireless ...24 3.5.1 Wireless Settings...24 3.5.2 MAC Filtering...28 3.5.3 Wireless Statistics ...30 3.6 DHCP ...31 3.6.1 DHCP Settings ...31 3.6.2 DHCP Clients List...32 3.6.3 Address Reservation ...33 3.7 Forwarding ...34 3.7.1 Virtual Servers...34 3.7.2 Port Triggering...
Introduction 1 1.1 Product Overview ...1 1.2 Main Features ...1 Chapter 2. Software Configuration 10 3.1 Login ...10 3.2 Status ...10 3.3 Quick Setup...11 3.4 Network ...12 3.4.1 LAN...12 3.4.2 WAN ...12 3.4.3 MAC Clone ...23 3.5 Wireless ...24 3.5.1 Wireless Settings...24 3.5.2 MAC Filtering...28 3.5.3 Wireless Statistics ...30 3.6 DHCP ...31 3.6.1 DHCP Settings ...31 3.6.2 DHCP Clients List...32 3.6.3 Address Reservation ...33 3.7 Forwarding ...34 3.7.1 Virtual Servers...34 3.7.2 Port Triggering...
User Guide
Page 18
...Save button. 3.2 Status The Status page displays the router's current status and configuration. TL-WR340G/TL-WR340GD 54M Wireless Router User Guide Chapter 3. LAN This field displays the current settings or information for wireless function, including Wireless Radio, SSID, Channel, Mode, Wireless MAC address, and IP address. On the right ... want to know more about this chapter and configure advanced settings though the Web-based Utility. 3.1 Login After your successful login, you click one of the router from when it was switched on the left of the web-based utility. If PPPoE is read ...
...Save button. 3.2 Status The Status page displays the router's current status and configuration. TL-WR340G/TL-WR340GD 54M Wireless Router User Guide Chapter 3. LAN This field displays the current settings or information for wireless function, including Wireless Radio, SSID, Channel, Mode, Wireless MAC address, and IP address. On the right ... want to know more about this chapter and configure advanced settings though the Web-based Utility. 3.1 Login After your successful login, you click one of the router from when it was switched on the left of the web-based utility. If PPPoE is read ...
User Guide
Page 20
... set is Dynamic IP. The physical address of the network. The value can configure the IP parameters of your router in Figure 3-2): LAN, WAN and MAC Clone. Enter the IP address of them, and you must use 255... Internet. If you 12 Click any login parameters (fixed IP Address, logging ID, etc), please select Dynamic IP. Normally use the new IP Address to configure the corresponding function. 3.4 Network TL-WR340G/TL-WR340GD 54M Wireless Router User Guide Figure 3-2 the Network menu...take effect, until they are provided below. 3.4.1 LAN You can 't be able to login the router.
... set is Dynamic IP. The physical address of the network. The value can configure the IP parameters of your router in Figure 3-2): LAN, WAN and MAC Clone. Enter the IP address of them, and you must use 255... Internet. If you 12 Click any login parameters (fixed IP Address, logging ID, etc), please select Dynamic IP. Normally use the new IP Address to configure the corresponding function. 3.4 Network TL-WR340G/TL-WR340GD 54M Wireless Router User Guide Figure 3-2 the Network menu...take effect, until they are provided below. 3.4.1 LAN You can 't be able to login the router.
User Guide
Page 24
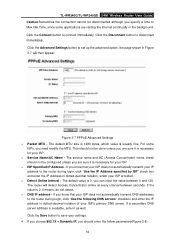
TL-WR340G/TL-WR340GD 54M Wireless Router User Guide Caution:Sometimes the connection cannot be disconnected although you specify a time to Max Idle Time, since some ISPs, you know that your ISP does not automatically transmit DNS addresses to the router during login, click "Use the IP Address specified by ISP" ... as well. This should not be configured unless you know that your ISP does not automatically transmit your IP address to the router during login, click "Use the following DNS servers" checkbox and enter the IP address in dotted-decimal notation of your ISP's primary DNS...
TL-WR340G/TL-WR340GD 54M Wireless Router User Guide Caution:Sometimes the connection cannot be disconnected although you specify a time to Max Idle Time, since some ISPs, you know that your ISP does not automatically transmit DNS addresses to the router during login, click "Use the IP Address specified by ISP" ... as well. This should not be configured unless you know that your ISP does not automatically transmit your IP address to the router during login, click "Use the following DNS servers" checkbox and enter the IP address in dotted-decimal notation of your ISP's primary DNS...
User Guide
Page 25
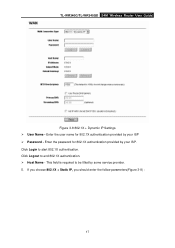
Click Login to end 802.1X authentication. ¾ Host Name - Click Logout to start 802.1X authentication. If you choose 802.1X + Static IP, you should enter the follow parameters(Figure 3-9) : 17 Enter the user name for 802.1X authentication provided by your ISP. Enter the password for 802.1X authentication provided by your ISP ¾ Password - This field is required to be filled by some service provider. 5. TL-WR340G/TL-WR340GD 54M Wireless Router User Guide Figure 3-8 802.1X + Dynamic IP Settings ¾ User Name -
Click Login to end 802.1X authentication. ¾ Host Name - Click Logout to start 802.1X authentication. If you choose 802.1X + Static IP, you should enter the follow parameters(Figure 3-9) : 17 Enter the user name for 802.1X authentication provided by your ISP. Enter the password for 802.1X authentication provided by your ISP ¾ Password - This field is required to be filled by some service provider. 5. TL-WR340G/TL-WR340GD 54M Wireless Router User Guide Figure 3-8 802.1X + Dynamic IP Settings ¾ User Name -
User Guide
Page 26
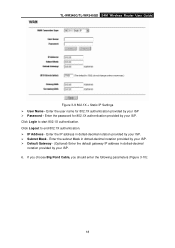
... ¾ Password - If you choose Big Pond Cable, you should enter the following parameters (Figure 3-10): 18 Click Logout to start 802.1X authentication. Click Login to end 802.1X authentication. ¾ IP Address - Enter the IP address in dotted-decimal notation provided by your ISP. 6. Enter the subnet Mask in... IP address in dotted-decimal notation provided by your ISP. ¾ Subnet Mask - Enter the user name for 802.1X authentication provided by your ISP. TL-WR340G/TL-WR340GD 54M Wireless Router User Guide Figure 3-9 802.1X + Static IP Settings ¾ User Name -
... ¾ Password - If you choose Big Pond Cable, you should enter the following parameters (Figure 3-10): 18 Click Logout to start 802.1X authentication. Click Login to end 802.1X authentication. ¾ IP Address - Enter the IP address in dotted-decimal notation provided by your ISP. 6. Enter the subnet Mask in... IP address in dotted-decimal notation provided by your ISP. ¾ Subnet Mask - Enter the user name for 802.1X authentication provided by your ISP. TL-WR340G/TL-WR340GD 54M Wireless Router User Guide Figure 3-9 802.1X + Static IP Settings ¾ User Name -
User Guide
Page 59
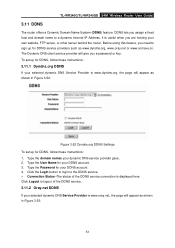
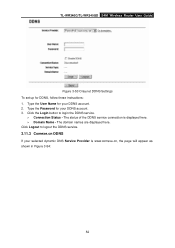
...your selected dynamic DNS Service Provider is useful when you are hosting your own website, FTP server, or other server behind the router. The Dynamic DNS client service provider will give you assign a fixed host and domain name to logout of the DDNS service ... 3.11.1 Dyndns.org DDNS If your DDNS account. 3. Click the Login button to login to sign up for DDNS, follow these instructions: 1. Click Logout to a dynamic Internet IP Address. TL-WR340G/TL-WR340GD 54M Wireless Router User Guide 3.11 DDNS The router offers a Dynamic Domain Name System (DDNS) feature. Type the domain ...
...your selected dynamic DNS Service Provider is useful when you are hosting your own website, FTP server, or other server behind the router. The Dynamic DNS client service provider will give you assign a fixed host and domain name to logout of the DDNS service ... 3.11.1 Dyndns.org DDNS If your DDNS account. 3. Click the Login button to login to sign up for DDNS, follow these instructions: 1. Click Logout to a dynamic Internet IP Address. TL-WR340G/TL-WR340GD 54M Wireless Router User Guide 3.11 DDNS The router offers a Dynamic Domain Name System (DDNS) feature. Type the domain ...
User Guide
Page 60
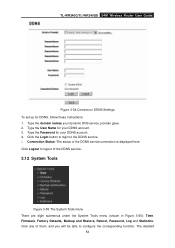
... 3-54: 52 Type the User Name for your DDNS account. 2. Click the Login button to logout the DDNS service. 3.11.3 Comexe.cn DDNS If your selected dynamic DNS Service Provider is displayed here. ¾ Domain Name - The domain names are displayed here. Type the Password for your DDNS account. 3. TL-WR340G/TL-WR340GD 54M Wireless Router User...
... 3-54: 52 Type the User Name for your DDNS account. 2. Click the Login button to logout the DDNS service. 3.11.3 Comexe.cn DDNS If your selected dynamic DNS Service Provider is displayed here. ¾ Domain Name - The domain names are displayed here. Type the Password for your DDNS account. 3. TL-WR340G/TL-WR340GD 54M Wireless Router User...
User Guide
Page 61
Click the Login button to login to the DDNS service. ¾ Connection Status -The status of them, and you will be able to logout of the DDNS service. 3.12 System Tools ... account. 4. Type the Password for DDNS, follow these instructions: 1. Click any of the DDNS service connection is displayed here. The detailed 53 TL-WR340G/TL-WR340GD 54M Wireless Router User Guide Figure 3-54 Comexe.cn DDNS Settings To set up for your DDNS account. 3. Type the domain names your dynamic DNS service provider gave. 2. Click Logout...
Click the Login button to login to the DDNS service. ¾ Connection Status -The status of them, and you will be able to logout of the DDNS service. 3.12 System Tools ... account. 4. Type the Password for DDNS, follow these instructions: 1. Click any of the DDNS service connection is displayed here. The detailed 53 TL-WR340G/TL-WR340GD 54M Wireless Router User Guide Figure 3-54 Comexe.cn DDNS Settings To set up for your DDNS account. 3. Type the domain names your dynamic DNS service provider gave. 2. Click Logout...
User Guide
Page 62
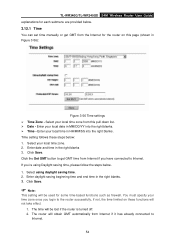
... saving time, please follow the steps below. 1. Enter your time zone once you login to the router successfully, if not, the time limited on this pull down list. ¾ Date... MM/DD/YY into the right blanks. If you have connected to Internet. 54 The router will be lost if the router is turned off. 2. Click the Get GMT button to get GMT from this... some time-based functions such as firewall. Click Save. Enter your local time zone. 2. TL-WR340G/TL-WR340GD 54M Wireless Router User Guide explanations for each submenu are provided below. 3.12.1 Time You can set time ...
... saving time, please follow the steps below. 1. Enter your time zone once you login to the router successfully, if not, the time limited on this pull down list. ¾ Date... MM/DD/YY into the right blanks. If you have connected to Internet. 54 The router will be lost if the router is turned off. 2. Click the Get GMT button to get GMT from this... some time-based functions such as firewall. Click Save. Enter your local time zone. 2. TL-WR340G/TL-WR340GD 54M Wireless Router User Guide explanations for each submenu are provided below. 3.12.1 Time You can set time ...

User Guide
Page 70
...PPPoE" for Internet connection mode. PPPoE Connection Type 4) If your browser, and click "WAN" submenu. How do I configure the router to the router, click the "Network" menu on Demand" or "Connect Manually" for WAN Connection Type. PPPoE Connection Mode ) Note: Sometimes the ... your adapter, which is in the "Password" field, finish by Ethernet users? 1) Login to access Internet by clicking "Save". 2) Some ISPs require that you are a Cable user, please configure the router following the above steps. 2. TL-WR340G/TL-WR340GD 54M Wireless Router User Guide Appendix C: FAQ 1.
...PPPoE" for Internet connection mode. PPPoE Connection Type 4) If your browser, and click "WAN" submenu. How do I configure the router to the router, click the "Network" menu on Demand" or "Connect Manually" for WAN Connection Type. PPPoE Connection Mode ) Note: Sometimes the ... your adapter, which is in the "Password" field, finish by Ethernet users? 1) Login to access Internet by clicking "Save". 2) Some ISPs require that you are a Cable user, please configure the router following the above steps. 2. TL-WR340G/TL-WR340GD 54M Wireless Router User Guide Appendix C: FAQ 1.
User Guide
Page 71
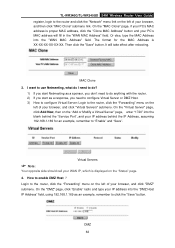
...Netmeeting as a sponsor, you don't need to do anything with the router. 2) If you start as an example, remember to the router, click the "Forwarding" menu on the left of your browser, and then click "MAC Clone" submenu link. On the "Virtual Server" page, click Add New, then on... "Status" page. 4. How to enable DMZ Host ? Login to click the "Save" button. MAC Clone 3. It will fill in the "WAN MAC Address" field. TL-WR340G/TL-WR340GD 54M Wireless Router User Guide register, login to the router and click the "Network" menu link on the left of your browser, and click "DMZ" submenu...
...Netmeeting as a sponsor, you don't need to do anything with the router. 2) If you start as an example, remember to the router, click the "Forwarding" menu on the left of your browser, and then click "MAC Clone" submenu link. On the "Virtual Server" page, click Add New, then on... "Status" page. 4. How to enable DMZ Host ? Login to click the "Save" button. MAC Clone 3. It will fill in the "WAN MAC Address" field. TL-WR340G/TL-WR340GD 54M Wireless Router User Guide register, login to the router and click the "Network" menu link on the left of your browser, and click "DMZ" submenu...
User Guide
Page 72
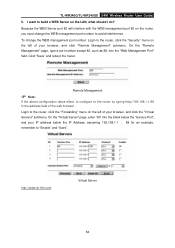
..."Virtual Server" page, enter "80" into the "Web Management Port" field. To change the WEB management port number to avoid interference. Login to "Enable" and "Save". Because the WEB Server port 80 will interfere with the WEB management port 80 on the LAN, what should.... http://www.tp-link.com Virtual Server 64 I want to build a WEB Server on the router, you must change the WEB management port number: Login to the router by typing http://192.168.1.1:88 in the address field of your browser, and click "Remote Management" submenu. TL-WR340G/TL-WR340GD 54M Wireless Router User Guide 5....
..."Virtual Server" page, enter "80" into the "Web Management Port" field. To change the WEB management port number to avoid interference. Login to "Enable" and "Save". Because the WEB Server port 80 will interfere with the WEB management port 80 on the LAN, what should.... http://www.tp-link.com Virtual Server 64 I want to build a WEB Server on the router, you must change the WEB management port number: Login to the router by typing http://192.168.1.1:88 in the address field of your browser, and click "Remote Management" submenu. TL-WR340G/TL-WR340GD 54M Wireless Router User Guide 5....


