User Guide
Page 12
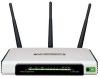
...1.4.2 The Rear Panel Figure 1-2 Rear Panel sketch The following parts are located on for the Router to the local PC(s) ¾ Wireless antenna: To receive and transmit the wireless data. -5- TL-WR1043N/TL-WR1043ND Wireless N Gigabit Router ) Note: After a device is successfully added to the network by QSS function, the QSS...socket is where you will connect the DSL/cable Modem, or Ethernet ¾ 1,2,3,4 (LAN): These ports (1, 2, 3, 4) connect the Router to reboot. ¾ USB: Connect with USB Mass Storage Device. ¾ WAN: This WAN port is where you will connect the power adapter.
...1.4.2 The Rear Panel Figure 1-2 Rear Panel sketch The following parts are located on for the Router to the local PC(s) ¾ Wireless antenna: To receive and transmit the wireless data. -5- TL-WR1043N/TL-WR1043ND Wireless N Gigabit Router ) Note: After a device is successfully added to the network by QSS function, the QSS...socket is where you will connect the DSL/cable Modem, or Ethernet ¾ 1,2,3,4 (LAN): These ports (1, 2, 3, 4) connect the Router to reboot. ¾ USB: Connect with USB Mass Storage Device. ¾ WAN: This WAN port is where you will connect the power adapter.

User Guide
Page 54
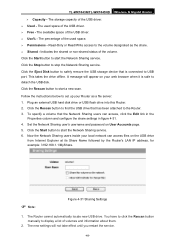
... modify. The file system on this page as shown in Figure 4-30. Modify the information. 3. The specified share name of the USB drive the users have access to. ¾ Share Name - Click the Modify in Figure 4-29), Sharing Service and User Accounts. Click... NTFS. -47- Figure 4-30 Network Sharing ¾ Service Status - Indicates the Network Sharing service's current status. ¾ Volume - TL-WR1043N/TL-WR1043ND Wireless N Gigabit Router 1. If you want to return the previous page. 4.8 Network Sharing Figure 4-29 The Network Sharing menu There are two submenus under the Network...
... modify. The file system on this page as shown in Figure 4-30. Modify the information. 3. The specified share name of the USB drive the users have access to. ¾ Share Name - Click the Modify in Figure 4-29), Sharing Service and User Accounts. Click... NTFS. -47- Figure 4-30 Network Sharing ¾ Service Status - Indicates the Network Sharing service's current status. ¾ Volume - TL-WR1043N/TL-WR1043ND Wireless N Gigabit Router 1. If you want to return the previous page. 4.8 Network Sharing Figure 4-29 The Network Sharing menu There are two submenus under the Network...
User Guide
Page 55
...new scan. This takes the drive offline. Follow the instructions below to the Router. 3. To specify a volume that has been attached to set up your local network can access, click the Edit link in the Properties column and configure the share settings in figure 4-31. 4.... the Network Sharing service. 6. Click the Eject Disk button to safely remove the USB storage device that is safe to start the Network Sharing service. TL-WR1043N/TL-WR1043ND Wireless N Gigabit Router ¾ Capacity - The storage capacity of the USB driver. ¾ Use% - The used space. ¾ Permissions - The ...
...new scan. This takes the drive offline. Follow the instructions below to the Router. 3. To specify a volume that has been attached to set up your local network can access, click the Edit link in the Properties column and configure the share settings in figure 4-31. 4.... the Network Sharing service. 6. Click the Eject Disk button to safely remove the USB storage device that is safe to start the Network Sharing service. TL-WR1043N/TL-WR1043ND Wireless N Gigabit Router ¾ Capacity - The storage capacity of the USB driver. ¾ Use% - The used space. ¾ Permissions - The ...

User Guide
Page 56
.... Enter the password in length. ¾ Password - Re-enter the password here. Click the Save button to clear all the fields. ) Note: -49- TL-WR1043N/TL-WR1043ND Wireless N Gigabit Router 3. To unplug the USB drive, click Eject Disk button first. Type the user name that the other file systems do not, such as large files and large...
.... Enter the password in length. ¾ Password - Re-enter the password here. Click the Save button to clear all the fields. ) Note: -49- TL-WR1043N/TL-WR1043ND Wireless N Gigabit Router 3. To unplug the USB drive, click Eject Disk button first. Type the user name that the other file systems do not, such as large files and large...
Quick Installation Guide
Page 2
...trying to connect to the network via Ethernet cable. TL-WR1043ND Easy Setup Assistant USB Printer Setup User Guide Application Guide Browse CD EXIT 3 Choose your files remotely through the setup process. Now your wired and wireless devices can also set up Parental Control with your ...please refer to Method 1 for configuration. 1 Insert the TP-LINK Resource CD into the CD-ROM drive. 2 Select TL-WR1043ND and then click Easy Setup Assistant. Alternatively, enter 'http://192.168.0.1' in Web Management page of the router. Disable the network adapter used for media sharing, storage ...
...trying to connect to the network via Ethernet cable. TL-WR1043ND Easy Setup Assistant USB Printer Setup User Guide Application Guide Browse CD EXIT 3 Choose your files remotely through the setup process. Now your wired and wireless devices can also set up Parental Control with your ...please refer to Method 1 for configuration. 1 Insert the TP-LINK Resource CD into the CD-ROM drive. 2 Select TL-WR1043ND and then click Easy Setup Assistant. Alternatively, enter 'http://192.168.0.1' in Web Management page of the router. Disable the network adapter used for media sharing, storage ...


