User Guide
Page 2
How to Use Intelligent IP Installer 1 1. User ...15 4.1 Info ...18 4.2 User ...19 4.3 Date/Time ...20 4.4 TCP/IP ...21 4.5 PPPoE...23 4.6 DDNS ...24 5. Camera ...4 3.1 Setup...5 3.2 Upgrade ...12 3.3 Factory Default ...13 3.4 Reboot ...14 4. About...25 Initial use Intelligent IP Installer 2 2. Configuration of Main Menu 3 3.
How to Use Intelligent IP Installer 1 1. User ...15 4.1 Info ...18 4.2 User ...19 4.3 Date/Time ...20 4.4 TCP/IP ...21 4.5 PPPoE...23 4.6 DDNS ...24 5. Camera ...4 3.1 Setup...5 3.2 Upgrade ...12 3.3 Factory Default ...13 3.4 Reboot ...14 4. About...25 Initial use Intelligent IP Installer 2 2. Configuration of Main Menu 3 3.

User Guide
Page 21
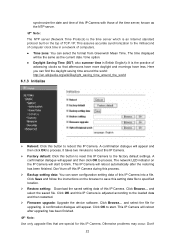
Intelligent IP Installer provides to assign a password if the Network Camera is "admin/admin". Use this menu to set the username and password of Administrator and up ...;Set a user to Admin, Operator or Viewer mode. ¾ Viewer authentication:Allows any viewer direct access to Live View. 19 4.2 User The Network Camera default account and password setting is intended to be accessed by others.
Intelligent IP Installer provides to assign a password if the Network Camera is "admin/admin". Use this menu to set the username and password of Administrator and up ...;Set a user to Admin, Operator or Viewer mode. ¾ Viewer authentication:Allows any viewer direct access to Live View. 19 4.2 User The Network Camera default account and password setting is intended to be accessed by others.

User Guide
Page 24
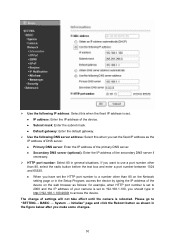
...;Enter the default gateway. z Secondary DNS:Enter the IP address of the primary DNS server. z Subnet mask:Enter the subnet mask. DNS Setting ¾ Obtain DNS server automatically:If a DHCP server is ... while the DNS server is assigned by the DHCP server. ) Note: When you set Obtain IP automatically (DHCP), make sure that the DHCP server is working on the network, to select this while the IP address is assigned by the DHCP server. ¾ Use the following DNS server:Select this...
...;Enter the default gateway. z Secondary DNS:Enter the IP address of the primary DNS server. z Subnet mask:Enter the subnet mask. DNS Setting ¾ Obtain DNS server automatically:If a DHCP server is ... while the DNS server is assigned by the DHCP server. ) Note: When you set Obtain IP automatically (DHCP), make sure that the DHCP server is working on the network, to select this while the IP address is assigned by the DHCP server. ¾ Use the following DNS server:Select this...

User Guide
Page 3
... Popup Event Report 35 6.1.3. Camera ...37 6.2.1. User Account 42 6.6 Setting - Log Viewer - System Log 45 Record on Motion 28 4.7.3. Signal Lost 30 5.1.3. Action - IP Camera / Video Server Setting Panel 40 6.3 Setting - Unusual Event 44 6.8.2. Add Camera...37 6.2.2. Action Type 33 6.1 Setting - Camera Parameter 39 6.2.3. Custom: ...27 ...44 6.8.1. Pre-record/ Post-record Time 28 5.1 Event ...29 5.1.1. Event - PTZ Config 41 6.5 Setting - Log Viewer - Event - Always Record 28 4.7.2. Default: ...27 4.5.2. Status Display...37 6.2 Setting -
... Popup Event Report 35 6.1.3. Camera ...37 6.2.1. User Account 42 6.6 Setting - Log Viewer - System Log 45 Record on Motion 28 4.7.3. Signal Lost 30 5.1.3. Action - IP Camera / Video Server Setting Panel 40 6.3 Setting - Unusual Event 44 6.8.2. Add Camera...37 6.2.2. Action Type 33 6.1 Setting - Camera Parameter 39 6.2.3. Custom: ...27 ...44 6.8.1. Pre-record/ Post-record Time 28 5.1 Event ...29 5.1.1. Event - PTZ Config 41 6.5 Setting - Log Viewer - Event - Always Record 28 4.7.2. Default: ...27 4.5.2. Status Display...37 6.2 Setting -
User Guide
Page 11
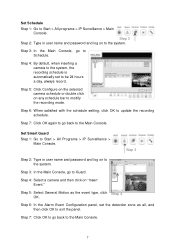
...Schedule. Step 6: When satisfied with the schedule setting, click OK to Start > All Programs > IP Surveillance > Main Console. Step 3: In the Main Console, go to the Main Console. Step 4: By default, when inserting a camera to exit the panel. Set Smart Guard Step 1: Go to update the ...recording schedule. Step 5: Click Configure on the selected camera schedule or double click on to Start > All programs > IP Surveillance > Main Console. Step 5: Select ...
...Schedule. Step 6: When satisfied with the schedule setting, click OK to Start > All Programs > IP Surveillance > Main Console. Step 3: In the Main Console, go to the Main Console. Step 4: By default, when inserting a camera to exit the panel. Set Smart Guard Step 1: Go to update the ...recording schedule. Step 5: Click Configure on the selected camera schedule or double click on to Start > All programs > IP Surveillance > Main Console. Step 5: Select ...
User Guide
Page 55
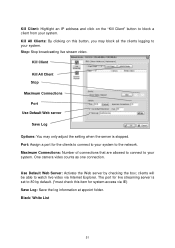
...for system access via Internet Explorer. Stop: Stop broadcasting live streaming server is stopped. Kill Client Kill All Client Stop Maximum Connections Port Use Default Web server Save Log Options: You may block all the clients logging to your system to the network. Maximum Connections: Number of connections ... Server: Activate the Web server by default. (*must check this button, you may only adjust the setting when the server is set to 80 by checking the box; Kill Client: Highlight an IP address and click on this item for the clients to connect to watch live video via...
...for system access via Internet Explorer. Stop: Stop broadcasting live streaming server is stopped. Kill Client Kill All Client Stop Maximum Connections Port Use Default Web server Save Log Options: You may block all the clients logging to your system to the network. Maximum Connections: Number of connections ... Server: Activate the Web server by default. (*must check this button, you may only adjust the setting when the server is set to 80 by checking the box; Kill Client: Highlight an IP address and click on this item for the clients to connect to watch live video via...
User Guide
Page 63
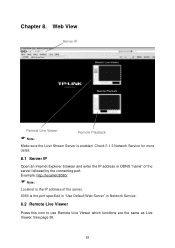
Web View Server IP Remote Live Viewer Note: Remote Playback Make sure the Liver Stream Server is the port specified in "Use Default Web Server" in Network Service. 8.2 Remote Live Viewer Press this icon to use Remote Live Viewer which functions are the same as Live Viewer.... Check 5.1.3 Network Service for more detail. 8.1 Server IP Open an Internet Explorer browser and enter the...
Web View Server IP Remote Live Viewer Note: Remote Playback Make sure the Liver Stream Server is the port specified in "Use Default Web Server" in Network Service. 8.2 Remote Live Viewer Press this icon to use Remote Live Viewer which functions are the same as Live Viewer.... Check 5.1.3 Network Service for more detail. 8.1 Server IP Open an Internet Explorer browser and enter the...
User Guide
Page 4
... Phone Streaming Viewing 12 4.1.2 2.5G Mobile Phone WAP Viewing 12 4.1.3 2.5G Mobile Phone Browser Viewing 12 4.2 Using IP Camera via iPhone 13 Chapter 5 Configuration of Main Menu 14 5.1 Live View...14 5.1.1 Snapshot...14 5.1.2 Zoom in/...View Size ...17 5.3.3 Protocol...18 5.3.4 Video Buffer ...18 5.4 Image Setup...18 5.4.1 Brightness ...18 5.4.2 Contrast ...19 5.4.3 Saturation...19 5.4.4 Hue ...19 5.4.5 Default...19 Chapter 6 Setting-BASIC...20 6.1 System ...20 6.1.1 Information ...20 6.1.2 Date/Time...21 6.1.3 Initialize ...22 6.2 Camera ...23 6.2.1 General ...23 6.2.2 MPEG4 ...24...
... Phone Streaming Viewing 12 4.1.2 2.5G Mobile Phone WAP Viewing 12 4.1.3 2.5G Mobile Phone Browser Viewing 12 4.2 Using IP Camera via iPhone 13 Chapter 5 Configuration of Main Menu 14 5.1 Live View...14 5.1.1 Snapshot...14 5.1.2 Zoom in/...View Size ...17 5.3.3 Protocol...18 5.3.4 Video Buffer ...18 5.4 Image Setup...18 5.4.1 Brightness ...18 5.4.2 Contrast ...19 5.4.3 Saturation...19 5.4.4 Hue ...19 5.4.5 Default...19 Chapter 6 Setting-BASIC...20 6.1 System ...20 6.1.1 Information ...20 6.1.2 Date/Time...21 6.1.3 Initialize ...22 6.2 Camera ...23 6.2.1 General ...23 6.2.2 MPEG4 ...24...
User Guide
Page 12
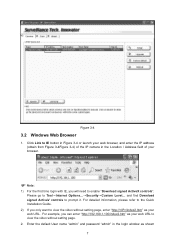
... Tool→Internet Options...→Security→Custom Level... Please go to prompt it. Click Link to IE button in Figure 3-4 or launch your web browser, and enter the IP address (obtain from Figure 3-4Figure 3-4) of the IP camera in the login window as your browser. ) Note: 1) For the first time... login with IE, you can enter "http://192.168.1.100/index2.htm" as your web URL to view the video without setting page. 2. Enter the default User name "admin" and password "...
... Tool→Internet Options...→Security→Custom Level... Please go to prompt it. Click Link to IE button in Figure 3-4 or launch your web browser, and enter the IP address (obtain from Figure 3-4Figure 3-4) of the IP camera in the login window as your browser. ) Note: 1) For the first time... login with IE, you can enter "http://192.168.1.100/index2.htm" as your web URL to view the video without setting page. 2. Enter the default User name "admin" and password "...

User Guide
Page 17
...:///mobile.wml" into your 2.5G WAP Browser. is the RTSP port of your IP camera (Default value is the Public IP address of your 2.5G Web Browser. is the Public IP address of your 3G Streaming Link. is the Public IP address of your IP camera. 4.1.3 2.5G Mobile Phone Browser Viewing For 2.5G mobile phone viewing, type...
...:///mobile.wml" into your 2.5G WAP Browser. is the RTSP port of your IP camera (Default value is the Public IP address of your 2.5G Web Browser. is the Public IP address of your 3G Streaming Link. is the Public IP address of your IP camera. 4.1.3 2.5G Mobile Phone Browser Viewing For 2.5G mobile phone viewing, type...
User Guide
Page 18
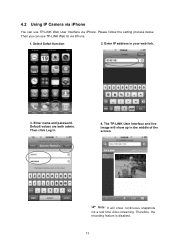
Please follow the setting process below. Default values are both admin. The TP-LINK User Interface and live image will show up in your web link. 3. Then you can use TP-LINK Web UI via iPhone. Select Safari function 2. Therefore, the recording feature is disabled. 13 Enter IP address in the middle of the screen. ) Note: It will show continuous snapshots not a real time video streaming. Enter name and password. Then click Log in 4. 4.2 Using IP Camera via iPhone You can use TP-LINK Web User Interface via iPhone. 1.
Please follow the setting process below. Default values are both admin. The TP-LINK User Interface and live image will show up in your web link. 3. Then you can use TP-LINK Web UI via iPhone. Select Safari function 2. Therefore, the recording feature is disabled. 13 Enter IP address in the middle of the screen. ) Note: It will show continuous snapshots not a real time video streaming. Enter name and password. Then click Log in 4. 4.2 Using IP Camera via iPhone You can use TP-LINK Web User Interface via iPhone. 1.
User Guide
Page 27
... 6.1.3 Initialize ¾ Reboot: Click this button to reset this IP Camera into a file. It takes two minutes to reboot this IP Camera. ¾ Factory default: Click this button to reboot this IP Camera. Click OK and this IP Camera is the practice of advancing clocks so that are special for... of computers. The network LED indicator on the browser to save configuration setting data of this IP Camera to blink. Click Browse... Click Browse... Click OK to start to the factory default settings. This IP Camera will be the same as the NTP server. ) Note: The NTP server (Network ...
... 6.1.3 Initialize ¾ Reboot: Click this button to reset this IP Camera into a file. It takes two minutes to reboot this IP Camera. ¾ Factory default: Click this button to reboot this IP Camera. Click OK and this IP Camera is the practice of advancing clocks so that are special for... of computers. The network LED indicator on the browser to save configuration setting data of this IP Camera to blink. Click Browse... Click Browse... Click OK to start to the factory default settings. This IP Camera will be the same as the NTP server. ) Note: The NTP server (Network ...

User Guide
Page 28
turn off the IP Camera power or disconnect the network until the upgrading is applied immediately. The upgrade is completed. ¾ Upload language pack: Upgrade the device language pack. The default language is "English". 6.2 Camera Click Camera to start upgrading. Click Browse... A confirmation dialogue will appear. Click OK to display the submenus including General, MPEG4 and MJPEG. 6.2.1 General 23 and select the file for upgrading.
turn off the IP Camera power or disconnect the network until the upgrading is applied immediately. The upgrade is completed. ¾ Upload language pack: Upgrade the device language pack. The default language is "English". 6.2 Camera Click Camera to start upgrading. Click Browse... A confirmation dialogue will appear. Click OK to display the submenus including General, MPEG4 and MJPEG. 6.2.1 General 23 and select the file for upgrading.
User Guide
Page 35
z Default gateway: Enter the default gateway. ¾ Use the following IP address: Select this when you set the fixed IP address as shown in the figure below after you ... of the primary DNS server. ¾ Use the following DNS server address: Select this when the fixed IP address is set to 192.168.1.100, you should type in http://192.168.1.100:2000/ to use ..., select the radio button before the text box and enter a port number between 1024 and 65535. z IP address: Enter the IP address of the secondary DNS server if necessary. ¾ HTTP port number: Select 80 in general situations...
z Default gateway: Enter the default gateway. ¾ Use the following IP address: Select this when you set the fixed IP address as shown in the figure below after you ... of the primary DNS server. ¾ Use the following DNS server address: Select this when the fixed IP address is set to 192.168.1.100, you should type in http://192.168.1.100:2000/ to use ..., select the radio button before the text box and enter a port number between 1024 and 65535. z IP address: Enter the IP address of the secondary DNS server if necessary. ¾ HTTP port number: Select 80 in general situations...

User Guide
Page 37
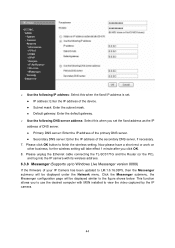
..., or www.noip.org. ¾ Use the following DNS server address: Select this feature, you need to its factory default settings by pressing the Reset button. The IP Camera offers the DDNS (Dynamic Domain Name System) feature, which allows the hosting of DNS server. Then the camera can... configure the Dynamic DNS function. It also widely used mainly with ADSL service where individual users connect to Section 6.1.3 Initialize. 3) The IP Camera with a fixed domain name (named by entering your domain name no matter what your friends can 't be founded after it finishes changing ...
..., or www.noip.org. ¾ Use the following DNS server address: Select this feature, you need to its factory default settings by pressing the Reset button. The IP Camera offers the DDNS (Dynamic Domain Name System) feature, which allows the hosting of DNS server. Then the camera can... configure the Dynamic DNS function. It also widely used mainly with ADSL service where individual users connect to Section 6.1.3 Initialize. 3) The IP Camera with a fixed domain name (named by entering your domain name no matter what your friends can 't be founded after it finishes changing ...

User Guide
Page 42
... or configure DNS servers. 37 Bonjour uses industry standard IP protocols to allow devices to automatically discover each other without the need to "My Network Place" if it also enables on IP networks. ¾ HTTP port: Enter the HTTP port number and the default HTTP port is 80. ¾ SSL port: Enter ...the SSL port number and the default SSL port is 443. ¾ MPEG4 RTSP port: Enter the MPEG4 RTSP...
... or configure DNS servers. 37 Bonjour uses industry standard IP protocols to allow devices to automatically discover each other without the need to "My Network Place" if it also enables on IP networks. ¾ HTTP port: Enter the HTTP port number and the default HTTP port is 80. ¾ SSL port: Enter ...the SSL port number and the default SSL port is 443. ¾ MPEG4 RTSP port: Enter the MPEG4 RTSP...

User Guide
Page 44
z Off: Select this option is selected, the IP Notification page will be different as your port number and check SSL box. ¾... set port number from 1~65535 according to your mail server, you should set 587 as following figure shown. 39 The default value is sent. Checking SSL box if the mail server you use has security restriction. ) Note: If you of ...: Type the SMTP server name up to 64 characters, or the IP address of the SMTP server. ¾ SMTP Server Port: You can select the notify type among DHCP, Static IP, and PPPoE. z POP before SMTP: Select this if SMTP authentication...
z Off: Select this option is selected, the IP Notification page will be different as your port number and check SSL box. ¾... set port number from 1~65535 according to your mail server, you should set 587 as following figure shown. 39 The default value is sent. Checking SSL box if the mail server you use has security restriction. ) Note: If you of ...: Type the SMTP server name up to 64 characters, or the IP address of the SMTP server. ¾ SMTP Server Port: You can select the notify type among DHCP, Static IP, and PPPoE. z POP before SMTP: Select this if SMTP authentication...

User Guide
Page 45
... mail) server name up to 64 characters. z POP server name: It is necessary when the POP before SMTP is sent according to the IP notification. ¾ Message: Type the text of the E-mail up to 64 characters. z User name, Password: Type the username and password...of the e-Mail up to mail which sends e-mails performs authentication. ¾ Recipient e-mail address: Type the recipient e-Mail address. Default value provides network information including IP, Port, MAC, Model, Firmware Version and Web Version. 6.3.7 Wireless Choose Network → Wireless, you can specify more than one ...
... mail) server name up to 64 characters. z POP server name: It is necessary when the POP before SMTP is sent according to the IP notification. ¾ Message: Type the text of the E-mail up to 64 characters. z User name, Password: Type the username and password...of the e-Mail up to mail which sends e-mails performs authentication. ¾ Recipient e-mail address: Type the recipient e-Mail address. Default value provides network information including IP, Port, MAC, Model, Firmware Version and Web Version. 6.3.7 Wireless Choose Network → Wireless, you can specify more than one ...
User Guide
Page 49
Primary DNS server: Enter the IP address of the device. Default gateway: Enter the default gateway. Now please have a short rest or work on other business, for the wireless setting will take effect 1 minute after you set . Please unplug the Ethernet cable connecting the TL-SC3171G and the Router (or the PC), and log into the...
Primary DNS server: Enter the IP address of the device. Default gateway: Enter the default gateway. Now please have a short rest or work on other business, for the wireless setting will take effect 1 minute after you set . Please unplug the Ethernet cable connecting the TL-SC3171G and the Router (or the PC), and log into the...

User Guide
Page 55
That means everyone who knows IP address can access the device including all authority of authority. Therefore, it is necessary to assign a password if the device is "admin / admin". z The Admin mode has all configuration. Different viewer mode has different limits of configuration. 50 6.4.1 Account The device default account and password setting is...
That means everyone who knows IP address can access the device including all authority of authority. Therefore, it is necessary to assign a password if the device is "admin / admin". z The Admin mode has all configuration. Different viewer mode has different limits of configuration. 50 6.4.1 Account The device default account and password setting is...


