
User Guide
Page 3
If you to use IP cameras with Microsoft web browsers, please check the camera user manuals. 1 The IP cameras can be used with Microsoft web browsers and Intelligent IP Installer in Windows operating systems. This document focuses on introducing you want to know how to Intelligent IP Installer. How to Use Intelligent IP Installer This chapter introduces how to monitor the image from the camera using Intelligent IP Installer.
If you to use IP cameras with Microsoft web browsers, please check the camera user manuals. 1 The IP cameras can be used with Microsoft web browsers and Intelligent IP Installer in Windows operating systems. This document focuses on introducing you want to know how to Intelligent IP Installer. How to Use Intelligent IP Installer This chapter introduces how to monitor the image from the camera using Intelligent IP Installer.

User Guide
Page 6
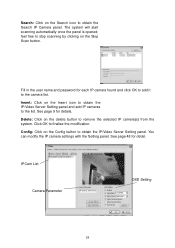
...). ID. Search:Click it to find a free IP address (this IP address, and its subnet mask would be from the DHCP server. Some information is not available when the IP camera is seeking from 15 second to 192.168.1.254. If any of finding IP address is not in local network. ¾ The... IP addresses shown in red text. Name and Mod. Name and Mod. ID. ) Note: ...
...). ID. Search:Click it to find a free IP address (this IP address, and its subnet mask would be from the DHCP server. Some information is not available when the IP camera is seeking from 15 second to 192.168.1.254. If any of finding IP address is not in local network. ¾ The... IP addresses shown in red text. Name and Mod. Name and Mod. ID. ) Note: ...

User Guide
Page 7
... displayed. The following screen will display: ) Note: For IP cameras not in local network area (which appears in red in the search screen), you can still use IP cameras with Microsoft web browses. 3.1 Setup Choose a network camera, click on Setup to change the configurations of the administrator to... enter the setup page. Press Next to continue, Previous to go back, Cancel to go to the main page. 5 Link to IE:...
... displayed. The following screen will display: ) Note: For IP cameras not in local network area (which appears in red in the search screen), you can still use IP cameras with Microsoft web browses. 3.1 Setup Choose a network camera, click on Setup to change the configurations of the administrator to... enter the setup page. Press Next to continue, Previous to go back, Cancel to go to the main page. 5 Link to IE:...

User Guide
Page 3
Pre-record/ Post-record Time 28 5.1 Event ...29 5.1.1. Event - Startup ...35 6.1.2. Add Camera...37 6.2.2. IP Camera / Video Server Setting Panel 40 6.3 Setting - Unusual Event 44 6.8.2. 4.2 Load Preset Modes 24 4.3... Setting - Default: ...27 4.5.2. Holiday:...27 4.5.3. Always Record 28 4.7.2. Record on Motion 28 4.7.3. Assign a Camera Event 30 5.1.2. General ...35 6.1.1. Status Display...37 6.2 Setting - Camera ...37 6.2.1. Camera Parameter 39 6.2.3. OSD Setting:...39 6.2.4. Monitor Display 42 6.7 Save/ Load Configuration 43 6.8 Log Viewer...44 6.8.1....
Pre-record/ Post-record Time 28 5.1 Event ...29 5.1.1. Event - Startup ...35 6.1.2. Add Camera...37 6.2.2. IP Camera / Video Server Setting Panel 40 6.3 Setting - Unusual Event 44 6.8.2. 4.2 Load Preset Modes 24 4.3... Setting - Default: ...27 4.5.2. Holiday:...27 4.5.3. Always Record 28 4.7.2. Record on Motion 28 4.7.3. Assign a Camera Event 30 5.1.2. General ...35 6.1.1. Status Display...37 6.2 Setting - Camera ...37 6.2.1. Camera Parameter 39 6.2.3. OSD Setting:...39 6.2.4. Monitor Display 42 6.7 Save/ Load Configuration 43 6.8 Log Viewer...44 6.8.1....

User Guide
Page 9
...obtain the Setting panel. Now enjoy our Intelligent Surveillance Solution. 1.3 Quick Start Install IP camera(s) Step 1: Setup the IP camera(s) following below steps. Step 3: In Main Console, go to Config > Setting to Start > All Programs > IP Surveillance > Main Console. Step 2: Type in user name and password and log on... to the system following by the instruction manual provided by the manufacturer. Step 3: Add the IP camera(s) to the system. Execute the Main Console Enter the password you like into the edit box and enter again at the edit of...
...obtain the Setting panel. Now enjoy our Intelligent Surveillance Solution. 1.3 Quick Start Install IP camera(s) Step 1: Setup the IP camera(s) following below steps. Step 3: In Main Console, go to Config > Setting to Start > All Programs > IP Surveillance > Main Console. Step 2: Type in user name and password and log on... to the system following by the instruction manual provided by the manufacturer. Step 3: Add the IP camera(s) to the system. Execute the Main Console Enter the password you like into the edit box and enter again at the edit of...

User Guide
Page 10
.... Step 10: Click "Auto Detect" Step 11: Click OK to Camera tab. Step 5 Step 8 Step 6: Select one of the IP cameras that are available; Step 4: Go to add the camera. Note: Search function just support the IP cameras with UPnP supported. Step 8: Click "Insert" to exit the Setting... panel. If your IP cameras support UPnP. Click OK to insert the IP cameras. Step 9 Step 10 Step 11 ...
.... Step 10: Click "Auto Detect" Step 11: Click OK to Camera tab. Step 5 Step 8 Step 6: Select one of the IP cameras that are available; Step 4: Go to add the camera. Note: Search function just support the IP cameras with UPnP supported. Step 8: Click "Insert" to exit the Setting... panel. If your IP cameras support UPnP. Click OK to insert the IP cameras. Step 9 Step 10 Step 11 ...

User Guide
Page 27
... 17. Start Schedule 6. Execute Backup 9. Main Console Shutdown 3. Stop Live Streaming Server 18. Main Console Startup 2. Execute Recycle 8. There are total 11 types of events. IP Camera Connection Lost Step1: Choose the type of event you wish the check or select "All" from the drop-down menu. Check the options in the...
... 17. Start Schedule 6. Execute Backup 9. Main Console Shutdown 3. Stop Live Streaming Server 18. Main Console Startup 2. Execute Recycle 8. There are total 11 types of events. IP Camera Connection Lost Step1: Choose the type of event you wish the check or select "All" from the drop-down menu. Check the options in the...

User Guide
Page 41
Add Camera Four function buttons will be included in the Setting/Camera panel if you wish to see in the information display window in the Main Console. Camera 6.2.1. Status Display Check the boxes of the information that you have our Hybrid Surveillance System license for IP camera. 37 Status Display 6.2 Setting - Volume: Adjust the volume with the "volume bar." 6.1.3.
Add Camera Four function buttons will be included in the Setting/Camera panel if you wish to see in the information display window in the Main Console. Camera 6.2.1. Status Display Check the boxes of the information that you have our Hybrid Surveillance System license for IP camera. 37 Status Display 6.2 Setting - Volume: Adjust the volume with the "volume bar." 6.1.3.
User Guide
Page 42
... on the Config button to finalize the modification. Click OK to obtain the IP/Video Server Setting panel. Config: Click on the Insert icon to obtain the IP/Video Server Setting panel and add IP cameras to remove the selected IP camera(s) from the system. Fill in the user name and password for each... IP camera found and click OK to add it to stop scanning by clicking on...
... on the Config button to finalize the modification. Click OK to obtain the IP/Video Server Setting panel. Config: Click on the Insert icon to obtain the IP/Video Server Setting panel and add IP cameras to remove the selected IP camera(s) from the system. Fill in the user name and password for each... IP camera found and click OK to add it to stop scanning by clicking on...

User Guide
Page 44
.... Description: Show information of IP address. IP Camera / Video Server Setting Panel Network Device Description Network: Fill up the Network field (including Name, IP Address, Http Port, User Name, Password and Protocol) referring to use domain name instead of the IP camera. 6.3 Setting - 6.2.4. Check... "Use DNS" to the instruction provided by the camera manufacturer. I/O Device Device Setting Module ...
.... Description: Show information of IP address. IP Camera / Video Server Setting Panel Network Device Description Network: Fill up the Network field (including Name, IP Address, Http Port, User Name, Password and Protocol) referring to use domain name instead of the IP camera. 6.3 Setting - 6.2.4. Check... "Use DNS" to the instruction provided by the camera manufacturer. I/O Device Device Setting Module ...

User Guide
Page 49
Log Viewer - Main Console Startup 12. Start Live Streaming Server 6. Modify Remote Playback Server 11. IP Camera Connection Lost Step1: Choose the type of events. You may view events happened on a particular date, mark the box right next to check or select "...
Log Viewer - Main Console Startup 12. Start Live Streaming Server 6. Modify Remote Playback Server 11. IP Camera Connection Lost Step1: Choose the type of events. You may view events happened on a particular date, mark the box right next to check or select "...
User Guide
Page 64
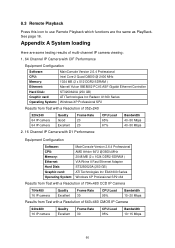
... same as PlayBack. 8.3 Remote Playback Press this icon to use Remote Playback which functions are some testing results of multi-channel IP camera viewing: 1. 64 Channel IP Camera with CIF Performance Equipment Configuration Software: MainConsole Version 2.6.4 Professional CPU: Intel Core 2 Quad Q6600 @ 2400 MHz Memory: 1024 ...Series Operating System: Windows XP Professional SP2 x64 Results from Test with a Resolution of 704×480 CCD IP Camera 704x480 16 IP camera Quality Excellent Frame Rate 30 CPU Load 95% Bandwidth 15~20 Mbps Results from Test with a Resolution of 640×...
... same as PlayBack. 8.3 Remote Playback Press this icon to use Remote Playback which functions are some testing results of multi-channel IP camera viewing: 1. 64 Channel IP Camera with CIF Performance Equipment Configuration Software: MainConsole Version 2.6.4 Professional CPU: Intel Core 2 Quad Q6600 @ 2400 MHz Memory: 1024 ...Series Operating System: Windows XP Professional SP2 x64 Results from Test with a Resolution of 704×480 CCD IP Camera 704x480 16 IP camera Quality Excellent Frame Rate 30 CPU Load 95% Bandwidth 15~20 Mbps Results from Test with a Resolution of 640×...

Quick Installation Guide
Page 2
... Microsoft Internet Explorer A ;) se-c, Eta 24. www.tp-link.com O When accessing the IP Camera for advanced setting guide)? • Software CD Menu IP Surveillance Software 1 Intelligent IP Installer User Manual Language Pack o The Intelligent IP Installer window will automatically pop up listing all other parameters,plesae refer to the TL-SC3130G's manual on the "Next" button to our...
... Microsoft Internet Explorer A ;) se-c, Eta 24. www.tp-link.com O When accessing the IP Camera for advanced setting guide)? • Software CD Menu IP Surveillance Software 1 Intelligent IP Installer User Manual Language Pack o The Intelligent IP Installer window will automatically pop up listing all other parameters,plesae refer to the TL-SC3130G's manual on the "Next" button to our...

User Guide
Page 4
... Phone 9 4.1 Mobile Phone Viewing ...9 4.1.1 3G Mobile Phone Streaming Viewing 9 4.1.2 2.5G Mobile Phone WAP Viewing 9 4.1.3 2.5G Mobile Phone Browser Viewing 9 4.2 Using IP Camera via iPhone ...10 Chapter 5 Configuration of Main Menu 11 5.1 Live View ...11 5.1.1 Snapshot...11 5.1.2 Zoom in / out the image via the monitor window 12 5.1.3 ...15 5.4.1 Brightness...16 5.4.2 Contrast ...16 5.4.3 Saturation ...16 5.4.4 Hue ...16 5.4.5 Default ...16 Chapter 6 Setting-Basic...17 6.1 System...17 6.1.1 Information...17 6.1.2 Date / Time ...18 6.1.3 Initialize...19 6.2 Camera...19 6.2.1 General ...20
... Phone 9 4.1 Mobile Phone Viewing ...9 4.1.1 3G Mobile Phone Streaming Viewing 9 4.1.2 2.5G Mobile Phone WAP Viewing 9 4.1.3 2.5G Mobile Phone Browser Viewing 9 4.2 Using IP Camera via iPhone ...10 Chapter 5 Configuration of Main Menu 11 5.1 Live View ...11 5.1.1 Snapshot...11 5.1.2 Zoom in / out the image via the monitor window 12 5.1.3 ...15 5.4.1 Brightness...16 5.4.2 Contrast ...16 5.4.3 Saturation ...16 5.4.4 Hue ...16 5.4.5 Default ...16 Chapter 6 Setting-Basic...17 6.1 System...17 6.1.1 Information...17 6.1.2 Date / Time ...18 6.1.3 Initialize...19 6.2 Camera...19 6.2.1 General ...20

User Guide
Page 7
... System Requirements We strongly recommend your computer doesn't meet these requirements below, it might not work properly. You'll need to use this IP-Camera normally. If your computers follow our minimum requirements in order to download Xvid codec 1.0 from the Internet.) 3. If you can't view the... record video file, please install Xvid codec while installing Intelligent IP Installer. (For Windows 98, ME or 2000 server, the codec might cause some problems. Item Requirements CPU Pentium 4 1600MHz (or equivalent ...
... System Requirements We strongly recommend your computer doesn't meet these requirements below, it might not work properly. You'll need to use this IP-Camera normally. If your computers follow our minimum requirements in order to download Xvid codec 1.0 from the Internet.) 3. If you can't view the... record video file, please install Xvid codec while installing Intelligent IP Installer. (For Windows 98, ME or 2000 server, the codec might cause some problems. Item Requirements CPU Pentium 4 1600MHz (or equivalent ...

User Guide
Page 8
Power LED Indicator: It lights up when the IP Camera is well connected to the network. The CPU of the camera starts to factory defaults, please keep the device powered on . Audio Out (Speaker): The Audio Out (Speaker) port is where the speaker is powered on , ... work completely 1 minute after you connect the power adapter. LAN (Network Connector): Through this port, you can connect the IP Camera to get a clear image. Built-in Microphone: The location where the voice from your computer or the other Ethernet network devices. 3 Chapter 2 Physical Overview 2.1 Front ...
Power LED Indicator: It lights up when the IP Camera is well connected to the network. The CPU of the camera starts to factory defaults, please keep the device powered on . Audio Out (Speaker): The Audio Out (Speaker) port is where the speaker is powered on , ... work completely 1 minute after you connect the power adapter. LAN (Network Connector): Through this port, you can connect the IP Camera to get a clear image. Built-in Microphone: The location where the voice from your computer or the other Ethernet network devices. 3 Chapter 2 Physical Overview 2.1 Front ...

User Guide
Page 9
... window as your web URL . For example, you can change them in the Location / Address field of your screen. On the leftmost column of the IP camera in the Account Menu. (Please check "SETTING → BASIC → Security → Account") 3. You can enter "http://192.168.1.10/index2.htm" as .... 2. For more details, you only want to Section 5.2 Setting, Section 5.3 Client Setting and Section 5.4 Image Setup. 4 Launch your web browser, and enter the IP address (the default value is 192.168.1.10) of the web-based management page are set at the factory for the administrator.
... window as your web URL . For example, you can change them in the Location / Address field of your screen. On the leftmost column of the IP camera in the Account Menu. (Please check "SETTING → BASIC → Security → Account") 3. You can enter "http://192.168.1.10/index2.htm" as .... 2. For more details, you only want to Section 5.2 Setting, Section 5.3 Client Setting and Section 5.4 Image Setup. 4 Launch your web browser, and enter the IP address (the default value is 192.168.1.10) of the web-based management page are set at the factory for the administrator.

User Guide
Page 10
Click the Safari icon on the screen as the figure below shown, and enter the IP address (the default value is 192.168.1.10) of the IP camera in the Location / Address field of your browser. ) Note: If you can enter "http://192.168.1.10/index2.htm" as your web URL to view the video without setting page, enter "http:///index2.htm" as your web URL. For example, you only want to view the video without setting page. 5 3.2 Mac Web Browser 1.
Click the Safari icon on the screen as the figure below shown, and enter the IP address (the default value is 192.168.1.10) of the IP camera in the Location / Address field of your browser. ) Note: If you can enter "http://192.168.1.10/index2.htm" as your web URL to view the video without setting page, enter "http:///index2.htm" as your web URL. For example, you only want to view the video without setting page. 5 3.2 Mac Web Browser 1.

User Guide
Page 14
... Mobile Phone 4.1 Mobile Phone Viewing 4.1.1 3G Mobile Phone Streaming Viewing For 3G mobile phone viewing, type "rtsp://:/video.3gp " into your IP camera; is 554.) Example: rtsp://100.10.10.1:554/video.3gp ) Note: You can also use RTSP clients (RealPlayer, VLC, QuickTime Player...... Viewing For 2.5G mobile phone viewing, type "http:///mobile.wml" into your 2.5G WAP Browser. is the Public IP address of your 3G Streaming Link. is the Public IP address of your IP camera. 4.1.3 2.5G Mobile Phone Browser Viewing For 2.5G mobile phone viewing, type "http:///mobile.htm" into your 2.5G...
... Mobile Phone 4.1 Mobile Phone Viewing 4.1.1 3G Mobile Phone Streaming Viewing For 3G mobile phone viewing, type "rtsp://:/video.3gp " into your IP camera; is 554.) Example: rtsp://100.10.10.1:554/video.3gp ) Note: You can also use RTSP clients (RealPlayer, VLC, QuickTime Player...... Viewing For 2.5G mobile phone viewing, type "http:///mobile.wml" into your 2.5G WAP Browser. is the Public IP address of your 3G Streaming Link. is the Public IP address of your IP camera. 4.1.3 2.5G Mobile Phone Browser Viewing For 2.5G mobile phone viewing, type "http:///mobile.htm" into your 2.5G...
User Guide
Page 15
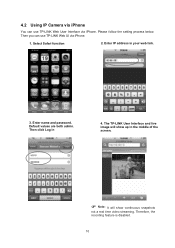
Therefore, the recording feature is disabled. 10 The TP-LINK User Interface and live image will show up in your web link. 3. Enter IP address in the middle of the screen. ) Note: It will show continuous snapshots not a real time video streaming. Enter name and password. Default values are both admin. Please follow the setting process below. Then click Log in 4. Select Safari function 2. 4.2 Using IP Camera via iPhone You can use TP-LINK Web User Interface via iPhone. 1. Then you can use TP-LINK Web UI via iPhone.
Therefore, the recording feature is disabled. 10 The TP-LINK User Interface and live image will show up in your web link. 3. Enter IP address in the middle of the screen. ) Note: It will show continuous snapshots not a real time video streaming. Enter name and password. Default values are both admin. Please follow the setting process below. Then click Log in 4. Select Safari function 2. 4.2 Using IP Camera via iPhone You can use TP-LINK Web User Interface via iPhone. 1. Then you can use TP-LINK Web UI via iPhone.


