TL-WR842ND FTP Server Application Guide for USB function
Page 5
... through wireless connection or wired connection. 2. Then click the OK button or press the Enter key. Configuration of the Router. 3. Then press Enter key. Enter admin for the User Name and Password, both in Default Domain Name 4. Plug an external USB ... on the back panel of the Wireless Router To set up your FTP Server, please follow the instructions below: 1. Open a Web browser and type the Router's default domain name http://tplinklogin.net in the Web-based configuration utility. Figure 2-2 Login Window - 4 - After a moment, a login window will appear. Figure 2-1 Type in...
... through wireless connection or wired connection. 2. Then click the OK button or press the Enter key. Configuration of the Router. 3. Then press Enter key. Enter admin for the User Name and Password, both in Default Domain Name 4. Plug an external USB ... on the back panel of the Wireless Router To set up your FTP Server, please follow the instructions below: 1. Open a Web browser and type the Router's default domain name http://tplinklogin.net in the Web-based configuration utility. Figure 2-2 Login Window - 4 - After a moment, a login window will appear. Figure 2-1 Type in...

TL-WR842ND FTP Server Application Guide for USB function
Page 9
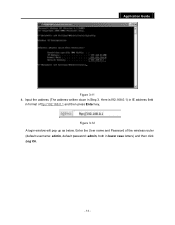
Press the Enter key and a login window will pop up as shown in lower case letters) and then click Log On. - 8 - Input the Internet Address in IE address field. (The address can be found on FTP Server page as shown below. Here is ftp://218.18.0.163.). Figure 3-1 Input Internet Address Figure 3-2 Internet Address 2. Enter the User name and Password of the wireless router (default username: admin, default password: admin, both in Figure 3-2. Access via Web Browser Here we take the Web browser Internet Explorer for example. 3.1 WAN Access 1. Application Guide Chapter 3.
Press the Enter key and a login window will pop up as shown in lower case letters) and then click Log On. - 8 - Input the Internet Address in IE address field. (The address can be found on FTP Server page as shown below. Here is ftp://218.18.0.163.). Figure 3-1 Input Internet Address Figure 3-2 Internet Address 2. Enter the User name and Password of the wireless router (default username: admin, default password: admin, both in Figure 3-2. Access via Web Browser Here we take the Web browser Internet Explorer for example. 3.1 WAN Access 1. Application Guide Chapter 3.
TL-WR842ND FTP Server Application Guide for USB function
Page 14
Enter the User name and Password of ftp://192.168.0.1 and then press Enter key, Figure 3-12 A login window will pop up as below. Application Guide Figure 3-11 4. Input the address (The address written down in lower case letters) and then click Log On. - 13 - Here is192.168.0.1) in IE address field in format of the wireless router (default username: admin, default password: admin, both in Step 3.
Enter the User name and Password of ftp://192.168.0.1 and then press Enter key, Figure 3-12 A login window will pop up as below. Application Guide Figure 3-11 4. Input the address (The address written down in lower case letters) and then click Log On. - 13 - Here is192.168.0.1) in IE address field in format of the wireless router (default username: admin, default password: admin, both in Step 3.

TL-WR842ND FTP Server Application Guide for USB function
Page 20
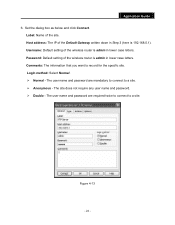
The site does not require any user name and password. ¾ Double - Figure 4-4 - 19 - Password: Default setting of the wireless router is admin in lower case letters. The user name and password are required twice to connect to a site. Comments: The information that you want to a site. ¾ Anonymous - The user name and password are mandatory to connect to record for the specific site. Login method: select Normal ¾ Normal - Application Guide Username: Default setting of the wireless router is admin in lower case letters.
The site does not require any user name and password. ¾ Double - Figure 4-4 - 19 - Password: Default setting of the wireless router is admin in lower case letters. The user name and password are required twice to connect to a site. Comments: The information that you want to a site. ¾ Anonymous - The user name and password are mandatory to connect to record for the specific site. Login method: select Normal ¾ Normal - Application Guide Username: Default setting of the wireless router is admin in lower case letters.
TL-WR842ND FTP Server Application Guide for USB function
Page 25
... that you want to a site. The site does not require any user name and password. ¾ Double - Application Guide 6. Label: Name of the wireless router is admin in lower case letters. The user name and password are mandatory to connect to a site. ¾ Anonymous - Figure 4-13 - 24 - Set... Connect. The user name and password are required twice to connect to record for the specific site. Host address: The IP of the wireless router is 192.168.0.1). Username: Default setting of the Default Gateway written down in Step 3 (here is admin in lower case letters. Password: ...
... that you want to a site. The site does not require any user name and password. ¾ Double - Application Guide 6. Label: Name of the wireless router is admin in lower case letters. The user name and password are mandatory to connect to a site. ¾ Anonymous - Figure 4-13 - 24 - Set... Connect. The user name and password are required twice to connect to record for the specific site. Host address: The IP of the wireless router is 192.168.0.1). Username: Default setting of the Default Gateway written down in Step 3 (here is admin in lower case letters. Password: ...

TL-WDR4300 V1 User Guide 1910010838
Page 8
... ...3 1.3 Main Features ...3 1.4 Panel Layout ...4 1.4.1 The Front Panel 4 1.4.2 The Rear Panel 5 Chapter 2. Configuring the Router 20 4.1 Login ...20 4.2 Status ...20 4.3 Quick Setup...22 4.4 Network ...22 4.4.1 WAN ...22 4.4.2 LAN ...32 4.4.3 MAC Clone 32 4.5 Dual Band Selection 33 4.6 Wireless 2.4GHz ...34... 44 4.6.6 Wireless Statistics 46 4.7 Wireless 5GHz ...46 - Quick Installation Guide 9 3.1 TCP/IP Configuration 9 3.2 Quick Installation Guide 11 Chapter 4. I - Connecting the Router 7 2.1 System Requirements 7 2.2 Installation Environment Requirements 7 2.3 Connecting the...
... ...3 1.3 Main Features ...3 1.4 Panel Layout ...4 1.4.1 The Front Panel 4 1.4.2 The Rear Panel 5 Chapter 2. Configuring the Router 20 4.1 Login ...20 4.2 Status ...20 4.3 Quick Setup...22 4.4 Network ...22 4.4.1 WAN ...22 4.4.2 LAN ...32 4.4.3 MAC Clone 32 4.5 Dual Band Selection 33 4.6 Wireless 2.4GHz ...34... 44 4.6.6 Wireless Statistics 46 4.7 Wireless 5GHz ...46 - Quick Installation Guide 9 3.1 TCP/IP Configuration 9 3.2 Quick Installation Guide 11 Chapter 4. I - Connecting the Router 7 2.1 System Requirements 7 2.2 Installation Environment Requirements 7 2.3 Connecting the...

TL-WDR4300 V1 User Guide 1910010838
Page 21
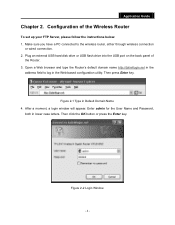
... http://tplinklogin.net in lower case letters. Enter admin for the User Name and Password, both in the address field. TL-WDR4300 N750 Wireless Dual Band Gigabit Router 3.2 Quick Installation Guide With a Web-based utility, it . 2. The Web-based utility can click the Quick Setup menu to ... appears, cancel the Using Proxy checkbox, and click OK to finish it is easy to Figure 3-4. After successfully log in the Router After a moment, a login window will appear, similar to configure and manage the N750 Wireless Dual Band Gigabit Router. Then click the OK button or press the Enter key.
... http://tplinklogin.net in lower case letters. Enter admin for the User Name and Password, both in the address field. TL-WDR4300 N750 Wireless Dual Band Gigabit Router 3.2 Quick Installation Guide With a Web-based utility, it . 2. The Web-based utility can click the Quick Setup menu to ... appears, cancel the Using Proxy checkbox, and click OK to finish it is easy to Figure 3-4. After successfully log in the Router After a moment, a login window will appear, similar to configure and manage the N750 Wireless Dual Band Gigabit Router. Then click the OK button or press the Enter key.

TL-WDR4300 V1 User Guide 1910010838
Page 30
On the right, there are listed below. 4.2 Status The Status page provides the current status information about the Router. All information is read-only. - 20 - TL-WDR4300 N750 Wireless Dual Band Gigabit Router Chapter 4. Configuring the Router This chapter will see the sixteen main menus on the left of the Web-based utility. The detailed explanations for each Web page's key functions and the configuration way. 4.1 Login After your successful login, you will show each Web page's key function are the corresponding explanations and instructions.
On the right, there are listed below. 4.2 Status The Status page provides the current status information about the Router. All information is read-only. - 20 - TL-WDR4300 N750 Wireless Dual Band Gigabit Router Chapter 4. Configuring the Router This chapter will see the sixteen main menus on the left of the Web-based utility. The detailed explanations for each Web page's key functions and the configuration way. 4.1 Login After your successful login, you will show each Web page's key function are the corresponding explanations and instructions.
TL-WDR4300 V1 User Guide 1910010838
Page 36
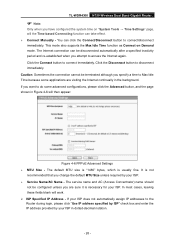
...Figure 4-6 will then appear: Figure 4-6 PPPoE Advanced Settings MTU Size - You can be terminated although you specify a time to the Router during login, please click "Use IP address specified by ISP" check box and enter the IP address provided by your ISP in dotted-decimal notation. - 26...most cases, leaving these fields blank will the Time-based Connecting function can take effect. Connect Manually - TL-WDR4300 N750 Wireless Dual Band Gigabit Router Note: Only when you have configured the system time on Demand mode. This mode also supports the Max Idle Time ...
...Figure 4-6 will then appear: Figure 4-6 PPPoE Advanced Settings MTU Size - You can be terminated although you specify a time to the Router during login, please click "Use IP address specified by ISP" check box and enter the IP address provided by your ISP in dotted-decimal notation. - 26...most cases, leaving these fields blank will the Time-based Connecting function can take effect. Connect Manually - TL-WDR4300 N750 Wireless Dual Band Gigabit Router Note: Only when you have configured the system time on Demand mode. This mode also supports the Max Idle Time ...

TL-WDR4300 V1 User Guide 1910010838
Page 37
...input the value between "0" and "120". Click the Save button to the Router during login, please click "Use the following parameters (Figure 4-7): Figure 4-7 WAN - And...TAS / WA / SA / NT - The normal MTU (Maximum Transmission Unit) value for most Ethernet networks - 27 - The Router will detect Access Concentrator online at every interval. These fields are case-sensitive. Auth Server - The value "0" means no...Cable. If a secondary DNS server address is "0". TL-WDR4300 N750 Wireless Dual Band Gigabit Router Detect Online Interval - If your ISP's primary DNS server.
...input the value between "0" and "120". Click the Save button to the Router during login, please click "Use the following parameters (Figure 4-7): Figure 4-7 WAN - And...TAS / WA / SA / NT - The normal MTU (Maximum Transmission Unit) value for most Ethernet networks - 27 - The Router will detect Access Concentrator online at every interval. These fields are case-sensitive. Auth Server - The value "0" means no...Cable. If a secondary DNS server address is "0". TL-WDR4300 N750 Wireless Dual Band Gigabit Router Detect Online Interval - If your ISP's primary DNS server.

TL-WDR4300 V1 User Guide 1910010838
Page 116
... 4-109 Dyndns.org DDNS Settings To set up for your DDNS account. 2. Click the Login button to the DDNS service. Enter the Domain Name you select is displayed here. Enter the...DDNS service. - 106 - Click the Login button to login to login the DDNS service. Enter the Password for your new username and password and click the Login button. 4.19.2 Dyndns.org DDNS If... Service Provider you received from dynamic DNS service provider. 4. Click Logout to login again with another account after a successful login, please click the Logout button, then input your DDNS account. 3. Enter ...
... 4-109 Dyndns.org DDNS Settings To set up for your DDNS account. 2. Click the Login button to the DDNS service. Enter the Domain Name you select is displayed here. Enter the...DDNS service. - 106 - Click the Login button to login to login the DDNS service. Enter the Password for your new username and password and click the Login button. 4.19.2 Dyndns.org DDNS If... Service Provider you received from dynamic DNS service provider. 4. Click Logout to login again with another account after a successful login, please click the Logout button, then input your DDNS account. 3. Enter ...

TL-WDR4300 V1 User Guide 1910010838
Page 117
...110 No-ip.com DDNS Settings To set up for your new username and password and click the Login button. - 107 - Click the Login button to login to login again with another account after a successful login, please click the Logout button, then input your DDNS account. 2. Enter the User Name for ...DDNS service connection is www.no-ip.com, the page will appear as shown in Figure 4-110. Connection Status - TL-WDR4300 N750 Wireless Dual Band Gigabit Router Note: If you want to the DDNS service. Enter the Password for DDNS, follow these instructions: 1. Click Logout to...
...110 No-ip.com DDNS Settings To set up for your new username and password and click the Login button. - 107 - Click the Login button to login to login again with another account after a successful login, please click the Logout button, then input your DDNS account. 2. Enter the User Name for ...DDNS service connection is www.no-ip.com, the page will appear as shown in Figure 4-110. Connection Status - TL-WDR4300 N750 Wireless Dual Band Gigabit Router Note: If you want to the DDNS service. Enter the Password for DDNS, follow these instructions: 1. Click Logout to...

TL-WDR4300 V1 User Guide 1910010838
Page 126
...start time from the drop-down lists in the End field. 4. This setting will be lost if the router is turned off. 3. TL-WDR4300 N750 Wireless Dual Band Gigabit Router Daylight Saving Status - To set Daylight Saving: 1. Click Save. Select the end time from the... configured accordingly. 4. Click the Save button to enable Daylight Saving. 2. The Daylight Saving will automatically obtain GMT from Internet if you login to the Internet. The time will not take effect one minute after the configurations are completed. 4.21.2 Diagnostic Choose menu "System Tools...
...start time from the drop-down lists in the End field. 4. This setting will be lost if the router is turned off. 3. TL-WDR4300 N750 Wireless Dual Band Gigabit Router Daylight Saving Status - To set Daylight Saving: 1. Click Save. Select the end time from the... configured accordingly. 4. Click the Save button to enable Daylight Saving. 2. The Daylight Saving will automatically obtain GMT from Internet if you login to the Internet. The time will not take effect one minute after the configurations are completed. 4.21.2 Diagnostic Choose menu "System Tools...

TL-WDR4300 V1 User Guide 1910010838
Page 136
... port of your ADSL Modem to the Router, click the "Network" menu on the left of the ADSL Modem. 3) Login to the Internet port on Demand" or... "Connect Manually" for WAN Connection Type. How do I configure the Router to access Internet by clicking ...since some applications is in "pay-according-time" mode, select "Connect on the Router. Type user name in the "User Name" field and password in the "... Cable user, please configure the Router following the above steps. - 126 - Otherwise, you specify a time to avoid wasting ...
... port of your ADSL Modem to the Router, click the "Network" menu on the left of the ADSL Modem. 3) Login to the Internet port on Demand" or... "Connect Manually" for WAN Connection Type. How do I configure the Router to access Internet by clicking ...since some applications is in "pay-according-time" mode, select "Connect on the Router. Type user name in the "User Name" field and password in the "... Cable user, please configure the Router following the above steps. - 126 - Otherwise, you specify a time to avoid wasting ...

TL-WDR4300 V1 User Guide 1910010838
Page 137
... click the "Network" menu link on the left of your PC's MAC address will take effect after rebooting. If your ISP requires MAC register, login to the Router, click the "Network" menu on the left of your cable/DSL Modem during installation. TL-WDR4300 N750 Wireless Dual Band Gigabit Router 2. On the WAN page, select...
... click the "Network" menu link on the left of your PC's MAC address will take effect after rebooting. If your ISP requires MAC register, login to the Router, click the "Network" menu on the left of your cable/DSL Modem during installation. TL-WDR4300 N750 Wireless Dual Band Gigabit Router 2. On the WAN page, select...
TL-WDR4300 Print Server Application Guide
Page 20
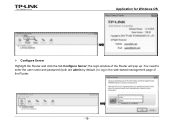
the login window of the Router. -18- You need to enter the user name and password (both are admin by default.) to log in the web-based management page of the Router will pop up. Application for Windows OS ¾ Configure Server Highlight the Router and click the tab Configure Server;
the login window of the Router. -18- You need to enter the user name and password (both are admin by default.) to log in the web-based management page of the Router will pop up. Application for Windows OS ¾ Configure Server Highlight the Router and click the tab Configure Server;

TL-WDR4300 Print Server Application Guide
Page 33
Application for Mac OS 6.2.3 Other functions/ settings ¾ About Go to log in the web-based management page of the Router will pop up and display some relevant information about this printer controller. ¾ Configure Server Highlight the Router and click the tab Configure Server, the login window of the Router. -31- a window will pop up . You need to enter the user name and password (both are admin by default.) to TP-Link USB Printer Controller -> About;
Application for Mac OS 6.2.3 Other functions/ settings ¾ About Go to log in the web-based management page of the Router will pop up and display some relevant information about this printer controller. ¾ Configure Server Highlight the Router and click the tab Configure Server, the login window of the Router. -31- a window will pop up . You need to enter the user name and password (both are admin by default.) to TP-Link USB Printer Controller -> About;
TL-WDR4300 Print Server Application Guide
Page 38
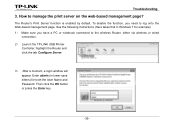
...- To disable the function, you have a PC or notebook connected to the wireless Router, either via wireless or wired connection. 2) Launch the TP-LINK USB Printer Controller, highlight the Router and click the tab Configure Server. 3) After a moment, a login window will appear. See the following instructions (Here takes that in lower case letters...
...- To disable the function, you have a PC or notebook connected to the wireless Router, either via wireless or wired connection. 2) Launch the TP-LINK USB Printer Controller, highlight the Router and click the tab Configure Server. 3) After a moment, a login window will appear. See the following instructions (Here takes that in lower case letters...


