Archer C2300EU V1 User Guide
Page 69
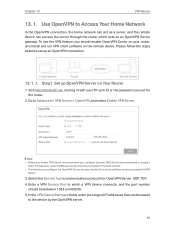
... the remote device. Step1. In the VPN Subnet/Netmask fields, enter the range of IP addresses that can access the server through the router which a VPN device connects, and the port number should enable OpenVPN Server on your TP-Link ID or the password you should be leased to set for OpenVPN Server...
... the remote device. Step1. In the VPN Subnet/Netmask fields, enter the range of IP addresses that can access the server through the router which a VPN device connects, and the port number should enable OpenVPN Server on your TP-Link ID or the password you should be leased to set for OpenVPN Server...

Archer C2300EU V1 User Guide
Page 71
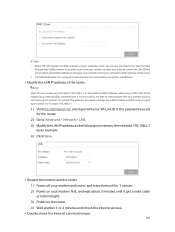
Step 2. Step 1. Visit http://tplinkwifi.net, and log in with internet. 3. In the Client IP Address filed, enter the range of IP addresses (up to 10) that can use the Windows built-in PPTP software or a third-party PPTP software to connect to Start > Control .... 2. Go to the devices by the PPTP VPN server. 4. Here we recommend you set for router's WAN port and synchronize your System Time with your TP-Link ID or the password you configure Dynamic DNS Service (recommended) or assign a static IP address for the router. 2. Go to PPTP Server. Chapter 13 VPN...
Step 2. Step 1. Visit http://tplinkwifi.net, and log in with internet. 3. In the Client IP Address filed, enter the range of IP addresses (up to 10) that can use the Windows built-in PPTP software or a third-party PPTP software to connect to Start > Control .... 2. Go to the devices by the PPTP VPN server. 4. Here we recommend you set for router's WAN port and synchronize your System Time with your TP-Link ID or the password you configure Dynamic DNS Service (recommended) or assign a static IP address for the router. 2. Go to PPTP Server. Chapter 13 VPN...
Archer C2300EU V1 User Guide
Page 111
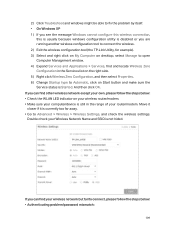
... and check the internet access. • Double check the internet connection type. 107 If so, the router is changed, so we need to clone your TP-Link ID or the password you set for the router. 2 ) Go to Advanced > Network > LAN. 3 ) Modify the LAN IP address as the follow picture shows....your computer when you access the internet for the first time through their default LAN IP address, which may conflict with the IP range of the router. Note: Most TP-Link routers use 192.168.0.1/192.168.1.1 as their Cable modem, if you add a router into your network to share your internet connection...
... and check the internet access. • Double check the internet connection type. 107 If so, the router is changed, so we need to clone your TP-Link ID or the password you set for the router. 2 ) Go to Advanced > Network > LAN. 3 ) Modify the LAN IP address as the follow picture shows....your computer when you access the internet for the first time through their default LAN IP address, which may conflict with the IP range of the router. Note: Most TP-Link routers use 192.168.0.1/192.168.1.1 as their Cable modem, if you add a router into your network to share your internet connection...
Archer C2300EU V1 User Guide
Page 113
...windows configuration utility is disabled or you are running another wireless configuration tool to connect the wireless. 2 ) Exit the wireless configuration tool (the TP-Link Utility, for example). 3 ) Select and right click on My Computer on desktop, select Manage to open Computer Management window. 4 ) Expand... Services and Applications > Services, find and locate Wireless Zero Configuration in the range of your router/modem. If you can find other wireless network except your own, please follow the steps below : • Check ...
...windows configuration utility is disabled or you are running another wireless configuration tool to connect the wireless. 2 ) Exit the wireless configuration tool (the TP-Link Utility, for example). 3 ) Select and right click on My Computer on desktop, select Manage to open Computer Management window. 4 ) Expand... Services and Applications > Services, find and locate Wireless Zero Configuration in the range of your router/modem. If you can find other wireless network except your own, please follow the steps below : • Check ...


