

User Guide
Page 2
...Mode 17 Chapter 5. Remove TP-Link ID(s) From Managing the Router 21 5. 4. Install the Tether App on Your Smartphones or Tablets 22 5. 4. 2. Use Quick Setup Wizard 13 4. 2. Set Up an IPv6 Connection 15 4. 5. LEDs 3 1. 2. 2. Get to Your Modem Router 10 Chapter 4. Physical Appearance 3 1. 2. 1. Connect the Hardware 7 2. 1. Position Your Modem Router 8 2. 2. Set Up Internet Connections 12 4. 1. Register a TP-Link ID 19 5. 2. Change Your TP-Link ID Information 19 5. 3. Add an TP-Link ID to Manage the Router 21 5. 3. 2. Remotely Manage Your Router Using...
...Mode 17 Chapter 5. Remove TP-Link ID(s) From Managing the Router 21 5. 4. Install the Tether App on Your Smartphones or Tablets 22 5. 4. 2. Use Quick Setup Wizard 13 4. 2. Set Up an IPv6 Connection 15 4. 5. LEDs 3 1. 2. 2. Get to Your Modem Router 10 Chapter 4. Physical Appearance 3 1. 2. 1. Connect the Hardware 7 2. 1. Position Your Modem Router 8 2. 2. Set Up Internet Connections 12 4. 1. Register a TP-Link ID 19 5. 2. Change Your TP-Link ID Information 19 5. 3. Add an TP-Link ID to Manage the Router 21 5. 3. 2. Remotely Manage Your Router Using...
User Guide
Page 4
... 15. Administrate Your Network 95 15. 1. Set Up a Dynamic DNS Service Account 89 14. 5. Reserve LAN IP Addresses 80 14. 2. Wireless Settings 82 14. 3. 1. SNMP Settings 107 Appendix: Troubleshooting 109 Set System Time 96 15. 2. System Log 102 15. 9. Interface Grouping 89 14. 6. Use WPS for Wireless Connection 84 14. 3. 3. View Wireless Information 87 14. 3. 5. Local Upgrade 98 15. 4. Create Static Routes 90 14. 7. Set Up the IPv6 Tunnel 93 14. 7. 1. Update the Firmware 97 15. 3. 1. Remote Management 101 15. 8.
... 15. Administrate Your Network 95 15. 1. Set Up a Dynamic DNS Service Account 89 14. 5. Reserve LAN IP Addresses 80 14. 2. Wireless Settings 82 14. 3. 1. SNMP Settings 107 Appendix: Troubleshooting 109 Set System Time 96 15. 2. System Log 102 15. 9. Interface Grouping 89 14. 6. Use WPS for Wireless Connection 84 14. 3. 3. View Wireless Information 87 14. 3. 5. Local Upgrade 98 15. 4. Create Static Routes 90 14. 7. Set Up the IPv6 Tunnel 93 14. 7. 1. Update the Firmware 97 15. 3. 1. Remote Management 101 15. 8.
User Guide
Page 5
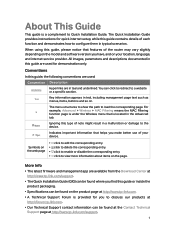
... latest firmware and management app are available from the Download Center at http://www.tp-link.com/support. • The Quick Installation Guide (QIG) can be found where you find this guide are in teal and underlined. the web page • click to enable or disable the corresponding entry. • click to a website or a specific section. All images, parameters and descriptions documented in this guide or...
... latest firmware and management app are available from the Download Center at http://www.tp-link.com/support. • The Quick Installation Guide (QIG) can be found where you find this guide are in teal and underlined. the web page • click to enable or disable the corresponding entry. • click to a website or a specific section. All images, parameters and descriptions documented in this guide or...
User Guide
Page 8
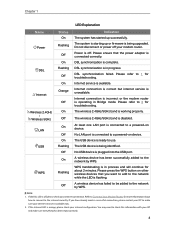
... being upgraded. Internet service is operating in Bridge mode. Internet connection is incorrect or the modem router is available. Refer to the network while the LED is orange, please check your internet configuration. DSL synchronization is unavailable. Internet connection is correct but internet service is complete. At least one LAN port is available now. 2. If you want to add to Connect Your Modem Router for troubleshooting. Chapter 1 LED Explanation Name Power DSL Internet Wireless 2.4GHz / Wireless 5GHz LAN USB WPS Status On Flashing Off On Flashing...
... being upgraded. Internet service is operating in Bridge mode. Internet connection is incorrect or the modem router is available. Refer to the network while the LED is orange, please check your internet configuration. DSL synchronization is unavailable. Internet connection is correct but internet service is complete. At least one LAN port is available now. 2. If you want to add to Connect Your Modem Router for troubleshooting. Chapter 1 LED Explanation Name Power DSL Internet Wireless 2.4GHz / Wireless 5GHz LAN USB WPS Status On Flashing Off On Flashing...
User Guide
Page 9
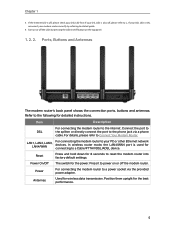
... other Ethernet network devices. Connect the port to DSL the splitter or directly connect the port to a power socket via a phone cable. Reset Press and hold down for detailed instructions. For details, please refer to your DSL LED is used for wireless data transmission. LAN1, LAN2, LAN3, LAN4/WAN For connecting the modem router to Connect Your Modem Router. Power For connecting the modem router to the phone jack via the provided power adapter. Refer to the following for 8 seconds to related guide. 4. Power On...
... other Ethernet network devices. Connect the port to DSL the splitter or directly connect the port to a power socket via a phone cable. Reset Press and hold down for detailed instructions. For details, please refer to your DSL LED is used for wireless data transmission. LAN1, LAN2, LAN3, LAN4/WAN For connecting the modem router to Connect Your Modem Router. Power For connecting the modem router to the phone jack via the provided power adapter. Refer to the following for 8 seconds to related guide. 4. Power On...
User Guide
Page 12
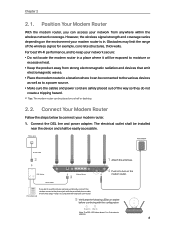
... the range of the way so they do not create a tripping hazard. Phone Jack Power Adapter Phone Cable 2 1 Attach the antennas. However, the wireless signal strength and coverage varies depending on the modem router. LINE DSL Splitter PHONE MODEM Phone Cable Modem Router 3 4 Push in to complete the hardware connection. 5 Verify that emit electromagnetic waves. • Place the modem router in . Position Your Modem Router With the modem router, you don't need the phone service, just directly connect the modem router...
... the range of the way so they do not create a tripping hazard. Phone Jack Power Adapter Phone Cable 2 1 Attach the antennas. However, the wireless signal strength and coverage varies depending on the modem router. LINE DSL Splitter PHONE MODEM Phone Cable Modem Router 3 4 Push in to complete the hardware connection. 5 Verify that emit electromagnetic waves. • Place the modem router in . Position Your Modem Router With the modem router, you don't need the phone service, just directly connect the modem router...
User Guide
Page 18
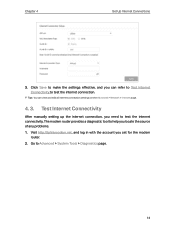
Test Internet Connectivity After manually setting up the internet connection, you set for the modem router. 2. Tips: You can refer to Test Internet Connectivity to test the internet connection. Visit http://tplinkmodem.net, and log in with the account you need to help you can view and edit all internet connection settings on the Advanced > Network > Internet page. 4. 3. Go to make the settings effective, and you locate the source of any problems. 1. The modem router provides a diagnostic tool to...
Test Internet Connectivity After manually setting up the internet connection, you set for the modem router. 2. Tips: You can refer to Test Internet Connectivity to test the internet connection. Visit http://tplinkmodem.net, and log in with the account you need to help you can view and edit all internet connection settings on the Advanced > Network > Internet page. 4. 3. Go to make the settings effective, and you locate the source of any problems. 1. The modem router provides a diagnostic tool to...
User Guide
Page 24
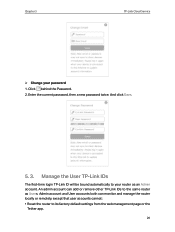
... current password, then a new password twice. Manage the User TP-Link IDs The first-time login TP-Link ID will be bound automatically to the same router as an Admin account. An admin account can monitor and manage the router locally or remotely, except that user accounts cannot: • Reset the router to its factory default settings from the web management page or the Tether app. 20 Admin account and User accounts both can add or remove other TP-Link...
... current password, then a new password twice. Manage the User TP-Link IDs The first-time login TP-Link ID will be bound automatically to the same router as an Admin account. An admin account can monitor and manage the router locally or remotely, except that user accounts cannot: • Reset the router to its factory default settings from the web management page or the Tether app. 20 Admin account and User accounts both can add or remove other TP-Link...
User Guide
Page 27
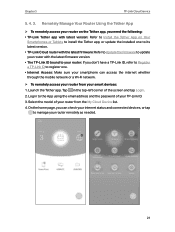
...; To remotely access your router on the Tether app, you need the following: • TP-Link Tether app with latest version: Refer to Install the Tether App on Your Smartphones or Tablets to install the Tether app, or update the installed one . • Internet Access: Make sure your smartphone can check your internet status and connected devices, or tap to the App using the email address and the password of the...
...; To remotely access your router on the Tether app, you need the following: • TP-Link Tether app with latest version: Refer to Install the Tether App on Your Smartphones or Tablets to install the Tether app, or update the installed one . • Internet Access: Make sure your smartphone can check your internet status and connected devices, or tap to the App using the email address and the password of the...
User Guide
Page 34
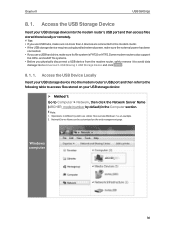
... take Windows 7 as an example. 2. Access the USB Device Locally Insert your USB storage device into the modem router's USB port and then refer to the following table to access files stored on the web management page. Network Server Name can be customized on your USB storage device into the modem router's USB port and then access files stored there locally or remotely. Tips: • If you use a USB hard drive, make sure its file system...
... take Windows 7 as an example. 2. Access the USB Device Locally Insert your USB storage device into the modem router's USB port and then refer to the following table to access files stored on the web management page. Network Server Name can be customized on your USB storage device into the modem router's USB port and then access files stored there locally or remotely. Tips: • If you use a USB hard drive, make sure its file system...
User Guide
Page 67
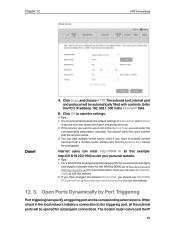
... parameters manually. Click OK to Set Up a Dynamic DNS Service Account for subsequent connections. Tips: 1. For a WAN IP that the service needs. 3. If you have changed the default External Port, you want to use http://domain name to visit your personal website. Open Ports Dynamically by ISP, it is not in this example: http://218.18.232.154) to visit the website. 2. The modem router can add multiple virtual server...
... parameters manually. Click OK to Set Up a Dynamic DNS Service Account for subsequent connections. Tips: 1. For a WAN IP that the service needs. 3. If you have changed the default External Port, you want to use http://domain name to visit your personal website. Open Ports Dynamically by ISP, it is not in this example: http://218.18.232.154) to visit the website. 2. The modem router can add multiple virtual server...
User Guide
Page 69
... with the account you set your PC, for the router. 3. Note: DMZ is totally exposed to the internet, which ports to enable DMZ. To solve this problem, set for example 192.168.1.100. 2. Go to Advanced > NAT Forwarding > DMZ and select the checkbox to open the corresponding ports. When it to your PC as a DMZ with other realizing the seamless connection of NAT device can login normally but cannot join...
... with the account you set your PC, for the router. 3. Note: DMZ is totally exposed to the internet, which ports to enable DMZ. To solve this problem, set for example 192.168.1.100. 2. Go to Advanced > NAT Forwarding > DMZ and select the checkbox to open the corresponding ports. When it to your PC as a DMZ with other realizing the seamless connection of NAT device can login normally but cannot join...
User Guide
Page 72
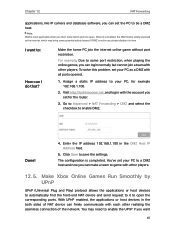
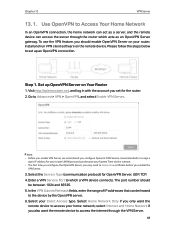
... log in with the account you enable the VPN Server. 3. Enter a VPN Service Port to set for OpenVPN Server: UDP, TCP. 4. Step 1. Select the Service Type (communication protocol) for the router. 2. Note: • Before you enable VPN Server, we recommend you configure Dynamic DNS Service (recommended) or assign a static IP address for your router's WAN port and synchronize your System Time via the internet. • The first time you configure the OpenVPN Server, you may need to access your home network...
... log in with the account you enable the VPN Server. 3. Enter a VPN Service Port to set for OpenVPN Server: UDP, TCP. 4. Step 1. Select the Service Type (communication protocol) for the router. 2. Note: • Before you enable VPN Server, we recommend you configure Dynamic DNS Service (recommended) or assign a static IP address for your router's WAN port and synchronize your System Time via the internet. • The first time you configure the OpenVPN Server, you may need to access your home network...

User Guide
Page 87
Note: If you use a wireless device to change the mode or channel: Go to manually join the network. ¾¾ To change the wireless settings, you need to Advanced > Wireless > Wireless Settings page and select the wireless network 2.4GHz or 5GHz. Mode: Select the desired mode. • 802.11n only: Select only if all of your SSID will be effective. ¾¾ To change the wireless network name (SSID) and wireless password: Enter a new...
Note: If you use a wireless device to change the mode or channel: Go to manually join the network. ¾¾ To change the wireless settings, you need to Advanced > Wireless > Wireless Settings page and select the wireless network 2.4GHz or 5GHz. Mode: Select the desired mode. • 802.11n only: Select only if all of your SSID will be effective. ¾¾ To change the wireless network name (SSID) and wireless password: Enter a new...

User Guide
Page 96
.... Open a web browser on the same subnet with the WAN IP or LAN IP of the gateway device to the gateway through the LAN port, so LAN should be sent. Enter the company server's IP address to save the settings. In the example, the data is the destination IP address, so here enters 172.30.30.1. • Subnet Mask: Determines the destination network with the router's IP...
.... Open a web browser on the same subnet with the WAN IP or LAN IP of the gateway device to the gateway through the LAN port, so LAN should be sent. Enter the company server's IP address to save the settings. In the example, the data is the destination IP address, so here enters 172.30.30.1. • Subnet Mask: Determines the destination network with the router's IP...
User Guide
Page 99
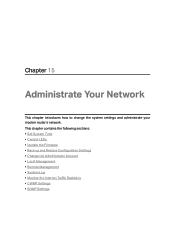
Chapter 15 Administrate Your Network This chapter introduces how to change the system settings and administrate your modem router's network. This chapter contains the following sections: • Set System Time • Control LEDs • Update the Firmware • Back up and Restore Configuration Settings • Change the Administrator Account • Local Management • Remote Management • System Log • Monitor the Internet Traffic Statistics • CWMP Settings • SNMP Settings
Chapter 15 Administrate Your Network This chapter introduces how to change the system settings and administrate your modem router's network. This chapter contains the following sections: • Set System Time • Control LEDs • Update the Firmware • Back up and Restore Configuration Settings • Change the Administrator Account • Local Management • Remote Management • System Log • Monitor the Internet Traffic Statistics • CWMP Settings • SNMP Settings
User Guide
Page 103
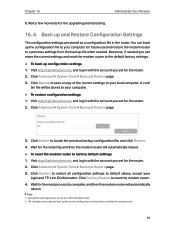
... the upgrading and rebooting. 15. 4. Click Advanced > System Tools > Backup & Restore page. 3. Click Backup to save a copy of the current settings to factory default settings 1. During the resetting process, do not turn off the modem router. 2. Click Factory Restore to default values, except your computer. ¾¾ To restore configuration settings 1. Wait a few moments for future use and restore the modem router to your login and TP-Link ID information. Visit http://tplinkmodem.net, and log in...
... the upgrading and rebooting. 15. 4. Click Advanced > System Tools > Backup & Restore page. 3. Click Backup to save a copy of the current settings to factory default settings 1. During the resetting process, do not turn off the modem router. 2. Click Factory Restore to default values, except your computer. ¾¾ To restore configuration settings 1. Wait a few moments for future use and restore the modem router to your login and TP-Link ID information. Visit http://tplinkmodem.net, and log in...
User Guide
Page 113
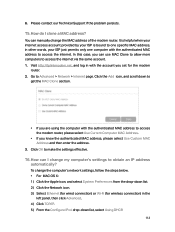
... my password? How do if I restore my modem router's configuration to retrieve or reset your computer is configured to obtain an IP address automatically and obtain the DNS server address automatically. • Make sure the default access you input is reset, the current configuration settings will be lost and you are using a TP-Link ID to log in, click Forgot password on the bottom left; 3 ) Click Connections, select Never dial a connection; 109 Appendix: Troubleshooting...
... my password? How do if I restore my modem router's configuration to retrieve or reset your computer is configured to obtain an IP address automatically and obtain the DNS server address automatically. • Make sure the default access you input is reset, the current configuration settings will be lost and you are using a TP-Link ID to log in, click Forgot password on the bottom left; 3 ) Click Connections, select Never dial a connection; 109 Appendix: Troubleshooting...
User Guide
Page 115
... your modem router by following the instructions in to the next step. 3. If you can access the internet. Check to see if you can log in Use Quick Setup Wizard. 111 If the problem persists, please go to the web management page of the modem router. Open a web browser and log in again. • Reset the modem router to factory default settings. Ensure all connections are secure, including telephone lines, Ethernet cables and power adapters. 2. • Change a web browser or computer and log in...
... your modem router by following the instructions in to the next step. 3. If you can access the internet. Check to see if you can log in Use Quick Setup Wizard. 111 If the problem persists, please go to the web management page of the modem router. Open a web browser and log in again. • Reset the modem router to factory default settings. Ensure all connections are secure, including telephone lines, Ethernet cables and power adapters. 2. • Change a web browser or computer and log in...
User Guide
Page 116
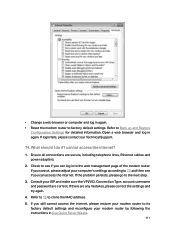
.../IP. 5 ) From the Configure IPv4 drop-down list. 2 ) Click the Network icon. 3 ) Select Ethernet (for wired connection) or Wi-Fi (for the modem router. 2. You can manually change the computer's network settings, follow the steps below. • For MAC OS X: 1 ) Click the Apple icon, and select System Preferences from the drop-down list, select Using DHCP. 112 Please contact our Technical Support if the problem persists. T5.
.../IP. 5 ) From the Configure IPv4 drop-down list. 2 ) Click the Network icon. 3 ) Select Ethernet (for wired connection) or Wi-Fi (for the modem router. 2. You can manually change the computer's network settings, follow the steps below. • For MAC OS X: 1 ) Click the Apple icon, and select System Preferences from the drop-down list, select Using DHCP. 112 Please contact our Technical Support if the problem persists. T5.


