Owners Manual
Page 4
... VAARALLISTA LASERSÄTEILYÄ". nätströmställaren skiljer ej hela apparaten fran nätet. 4 Contents Thank you for choosing TEAC. VARING: APPARATEN INNEHÅLLER LASER KOMPONENT MED STRÅLNING ÖVERSTIGANDE KLASS 1. If nonetheless the mains plug is too short to reach... consult your home or the cable is cut off , remove the fuse and dispose of Each Control 8 Remote Control Unit 10 CD Playing a CD 11 Intro Check 13 Repeat Playback 14 Shuffle Playback 14 Programmed Playback 15 TUNER Listening to the Radio 17 How to Preset Stations ...
... VAARALLISTA LASERSÄTEILYÄ". nätströmställaren skiljer ej hela apparaten fran nätet. 4 Contents Thank you for choosing TEAC. VARING: APPARATEN INNEHÅLLER LASER KOMPONENT MED STRÅLNING ÖVERSTIGANDE KLASS 1. If nonetheless the mains plug is too short to reach... consult your home or the cable is cut off , remove the fuse and dispose of Each Control 8 Remote Control Unit 10 CD Playing a CD 11 Intro Check 13 Repeat Playback 14 Shuffle Playback 14 Programmed Playback 15 TUNER Listening to the Radio 17 How to Preset Stations ...
Owners Manual
Page 5
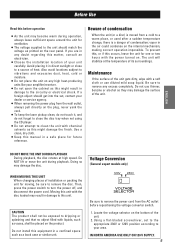
..., press the power switch to remove any excess completely. Moving this might result in direct sunlight or close the disc tray when not using the CD player. < Do not attempt to clean the unit with the power turned on the bottom of its surroundings. Using a flat-bladed screwdriver, set , contact your...
..., press the power switch to remove any excess completely. Moving this might result in direct sunlight or close the disc tray when not using the CD player. < Do not attempt to clean the unit with the power turned on the bottom of its surroundings. Using a flat-bladed screwdriver, set , contact your...
Owners Manual
Page 6
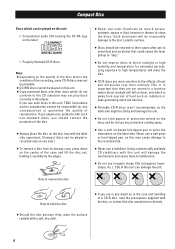
... be played or recorded only on one side.) < To remove a disc from sources of heat such as radiators or heat-generating electrical devices. < Printable CD-R discs aren't recommended, as the label side might be responsible for extended periods. It is away from its subsidiaries cannot be sticky and damage the...to remove the disc How to hold the disc < If you use such discs in this unit, TEAC Corporation and its storage case, press down on the center of heat and ultraviolet rays than ordinary CDs. If you are in any protective coating spray. < Use a soft oil-based felt-tipped pen to...
... be played or recorded only on one side.) < To remove a disc from sources of heat such as radiators or heat-generating electrical devices. < Printable CD-R discs aren't recommended, as the label side might be responsible for extended periods. It is away from its subsidiaries cannot be sticky and damage the...to remove the disc How to hold the disc < If you use such discs in this unit, TEAC Corporation and its storage case, press down on the center of heat and ultraviolet rays than ordinary CDs. If you are in any protective coating spray. < Use a soft oil-based felt-tipped pen to...
Owners Manual
Page 9
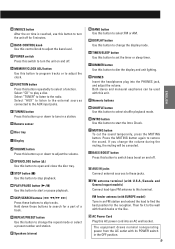
... extend the lead to find the best position for a part of a track. B BASS CONTROL knob Use this control knob to select shuffle playback mode. Select "CD" to open and close the disc tray. K OPEN/CLOSE button (L) Use this button to play a disc. M PLAY/PAUSE button (y/J) Use this button to start the...
... extend the lead to find the best position for a part of a track. B BASS CONTROL knob Use this control knob to select shuffle playback mode. Select "CD" to open and close the disc tray. K OPEN/CLOSE button (L) Use this button to play a disc. M PLAY/PAUSE button (y/J) Use this button to start the...
Owners Manual
Page 11
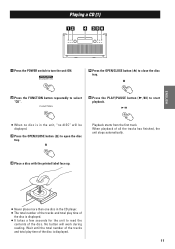
... disc is displayed. 11 Playback starts from the first track. ENGLISH < Never place more than one disc in the unit, "no disc is in the CD player. < The total number of the tracks and total play time of the disc is displayed. < It takes a few seconds for the unit to read... contents of all the tracks has finished, the unit stops automatically. 4 Place a disc with the printed label face up. When playback of the disc. Playing a CD (1) 12 4 35 6 1 Press the POWER switch to turn the unit ON. 5 Press the OPEN/CLOSE button (L) to close the disc tray. 2 Press the FUNCTION button...
... disc is displayed. 11 Playback starts from the first track. ENGLISH < Never place more than one disc in the unit, "no disc is in the CD player. < The total number of the tracks and total play time of the disc is displayed. < It takes a few seconds for the unit to read... contents of all the tracks has finished, the unit stops automatically. 4 Place a disc with the printed label face up. When playback of the disc. Playing a CD (1) 12 4 35 6 1 Press the POWER switch to turn the unit ON. 5 Press the OPEN/CLOSE button (L) to close the disc tray. 2 Press the FUNCTION button...
Owners Manual
Page 12
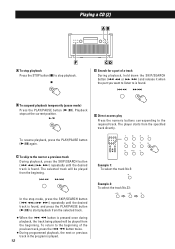
... track will be played from the specified track directly. E Direct access play Press the numeric buttons corresponding to start playback from the beginning. CD D Search for a part of the previous track, press the .m button twice. < During programmed playback, the next or previous track in...No.23: To resume playback, press the PLAY/PAUSE button (y/J) again. In the stop playback. Playback stops at the current position. Playing a CD (2) AB F A To stop playback Press the STOP button (H) to stop mode, press the SKIP/SEARCH button (.mor,/) repeatedly until the desired ...
... track will be played from the specified track directly. E Direct access play Press the numeric buttons corresponding to start playback from the beginning. CD D Search for a part of the previous track, press the .m button twice. < During programmed playback, the next or previous track in...No.23: To resume playback, press the PLAY/PAUSE button (y/J) again. In the stop playback. Playback stops at the current position. Playing a CD (2) AB F A To stop playback Press the STOP button (H) to stop mode, press the SKIP/SEARCH button (.mor,/) repeatedly until the desired ...
Owners Manual
Page 15
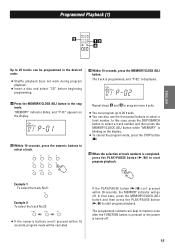
... within 10 seconds, the MEMORY indicator will be programmed in the desired order. < Shuffle playback does not work during program playback. < Insert a disc and select "CD" before beginning programming. 3 Within 10 seconds, press the MEMORY/CLOCK ADJ button. Repeat steps 2 and 3 to program more tracks. < You can program up to 20...
... within 10 seconds, the MEMORY indicator will be programmed in the desired order. < Shuffle playback does not work during program playback. < Insert a disc and select "CD" before beginning programming. 3 Within 10 seconds, press the MEMORY/CLOCK ADJ button. Repeat steps 2 and 3 to program more tracks. < You can program up to 20...
Owners Manual
Page 20
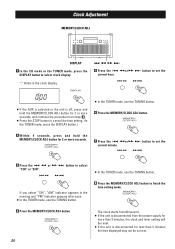
Clock Adjustment MEMORY/CLOCK ADJ DISPLAY 1 In the CD mode or the TUNER mode, press the DISPLAY button to select clock display. .m ,/ 5 Press the .mor,/ button to set the current minute. 3 Press the .m or ,/ ...
Clock Adjustment MEMORY/CLOCK ADJ DISPLAY 1 In the CD mode or the TUNER mode, press the DISPLAY button to select clock display. .m ,/ 5 Press the .mor,/ button to set the current minute. 3 Press the .m or ,/ ...
Owners Manual
Page 21
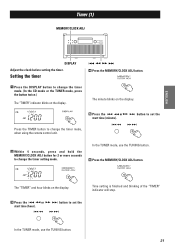
... The "TIMER" and hour blinks on the display. The minute blinks on the display. 5 Press the .mor,/ button to change the timer mode. (In the CD mode or the TUNER mode, press the button twice.) The "TIMER" indicator blinks on the display. In the TUNER mode, use the TUNING button. 6 Press...
... The "TIMER" and hour blinks on the display. The minute blinks on the display. 5 Press the .mor,/ button to change the timer mode. (In the CD mode or the TUNER mode, press the button twice.) The "TIMER" indicator blinks on the display. In the TUNER mode, use the TUNING button. 6 Press...
Owners Manual
Page 22
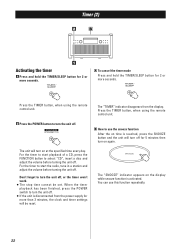
...control unit. Don't forget to start the radio, tune in a station and adjust the volume before turning the unit off . B How to select "CD", insert a disc and adjust the volume before turning the unit off . The "SNOOZE" indicator appears on at the specified time every day. For ...the timer to start playback of a CD, press the FUNCTION button to use this function repeatedly. 22 Timer (2) 2 B 1 Activating the timer 1 Press and hold the TIMER/SLEEP button for 2...
...control unit. Don't forget to start the radio, tune in a station and adjust the volume before turning the unit off . B How to select "CD", insert a disc and adjust the volume before turning the unit off . The "SNOOZE" indicator appears on at the specified time every day. For ...the timer to start playback of a CD, press the FUNCTION button to use this function repeatedly. 22 Timer (2) 2 B 1 Activating the timer 1 Press and hold the TIMER/SLEEP button for 2...

Owners Manual
Page 23
... or similar appliances. e If a fluorescent light is too weak. Tuner Cannot listen to avoid vibration and shock. e Load a disc with your dealer or TEAC service center. eDepending on , press the MUTING button. e Place the unit on this chart and see if you have problems with label side up. e ... work. e If the disc is noisy. e Adjust the volume. Sound skips. e Clear obstacles between the remote control unit and the main unit. e CD-RW discs cannot be playable. TUNER Section Frequency Range (FM): 87.50 MHz to 108.00 MHz (100 kHz step) (U.S.A./Canada Model, General Export Model...
... or similar appliances. e If a fluorescent light is too weak. Tuner Cannot listen to avoid vibration and shock. e Load a disc with your dealer or TEAC service center. eDepending on , press the MUTING button. e Place the unit on this chart and see if you have problems with label side up. e ... work. e If the disc is noisy. e Adjust the volume. Sound skips. e Clear obstacles between the remote control unit and the main unit. e CD-RW discs cannot be playable. TUNER Section Frequency Range (FM): 87.50 MHz to 108.00 MHz (100 kHz step) (U.S.A./Canada Model, General Export Model...


